You are using an out of date browser. It may not display this or other websites correctly.
You should upgrade or use an alternative browser.
You should upgrade or use an alternative browser.
Post a photo of the last thing you made
- Thread starter DTR
- Start date


Help Support UKworkshop.co.uk:
This site may earn a commission from merchant affiliate
links, including eBay, Amazon, and others.


ey_tony
Established Member
I'm currently building a Catio for my two BSHs if the weather actually ameliorates long enough to get it finished but here's my last finished serious project.
I originally wanted both a potting shed and a storage shed but didn't really have room in my garden for both so I combined them and made this one which I have to say is in now constant use and was worth the effort to build. The reproduction Victorian corner cupboard in distal end of the shed was a project I started over well over 25 years ago but never ever got around to glazing so it languished in my garage unfinished until I finally made use of it though it's still not glazed.. I'm overwhelmed with tomatoes and cucumbers right now but that's not a bad thing.")
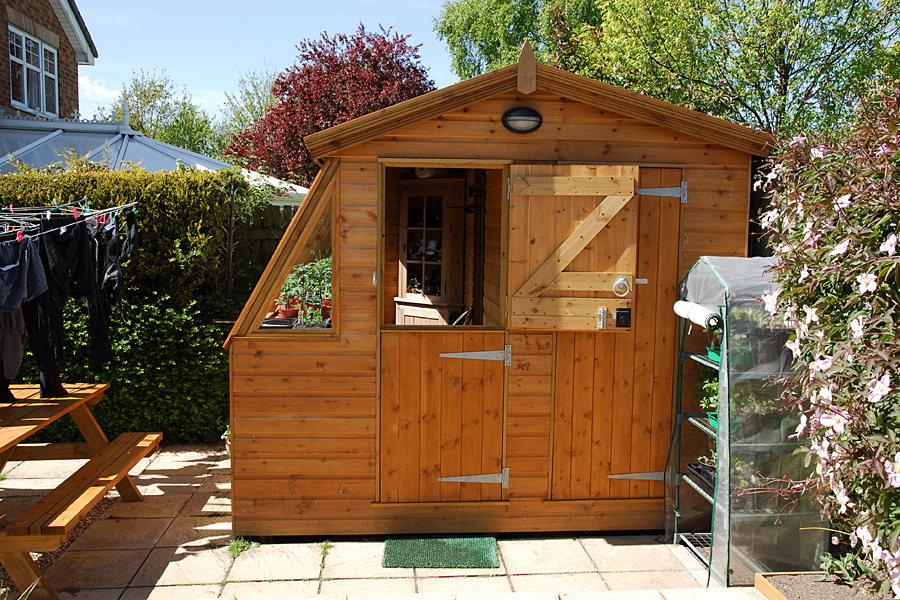
I originally wanted both a potting shed and a storage shed but didn't really have room in my garden for both so I combined them and made this one which I have to say is in now constant use and was worth the effort to build. The reproduction Victorian corner cupboard in distal end of the shed was a project I started over well over 25 years ago but never ever got around to glazing so it languished in my garage unfinished until I finally made use of it though it's still not glazed.. I'm overwhelmed with tomatoes and cucumbers right now but that's not a bad thing.
TheBeeBoyKid
Edward Chisel Fingers
Not at all! This is UK Workshop, not UK Woodworking.
The framing is a tad heavy for me, but it's a fun design and looks beautifully finished.
You know what, that was one of my thoughts on completion, the legs look a bit chunky for the top. Also the refinement on the finish of the legs doesn’t quite match the top...
My brother does structural fabricating so everything has to be big!!!
MikeG.
Established Member
I bought a box of old saws .......
Excellent, well done. It's a pity about the broken teeth. You were just unlucky, I think. I've never had a tooth break. I hope you finished off that handle and gave it a coat of something.....otherwise, that's your job for this morning!!
This might be useful - http://norsewoodsmith.com/files/file/saw-filing-templates.pdfI bought a box of old saws about 5 years back, it was an impulse purchase knowing nothing about saws. Having received them most had lots of bends and waves in the saw plate that I could not remedy so they were binned. There was one old Diston that was straight but the teeth were terrible, so I filed the plate smooth and it went on a shelf.
in my recent gumtree box of goodies was an old, dirty, knackered saw vice. After attacking it with a sander, and planing the jaws flat, it’s functional. Not pretty, but functional. Oh now where did I put that saw plate!
View attachment 91096I I marked up a scrap piece of work with marks every 1/8th inch, clamped the scrap and plate in the vice and used a hacksaw to cut slots at the marks. The teeth were then filed a standard rip cut, keeping it simple as it’s only my second ever saw sharpening. I used a eclipse saw set to set the teeth.
View attachment 91098
Happy in general with the outcome, and it cuts straight, which is nice. However, as I set the teeth I heard at least half a dozen ‘snaps’ and then one tooth broke off. I set the eclipse on 10 which I though would be ok. Also some of my teeth spacing is not bob on. A learning curve, but a fun one!
View attachment 91099
The handle was oddly shaped and my knuckles caught on it in use so it got modified with a coping saw and a rasp.
View attachment 91101
A fun experience and given me the confidence to look out for other saws to refurb.
F.
ey_tony
Established Member
@ey_tony that is a rather fetching shed, I like the design. If i can ask what is a catio?
You can indeed ask and my please in answering...a Catio is a commonly used term for a secure framed space often placed on a patio (flagged area usually ) to prevent house cats ( those which don't go outdoors) escaping/running off.
I'm building a modular version so that I can add to it as I go along. If I get the guttering up later today I'll post a couple of pics of the work in progress.
El Barto
👍
Woody2Shoes
Impressive Member
Very nice! I'd use copper (or zinc) clout nails (horizontally into the "verge") to fix the lead. I'd wipe on BLO to stop the lead staining as well. Cheers, W2SToday I (almost) finished making a bird box. I made it more for practising techniques (mostly power tool ones this time) than because we particularly needed a bird box, hence the over-done joinery and the possibly unnecessary roof covering.
Made from oak (joined from thin bits into thicker bits) with the roof coated in some lead flashing that came off my roof a few years ago and which I battered flat and then hit repeatedly with a ball peen hammer to give it a dappled appearance. The roof (in three pieces) is currently only held on with gravity as I haven't decided how I'll attach it yet. For scale, the hole is sparrow sized (32 mm) and the fingers of the joints are 9 mm.
View attachment 91016
View attachment 91017
The lead still needs trimming at the back and fixing in some way yet to be determined.
The roof has a couple of blocks of wood spaced to match the internal dimensions of the bird box and is held on with a single stainless screw from behind so it can be taken off for cleaning if/when required:
View attachment 91018
Very nice! I'd use copper (or zinc) clout nails (horizontally into the "verge") to fix the lead. I'd wipe on BLO to stop the lead staining as well. Cheers, W2S
Blimey that's the poshest bird box I have seen , Just one thing , Should it have a small dowel just in front of the entry hole ? for Mr or Mrs bird to land on before entering their new home ,
I know nothing about bird boxes
This is the last thing I made, or rather one of eight. The overall design was from FWW, but the backs were my own design, I've only ever made one indoor chair before, and that was very uncomfortable. These, thankfully are comfortable. Ash finished with beeswax and linseed oil. Flat reed seats - the first one took a day to weave, but got it down to four hours on number eight.

This is the last thing I made, or rather one of eight. The overall design was from FWW, but the backs were my own design, I've only ever made one indoor chair before, and that was very uncomfortable. These, thankfully are comfortable. Ash finished with beeswax and linseed oil. Flat reed seats - the first one took a day to weave, but got it down to four hours on number eight.View attachment 91153
Wow that's lovely , NO way I could do anything like that ,
artie
Sawdust manufacturer.
Today I solved a problem I've had for more than a year.
I bought new overalls and didn't discover until I got home that there was no pencil pocket.
So after a long time of lost pencils, misplaced pencils and dropped pencils, I came up with this solution, which keeps my pencil where I want it at the expense of an old pocket knife.
I'm open to hear better ideas.
Attachments

No. It's a perch for predators.Blimey that's the poshest bird box I have seen , Just one thing , Should it have a small dowel just in front of the entry hole ? for Mr or Mrs bird to land on before entering their new home ,
I know nothing about bird boxes
I found the solution for lost pencils - keep them everywhere. I cleaned my bench off one day and found forty one .......... eleven tapes and seven Stanley knives.
Last edited:
Coyote
Established Member
Should it have a small dowel just in front of the entry hole ? for Mr or Mrs bird to land on before entering their new home ,
Apparently not as it allows predators to stick their heads in and snap up the chicks. I made that mistake when I made a couple for my kids to "decorate" at the start of lockdown and had to trim flush after a bit of post construction research.
Today I solved a problem I've had for more than a year.
I bought new overalls and didn't discover until I got home that there was no pencil pocket.
So after a long time of lost pencils, misplaced pencils and dropped pencils, I came up with this solution, which keeps my pencil where I want it at the expense of an old pocket knife.
I'm open to hear better ideas.
Stick it behind your ear ?
artie
Sawdust manufacturer.
Unfortunately, ears too big. Not too bad in winter, I can lodge it between cap and barnett, but in summer when I expose the solar panel it gets dislodged easily.Stick it behind your ear ?
Made this little tool tidy for my cocktail kit. Really nice to get back into the shop and get lost in making again. Turned out nice. Walnut with danish oil finish
Attachments
-
 B91D68B2-793C-4307-98C6-43EDFA2F935B.jpeg1.3 MB · Views: 42
 -
 6D0E920E-5A3F-4886-A6EF-18C26EBA7823.jpeg1.6 MB · Views: 43
 -
 4FEEBFC3-0BE8-432F-A83C-F47ED0EE132D.jpeg1.3 MB · Views: 51
 -
 8668149A-A36C-42CE-85D3-6622F6068423.jpeg2.1 MB · Views: 56
 -
 7CEF5135-3CB5-4CB7-B712-098A74BEB23B.jpeg2.6 MB · Views: 55


Similar threads
- Replies
- 635
- Views
- 47K
- Replies
- 44
- Views
- 3K