You are using an out of date browser. It may not display this or other websites correctly.
You should upgrade or use an alternative browser.
You should upgrade or use an alternative browser.
Creativity & Development of concepts
- Thread starter Wood spoiler
- Start date


Help Support UKworkshop.co.uk:
This site may earn a commission from merchant affiliate
links, including eBay, Amazon, and others.

Silverbirch
Established Member
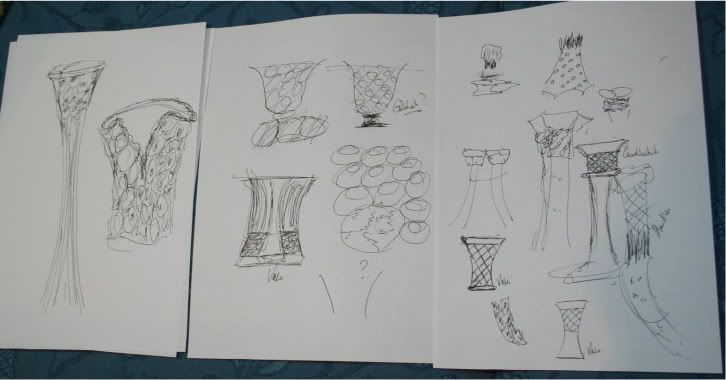
Looking at the bits of plant material Philip posted, I thought the centre section suggested a vase type shape with a diagonal or spiral pattern of dots/bumps.
I`ll have a go at transforming my sketches into a turned piece. I have a shape I like(circled) and a pattern to embellish it.
I need to do some more drawing to get a clearer idea of the pattern I want. I`ll have to think about how I`m going to produce it - carving - pyrography( with my new LIDL £8.99 pyro kit") ) - carving -colouring.....?
) - carving -colouring.....?
Ian
I`ll have a go at transforming my sketches into a turned piece. I have a shape I like(circled) and a pattern to embellish it.
I need to do some more drawing to get a clearer idea of the pattern I want. I`ll have to think about how I`m going to produce it - carving - pyrography( with my new LIDL £8.99 pyro kit
) - carving -colouring.....?Ian
Attachments

gus3049
Established Member
Well then,
Today, amidst starting to lay the kitchen floor, I had a go at the little form as per the sketches. Although it started out being to the design, it gradually developed a life of its own and drifted a little. Way from finished as I don't know where to go next. I might make the inside bit smooth and the outside textured or vici verci. Or not as the mood takes me. It may get coloured. I'm not sure I have the patience to put it away and think about it so I will probably continue to attack it tomorrow.
There is a huge amount of sanding and smoothing necessary to get the inside egg to a good finish. I wonder if there is better way than abrasive on lolly sticks?
Attachments

- Joined
- 19 Mar 2007
- Messages
- 5,290
- Reaction score
- 377
I got one of these years back and it is still going strong http://www.permagrit.com/index.php?cPath=80_82
Bit more expensive than when I got mine. They also do rotary kit now. Have a look at the site, there's all sorts of stuff on there.
Bit more expensive than when I got mine. They also do rotary kit now. Have a look at the site, there's all sorts of stuff on there.
Wood spoiler
Established Member
Ok so pen in hand and paper at the ready!
I doodled but not entirely sure what I will take from it - obviously trying to get to useable concepts. But the pen is NOT mightier than the gouge. It would appear that the larger amount of my "artist" remains as the second word of a well known saying
As I started this - I offer my priceless art work of for the benefit of communal laughter!
Wood spoiler
Established Member
gus3049":4t7hu5gz said:Well then,
Today, amidst starting to lay the kitchen floor, I had a go at the little form as per the sketches. Although it started out being to the design, it gradually developed a life of its own and drifted a little. Way from finished as I don't know where to go next. I might make the inside bit smooth and the outside textured or vici verci. Or not as the mood takes me. It may get coloured. I'm not sure I have the patience to put it away and think about it so I will probably continue to attack it tomorrow.
There is a huge amount of sanding and smoothing necessary to get the inside egg to a good finish. I wonder if there is better way than abrasive on lolly sticks?
Interesting start.
these would help. I bought some of the larger stones in a set that was only £4 on a market tool store. the grinding and sanding stones shouldn't break the bank.
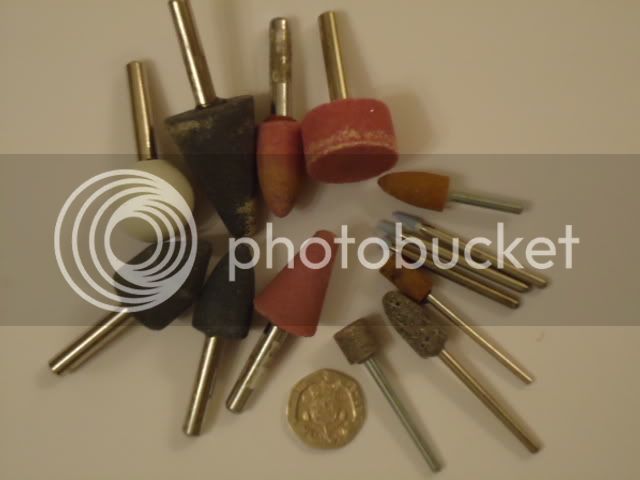
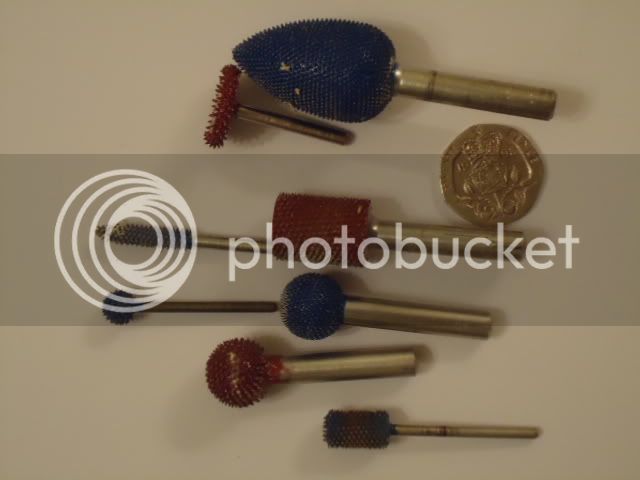
The small blue Typhoon Burr at the bottom of the picture will cut on the top surface and removes material most effectively
gus3049
Established Member
Wood spoiler":18sdzrq6 said:Ok so pen in hand and paper at the ready!
I doodled but not entirely sure what I will take from it - obviously trying to get to useable concepts. But the pen is NOT mightier than the gouge. It would appear that the larger amount of my "artist" remains as the second word of a well known saying
As I started this - I offer my priceless art work of for the benefit of communal laughter!
Laughter is the best medicine. I didn't though. Can't see anything wrong with that. Its not an art competition, just a way of developing ideas. Like everything else though, a bit of practice works wonders.
gus3049
Established Member
Jonzjob":3bqq6p9n said:I got one of these years back and it is still going strong http://www.permagrit.com/index.php?cPath=80_82
Bit more expensive than when I got mine. They also do rotary kit now. Have a look at the site, there's all sorts of stuff on there.
Thanks John, Interesting site. I am a bit annoyed with myself because at Breville last week there was a guy selling a set of good looking miniature rasps for €30 which I thought was too much - clearly not.
Wood spoiler":3bqq6p9n said:Interesting start.
these would help. I bought some of the larger stones in a set that was only £4 on a market tool store. the grinding and sanding stones shouldn't break the bank.
The small blue Typhoon Burr at the bottom of the picture will cut on the top surface and removes material most effectively
The typhoon burrs look interesting. The main problem with this little form is the sections under the outer layer. Apart from getting the 'egg' smooth, i need to do the inside of the outer (!) bit too. One of the problems with this thing is that its in boxwood. Most of the abrasive tools I have either just polish t or burn it at high speed and won't touch it at all at low speed. And I used box because it takes such a good finish!! Easy on the outside of course.
gus3049
Established Member
One of the problems I've had with this, is the actual control of the rotary tool when undercutting. I use the Dremel metal burrs for this in the air tool. Although they are round, they tend to jump occasionally and on several occasions have marked the outside surface. It could be, I suppose, that they work better at low speed but I much prefer the air tool as its extremely comfortable to hold whereas the Dremel is clunky. I don't want to have to spend out further on an extension.
Because of the nature of the piece, I'm sure I will be able to disguise it but its annoying. Less haste more speed I suspect.
Because of the nature of the piece, I'm sure I will be able to disguise it but its annoying. Less haste more speed I suspect.
gus3049
Established Member
DAY 2.
Had a further play today. At the risk of being obvious, I decided to make it seem a bit more organic by rounding over the edges instead of the crisp look I had intended. As I don't have the right tools and given that patience is not my strongest suit, it got textured, Sort of orange peel on the inner and sort of plant like outside. Still to be decided is if to colour the inside in some way.
I wonder where this will end up :?
Attachments


CHJ
Established Member
Done thunk good so far Gordon, gives me a headache just looking at it without having to think about how to progress further, or even if there is a need to progress further.
Wood spoiler
Established Member
As they say .... I like what you have done with the place.
I like the orange peel effect.
Don't like to interfere with the creative process as I like the way it is evolving so I don't want to offer any further comment right now. Please accept this as encouragement.
I like the orange peel effect.
Don't like to interfere with the creative process as I like the way it is evolving so I don't want to offer any further comment right now. Please accept this as encouragement.
- Joined
- 19 Mar 2007
- Messages
- 5,290
- Reaction score
- 377
I am very impressed by the result so far Gordon, but I have no idea as to what to say as to if I like it or not? Totally confused and I think that the on;y way I culd decide on a comment would be to get me sweaty mits on it and look?
I am sure that I haven't seen anything quite the same, and that is not a downer on it. Just totally different and I think (?) that I like it?
I am sure that I haven't seen anything quite the same, and that is not a downer on it. Just totally different and I think (?) that I like it?
gus3049
Established Member
Thank you all for your encouragement. Its a fascinating process just letting things develop and see where they lead. I suspect that the more you let the mind wander and work freeform, the more entertaining the whole thing will become.
So again, thanks to Colin for starting this and to Philip for providing the spur.
How are the rest of you doing????
So again, thanks to Colin for starting this and to Philip for providing the spur.
How are the rest of you doing????
Silverbirch
Established Member
How are the rest of you doing????
Errrmm......... not as well as you, Gordon, but I am thinking about it. Need some workshop time - hopefully this weekend.
Ian
Philip Streeting
Established Member
It is encouraging to see Gordon, Ian and Colin getting to grips with the thread and sharing progress. It seems to me that Gordon has already made a big shift in what he feels turning may offer by way of personal challenge. Any new personal development in an approach to turning becomes brain food, stimulates the grey matter and adds something to enthusiasm for making. It will be great to see other work appearing here as and when.
As far as Gordon’s questions and observations on sanding and shaping are concerned here are a couple of pictures of some of the tools I use. You will see some Permagrit tools which are available in file, sheet and rotary tool form. Burrs have already been mentioned, I have a selection of rotary chisels but not shown here.
As well as the lolly stick homemade sanding method mentioned by Gordon you will see in the pictures various other ways of making sanders using self adhesive Velcro sheet cut to fit holders. Sanding sheets with velrco type backing can be cut to fit a toothbrush with the bristles removed these work well and are comfortable to hold. Abranet is shown attached to an old Sandvik plate holder. The method also works well on round or other shapes and I make sanders for turning too, keeps finger from being caught. Bent aluminium pipe or rod works well with thin wire twists helping to prevent possible movement as the transferred heat can soften the adhesive. Electric toothbrushs can make good mini power sanders.
The last picture shows rotary tools and cutters of various types. Burr types, PCB cutters, dental drills as well as the usual Dremel type shaping cutters. High speed work best with these cutters but look for max rpm ratings. I use The Foredom type heavy duty flexidrive, Foredom micromotor and the NSK dental lab air tool. I have a speed range from slow to 400,000 rpm. Special drill bits are required for the NSK tool.
The reason for adding this info is to illustrate that as with turning, some ideas need specialist equipment and tools to aid the maker achieve their aims. Some machines are very expensive. Once a work direction has been identified then over time various bits and pieces accumulate to a substantial tool kit.
Phil.


P.S. I forgot to add to this post that on my Blog earlier this week I showed a couple of examples of looking at and possibly simplifying images using computer software so here is a link http://www.philipstreeting.blogspot.com/ for those that may be interested.
As far as Gordon’s questions and observations on sanding and shaping are concerned here are a couple of pictures of some of the tools I use. You will see some Permagrit tools which are available in file, sheet and rotary tool form. Burrs have already been mentioned, I have a selection of rotary chisels but not shown here.
As well as the lolly stick homemade sanding method mentioned by Gordon you will see in the pictures various other ways of making sanders using self adhesive Velcro sheet cut to fit holders. Sanding sheets with velrco type backing can be cut to fit a toothbrush with the bristles removed these work well and are comfortable to hold. Abranet is shown attached to an old Sandvik plate holder. The method also works well on round or other shapes and I make sanders for turning too, keeps finger from being caught. Bent aluminium pipe or rod works well with thin wire twists helping to prevent possible movement as the transferred heat can soften the adhesive. Electric toothbrushs can make good mini power sanders.
The last picture shows rotary tools and cutters of various types. Burr types, PCB cutters, dental drills as well as the usual Dremel type shaping cutters. High speed work best with these cutters but look for max rpm ratings. I use The Foredom type heavy duty flexidrive, Foredom micromotor and the NSK dental lab air tool. I have a speed range from slow to 400,000 rpm. Special drill bits are required for the NSK tool.
The reason for adding this info is to illustrate that as with turning, some ideas need specialist equipment and tools to aid the maker achieve their aims. Some machines are very expensive. Once a work direction has been identified then over time various bits and pieces accumulate to a substantial tool kit.
Phil.
P.S. I forgot to add to this post that on my Blog earlier this week I showed a couple of examples of looking at and possibly simplifying images using computer software so here is a link http://www.philipstreeting.blogspot.com/ for those that may be interested.
- Joined
- 19 Mar 2007
- Messages
- 5,290
- Reaction score
- 377
I'm doing really well 8) 8)
I have found me dictionary
I have found me dictionary
Philip Streeting
Established Member
Briiliant John - there will be no holding you back now! :idea:
Phil
:idea: Phil
boysie39
Established Member
Gordon, Thats one hell of a good looking form, it is IMO not unlike the work or thoughts of Joey Richardson.
I mean this as a compliement, I really like it. =D> =D> .
For one who says he has very little patience with fiddley things you have done a super job on that piece.
I know that everybody has their own views on what it should look like when finished, right now I see a piece of wood that was turned and carved into a beautiful form and can still be recognised as a wooden form.
You may go on to embellish it further but I have this filed away as it is now.
Gordon thanks for sharing.
gus3049
Established Member
Thank you.boysie39":1vmaxukb said:Gordon, Thats one hell of a good looking form, it is IMO not unlike the work or thoughts of Joey Richardson.
I mean this as a compliement, I really like it. =D> =D> .
For one who says he has very little patience with fiddley things you have done a super job on that piece.
I know that everybody has their own views on what it should look like when finished, right now I see a piece of wood that was turned and carved into a beautiful form and can still be recognised as a wooden form.
You may go on to embellish it further but I have this filed away as it is now.
Gordon thanks for sharing.
As this is very much an experiment, I will push it as far as it wants to go. I strongly suspect that it will end up coloured on the inside - something really 'orribly French and garish. But it will teach me a thing or two.
No work on it today as I'm in the middle of cooking a curry for six and knowing the boozy lot that are coming for lunch, it will last all afternoon and my hands will be a little unsteady later - and possibly the rest of me too :lol:
Similar threads
- Replies
- 6
- Views
- 671
- Replies
- 0
- Views
- 409