You are using an out of date browser. It may not display this or other websites correctly.
You should upgrade or use an alternative browser.
You should upgrade or use an alternative browser.
Cherry Dresser - NOW FINISHED
- Thread starter Dodge
- Start date


Help Support UKworkshop.co.uk:
This site may earn a commission from merchant affiliate
links, including eBay, Amazon, and others.
Dodge
Established Member
srt":3rg4csbv said:Hi Roger very impressive work,iam new to woodwork and i was wondering how you cut your tenons they look very clean?
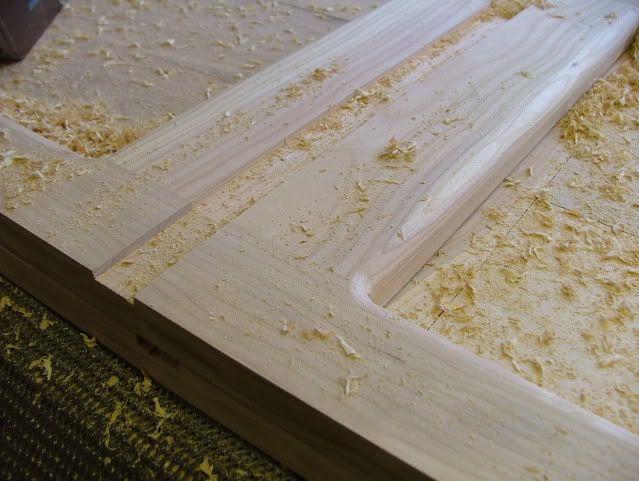
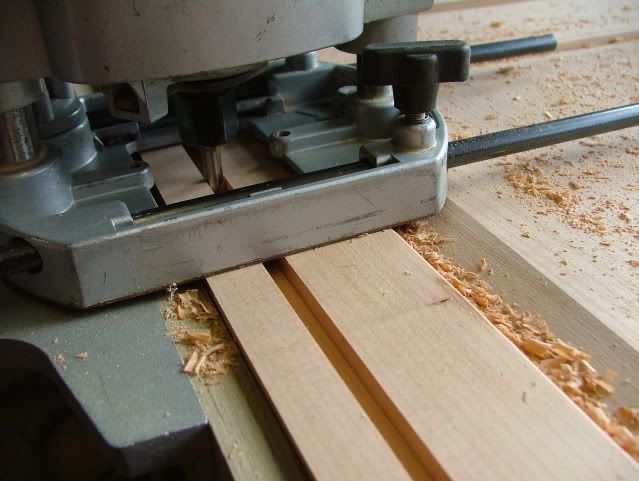
Radial Arm Saw using repetitive cuts to remove the cheeks and then haunches cut on bandsaw, final clean up with chisel/shoulder plane if needed.
I know the RAS leaves striations across the tenon but these hold the glue when inserting into the mortice hole if you apply the glue to the faces of the tenon
condeesteso
Established Member
Very nice indeed - looks great, nice processes etc. Will be interested in the finish choice as and when. You've reminded me I need some cherry... and I know where to get some :wink:
Dodge
Established Member
MrYorke":162l4wm1 said:I have used my RAS for making tenons like that......takes sooooooooo long. Do you move the timber along by hand for each draw of the RAS?
All looking great so far
Yorkie
Yorkie, it doesnt, yes I move the timber by hand but I can cut the cheeks on a tenon like those pictured (30mm long) in about 30 seconds, so roughly two a minute.
Admittedly though I have had alot of practice!
Yorkie, it doesnt, yes I move the timber by hand but I can cut the cheeks on a tenon like those pictured (30mm long) in about 30 seconds, so roughly two a minute.
Admittedly though I have had alot of practice![/quote]
Very impressed. Do i see a video being made to demonstrate that?
I need more practice.
I'm guessing you start at your pencil mark and pull the timber away from the blade?
Admittedly though I have had alot of practice![/quote]
Very impressed. Do i see a video being made to demonstrate that?
I need more practice.
I'm guessing you start at your pencil mark and pull the timber away from the blade?
Sawyer":a5but7bo said:Proper old school traditional work - just what I like.
No CAD or domino jointer in my workshop either!
Buckeye":a5but7bo said:thanks for posting, great to follow
Great to see the stages of a build all the way through, I'm sure this'll turn out to be a right good 'un...
Thanks for sharing Dodge....
mtr1
Established Member
Very nice, and as you have said the timber is superb. Question, I realise that doing tenons on a RAS is quickish but a tenoner is quicker and leaves a better finish. Have you not thought of buying one? If you have tenons in most(from what I've seen all) of your work, would it not be a benefit to own one perhaps.
Mark..... who's thinking of selling his
Mark..... who's thinking of selling his
Charlie Woody
Established Member
Dodge
Lovely work and Cherry!
How wide are the rails and stiles please?
Lovely work and Cherry!
How wide are the rails and stiles please?
Dodge
Established Member
Mark,
To be honest I have never felt the need for a tenoner, the trouble is my work is so varied from large to small I prefer to just cut the tenons appropriate to the job - and to be honest I dont think I have got room for a tenoner!
Regarding the finish on the cheeks, I prefer not to have them too smooth, as I mentioned earlier I apply my glue to the cheeks of the tenons and then brush over evenly with a glue brush, when inserted into the mortice the glue tends to be held on the tenon and not just get scraped off by the side of the mortice hole and end up sqeezing out between the shoulders.
Every one to the own though off course - what works for me may be despised by another.
Charlie, the Door stiles are 60mm wide with the bottom rail being 75mm and top rail 55mm respectively.
Will do follow up with some pics later - Tea calling me!!
Dodge
Established Member
Ok well since my last update I have a couple more days under my belt and work on the dresser is progressing well
Housings have been cut and edges rounded
Grooves cut ready to accept the plywood back in the base section
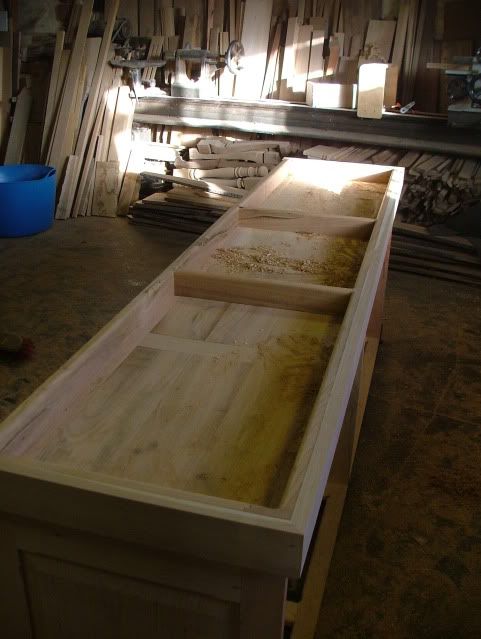
And the main carcase for the lower section duly glued up
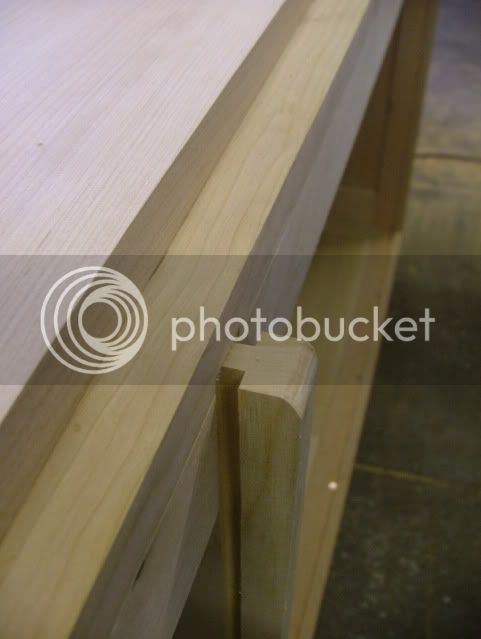
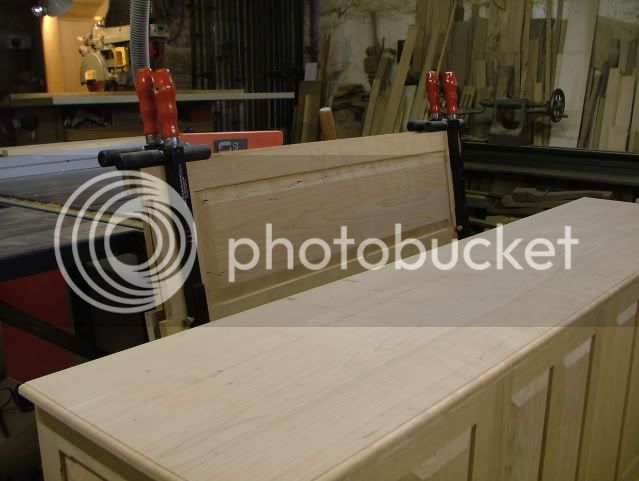
When the basic carcase was dry I removed the clamps, turned upside down and fitted the plynth - I also rounded over the edges on the underside - Much kinder to the hands when carrying it into customers!
The mitre and moulding detail on the upper edge of the plynth

Now I was hoping to get on with the dentil inlays in the door panels today but unfortunately on receiving the package from Original Marquetry they had only sent me 2 metres of Inlay not the 20 metres ordered - Funny how they still managed to charge the full price though! Anyway after a frustrated phone call have been promised delivery of the other 18 metres tomorrow morning and have even received the tracking number!
So instead I tight fitted the doors, they will be glued after the panels are inlaid so the zero tollerance at the moment will be lightly planed once glued to allow free movement on the hinges.
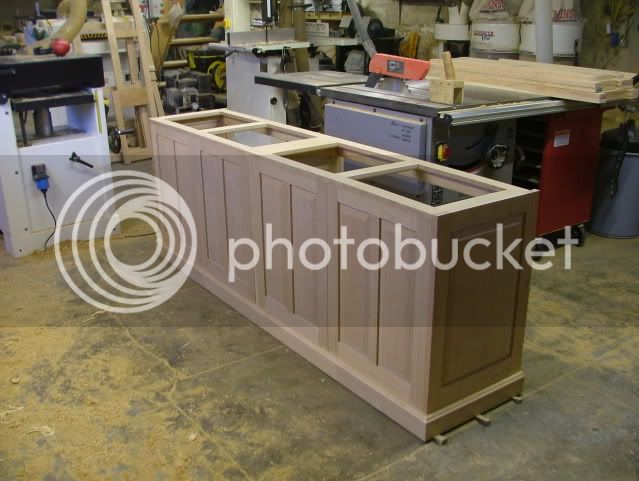
The back of the carcase showing the groove where the birch plywood back will be slid into.
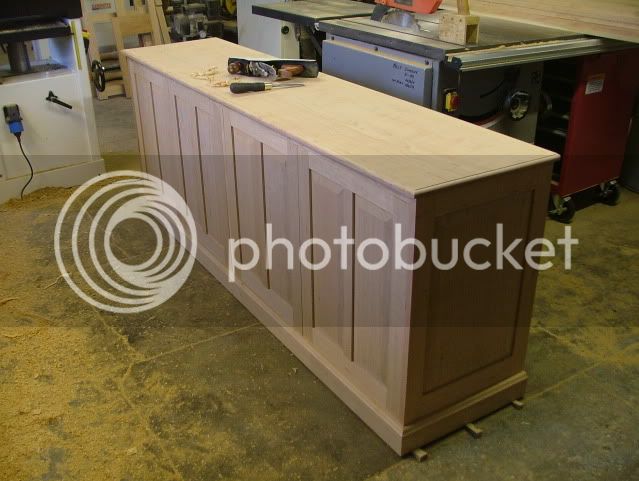
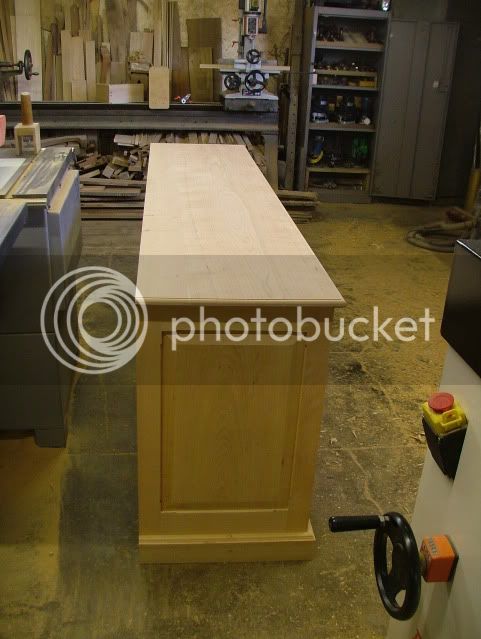
The basic carcase of the lower section is now complete, the top cut to size and edged. The beady eyed amongst you may wonder what the packing pieces are under the end of the plynth - Basically my floor is uneven and those wedges are just keeping everything nice and true!
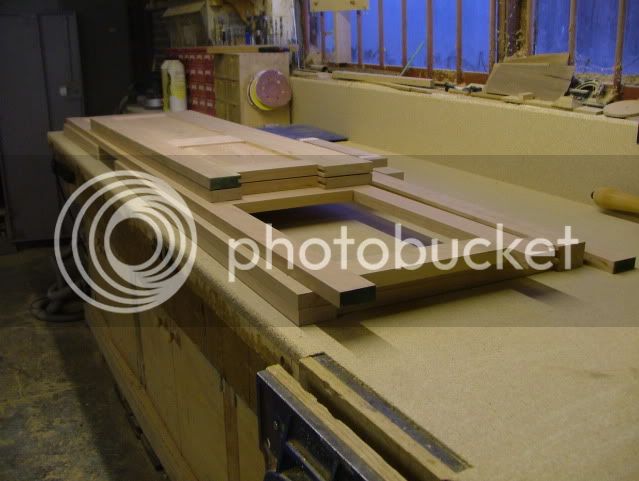
So tomorrow will be starting on the upper section - All the frames/sections are made - they just need jointing and putting together the end panels are in cramps here behind the lower carcase
and the last few components already made are laying on the bench ready for the elves to start work on tonight - oh sorry thats another story!! :lol:
So hopefully you approve of the progress - Considering I only collected the timber last Friday and didn't start on the project in ernest until Friday afternoon I think its coming together quite nicely.
The client is coming to the workshop tomorrow to see it so far - I'm aiming to get it completed and delivered by the end of January.
Oh and those of you who have offered to come and relieve me of the off-cuts I'm afraid that I have been as tight as possible with the boards and there has been negligeable waste other than the wane and small amount of sap at the edges - So far I have used ALL the boards bar one which is being kept to one side incase I make a booboo inlaying the panels!
Housings have been cut and edges rounded
Grooves cut ready to accept the plywood back in the base section
And the main carcase for the lower section duly glued up
When the basic carcase was dry I removed the clamps, turned upside down and fitted the plynth - I also rounded over the edges on the underside - Much kinder to the hands when carrying it into customers!
The mitre and moulding detail on the upper edge of the plynth
Now I was hoping to get on with the dentil inlays in the door panels today but unfortunately on receiving the package from Original Marquetry they had only sent me 2 metres of Inlay not the 20 metres ordered - Funny how they still managed to charge the full price though! Anyway after a frustrated phone call have been promised delivery of the other 18 metres tomorrow morning and have even received the tracking number!
So instead I tight fitted the doors, they will be glued after the panels are inlaid so the zero tollerance at the moment will be lightly planed once glued to allow free movement on the hinges.
The back of the carcase showing the groove where the birch plywood back will be slid into.
The basic carcase of the lower section is now complete, the top cut to size and edged. The beady eyed amongst you may wonder what the packing pieces are under the end of the plynth - Basically my floor is uneven and those wedges are just keeping everything nice and true!
So tomorrow will be starting on the upper section - All the frames/sections are made - they just need jointing and putting together the end panels are in cramps here behind the lower carcase
and the last few components already made are laying on the bench ready for the elves to start work on tonight - oh sorry thats another story!! :lol:
So hopefully you approve of the progress - Considering I only collected the timber last Friday and didn't start on the project in ernest until Friday afternoon I think its coming together quite nicely.
The client is coming to the workshop tomorrow to see it so far - I'm aiming to get it completed and delivered by the end of January.
Oh and those of you who have offered to come and relieve me of the off-cuts I'm afraid that I have been as tight as possible with the boards and there has been negligeable waste other than the wane and small amount of sap at the edges - So far I have used ALL the boards bar one which is being kept to one side incase I make a booboo inlaying the panels!
Dodge
Established Member
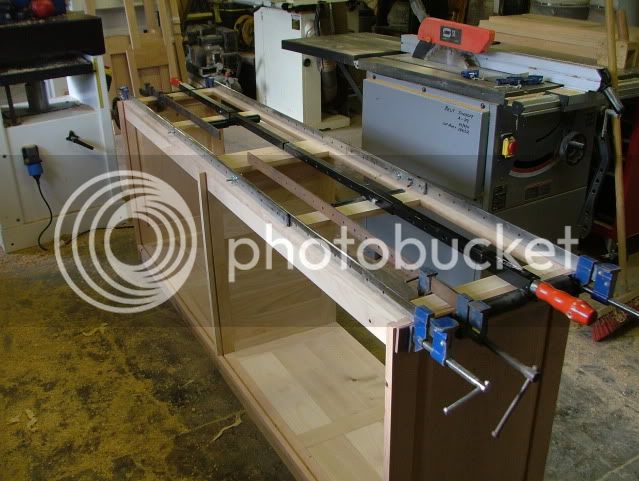
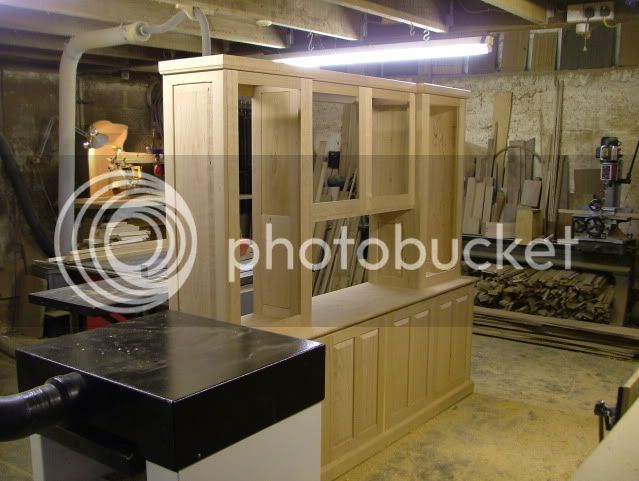
Well I have had another very busy day in the workshop and all the components for the top have today been jointed together and when I left I was able to put it onto the lower carcase.
It is actually starting to look like the finished article
Rog
It is actually starting to look like the finished article
Rog
neilyweely
Established Member
Hi Roger
What are those clamps with the red handles? Are they Bessey?
Like the look of them; am I right in thinking you are using them to clamp more than one section at a time, but with one long bar? In one of the pictures it looked like you had the intermediate upright panels held in place with the long clamp that ran the entire length? Or am I imagining it?
Thanks, and lovely work, really lovely.
Neil
mailee
Established Member
Bl**dy Hell Rog! I thought I was quick. That is astonishing considering you started Friday! It is looking really nice. How much timber was there in building this?
Dodge
Established Member
Neil,
The cramps are
http://www.felder-tooling.co.uk/8head-z ... ext10.html
Not cheap but worth every penny in my opinion - you can get them from Wurths as well. As they have rubber faces there is no need for packing pieces and can also be used as spreaders.
Alan, 10 cubic feet - that was what I brought home in the van and reckon by the end of today I will have about half a board left!
I must admit this has gone together quickly but the timber has alot to do with it, the only piece I needed to try/biscuit joint was the top of the lower carcase, all other panels etc are single pieces from the wide board plus there was no wastage in the board apart from small wane at the edge
It is also really nice to be working in one of my favourite timbers, more or less everything last year was Oak.
wallace
Established Member
Hi Roger I wish I had a quarter of your talent. I seem to have all the gear but little idea . What is the monster long lathe in the background. The tailstock looks very Wadkin. I like the idea of haveing the morticer on the bed of the lathe.
Mark
. What is the monster long lathe in the background. The tailstock looks very Wadkin. I like the idea of haveing the morticer on the bed of the lathe.Mark
Dodge
Established Member
wallace":192d7bwg said:Hi Roger I wish I had a quarter of your talent. I seem to have all the gear but little idea
Mark
slightly embarrassed!Anyway the lathe you can see in the background is a bit of a brute - No idea what make it is but cam to me about 11 years ago when it was going to be scrapped as nobody had room for it - gave scrap value for it too - It will turn up to 9' in length and 24" diameter over the bed. Driven by a DC motor with variable drive - Doesn't get much use but when it does its brill!
My Morticer is mounted on a sliding table on the bed which can be would down the lathe bed when I need more room for morticing.
Must have a nice, wide planer then?Dodge":2drddi20 said:Neil,
I must admit this has gone together quickly but the timber has alot to do with it, the only piece I needed to try/biscuit joint was the top of the lower carcase, all other panels etc are single pieces from the wide board plus there was no wastage in the board apart from small wane at the edge
.
I only have a 12" wide Rojek. Pretty good machine, but I end up having to do a lot of edge-jointing, which is quite time consuming.
Dodge
Established Member
Axminster TH410 - Had it just over a year and am very pleased with it.
Dodge
Established Member
MrYorke":200exd5q said:Yorkie, it doesnt, yes I move the timber by hand but I can cut the cheeks on a tenon like those pictured (30mm long) in about 30 seconds, so roughly two a minute.
Admittedly though I have had alot of practice!
Very impressed. Do i see a video being made to demonstrate that?
I need more practice.
I'm guessing you start at your pencil mark and pull the timber away from the blade?[/quote]
You asked for a video showing it done, well he you go! My wife was in the workshop so filmed me on her phone doing some tenons - I actually completed the tenons in less than 20 seconds each, confirmed by the video footage. You may also see that I wear a rubber faced glove on my left hand, this helps you to hold the wood firmly whilst also allowing you to slide the timber along the fence of the RAS.
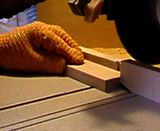
If you click on the photo it will show the video - I only mark one tenon then use the repetitive stop for the others.
Similar threads
- Replies
- 2
- Views
- 319
- Replies
- 22
- Views
- 516