Post a photo of the last thing you made

UKworkshop.co.uk

Help Support UKworkshop.co.uk:

This site may earn a commission from merchant affiliate links, including eBay, Amazon, and others.
Hi there,
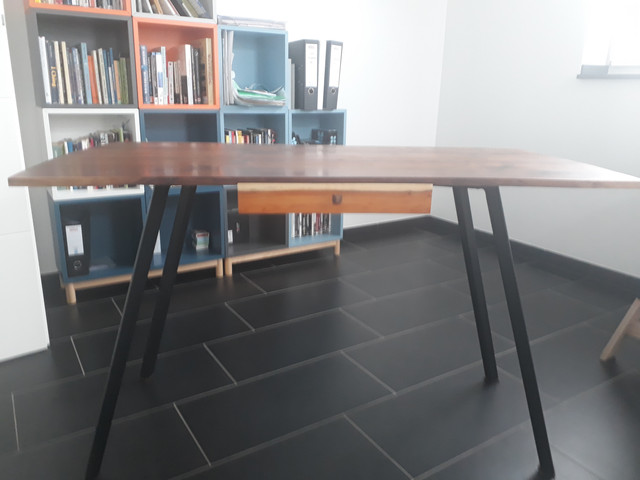
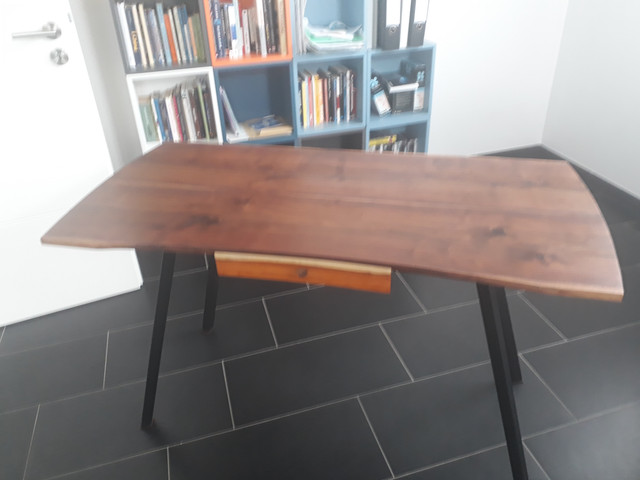
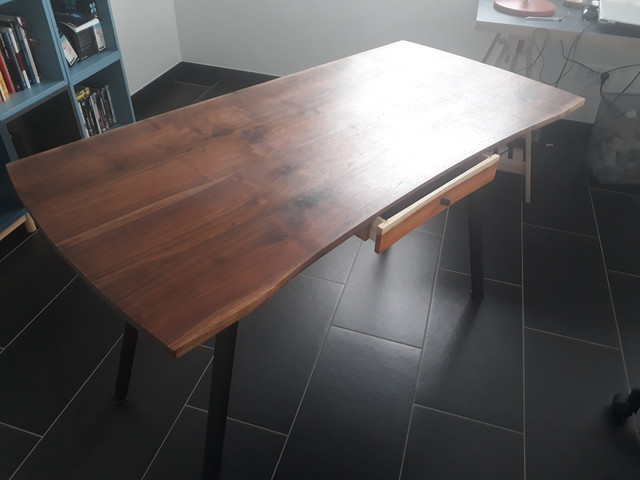
here's my last project. American Walnut tabletop made out of an old 2.7m x 0.4m x 52mm slab. The wood had a lot of tension in it, so keeping it fairly flat after reswaing was quite a challenge. I ended up putting 2 embedded steel bars of 5mm thick. It's not perfect, but OK.
The drawer is made of watered maple and the front out of yew, as well as the box enclosing it. Runners out of wengue strips.

Legs are square tube 30mm painted black mate.

The project has a lot of mistakes, but I like the way it looks and feels, plus, I learned a lot!

Regards
Miguel


7CIbkceh.jpg


MJZVEOEh.jpg
 
Just finished the last baluster! Various decorative options considered but Brancusi got the short straw. Roughed out with band saw, planed with Record 73 (it's never done so much work in its life)
The boards underdrawing the stairs are chapel originals cleaned up slightly. Original colour scheme was blue/brown/grey throughout.
Staircase is one I made earlier.
IMG_2856 copy.JPG
IMG_2857 copy.JPG
 

Attachments

  • IMG_2856 copy.JPG
    IMG_2856 copy.JPG
    729.1 KB · Views: 294
  • IMG_2857 copy.JPG
    IMG_2857 copy.JPG
    633.1 KB · Views: 294
Made some bobbins. I really like doing 'ordinary' stuff. These are samples for a girl who does hair braiding, whatever that is, not having much hair myself.
'Industrial' quality - no fine finishing but they have to be just right for the job and as cheap as possible.
She might order them in 10s or 20s which I also like - I hate making one-offs at any scale. The more you do the better you get; by no.100 or so you are world class expert, or should be in theory. :shock:
4bobbins.JPG
 

Attachments

  • 4bobbins.JPG
    4bobbins.JPG
    181.3 KB · Views: 233
Just made my first bird-box
32 mm diameter entry for house sparrows
uxk8sv2h.jpg

Clamped to fence for photo; will probably give it away :)
Lf2SwGEh.jpg
 
That is the Asgard of bird houses Cordy!
:D
Solid. Love the defensive measures!
 
Under counter kennel in a utility room.

This was what they started with.
IMG_2442.JPG


Design brief was to create a kennel unit for two small dogs incorporating drawers, shelves for shoes and a space for a robot vacuum docking station. All to match an existing Magnet kitchen in gloss white.

The Client provided the Blum pre made drawer boxes and I made everything else and finished it with the Graco airless. The finish came out really good, the Client actually said it was indistinguishable from the factory applied coating on the rest of the kitchen. The steel wire mesh is set into a rebate in the reverse of the sliding doors.

IMG_2437.jpg
 

Attachments

  • IMG_2437.jpg
    IMG_2437.jpg
    212.7 KB · Views: 458
  • IMG_2442.JPG
    IMG_2442.JPG
    98.3 KB · Views: 458
I've always been fascinated by 'puzzle' boxes and make some with obscure opening mechanisms using brass catches and springs, but last week somewhere on one of the UKW forums I saw a 'Wheel Puzzle' box which intrigued me. There was a video and the demonstrator made 3D printed components to show how it worked . . . but I can no longer find it!!

Anyway, I took the basic idea and made my own. It's 200mm x 80mm x 50mm mostly Maple with African Blackwood detail. The catch is simply gravity actuated so the box has to be tilted first left and then right to about 80º.
 

Attachments

  • Puzzle Box Gravity Catch.png
    Puzzle Box Gravity Catch.png
    937.7 KB · Views: 359
  • Puzzle Box B.png
    Puzzle Box B.png
    814.5 KB · Views: 359
  • Puzzle Box A.png
    Puzzle Box A.png
    620.1 KB · Views: 359
Cordy":bz0ir36c said:
Just made my first bird-box
32 mm diameter entry for house sparrows
uxk8sv2h.jpg

Clamped to fence for photo; will probably give it away :)
Lf2SwGEh.jpg

And you too now have a birdhouse in your soul.
 
Oak and glass dining table! A really interesting commission, it’s a wedding present for the clients granddaughter and features a slab of oak from a tree that grew next to their family home!
0cadadfb2564389e74bfa1a3a68f7f76.jpg
4e981eafd5cbf4f997a6d1196f600c2d.jpg


Sent from my iPhone using Tapatalk
 
Nice table, but did you ask "A" and "C" which end of the table they preferred? :wink:
 
rafezetter":2oed1p95 said:
Nice table, but did you ask "A" and "C" which end of the table they preferred? :wink:
it was an executive decision by the grandfather [FACE WITH TEARS OF JOY]


Sent from my iPhone using Tapatalk
 
That's proper. Well designed and beautifully executed. Not a hint of epoxy in sight.

Hats off. (hammer)
 
Bm101":2yrbw8ly said:
That's proper. Well designed and beautifully executed. Not a hint of epoxy in sight.

Hats off. (hammer)

I concur - really nice lines. Is that a traditional design that I would recognise if I wasn't the class numpty, or all your own work?
 
A number of you fine folk helped me with advice on my lamp. I finished it a few months back and keep meaning to post a bit of a wip but never finding time. Anyhow all done and wouldn’t have managed without your advice.

Three way joint at the base reinforced with brass plate let into the underside. Splines were supposed to be contrasting lighter timber, sycamore vs mahogany but they soaked up the analine dye better and ended up even darker!

I wanted a lamp where the cord did not dangle down like an unwanted tail, so the back of one leg had a channel rebated into it then a cover inset. The electrics were fitted after finish applied and sycamore ‘accents’ used to cover fixings/ entry points.

Bottom leg joints are bridles and top leg joints ‘open mortices’ with loose tenons/dowels, if that description makes any sense!

Was a huge learning curve as none of the joints are 90 degrees, and the top angles don’t match the bottom as the legs taper. Ended up with a table full of jigs and test joints to ensure at least an acceptable outcome.

Overall I’m pleased and proud with the outcome and it can’t be too bad as the good wife has even accepted it into the house.

Thanks again for all the help, onwards with a large box jointed coffee table next.

Fitz

PS: comments and criticisms welcome, for me the base is an inch or two too wide, it adds some stability but isn’t as refine as I’d completely like.

4B1B5B02-58FF-4E72-9049-7B79D097974E.jpeg

B7484219-EE64-4FC6-A725-B6E6E6459475.jpeg

884D863A-5F88-4695-B896-B4D78DFB9BEA.jpeg

B0E4676F-3E51-4129-BAC8-5DE07193FB00.jpeg
C5C47569-4B51-4F01-B52B-382FBA075F63.jpeg
E497CA15-225A-4926-9437-AE7F04C7625E.jpeg


F90D729C-8ED9-4E27-8910-13F38F657581.jpeg
 

Attachments

  • 4B1B5B02-58FF-4E72-9049-7B79D097974E.jpeg
    4B1B5B02-58FF-4E72-9049-7B79D097974E.jpeg
    567.1 KB · Views: 254
  • B7484219-EE64-4FC6-A725-B6E6E6459475.jpeg
    B7484219-EE64-4FC6-A725-B6E6E6459475.jpeg
    831.5 KB · Views: 254
  • 884D863A-5F88-4695-B896-B4D78DFB9BEA.jpeg
    884D863A-5F88-4695-B896-B4D78DFB9BEA.jpeg
    606 KB · Views: 254
  • B0E4676F-3E51-4129-BAC8-5DE07193FB00.jpeg
    B0E4676F-3E51-4129-BAC8-5DE07193FB00.jpeg
    834.2 KB · Views: 254
  • C5C47569-4B51-4F01-B52B-382FBA075F63.jpeg
    C5C47569-4B51-4F01-B52B-382FBA075F63.jpeg
    644.1 KB · Views: 254
  • E497CA15-225A-4926-9437-AE7F04C7625E.jpeg
    E497CA15-225A-4926-9437-AE7F04C7625E.jpeg
    687 KB · Views: 254
  • F90D729C-8ED9-4E27-8910-13F38F657581.jpeg
    F90D729C-8ED9-4E27-8910-13F38F657581.jpeg
    1.1 MB · Views: 254
Fitzroy":3sneiyke said:
A number of you fine folk helped me with advice on my lamp. I finished it a few months back and keep meaning to post a bit of a wip but never finding time. Anyhow all done and wouldn’t have managed without your advice.

Three way joint at the base reinforced with brass plate let into the underside. Splines were supposed to be contrasting lighter timber, sycamore vs mahogany but they soaked up the analine dye better and ended up even darker!

I wanted a lamp where the cord did not dangle down like an unwanted tail, so the back of one leg had a channel rebated into it then a cover inset. The electrics were fitted after finish applied and sycamore ‘accents’ used to cover fixings/ entry points.

Bottom leg joints are bridles and top leg joints ‘open mortices’ with loose tenons/dowels, if that description makes any sense!

Was a huge learning curve as none of the joints are 90 degrees, and the top angles don’t match the bottom as the legs taper. Ended up with a table full of jigs and test joints to ensure at least an acceptable outcome.

Overall I’m pleased and proud with the outcome and it can’t be too bad as the good wife has even accepted it into the house.

Thanks again for all the help, onwards with a large box jointed coffee table next.

Fitz

PS: comments and criticisms welcome, for me the base is an inch or two too wide, it adds some stability but isn’t as refine as I’d completely like.

View attachment 4

View attachment 884


I personally wouldn't say the base is too wide; If I were making it I'd have made the base as wide as the lampshade, so you've got visual symmetry top and bottom, so you're not far off an that score, and I think it looks the better for it - to my eye's anyway.

Lovely work, I remember your post about that bottom triple joint and reinforcing it, you've done it nicely, highlighted it without overdoing it by using a ligher wood for the splines, which I think would have been a mistake.

And you even clocked the screws =D>
 
More a case of "the last thing i finished" than made, as I've been making this on and off for a few months in between other things.

This was more of a trial run to test out new (to me) ways of dovetailing. I'm pleased to say my accuracy improved during this. The new ways were using blue tape (a la Derek Cohen), building and using a moxon vice along with a dovetail alignment jig, and getting some reading glasses to magnify the work. All contributed in some way I guess.

The box is made from Oak, not a particular favourite of mine, but I had some spare. I got a bit of tear out, and I undercut the DT's too much, so had to fill a couple of places when I cut the lid off.
large.jpg


large.jpg


large.jpg


The lid was a solid piece of oak set into a rebate, and there has been a bit of shrinkage during the summer. Other than using a veneered piece, any advice on what I could have done to minimise this?

large.jpg


Hinges are from Andrew Crawford (next time I wont be going for the brass - easily tarnish - lesson learnt). These are expensive compared to the ones i usually use, but you can tell the difference in quality.

Knob from Prokraft.

Finish Osmo Polyx

Oh and of course the lining was done using the most excellent method from Custard.
 

Latest posts

Back
Top