You are using an out of date browser. It may not display this or other websites correctly.
You should upgrade or use an alternative browser.
You should upgrade or use an alternative browser.
Axminster TS250-2 modifications.
- Thread starter MikeJhn
- Start date


Help Support UKworkshop.co.uk:
This site may earn a commission from merchant affiliate
links, including eBay, Amazon, and others.
Sorry if I am teaching you to suck eggs, but don't forget when setting the dimension of the blade to the mitre slot to use the same tooth on the blade, otherwise it could be your blade that is out of alinement.
Mike
Mike
No I appreciate it mate. I don't get a lot of time in the shed so some things I have to relearn when I get a chance to woodwork ")
I've been down t 'shed again for a bit of late night fettling. The blade alignment is indeed easy enough when you undo the bolts a little but not too much. Mistake I made was undoing one side almost completely.. then when that didn't work I undid all 4. Had another go and blade is now close enough for me. To be fair it was less than a mm out, but now its much better.
I've been down t 'shed again for a bit of late night fettling. The blade alignment is indeed easy enough when you undo the bolts a little but not too much. Mistake I made was undoing one side almost completely.. then when that didn't work I undid all 4. Had another go and blade is now close enough for me. To be fair it was less than a mm out, but now its much better.
Work in progress test mini side extension to make full use of the basic saw fence rail width. Will be doing the same on the other side for a little more stability on crosscuts. The extension is height adjustable using 4 bolts.
I've replaced the guard lever with a star knob. Same for the tilt lock as there wasn't really enough clearance to use it.

I've replaced the guard lever with a star knob. Same for the tilt lock as there wasn't really enough clearance to use it.
Attachments
The tilt lock is a lift and shift lever, so it can be moved after pulling it outwards and moved to a more favourable position, same goes for the guard lever, and sub fence attachment bolts/lift and shift levers.
Mike
542
Mike
542
Yeah I know. But they still got in the way a bit and I could only turn it a little bit before having to pull and turn again. The tilt hit the height adjuster (if at 90) and the guard only had space if you raised the blade. I just prefer not having to use them. Easier to spin a knob.
Merry Christmas
Merry Christmas
Eric The Viking
Established Member
- Joined
- 19 Jan 2010
- Messages
- 6,599
- Reaction score
- 74
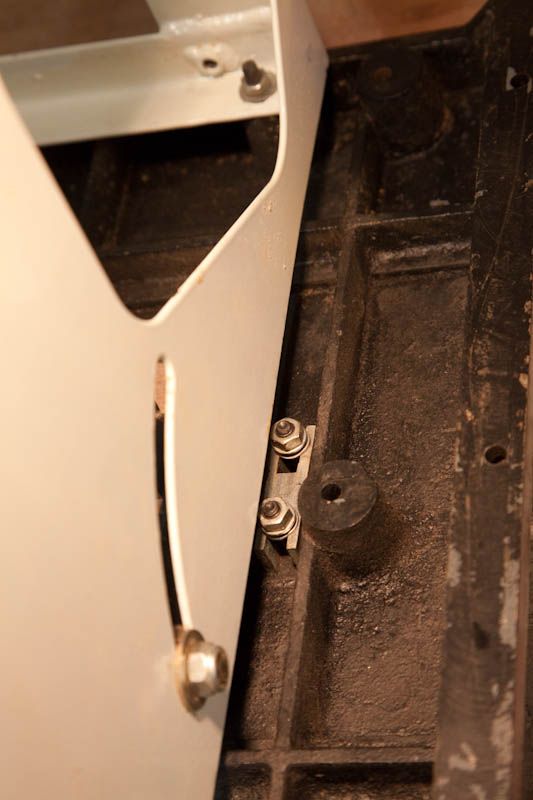
MikeJhn":eav7aae2 said:Pic below shows the pivot trunnion from a TS200, the back one being accessible from the outside of the casing on this smaller model, the TS250 is similar, but can only be accessed from inside the casing.
Mike

That's a shame. I've just passed on my Kity 419, and I'm still working on the TS200 as/when. One of the big issues with both saws was those STUPID adjuster nuts under the pivots ("trunnions"). I thought Axminster had seen sense, but apparently not (assuming, of course, that your saw is recent).
To explain (to someone who doesn't own one of this style of saw cab), the infuriating problem is that you can't spanner the stupid things to adjust them properly when the saw is the right way up and able to be measured sensibly. If you have the sliding table option, it's even worse, as that has two arms that fit under the saw top, in exactly the wrong place.
There are two fixes (workarounds) that I've thought of:
1. This I think is the best approach: From memory, the distance between centres for the pairs of bolts holding up the pivots and adjusters is 30mm. Make a plate out of mild 4mm mild steel thats roughly the same dimensions as the support bracket (shown in Mike's picture), with two tapped holes in it (M6, again from memory) to replace the nuts. This means each bolt holds the thing tigght and no spanners underneath are necessary for adjustment.
2. Same idea but requiring less precision: make a plate with through holes instead (probably 6.5mm holes, to give a bit of slop). Do the assembly up, snug but not tight, ideally with brass bolts and mild steel (unplated) nuts. Tack weld the nuts to the new plate. Functions just as (1) above, but no issues with holes going off-centre in manufacture!
Finally, replace any cross-headed countersunk machine screws with Allen-headed ones above the table, so you can use appropriate force to tighten. I also apply red Loctite to the thread, so it's not inclined to come loose.
The Axminster pivot retainer is a slightly better design to my early Kity one. The latter was a cast lump, with a bit of slop, and annoyingly a couple of cast nibs right under the pivot in the centre of the thing, which got in the way of a simple flat bit of steel. I simply filed these off and smoothed the back surface so they could slide fairly easily.
I tried (2) with the Kity 419 and it seemed to work nicely. The new owner is around here somewhere (but away for Christmas), so he'll probably comment when he picks up on this discussion.
I'm going to thread some plate properly for the ones on the TS200, but that has bigger issues at the moment (height adjust pivot is shot).
IMPORTANT PS: it's Christmas morning and I'm not going out to measure the jolly things - my memory is terrible, so for Pete's sake check for yourselves!
------------------
To change the subject, Mike, I'll be thinking of you with the hand ops coming up. Sadly mine are probably beyond any intervention now and just continue to slow my typing (and other things). The aggro ought to be well worth it, even if it's horribly frustrating right now. We'll all be thinking of you. Have a blessed New Year!
Eric, as far as I'm aware, having done it once with help from Bodgers and Mike for my TS250M2, you just loosen from the top of the table then you can move things and retighten. The key is not loosening completely, so you can pivot and adjust one end at a time. Maybe it does work a little better now?

Attachments
Have to admit I did not have any problem with my TS250 so perhaps it is easier on the bigger model and its the TS200 and Kity 419 that have the problem. On the TS250 I loosened them off from the top, levered it over from one end, measured, adjusted, job done, tighten bolts.
Mike
P.S. Eric Thanks for the well wishes, if you haven't had them I recommend the Cortisone injections, a month of instant relief, from each injection, but only three allowed.
Eric another thought, it looks to me as if the threaded plate was about 25mm long away from the tapped hole it would not be able to turn through 180deg, but would come up against the web of the table or another obstruction, this then takes away any need for precise measurements for the plate holes or tack welding under the table, a spring and plain washer and your set.
Eric The Viking
Established Member
- Joined
- 19 Jan 2010
- Messages
- 6,599
- Reaction score
- 74
The plate/strap just replaces the two nuts - same length/width as the yoke part. As long as you don't remove a bolt completely, each bolt then stops the other spinning and not tightening. Really, really simple.
The only tack welding is nut to plate/strap, instead of drilling and tapping. At the time I did the Kity I didn't have any means of getting the holes spot on. A very nice person recently gave me an optical centre punch, so I'd drill + tap now. I'm morally certain the TS 200 has just such a plate, but I can't go look right now.
The only tack welding is nut to plate/strap, instead of drilling and tapping. At the time I did the Kity I didn't have any means of getting the holes spot on. A very nice person recently gave me an optical centre punch, so I'd drill + tap now. I'm morally certain the TS 200 has just such a plate, but I can't go look right now.
pike":25k51jz2 said:The pic I posted above is from the manual for both the 200/250 mk2. I think the pic Mike posted is a mk1?
Interesting, I didn't recognise those pages so I had another look at the manual on line and increased the picture up to maximum size, the bolts now have a threaded plate on them just like Erik suggests, =D> as this is one of the first operations you should do to your saw I have modified post one to reflect this, no wonder I did not have a problem with mine, no nuts to undo.
As these pages are at the back of the manual this is obviously an addendum to the construction and manual, IMO as this is one of the first operations, the information should be at the front of the manual, or at least referenced there.
Mike :ho2
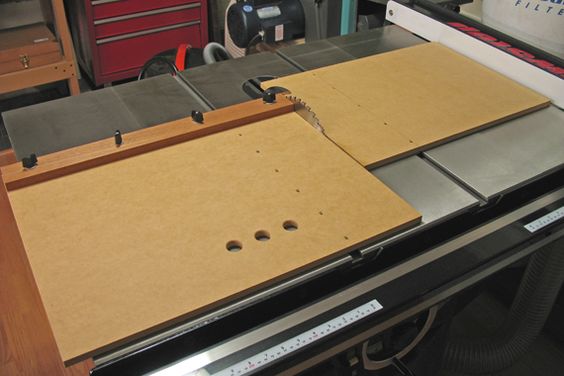
Just a couple more pics of my basic TS250M2 with adjustable mini extensions (and storage). It's easy to level and gives me that bit more support. The whole thing still fits in a footprint around 80cmx80cm. Any bigger would be pushing it in my shed. As a test, this was made out of a wickes kitchen unit we were going to get rid of.
Using the big hood underneath hooked up to my extractor is working a charm. Cheers Mike for the advice on that.


Next thing is a crosscut sled of some sort. I'm tempted to do a split one so I can leave the guard on.
Using the big hood underneath hooked up to my extractor is working a charm. Cheers Mike for the advice on that.
Next thing is a crosscut sled of some sort. I'm tempted to do a split one so I can leave the guard on.
Attachments
Bodgers
Established Member
pike":34705o21 said:Just a couple more pics of my basic TS250M2 with adjustable mini extensions (and storage). It's easy to level and gives me that bit more support. The whole thing still fits in a footprint around 80cmx80cm. Any bigger would be pushing it in my shed. As a test, this was made out of a wickes kitchen unit we were going to get rid of.
Using the big hood underneath hooked up to my extractor is working a charm. Cheers Mike for the advice on that.
Next thing is a crosscut sled of some sort. I'm tempted to do a split one so I can leave the guard on.
Probably better to make one with a plexiglass top for a guard. Splitting it at the back will make the whole sled unstable.
Yeah the guard is good idea, if I make a regular 2 runner sled. I think I'd only get on with a proper sled if I modify the guard which comes with the saw to go on off easier.
I'm thinking about a left side only sled (or one where there is a separate flat board on the right side to catch the offcut). Although neither of these american examples have the guard on.
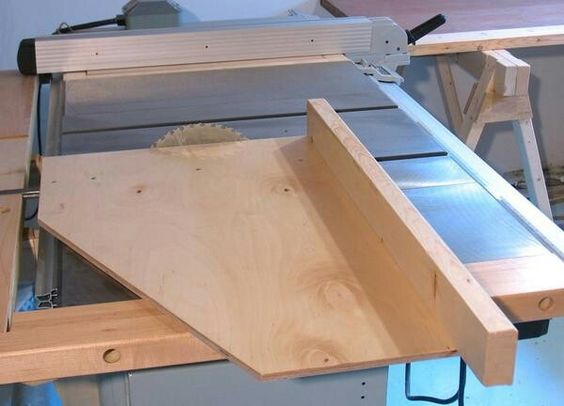
I'm thinking about a left side only sled (or one where there is a separate flat board on the right side to catch the offcut). Although neither of these american examples have the guard on.
Wouldn't the supplied mitre gauge with an extended fence do the same job?
Even with those shown above I can't see the reason for taking the guard off? except on the second one there is no kerf blade/riving knife to fix one to, obviously off an American site. :?
I can't claim originality for the big mouth duct under the saw, It was the manager at Axminster tools that showed me their version in the Sittingbourne store, but to make the extraction even better until I make my new guard, I have fitted a vacuum to the supplied guard to take the dust off the top of the table, works well, but not well enough yet as it extracts from the rear of the guard and not the front where the dust on top of the table originates from.
Mike
MikeJhn":2j8g2agg said:Wouldn't the supplied mitre gauge with an extended fence do the same job?
Mike
Yeah it wouldn't be far off what I want, although I'd prefer something on a sliding table so I'll probably make the one in the 2nd pic, a Matthias Wandel design.
MikeJhn":2j8g2agg said:Even with those shown above I can't see the reason for taking the guard off? except on the second one there is no kerf blade/riving knife to fix one to, obviously off an American site. :?
Mike
That's why I showed them, because you could leave the guard on.
MikeJhn":2j8g2agg said:Anyone noticed this sentence before on the Axminster site for the TS-250-2: Owing to the small hose diameters, a vacuum extractor works best with this machine. I can't say I have ever noticed it before.
Mike
I did read that before I ordered. I've never quite understood whether a vac or a chip extractor works better for tablesaws and bandsaws, as they only produce dust there must be a case for a vac. That note is odd though as the TS250 comes with a 4 inch outlet as well as the smaller guard one. I've got my vac hanging over head for use with festool tools so it's easy for me to just stick that on the guard if need be.
Similar threads
- Replies
- 33
- Views
- 3K
- Replies
- 1
- Views
- 830