WIP Painted face frame kitchen- Birch Ply

UKworkshop.co.uk

Help Support UKworkshop.co.uk:

This site may earn a commission from merchant affiliate links, including eBay, Amazon, and others.

munkypuzel

Established Member
Joined
3 Sep 2010
Messages
154
Reaction score
1
Location
Hertford
Been on this project at weekends/evenings since July!! Although i didn't start building the actual kitchen until October.

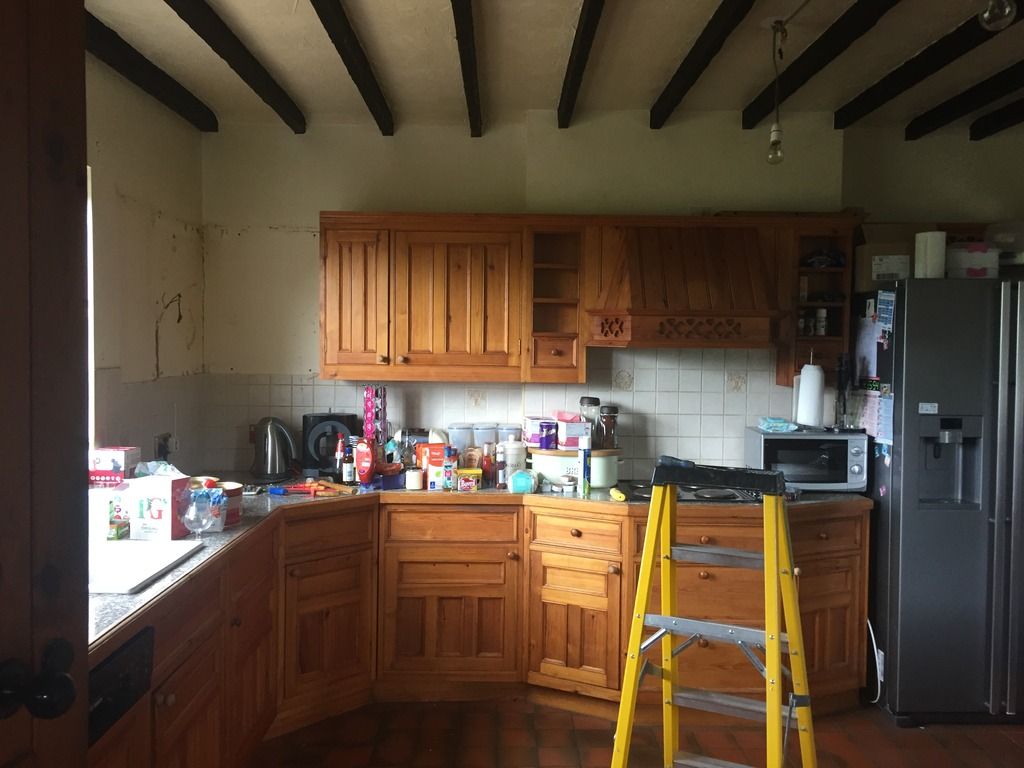
To give it a little context, it started with a 1980's hand built kitchen (very nicely made) that i removed from a kitchen that was a little starved of natural light.

Original kitchen:


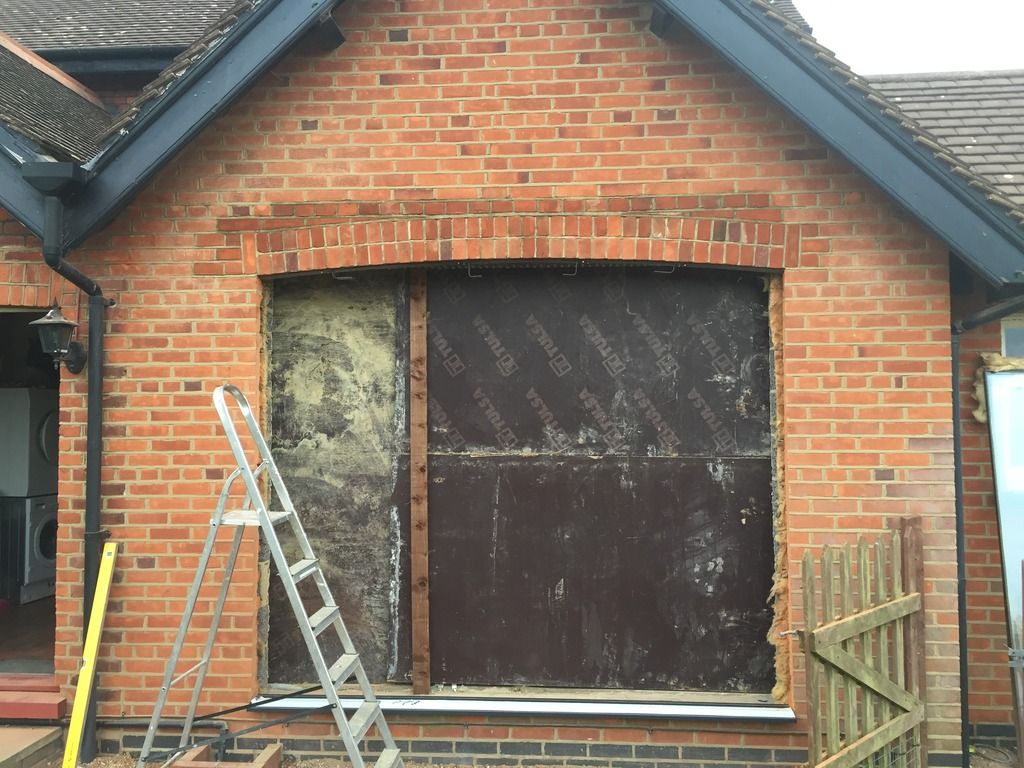
I opened up the back of the kitchen to improve light and take advantage of the outlook:


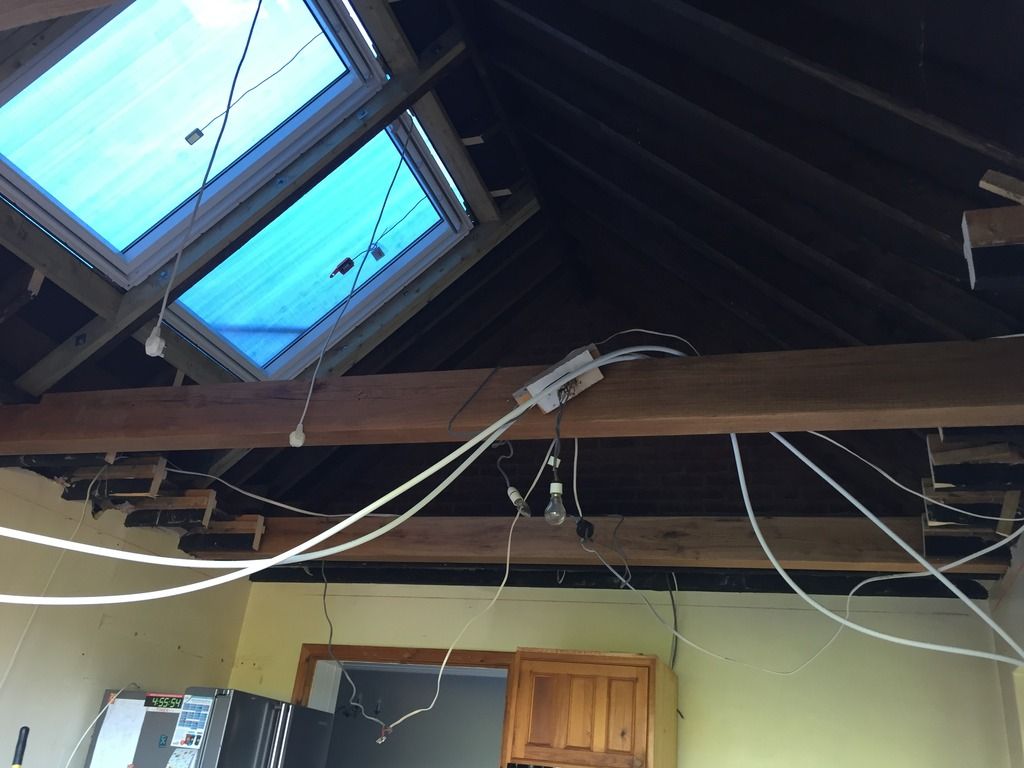
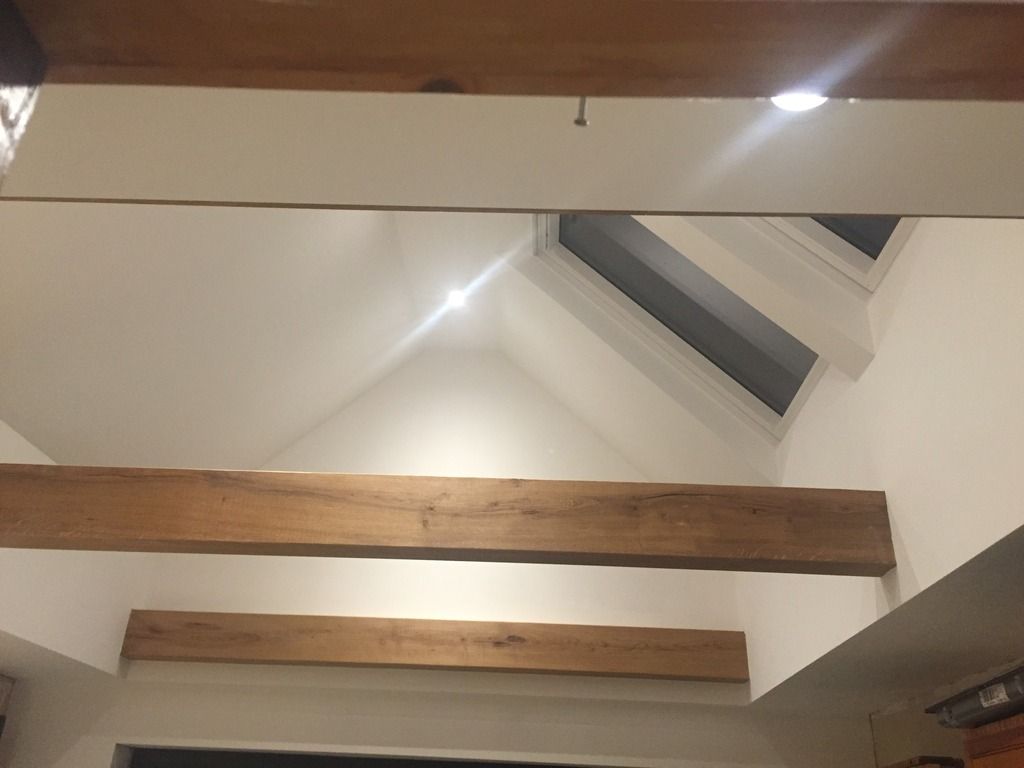
There was a large empty void above the flat cottage style beamed ceiling, so I cut out all of the joists and created a vault with some feature oak beams to add a bit of interest to the roof (also a bit of structural support!)


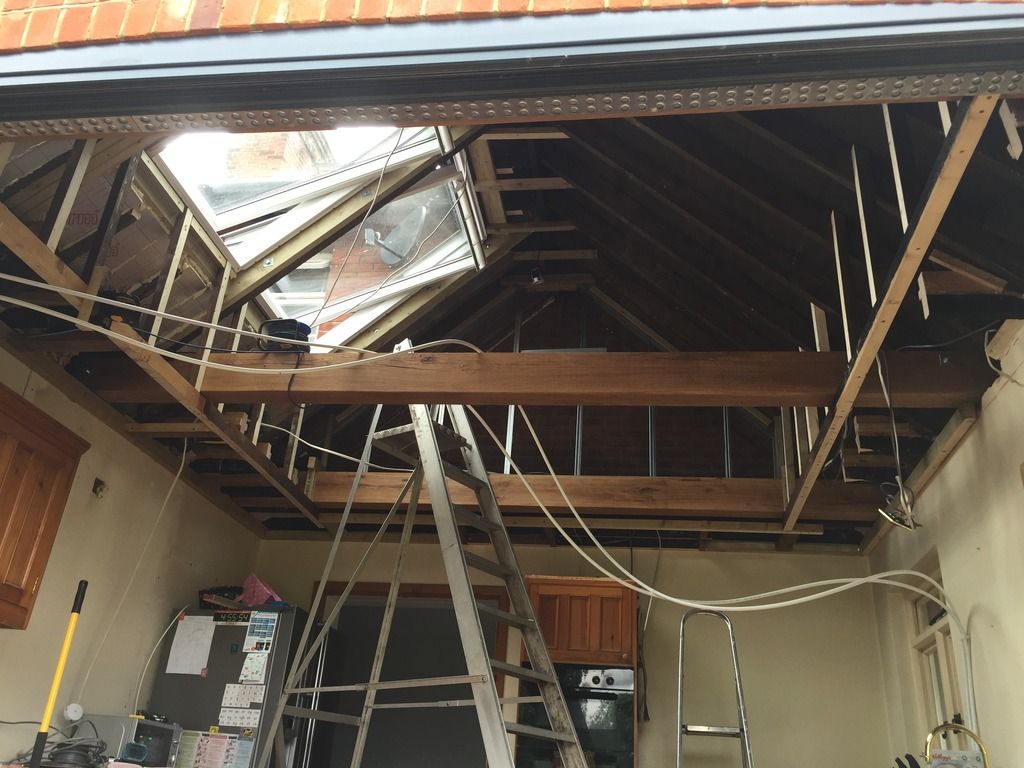
I formed a bulkhead with some of the scrap timber


With the addition of a couple of windows, insulation, plasterboard etc the end result was this


The next post will be more about the kitchen build..
 
This is my first, and possibly last kitchen build, and I researched a great deal on this forum, taking tips from numerous other kitchen build threads. Unfortunately, i am a little light on pictures in the early stages but if anyone has any specific questions about how I went about a certain task please ask!

Building the carcasses out of birch ply - these were quite straight forward boxes apart from this one which was the wine rack.


All made of birch ply, domino-ed and screwed. The wine rack has an oak lipping on the raw birch ply edge. I used 18mm ply fro the cabinets and 6mm for the backs (as i already had a load of this). I would probably have used thicker on the backs, but having used 6mm it was perfectly sound.

This is a butler sink cabinet - all cabinets finished with a shellac coat and three coats of PU lacquer- hand applied.


Here are the base cabinets in place - with the remnant of the old kitchen on the wall..


The draw boxes are oak dovetailed, not hand made, but purchased fully made from Hafele.

Base cabinets on the other side of the room fitted


Kitchen island base build


Face frames and doors next..
 
looking good
but I think you may be in trouble with that socket below sink
I assume that you have a fused spur above counter so that you can isolate it?
a sparks will be along soon
but forget the safety police

it all looks good, watching this one, I like to see kitchen builds

Steve
 
Face frames were made from Poplar/Tulip wood. This is the first time I have used this timber and it machines and works beautifully although as many others have previously said, it is very soft.

Drawer face frame - I routed an 8mm cock bead onto the frame. The frame was 27mm deep and 40mm wide. I have a morso guillotine for chopping out the frames, which worked really nicely. They were then fixed with dominoes and glued up before fitting. I have gone against quite a lot of others advice and fitted the frame after fitting the cabinets, which meant that i have had to fix through the front of the frames. There was a good reason for this, which was to do with the type of 'make it up as you go along' design that was all in my head and not on paper!


I did fix through with very long screws with very small heads (screws designed for decking) so that filling and decorating is kept to a minimum. I am sure that these filled holes may show through in the future, and I accept i may need to affect some additional repairs as time goes on..

Here is a shot of the wall cabinet with frame fitted - the shelf edges are just raw polished ply- I may leave these as is, but am currently undecided.


And another shot with some primer applied to the face frame.

 
Steve F - Re socket - I am pretty confident that this wont get wet, but time will tell. No fused spur on this one i'm afraid, i can get access behind via the dishwasher if need be to add one.

Thanks for your comments :)
 
OK, a pile of wood for the doors:


The doors are 25mm thick, with 75mm rails and stiles. I have grooved the panels in approx 20mm and used 6mm ply for some of the doors and 6mm mdf for others as that's what i had spare at the time. I have run the 20mm groove around the ends of the rails and used a loose tenon to add the strength.


Here is a shot of the un-paneled top draw fixed to the Hafele draw box


and a couple of drawers with panels in place.


Late in the project, i have decide do apply a panel molding so it dosen't look like every other kitchen out there.


This is just about as far as I have got now- its still in primer, although I have done some test pieces in top coat.


Paint is Mylands - I have tried the Farrow and Ball on a wardrobe, the Mylands to me is far superior to apply with a brush and i get a much nicer finish.- I am no painting expert but am taking my time and remain amazed at the difference in finish you get trying out different brushes.
 
Looks like a pro job, you wouldn't guess that was your first kitchen, well done!
I also liked the colour of the primer.
 
Looks very good, i'm impressed. I will be doing one for my niece sometime this year and will check out the Mylands paint you mention. Could you tell me what sort of brush gave you the best finish?
 
Thanks for the positive comments- to answer a few questions-

First of all - the colour. My wife purchased every grey colour from the Mylands range one at a time at £4.50 a pop and still could not decide. I was desperate to get some paint on, so went with Mylands light grey primer. She looked at it and... you guessed it... 'I want that colour!!'
So i have now had a Mylands finish mixed in the primer colour.

Experience wise, I have built 3 different sets of wardrobes- one was a frame in an alcove with some MDF doors with plant on shaker style rails and stiles.
I then built wardrobes as carcasses - birch ply with the same layover shaker style doors on blum hinges. Then my last project was some MDF carcass tall wardrobes (still unfinished as I lost interest once the clothes were inside!) there is painting to do and end panels but i wanted to get on with the kitchen.

This is first time i've made face frames and real doors. Its been slow progress and really hard work- hats off to the guys that make a living out of this.

Painting - I started with some cheap synthetic brushes, then got some slightly better ones. The paint was not finishing that well. I took some advice from a guy i know who is a French polisher, he took a look and said I should be getting better. Off I went for more brushes - Brewers decorating centre sold me some Wooster Silvertip brushes and a laying off brush. To be honest the finish was not much better.. I done some googling and then bought a Proform Picasso brush. First stroke of the brush and it was amazing, you could tell straight away. It flattened beautifully! I have now bought various Picasso brushes and i am over the moon with the result

I have also now tested a panel with an additive - 'Floetrol' paint additive - this slightly retards the drying time and again improves the end result a little more. However, for me the brush was the main difference.

Thanks All
 
I have recently discovered Floetrol paint additive and I've got to say, this difference is like night and day.
I have been doing gloss painting to some skirting boards, I put the paint on with a small napp roller and then lay it off with a good quality brush and the finish comes out lovely.

As for your kitchen, it looks amazing, I was impressed when I saw the pictures and then doubly impressed when I read that it was your first one! Hats off to you indeed!

More pictures please?!?!? :D
 
Thanks for the painting info. My brother is a decorator and will most likely do any painting i require but is sometimes too busy, so i end up doing it and could do with a good set of brushes. He has always used Hamilton perfection brushes but i think that is just down to habit and the "I've always used them" mentality. I'll check out the Picasso ones.
 
Skipdriver,

The 'laying off' brush that i bought was a Hamilton, it just left long brush strokes in the paint however i used it. The picasso wont leave lines when used side by side. I haven't used any other hamilton brushes on this project though. I guess its about expectation - the finish i achieved with the cheapo brushes, is the same finish i have accepted on all of my decorating woodwork for 20 years! I just wanted better for the kitchen cabinets. I have suddenly become really fussy :)

Thanks
 
munkypuzel":3i5mshcb said:
Skipdriver,

The 'laying off' brush that i bought was a Hamilton, it just left long brush strokes in the paint however i used it. The picasso wont leave lines when used side by side. I haven't used any other hamilton brushes on this project though. I guess its about expectation - the finish i achieved with the cheapo brushes, is the same finish i have accepted on all of my decorating woodwork for 20 years! I just wanted better for the kitchen cabinets. I have suddenly become really fussy :)

Thanks
Lovely looking job.
I like the picassos but the blaze & contractors seem better still - all very good brushes and as you say make a big difference to the end result.
 
In case it's of help to anyone, the Proform Picasso brushes are made from a type of nylon, called taklon or golden taklon in the trade, which is also used in many synthetic artists' brushes. There's nothing special about taklon as a bristle material, an equivalent polyester bristle will give you much the same results.

What sets these brushes apart from some other synthetics is that the ends are shaped to a chisel edge and the bristle tips are tapered, giving smoother results especially when using water-based paints.
 
Back
Top