The UKW Infill Project

UKworkshop.co.uk

Help Support UKworkshop.co.uk:

This site may earn a commission from merchant affiliate links, including eBay, Amazon, and others.
Hi Jim,

Yes, I know exactly what you mean about risk and I certainly don't blame you; the further you get into a project the bigger the investment at stake. I'm sure it will be a joy to use and give you great satisfaction to see the finished article on the bench.

Jim
 
yetloh":3b9e9vwl said:
Hi Jim,

Yes, I know exactly what you mean about risk and I certainly don't blame you; the further you get into a project the bigger the investment at stake. I'm sure it will be a joy to use and give you great satisfaction to see the finished article on the bench.

Jim

Yes Jim...I have weighed the whole thing up and the pros are simply not significant enough to risk the cons which are significant and could result in a major issue with the geometry of the key part...the lever cap and its functionality.

All the rest of the geometry is spot on and since I am always very careful when I reinsert an iron...I think that I will just use bolts.

Apart from the iron I wanted to add a few modern signatures and I think that Allen headed bolts would be ideal in filling that role. I am open to suggestions though! :mrgreen:

Jimi
 
I'm afraid I wouldn't like the look of allen bolts. Just get some old fashioned ones with a screwdriver slot. It would be a shame of all the nice work to use an Ikea fastener in there.
 
+1 for Allen keys but not exactly modern, 19th century idea.

Coming along very nicely James, brass lever caps might be a pita but well worth the effort.
 
That's a cracking little Veritas plane Jimi, and good work.

Re sprung loaded cap, all you need is a couple of holes on the cap deep enough for a pin and spring, say 20mm, 15mm for the pin and 5mm for the spring.
If you made them out of brass it would look like one of the screws you are using on the infills, which i think would look nice, but its up to you in the end, I don't want to force your hand.

Pete
 
I like the Allen bolts idea. Richard used to use them to fix the bridge in place on his heavy based smoothers, and they looked reet smart.
 
WOW...some interesting comments there with regards to the final step!

And thanks Pete for pointing that point which I completely missed...that you don't have to drill right through to get sprung pins to work! (homer)

In fairness...I was temporarily distracted by the Great Jim himself from this picture in his book...

20140629_155135.jpg


...so much so that I was blinded by the fact that the pin can be pins and the spring, springs and never the twain shall meet!

Highly possible now!

Ok...this is the decision because my gut and to some extent the consensus...is indicating that Allen bolts could look nice....

I'm going to go with these and then that creates the line up I need to do AND means I can test the darn thing.

I will then photograph it and should they look out of place or simply rubbish, then I can drill out to countersink width...and put a shouldered sprung pin either side the tip of which will show flush to the steel side and match the others.

Sound like a plan?

myHERPES!!!! GRRRRRRR!!! I really have a major problem with that outfit...the bleedin' steel has been sitting in their "sender's depot" awaiting someone to do something...like...hey...try putting it on a friggin' truck! This according to the myHERPES track and treat webpage.

By experience...this effectively means it could be somewhere between Sheffield and Kent...in fact...they usually turn up just as I'm taking ALFIE out for a pee...but at least I know the bloke this end now so he will just leave it safe for me...well ALFIE actually because he loves ALFIE...heaven knows why as he nearly had his hand off last time he tried to pass a parcel over the fence! :oops:

So...wait...and wait and wait and more updates as and when the winged messenger get's his act in gear. Perhaps he flew too close to the sun over Birmingham....nah...wrong bloke! :mrgreen:

Jimi
 
Well...guess what...no steel...but at least it's being "sorted at the national hub"....wow...that's comforting!

So...in order to take my mind off this slight hiccup I finished off the front and the wave to a base level before final finishing...

20140709_173117%20(2).jpg


A little bit of filling again to be done when I do get around to that final bit but generally I'm pretty happy with the shape...

20140709_173140.jpg


....and these shots are helping show up where I need to tidy things up a bit and do some filling come the time...like the right edge there between the wood and the steel.

All in all a fun day...and it's coming along as I planned originally in the brief sketch...

PaperArtist_2014-07-09_19-59-55.jpg


Nah....joke...I was playing with the Paper Artist App on my Samsung phone! :mrgreen: :mrgreen: :mrgreen:

Cheers

Jimi

p.s. no updates tomorrow...I have a little hospital visit to overcome so hopefully will be back in full swing by the weekend.
 
Cheers Adam...and a very timely post as you will see!

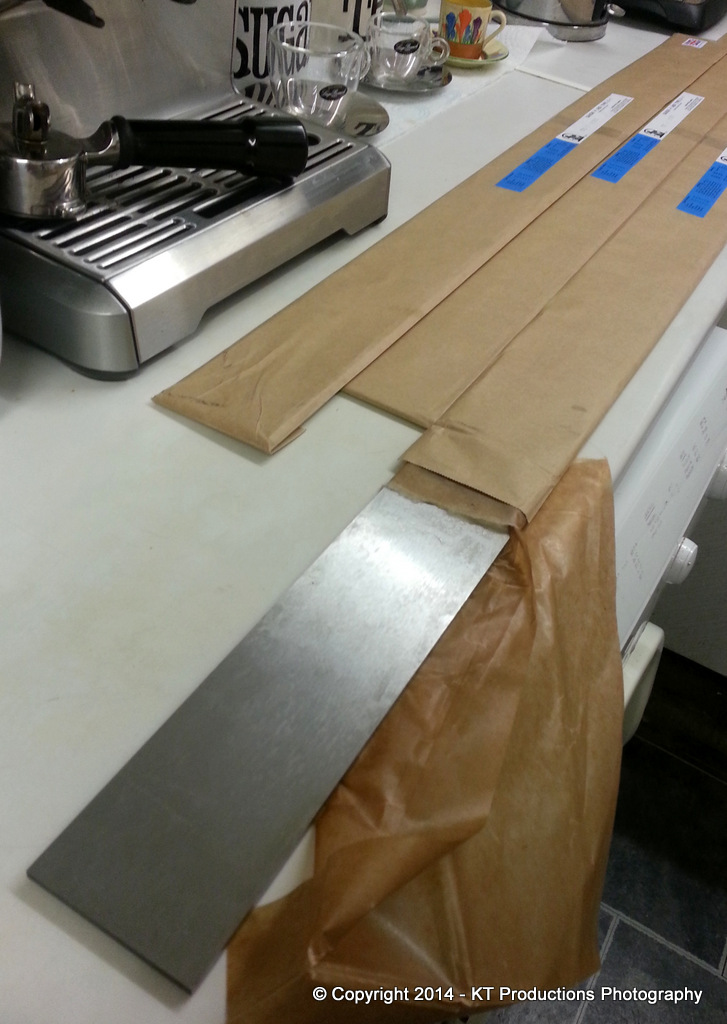
Guess what...the steel arrived!! YES!! Finally! :roll:

I didn't get back until really late from my fun day out...and there was this huge and heavy parcel.

Thankfully...our local Hermes guy is a nice bloke and he carted it into the house for my wife...running the gauntlet of ALFIE at the same time.

20140711_002926.jpg


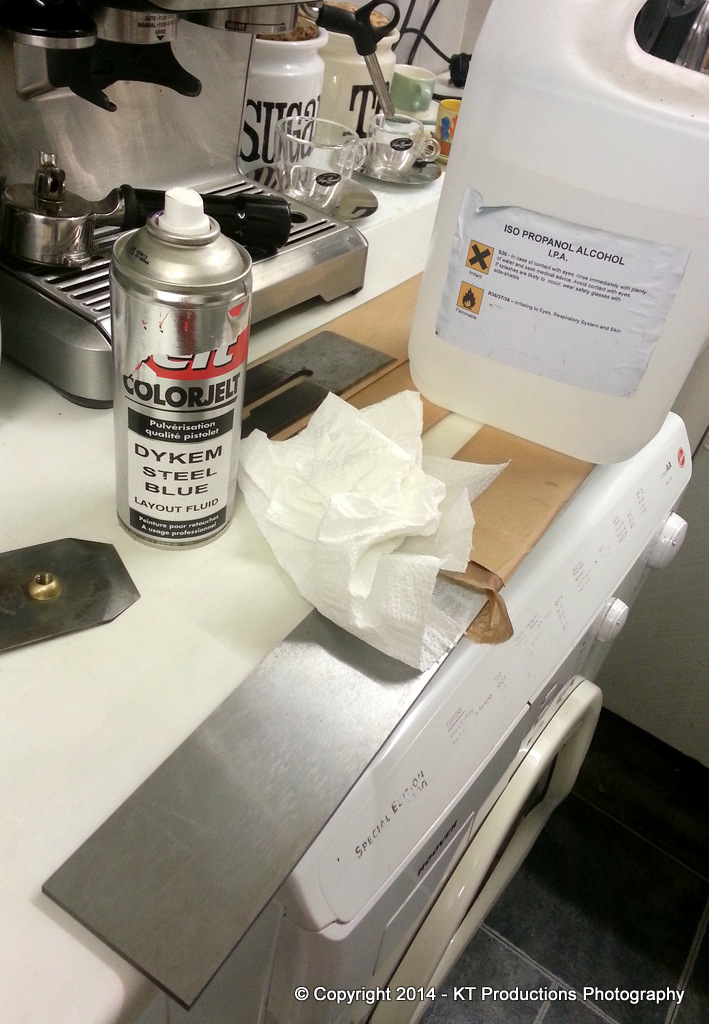
The first thing to do is to remove the protective grease with isopropyl alcohol...

20140711_003151.jpg


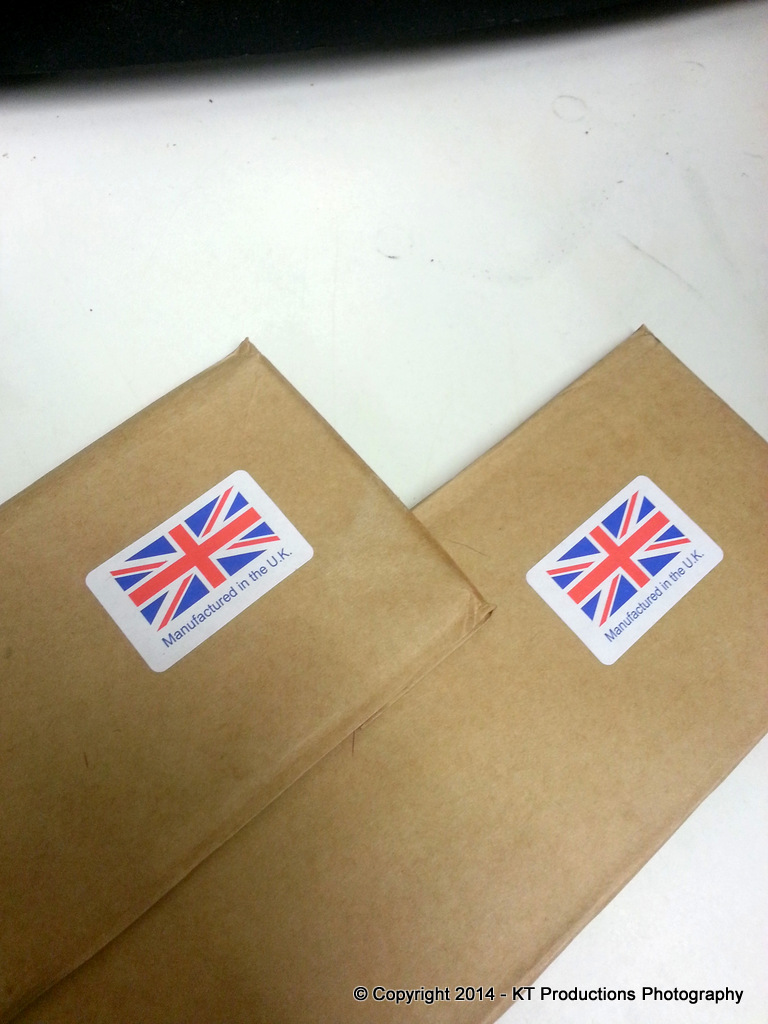
Nice little labels....

20140711_003626.jpg


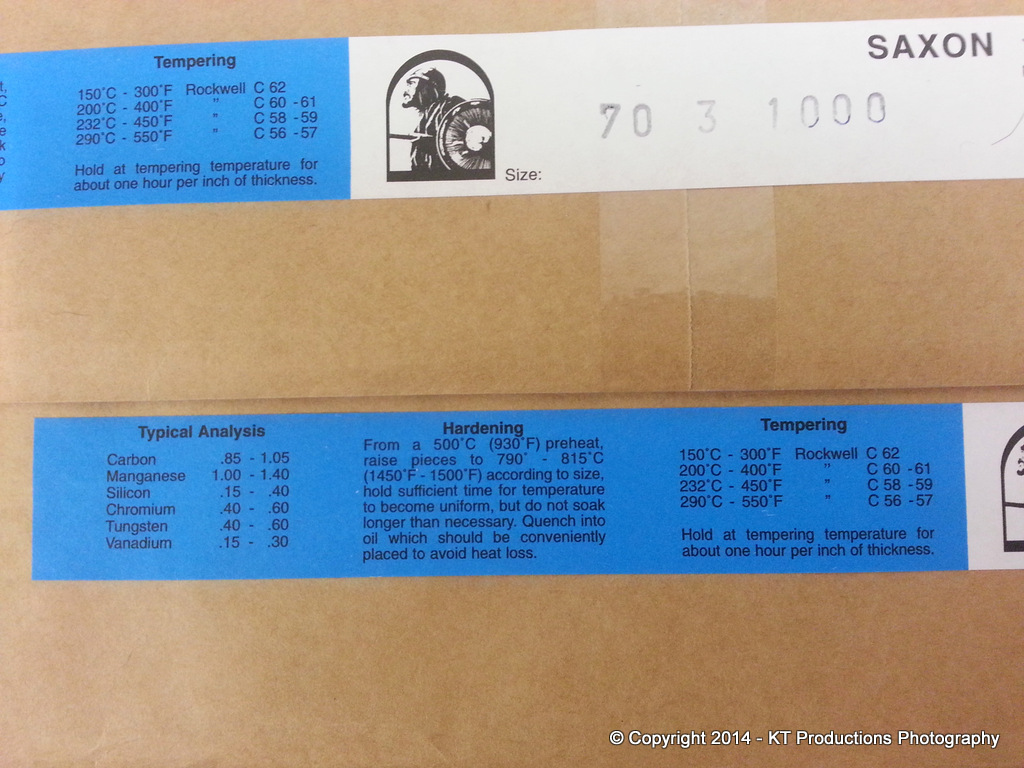
....and just in case I wanted to harden it myself...

20140711_003715.jpg


....all the information right there on the label...(see that Pete! :mrgreen: )

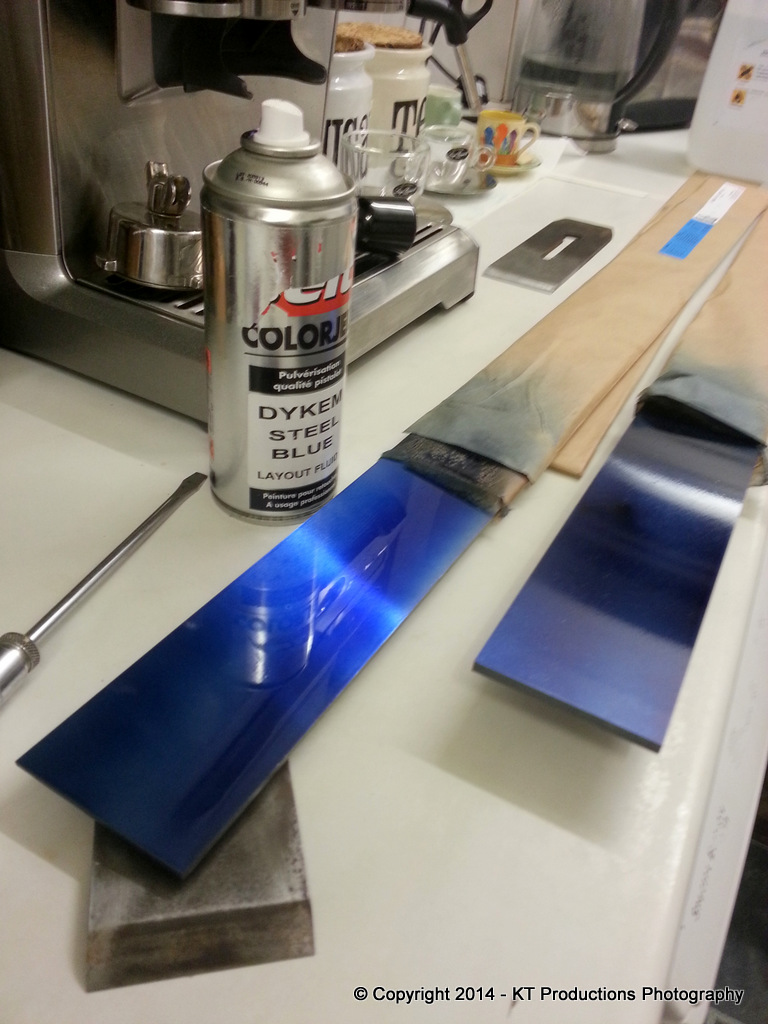
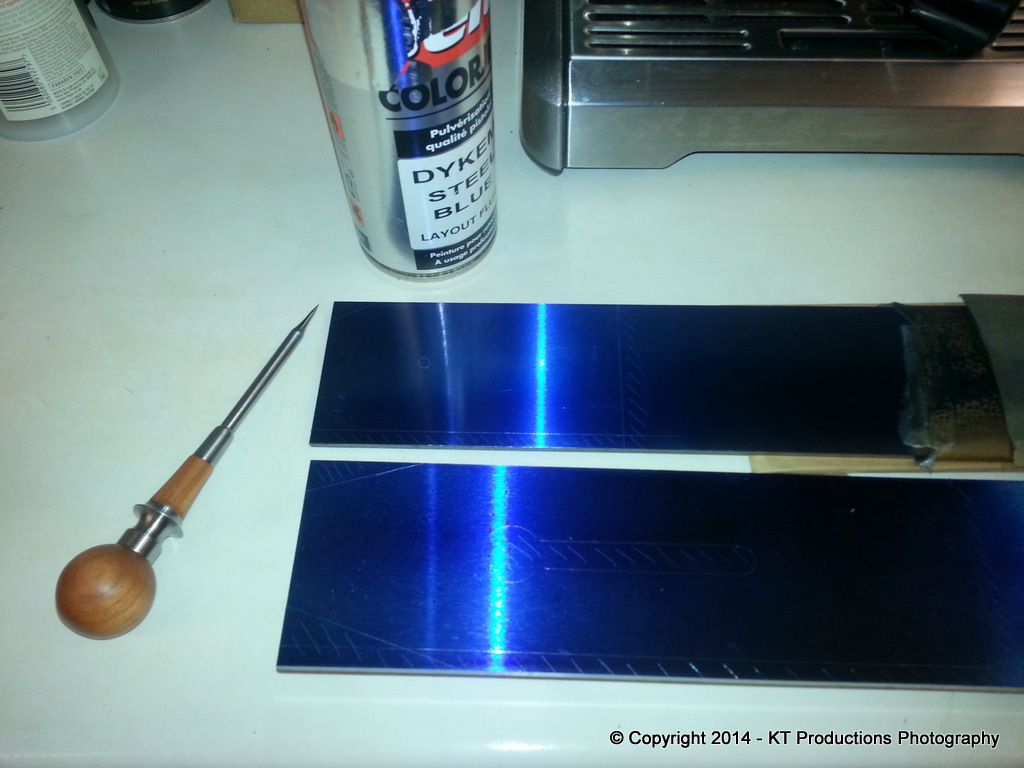
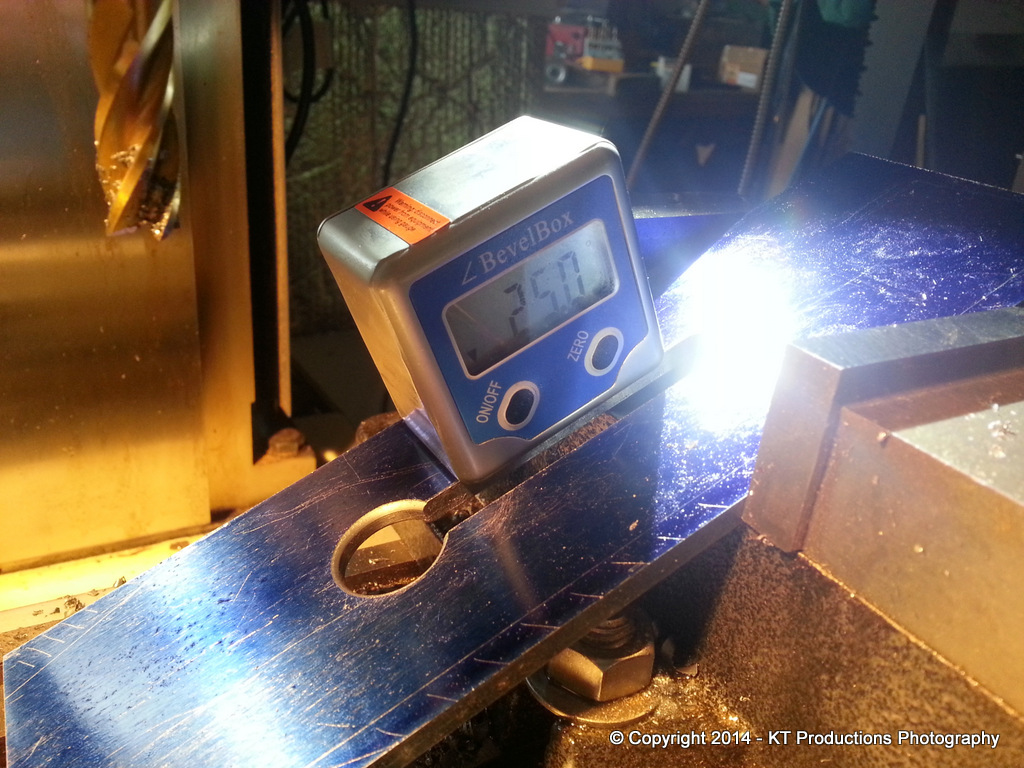
First to blue the ends...

20140711_004930.jpg


Boy...I just love that spray "blue" layout paint...it dries really quickly in a couple of minutes and is such a lovely colour!

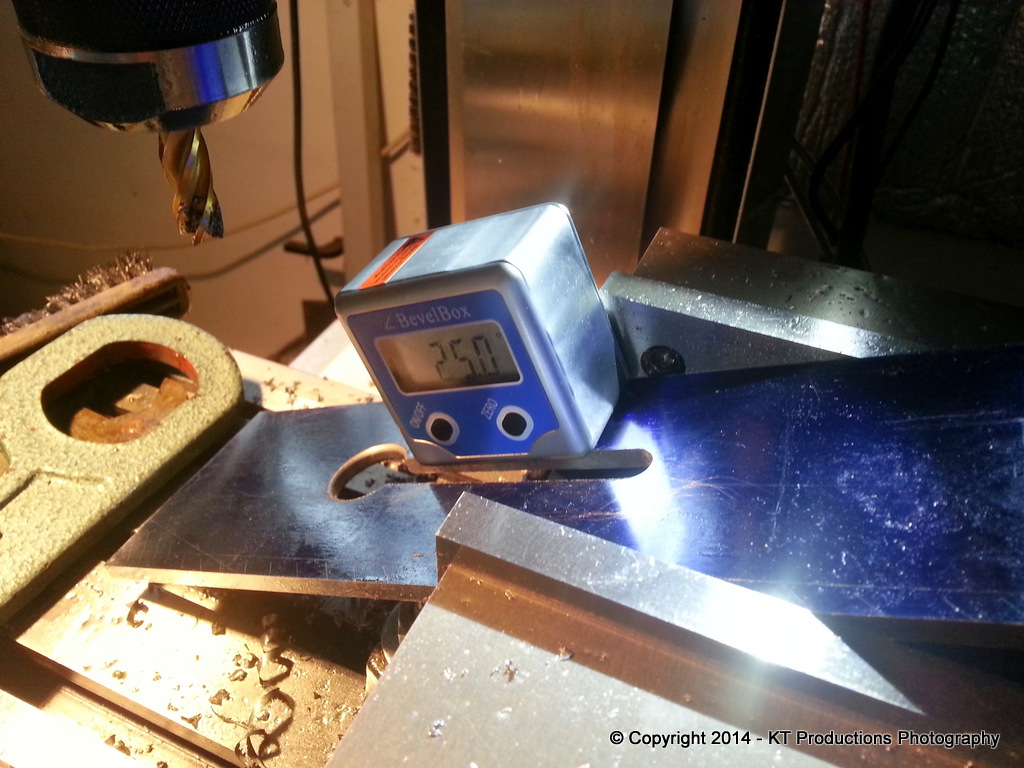
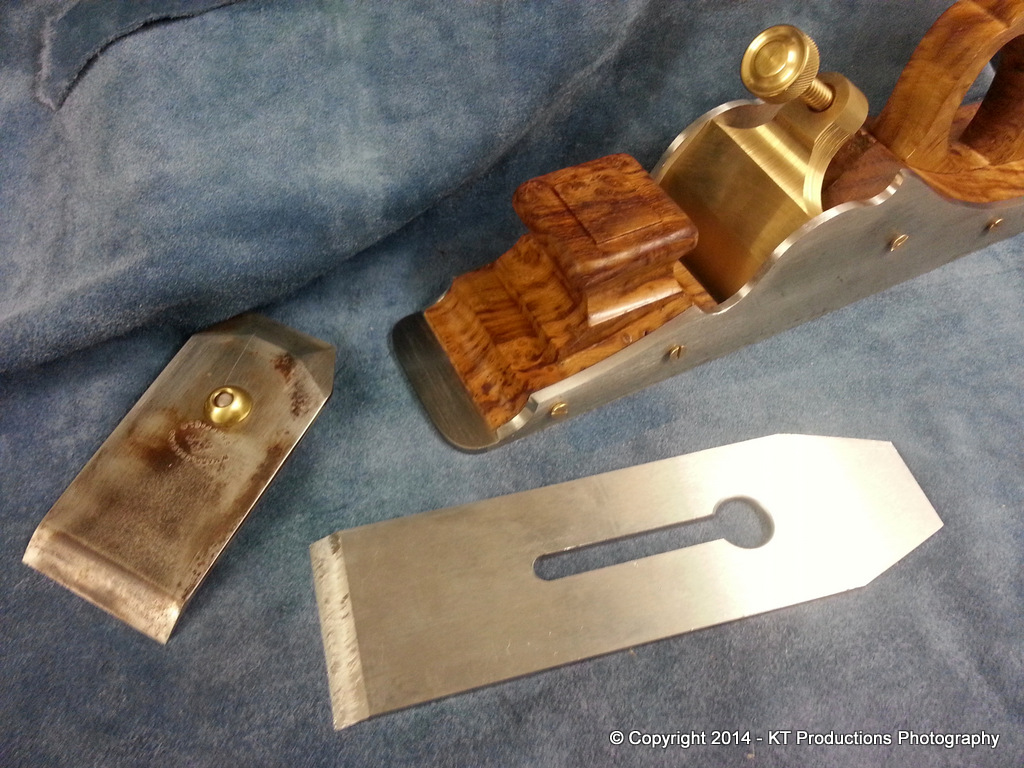
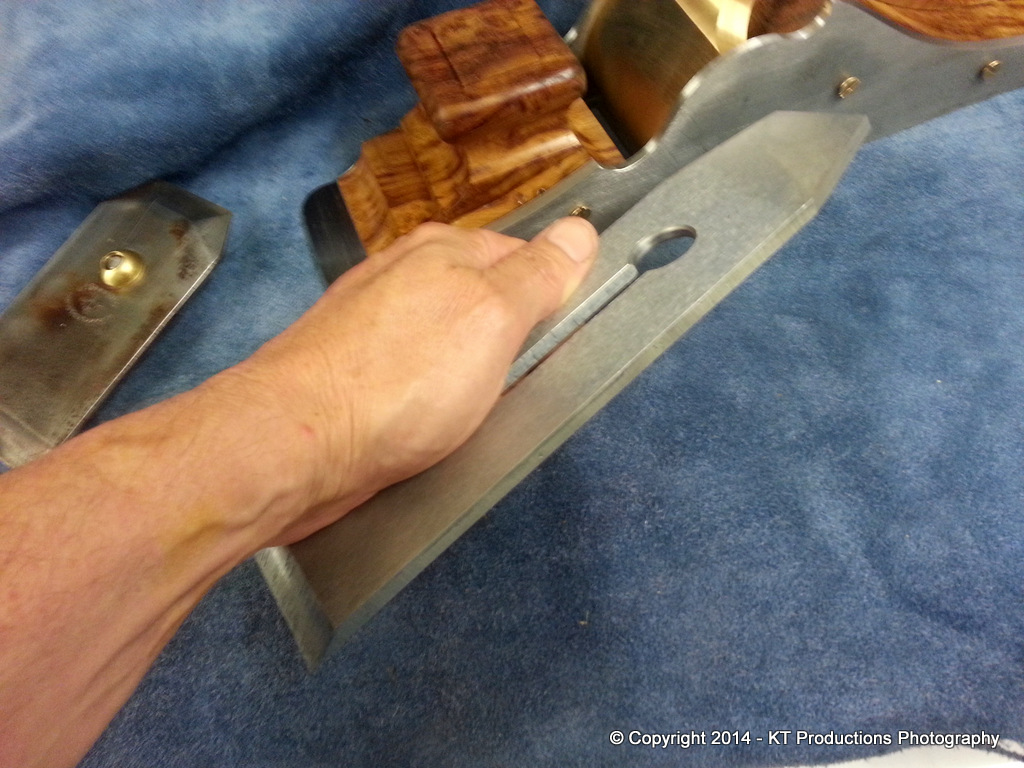
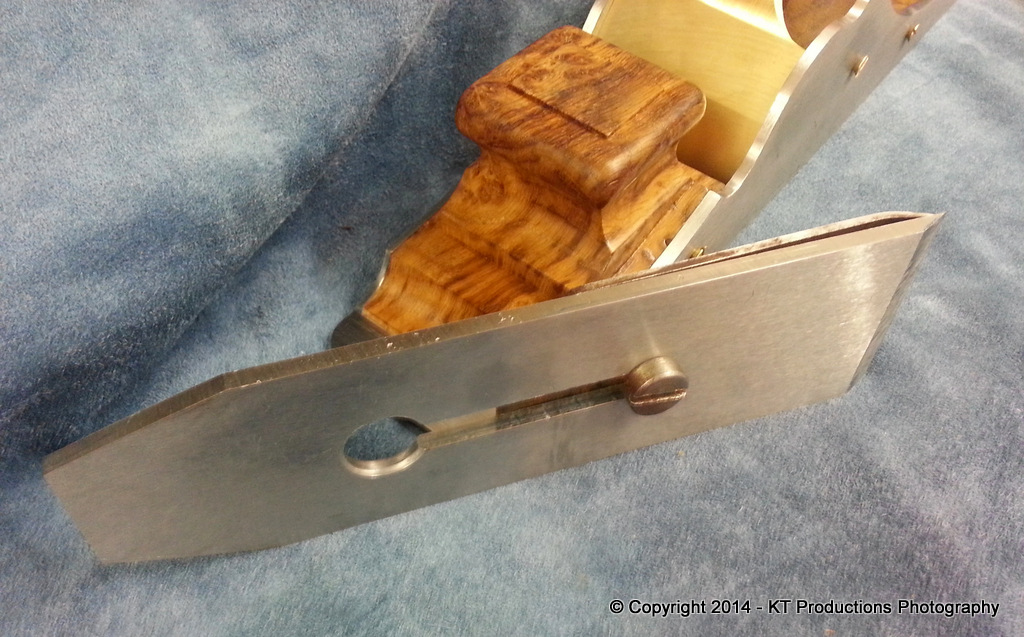
Then...there ya go Adam...marking out the iron and the cap iron...

20140711_011625.jpg


Simple job...quality tool...makes me feel in control..I just love nice tools...don't you!

First blood of the Riley Toolworks marking awl...what a wonderful gem that is...thanks mate!

So...it being gone 1 a.m. - I think I will be leaving the sawing up of the blanks until tomorrow...hopefully in the sunshine on the porch with ALFIE helping!

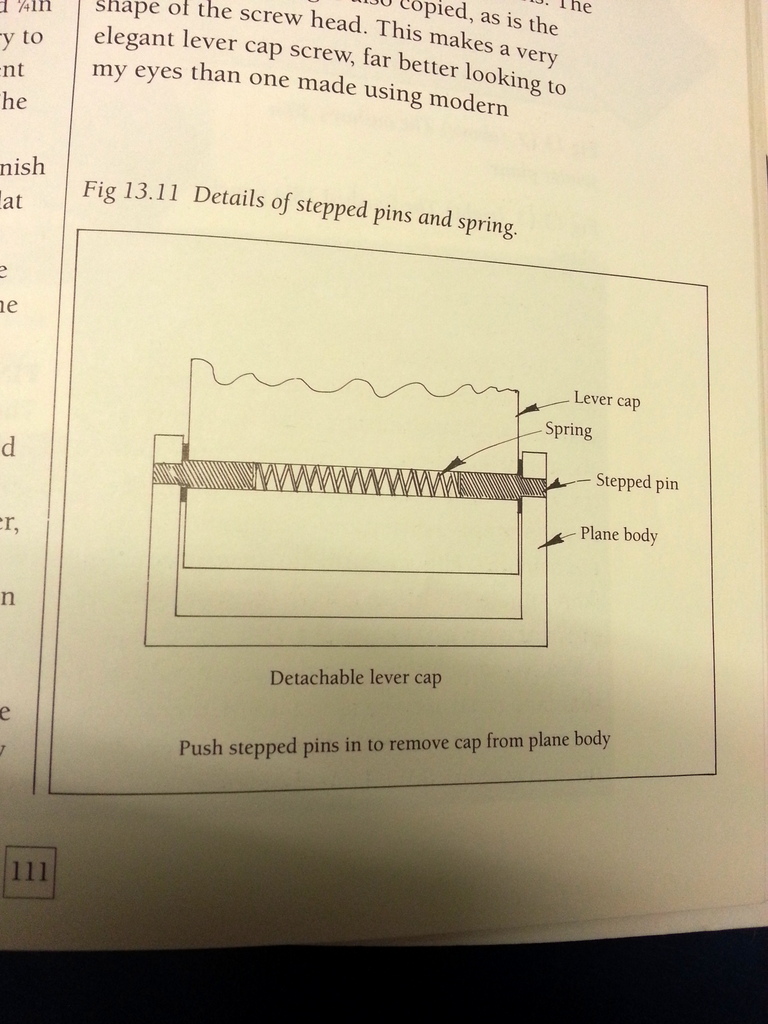
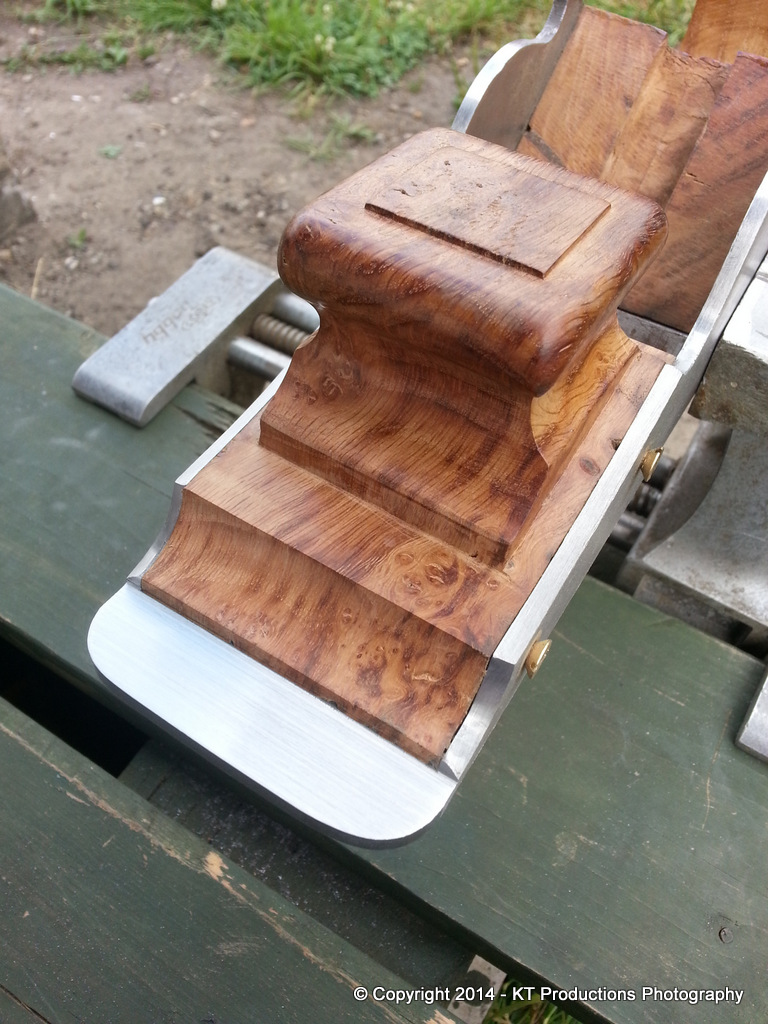
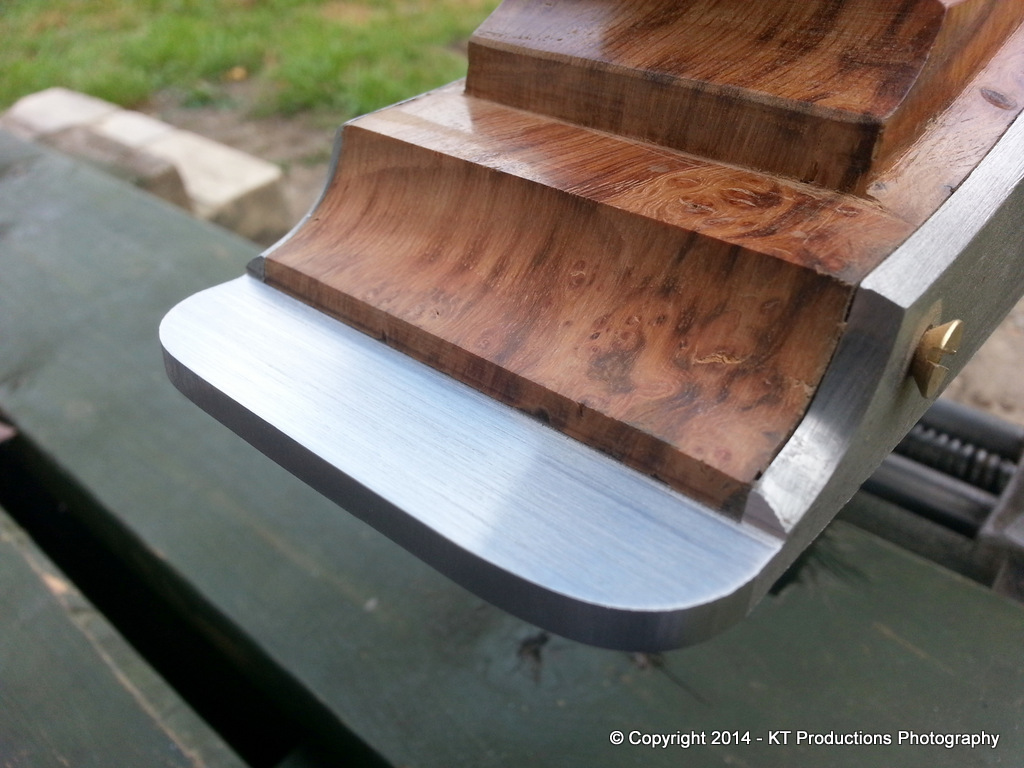
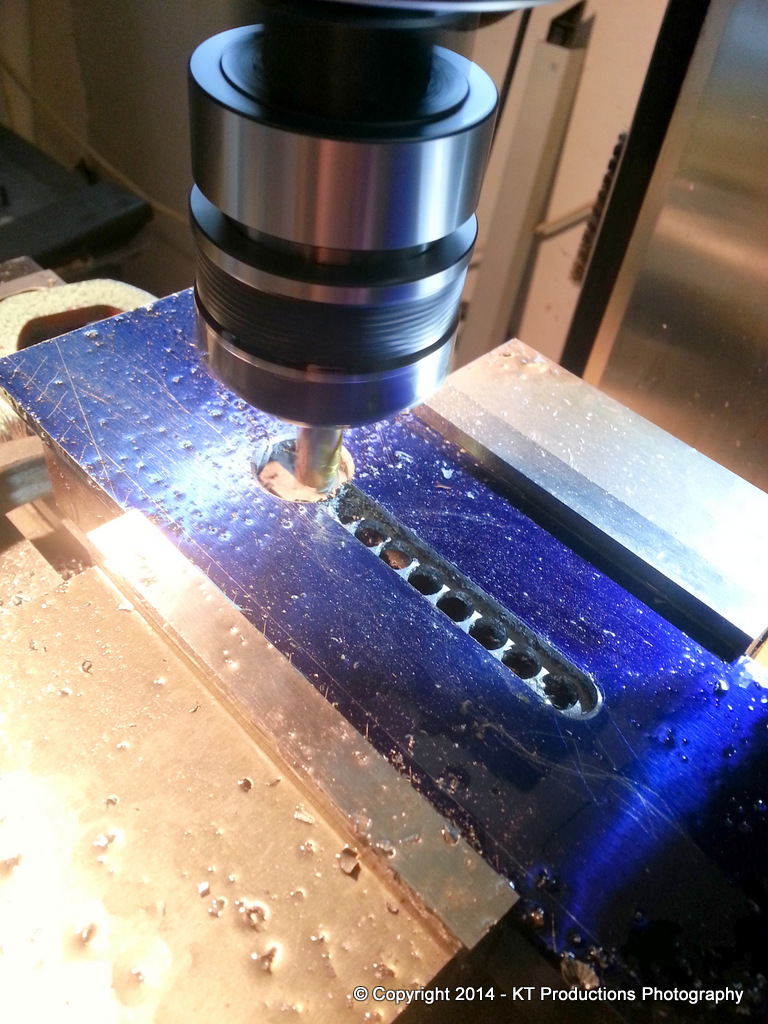
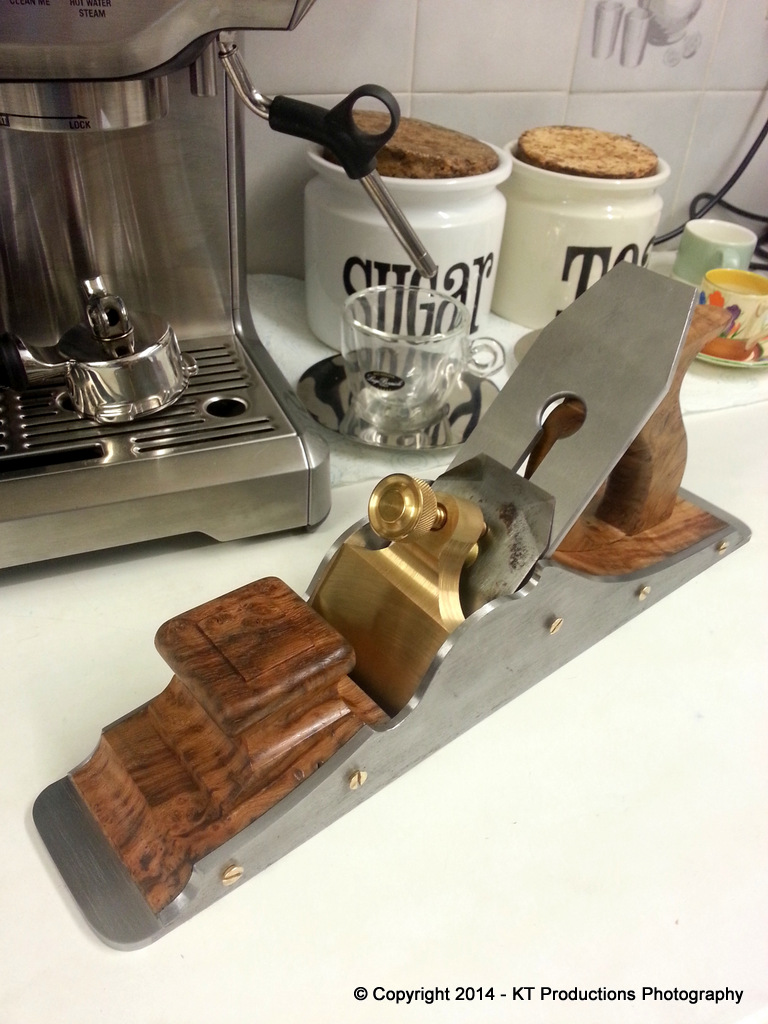
Once these are cut out and milled into shape I can fit them and see where we are with the placement of the lever cap.

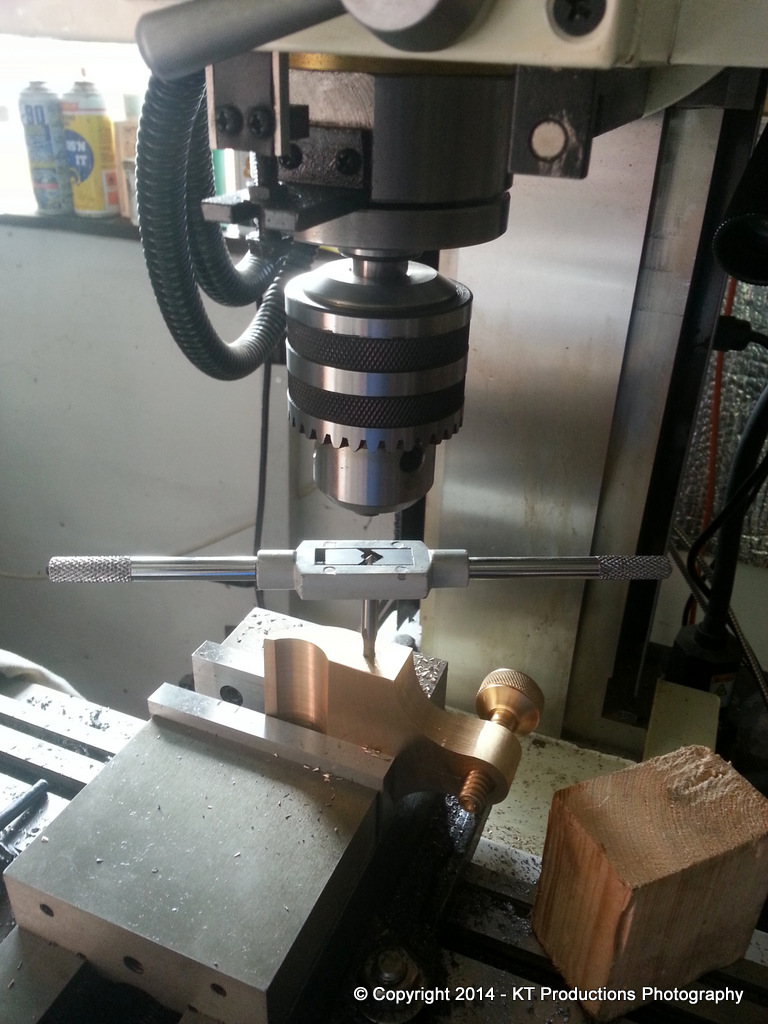
The Allen bolts arrived today...a selection of sizes thankfully...I wanted to make sure I had the right size.

Still keeping the sprung pin idea in the back of my mind though! :wink:

Night all!

Jimi
 
The end is in sight now, Jim. Well done indeed - I have been following this thread with great interest.

I tried Jim Kingshott's way of attaching the lever cap and didn't get it to work quite right because I couldn't find or make a spring that would compress far enough and provide sufficient force. I ended up making a sort of expanding bolt, which works very well - see photo below.

I drilled the lever cap from both sides and the holes met in the middle quite well but with a slight "step". I think this is very likely to occur unless you have a very accurate machine. I removed the step with small files, taking great care not to enlarge the ends of the hole - this was a bit tedious to do. You could try on a bit of scrap metal and see how you get on.
 

Attachments

  • IMG_1081C.jpg
    IMG_1081C.jpg
    171.2 KB · Views: 664
Look forward to see the blade making.

Going back to the lever cap, for me, by far the most elegant solution is Karl Holtey's scroll recesses

levercap_zps7df3ce17.jpg


they fit over small pegs in the plane sides and tightening the lever cap screw locks the whole thing solid, but very difficult to do without CNC milling I would guess.

Jim
 
Hi rxh....

Yes...I foresee more problems than benefits from following Jim's idea there...and since it's not even traditional then I think I will either go for two bolts into either the pure brass or into inserts. OR...I might go for sprung stubs. Bolts for now first so I can do some planing with the Marples and see how he performs...my patience is waning rather fast now it looks like a proper plane! :oops:

Steel porn! HA! Yes...but I blinkin' HATE steel...the swarf is the devil's dandruff!! :evil:

And so to the milling again...not long now and I don't have to do this too often again!

20140711_165705.jpg


Drill the big hole first..then drill little holes all the way along the slot to relieve the strain on the mill a bit..and it's much faster!

Then tilt the iron to 25 degrees and mill out a bevel...

20140711_172035.jpg


Handy thing those magnetic bevel gauges....

20140711_172014.jpg


Lots of hacksawing and filing followed...and we got this....

20140711_221356.jpg


This is one hell of a lump of steel...

20140711_221415.jpg


I then test fitted the Marples cap iron and they were made for each other...

20140711_221526.jpg


The new cap iron will be much more butch and of a different design I've been researching....more on that later.

So...test fit so far...

20140711_222317.jpg


I have left enough at the top (following my last screw up! :oops: ) and I think it may be a tad too long...but we shall see when it's mated with the new cap iron.

The cap iron will be started tomorrow...I don't think that's going to be anywhere NEAR as difficult as the steel is nearly half as thick...but there are a lot of compound bevels going on too so that should be fun!

More later

Cheers

Jimi
 
More awesome-ness Jim!
When are you going to start offering aftermarket irons to the masses?
How did you get on with the awl. Glad to see it's being put to use on such a cool project.
I have one that I use solely for marking steels.

I'll have to get myself a milling machine soon. I've been to look at a few Bridgeports, but they were badly abused unfortunately.
Can't see me finding one at the boot sale (though I have seen a few in the past!).
 
yetloh":1l2ctmcw said:
Look forward to see the blade making.

Going back to the lever cap, for me, by far the most elegant solution is Karl Holtey's scroll recesses

levercap_zps7df3ce17.jpg


they fit over small pegs in the plane sides and tightening the lever cap screw locks the whole thing solid, but very difficult to do without CNC milling I would guess.

Jim

Hi Jim!

Wow...is that an older Holtey? I thought all his lever caps were milled from stock now..that one's a superbly finished casting I see.

It would be another option...very clever indeed...I need to ponder this latest idea a while..thanks for that! ( #-o :mrgreen: :mrgreen: )

rileytoolworks":1l2ctmcw said:
More awesome-ness Jim!
When are you going to start offering aftermarket irons to the masses?
How did you get on with the awl. Glad to see it's being put to use on such a cool project.
I have one that I use solely for marking steels.

I'll have to get myself a milling machine soon. I've been to look at a few Bridgeports, but they were badly abused unfortunately.
Can't see me finding one at the boot sale (though I have seen a few in the past!).

I was very gentle with it mate...soft steel versus harder steel... no contest and no blunting of the tip as I only really scratched paint I was so careful!

Maybe I ought to get another one...the box one you had was beautiful...perhaps you need me to send you some box for that? :wink:

As for offering after-market irons...nah mate...that would take all the fun out of it and the number of hours it takes me to make one...I would be on less than minimum wage...and that's without the kind offers of hardening from Pete and Philly!

Milling machines...mmmmm....I spent ages finally settling on this one. I saw innumerable secondhand ones and the play was ridiculous on almost all of them...mostly on the spindles. Ok..this can be rectified fairly easily but to be honest the key thing which sold me on the SX3 was the silence! If I have the radio on...even low volume...and the mill isn't cutting...I can't hear it at all...

Bloody dangerous sometimes! I have to check! Also, all this faffing around with belts...no..the DC variable speed motor is the way to go. Infinitely controllable and in the end...the investment has been worth its weight in gold.

I'm pretty sure there are better ones than the Sieg but for the money..it's an awful lot of machine for the price.

Cheers guys

Jimi
 
Yes, it is a slightly older Holtey and yes, he does now machine all his lever caps from solid. The scroll recesses really are brilliant. I have a very early no 98 which has a fixed lever cap but saw this new version in his workshop and it transforms blade, removal and replacement, particularly because, as you would expect, he makes blade fit pretty snug to take slack out of adjustment.

Jim.
 
yetloh":2qlh6jco said:
Yes, it is a slightly older Holtey and yes, he does now machine all his lever caps from solid. The scroll recesses really are brilliant. I have a very early no 98 which has a fixed lever cap but saw this new version in his workshop and it transforms blade, removal and replacement, particularly because, as you would expect, he makes blade fit pretty snug to take slack out of adjustment.

Jim.

I read through Karl's blog earlier today and read up quite a bit on this mechanism...very clever indeed. I am keeping this on the back boiler for a couple of reasons. Firstly...the difficulty in doing the scroll correctly without CNC...and most importantly..I don't really want to copy Karl's idea...not really "done form" I think. But it is superb and I didn't hear of this before so a great bit of education.

So...to get a move on and test the plane out, I bit the bullet...not for the first time in this project...and drilled the holes for the bolts!

Surprisingly...playing around with the positioning ended up giving me exactly the same location as on my Scottish panel smoother...

I was a bit distracted at first because the scroll top on each plane is very different and it just didn't look right. So there was a few hours of head scratching and deliberation before this stage I can tell you!

20140712_180538.jpg


I didn't photograph the hole drilling for the side...it's just hole drilling! And..if truth be known...I was concentrating and measuring more than once or twice I can tell you! I took the plane out of the vise at least a dozen times before I was certain I hadn't made some stupid cock-up...like being a few mm out of alignment! You can't just cut another piece on this job! :lol:

Once assembled I checked it out and the clamping is very firm and flat across the cap iron so seems that this stage is over with little worry!

And so to the first shavings!! The Marples iron is "as received from eBay" and is frankly a bit blunt...not bad but will need some fettling but I couldn't wait so first of all a deepish cut...

20140712_191331.jpg


There was that pleasing whoosh sound even with this deep a cut...and a less than optimum iron. Nor have I checked the flatness of the sole...I am actually predicting that will not be necessary...knowing how good Richard was with these things!

20140712_191020.jpg


A little uneven but that's the iron.

20140712_190923.jpg


So...a little bit of adjustment and the shavings got thinner and thinner...

20140712_185716.jpg


I am going to take a break now...then concentrate on that iron and see what I can get out of the plane but for now...I am well chuffed that things are going in the right direction.

Jimi
 
Shavings!

Wicked work Jimi, that's some high stress work out of the way.

Pete
 

Latest posts

Back
Top