Spindle moulder cutter question

UKworkshop.co.uk

Help Support UKworkshop.co.uk:

This site may earn a commission from merchant affiliate links, including eBay, Amazon, and others.

RogerS

Established Member
Joined
20 Feb 2004
Messages
17,921
Reaction score
276
Location
In the eternally wet North
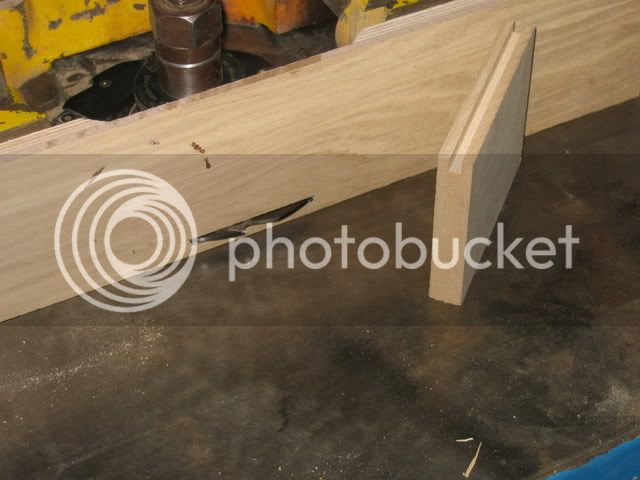
Starting to make some casement windows. I'm using the No.65 traditional window cutter from Axminster and this moulds the profile and rebate at the same time. It also has a scribing cutter (No.66) and you can see it mounted here

P1050453.jpg


apologies for the breakout :oops:

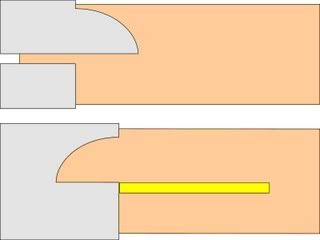
So far so good. But I think that the scribing cutter actually needs a bit more added to it as when you offer the rail up to the stile like so

P1050452.jpg


you can see a shoulder left behind (arrowed). I can't see an easy way to remove it.

I can bandsaw down the side of the tenon but can't work out how to cut the bottom of the groove square. Note that it also has to be a groove to accomodate the slight shoulder.

A grooving cutter for my spindle moulder perhaps?

If the cutter had a bit extra on top then there wouldn't be a problem. Seems to me a lot of faffing about is needed.

Jason has given me an alternative approach using mitres and forgetting about scribing with the spindle moulder but I'd like to know if there is any obvious solution to my problem.

Many thanks
 
Roger

I'm no expert on window making but I think that the area highlighted by your arrow should be tenoned into the rail as well and not removed. Unless I've got it totally wrong this is called 'franking'

Cheers

Tim
 
As far as i can recall the top of the scribing cutters that you are using should be cutting your tenon cheek, ie no step. In this situation you will end up with a deeper rebate which is no bad thing considering the current need for at least 20mm glazing units or 24 if not argon filled. These scribe and profile sets have quite a narow margin for adjustment and you have to make your joinery to suit them rather than the other way around Regards Andy.
 
I take your point, Andy, but these are all-in-one cutters and do the rebate and moulding at the same time...so the bit arrowed is left after passing through the cutter.

TIm...as ever, an elegant solution that works!
 
The flat that you are having trouble with would ordinarily represent where your tenon should go, which is why they are 3/8 or 1/2" wide. This is OK but it leaves you with quite a narrow rebate for your glazing unit + bead.
 
The scribing set that you have also has a profile mould ground into the other end and if you rebate the timber to suit you can mould a profile to suit. I usually use 45mm timber and cut a 30wide x 15mmdeep rebate this leaves 15 mm for the moulding. Look again at my photo and subsitute the flat profile for your curved one and you'll get the idea. Sorry but it's difficult trying to explain something you haven't done for a while, clearly over the internet
 
Roger

Part of the problem comes from working on the spindle moulder rather that a tenoner. On a tenoner there are two scribing heads, unconnected, which scribe the joints, thus:

Tenoning1.jpg


So the adjustment is made very easily. My feeling is that the ovolo scribing cutter should have the land on the cutter so that you can reproduce this on a spindle moulder. It seems ridiculous to have to adjust the cut by making an extra pass with a rebate cutter or groover.

Scrit
 
Scrit, in this case it is only an issue because the tenon should correspond with the flat on the moulding which would make the flat irrelevant to the joint. This is another example joint and the way it should be. This has a 1/2" flat to correspond with the tenon.


Andy Pullen's photo's show how it should be done correctly.

It is better to machine the tenon in one pass by mounting a rebating block above the moulding cutterblock with a suitable spacer between them. This ensures that there will be no variation in the tenons.

The spelching is usually eliminated by making suitable backing pieces, but machining the tenons before running the moulding and rebate is easier and will give a better finish
 
Dan":3o92aeta said:
It is better to machine the tenon in one pass by mounting a rebating block above the moulding cutterblock with a suitable spacer between them. This ensures that there will be no variation in the tenons.
Agreed, but with a smaller, non-commercial spindle moulder this is rarely achievable because the spindle length is often inadequate and the spindle may not have sufficient power to spin-up two blocks without cutting out before reaching operating speed (a problem dealt with by Felderman in a thread earlier this year). Rebate block + 15mm spacer ( to allow for the cutter overghang above the top edge of the profile block) + Euro block is 50 + 10 + 40mm = 105mm spindle height.

There is, however, a major problem in using a profile block above a rebate block - that is because of the presence of the arbor and spacer rings all you are developing is a stub tenon which may not be long enough to make a secure joint, although in the case of window beading I don't see that as a problem. You're anls going to be restricted in the depth of rebates you can achieve as it will not be possible to adjust the rebarte depth with a fixed rebate block. Single end tenoners will develop the full length of tenon because the two heads have a gap between them. Similarly, within constraints, a pair of tenoning discs will do the same on a spindle moulder, the limitation there generally being the size and weight of the discs. If those options aren't open to you then using a scribing cutter in the way Roger has done, turning the work over then working with a rebate block from the other side seems to be the only viable solution, I'd say

Scrit
 
My first thoughts looking at that picture is to take a chisel to the flat on the stile allowing the tenon to drop down into the mortice . I assume the ridge is the same depth as the rebate ?
In other words rather than try and remove it from the tenon remove it from the morticed peice .
 
JFC":2vrfv0ym said:
My first thoughts looking at that picture is to take a chisel to the flat on the stile allowing the tenon to drop down into the mortice . I assume the ridge is the same depth as the rebate ?
In other words rather than try and remove it from the tenon remove it from the morticed peice .


That would create a haunched shoulder and would work but what if you had a hundred to do. I think a rethink on setting up needs to be done so it is done correctly the first time and so needs no finishing work. The tenon has to pass thru the raised flat for it to work. Regards Andy
 
If the ridge is out of line with the rebate then yes but it wouldn't take alot to cut it off so its level with the rebate . I don't have a sliding carriage for my spindle so i scribe hundreds of joints , it doesn't take that long .But i do know what your saying .
 
Hi Roger,
Funnily enough I too have been making windows this weekend using the spindle moulder :D .


I also have a set of the Axminster Traditional Cutters, although the term "Traditional" is a bit misleading imho, (but that's another issue :) ).

Andy & Scrit have highlighted the problem your having.
Using the Axminster cutters you mention unfortunately your forced to put the mortice as per Andy's pic, or the only other alternative as you suggest is to remove the offending shoulder with a slotting cutter although this is a bit time consuming. But at least you get to place the mortice where you want it.

The problem with most of these types of cutter is your limited to where you can place your mortice.

I noticed the tearout in your photo (Sorry :oops: ). I can give you a top tip about this if you don't mind. When using scribe & mould cutters make the Scribe first & then do the mould, that way you have a square edge tight up to your backer/breakout board.

As to a much easier solution is to have your cutters made to your own profiles. I've found the cost isn't that much more than off the shelf ones.
 
Thanks everyone for the suggestions.

In my defence, this was the first time using my spindle moulder!

My tenon position was chosen to allow a wider rebate that could accomodate dg units but I can now see that that boxed me into a bit of a corner. In the absence of groovers etc, removing the wood from the stile (containing the mortice) proved to be quite easy on the 'Rat and the corners easily removed and squared up with a chisel.

I can now also see the benefit of making your own cutters since the Axminster ones didn't create as wide a rebate as I needed and so the stock required a second pass on the router table.

The point is wellmade regarding sequencing of tasks and next time I'll mould later on in the process.

Couple of more questions...

any recommendations as to tenoning cutters for the spindle moulder (Kity 1629 with sliding table)?

maintaining consistency of scribing is proving a bit difficult but I think that this is probably more due to workholding difficulties in trying to scribe post-moulding rather than doing it before moulding.
 
Roger

I don't think I'd have tried a tenoning job as my first spindle job.......

Roger Sinden":3rrd7kib said:
......any recommendations as to tenoning cutters for the spindle moulder (Kity 1629 with sliding table)?
The questions have got to be how big is the table opening and what power is the motor? With a smaller machine it is probably better to go for a rebating block which can be set-up like your Euro scribing block as this will allow a deeper cut than you'd normally get. That means making two passes, though.

Unless you have 5HP to play with (possibly 3HP on three phase) I doubt that you have the power to start up two tenoning discs which would allow you to do the cuts in one pass. If you want to have a look for tenoning discs then get hold of the Whitehill catalogue (Note: the online catalogue is well out of date - you need to request the printed version). 200mm diameter x 30mm high discs for example will give you a tenon depth of approximately 60 to 85mm (allowing a generous 70mm for the spindle boss and spacers), but they are steel and take a hefty motor to spin up. Don't know if anyone does ally ones. The other issue is that your standard fence will not accommodate them and a tenoning hood will need to be bought or built.

Roger Sinden":3rrd7kib said:
......maintaining consistency of scribing is proving a bit difficult but I think that this is probably more due to workholding difficulties in trying to scribe post-moulding rather than doing it before moulding.
Assuming that your sliding table has a hold down are you using it? And are you using either Shaw pressure guards or a power feeder when making your moulding cuts? Also when making the moulding cuts are you running against a temporary false fence (like a zero clearance insert) to provide the workpiece with support? Small section stuff can and does flex if not adequately supported

IMG_1209.jpg


Scrit
 
Scrit":j59feiyh said:
Roger

I don't think I'd have tried a tenoning job as my first spindle job.......

Roger Sinden":j59feiyh said:
......any recommendations as to tenoning cutters for the spindle moulder (Kity 1629 with sliding table)?

The questions have got to be how big is the table opening and what power is the motor? With a smaller machine it is probably better to go for a rebating block which can be set-up like your Euro scribing block as this will allow a deeper cut than you'd normally get. That means making two passes, though.

The motor is rated at 1.5kW (16 amp supply needed).
max tool height - 90mm
stroke - 110mm
max tool in guard - 200mm
arbor speed - 4800/6400/8700 (my block is rated at 8500)
max forward tilt - 30 deg
max rear tilt - 5 deg

Unless you have 5HP to play with (possibly 3HP on three phase) I doubt that you have the power to start up two tenoning discs which would allow you to do the cuts in one pass. If you want to have a look for tenoning discs then get hold of the Whitehill catalogue (Note: the online catalogue is well out of date - you need to request the printed version). 200mm diameter x 30mm high discs for example will give you a tenon depth of approximately 60 to 85mm (allowing a generous 70mm for the spindle boss and spacers), but they are steel and take a hefty motor to spin up. Don't know if anyone does ally ones. The other issue is that your standard fence will not accommodate them and a tenoning hood will need to be bought or built.

If it is 200mm dia then the standard fence will fit.

Roger Sinden":j59feiyh said:
......maintaining consistency of scribing is proving a bit difficult but I think that this is probably more due to workholding difficulties in trying to scribe post-moulding rather than doing it before moulding.
Assuming that your sliding table has a hold down are you using it?

Yes sometimes although it's not that brilliant in terms of range of adjustment vertically and also as you tighten it, it throws out of alignment the fence on the sliding table. So I use clamps.
And are you using either Shaw pressure guards or a power feeder when making your moulding cuts?
Yes - most definitely - I use the Shaw guard. I do have a power feed but the wheels need replacing as they don't grip the wood properly and it slips.
Also when making the moulding cuts are you running against a temporary false fence (like a zero clearance insert) to provide the workpiece with support? Small section stuff can and does flex if not adequately supported

Most definitely as I took on-board what you said in another thread! Cutting through the sacrificial fence for the first time was somewhat scary

:wink:
 
Back
Top