Post a photo of the last thing you made

UKworkshop.co.uk

Help Support UKworkshop.co.uk:

This site may earn a commission from merchant affiliate links, including eBay, Amazon, and others.
Is it braced underneath?
Oh yes!
1695361632640.jpeg
 
More kumiko …

I’ve gone back to square kumiko patterns for this project. I wanted to have a go at the ‘kiri’ pattern Desmond King uses in a panel in his second book, Beyond the Basics. The pattern does look more impressive with more repetitions in a larger screen but I managed to get the detail into a panel measuring 252mm x 142mm x 12mm.

The kumiko strips are 12mm x 2.2mm cut from a board of lime and the frame is beech. I splashed out on some lovely Tenjin Paper from GreatArt in London.

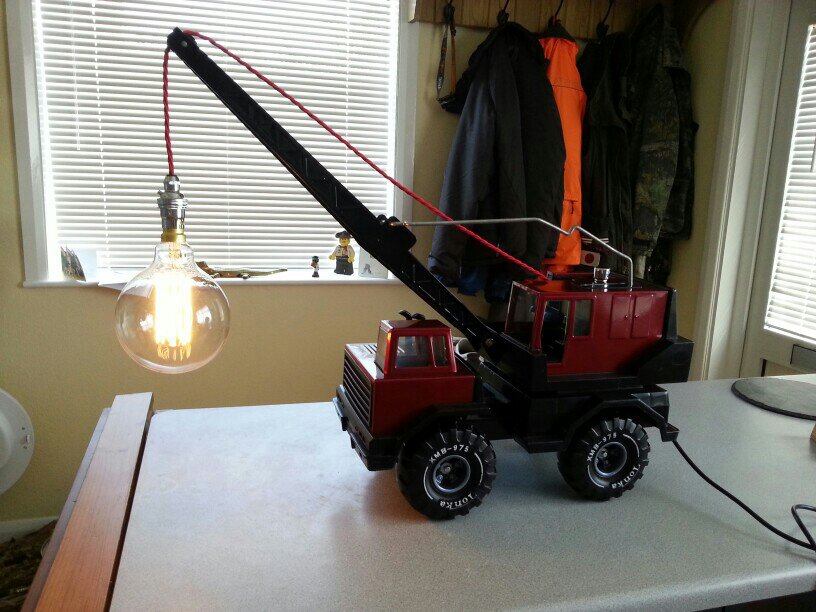
The overall measurements of the table lamp are 320mm x 170mm x 170mm.

View attachment 166627
Absolutely stunning mate. I really wanna get back into trying some kumiko again, I just need to remake my table saw jig for cutting the thin strips.
 
A couple of roll boards for Systainers.

This started out as knocking up a couple of quick/cheap roll boards and by the time I finished I would have been better off just buying the proper Festool ones!

Got the mounting kits from Strawbyte Workshop, work really well. I sunk them in a few mill as I felt it would make a better job, I just drew around them then free handed with the router.

View attachment 166696

View attachment 166697

I find this is a really handy set up on jobs, having a little bench to work on and most used fixings in the drawers.

View attachment 166698
Very nifty
 
Interesting thought. Are you thinking for strength rather than to prevent cupping? I’ve done a few and never braced lengthways either.
Table looks good (I've made a couple in similar hairpin leg style but in Birch ply) - a little surprised you didn't brace it lengthwise too?
My braces are fairly wide (hide some sins beneath them as well, which is an added bonus) so I decided that lengthways bracing was unnecessary partly because the width of the braces also provides some lengthways support. The customer wanted a thin looking table, so I also didn't want to put an apron on it either.
The wood has been drying in the roof space of my barn for about three years from purchase, and is good and dry.
1695463299194.jpeg
 
I have a very small workshop and whilst I have a compact table for my 1/4" router I don't have any way of mounting my 1/2" in a table. I have some projects coming up which will need a 1/2" in a table, so I made this table-top.

The idea was that with the router removed, the top will be able to hang up flat on the inside of one of my cabinet doors, then for use I can put it on sawhorses.

I used some 18mm birch ply, braced underneath with some 35mm battens to hopefully help it stay flat over a longer period. I mounted my Triton TRA001 (which I am extremely impressed with, particularly the ability to adjust height above the table using the winding function, and the automatic lock-off in fully extended position so that I can change the bit above the table) to the Kreg mounting plate which I recessed into the plywood top. Added some T-Track for a fence.

The fence itself is designed with a micro-adjustment feature. I lock off the fence assembly onto the T-Track, then the actual fence face is pivoted at one end, so that I can wind the middle horizontally mounted knob in and out to make minute adjustments to the fence depth, when I'm happy it can be locked off using the other vertical knob. The hole in the middle is to accept the dust port I have for it. T track on top of the fence is for the stop block.

The router has a pecular mix of threads, a left-hand thread for the dust extraction port (strange - i see no reason for this), and some of the bolts are M6 metric, others 1/4-20 UNC. Confused me at first why there is such a variety!

Its the sort of tool that I won't use very often, but I will be grateful to own on the occasions that I do!
 

Attachments

  • 20270146-04D5-4ADD-A21C-82475B02F392.jpeg
    20270146-04D5-4ADD-A21C-82475B02F392.jpeg
    2.9 MB · Views: 0
  • F69EC45C-988C-40CB-A09D-562B6CA95A7A.jpeg
    F69EC45C-988C-40CB-A09D-562B6CA95A7A.jpeg
    3.1 MB · Views: 0
  • 57AC9466-54B5-4DCC-97E3-6FB4B59A8ED4.jpeg
    57AC9466-54B5-4DCC-97E3-6FB4B59A8ED4.jpeg
    2.9 MB · Views: 0
  • 2852ECA5-B091-43D5-9218-776E589062CA.jpeg
    2852ECA5-B091-43D5-9218-776E589062CA.jpeg
    657.2 KB · Views: 0
  • DC6CBE3F-E1D6-47F0-845C-F759E55E5408.jpeg
    DC6CBE3F-E1D6-47F0-845C-F759E55E5408.jpeg
    2.3 MB · Views: 0
Some of my favourite tools are tools I've made get great pleasure whenever I use them
Problem is, making tools becomes an obsession… .”I’m not buying tools, I am making them.”. These two planes are actually for making various sash window planes. So in my case, I have rebuilt and refurbished the tools (metal milling machines etc), to make the tools (eg plane makers floats), to make the tools (these two mother planes) to make the tools (some sash planes) to make some windows.

My wife is getting really fed up. She’s been waiting for her greenhouse for 2 years now.
 
My obsession with quirky lights continue :lol:
ujysymaq.jpg

Researched by watching miley cyrus wrecking ball video.
I have an 18 month old Great Nephew who would love to play with that. Though I don't know how long it would survive! :giggle:
 
Nothing fancy, just a bookstand to keep your place - for my oldest son. A lovely piece of wood with some beautiful figure and just needed 30 degree bevels. Not so simple and using a plane to tidy up saw marks made pieces slightly different widths so joints were not tight, luckily I had a very thin slice of the wood which I used to fill the gaps, with some sawdust and glue.

Finished yesterday and heard that son had an epileptic seizure and got taken in to A&E in London, just as his poor girlfriend was setting out to catch a flight to Australia. Luckily younger sin was able to get across London to be with the invalid and I am driving from Devon today to pick him up (kept in overnight). So I can take the bookstand with me!
 

Attachments

  • IMG_20230924_141946813.jpg
    IMG_20230924_141946813.jpg
    1.1 MB · Views: 0
Looks good. Will you be doing a build thread?
Regards
John
I’m think everyone’s probably fed up with me doing build threads after my recent window thread which ran and ran :) and ran.

Perhaps for one of the planes these little mother planes will make …
 
IMG_20230925_130106.jpg


Due to time limitations I had a local company make the canopy for me, out of timber I supplied.

When we assembled it we hit an issue. Or two.

LHS is 32mm out of line. The wall is bent away from the large white timber.
The vertical runs are 19mm out of square. Plus about 10 on the twist.

Nipped to a salvage yard, 2 old scaffold planks.
Theses we planed to take out the distortion. This meant the canopy now sits flush with the wall.

The Wood recycling yard has a burger van near by. We had a good burger as the planed down 2 scaffold planks.
We then trimmed and planed them down so they take out the distortion of the walls.


IMG_20230925_130111.jpg


Two tone wood stain and varnish. We will be staining the under side of the roof with a lighter stain.
Plus replace the 2 SS screws you can see with brass.

What can not be seen, is the cables for the LED Flt lights.

The wood will be given a goo oiling as well.
Modern self adhesive flasing has been added.
 
Back
Top