Post a photo of the last thing you made

UKworkshop.co.uk

Help Support UKworkshop.co.uk:

This site may earn a commission from merchant affiliate links, including eBay, Amazon, and others.
Today I declared finished a project that I've been working on since January: a travel tool chest & workbench.

The primary reason I did this project was to practice hand tool woodwork without having to worry too much about aesthetics (which are not my forte). Less significantly, I also wanted the ability to take a tool kit on holiday and be able to make small boxes and such-like. Since Carolyn has had M.E., she often needs to spend a reasonable amount of time resting and I'd go spare if I just had to sit around reading all day, so having a little project kit with me helps keep me sane.

All the woodwork (with the exception of a few "resawing" cuts on a bandsaw) was done with hand tools. All of the metal bits were also made by me, but not with hand tools :LOL:

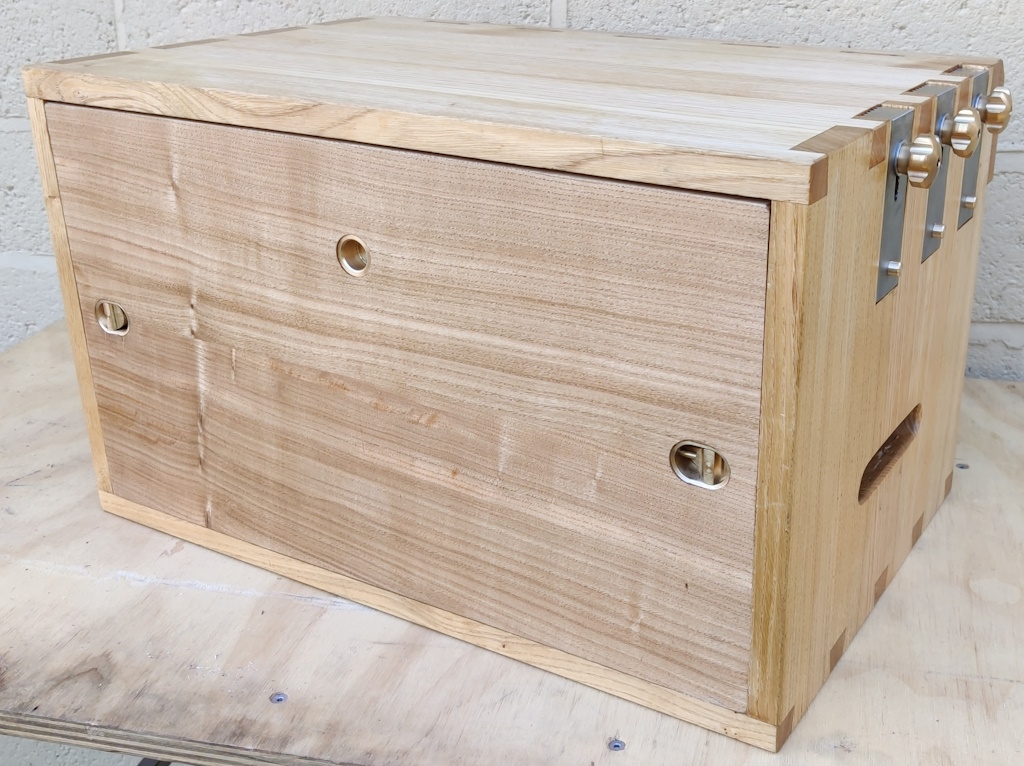
Anyway, this is the chest closed...

with_front_on.jpg


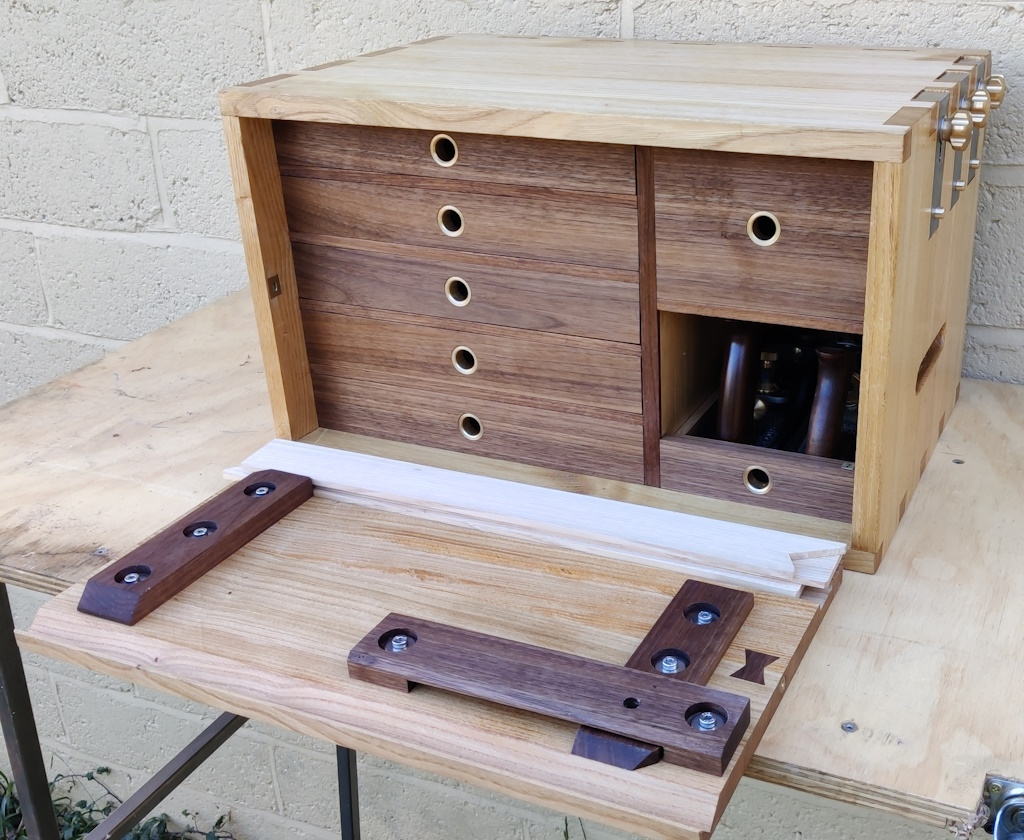
... and opened (the front doubles as a shooting board):

just_opened.jpg


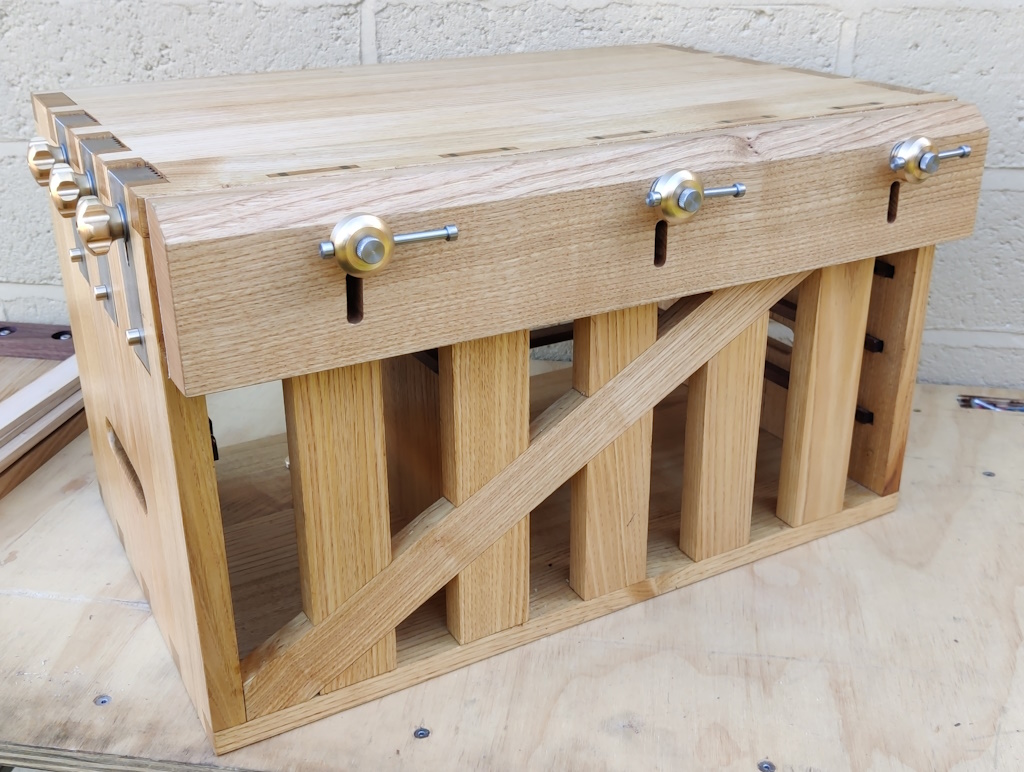
Rear view with a leather-jawed vice (which can also be turned round and used as a stop, or removed completely to allow clamping to the uprights on the back):

rear_view_showing_vice.jpg


More photos and details in this project thread: Travel Tool Chest / Workbench
 
Last edited:
I am doing the online stereotomy course and noticed the book in the photo. Are you able to read it? The majority of books on the subject are in french, which I have, but Google translate or even fluent French speakers have trouble with them due to the terminology. Do you have a method for working out exactly what is meant?
It's early days for me and it's a progression of a fan vault project that I have been looking at for the last couple of years.

I'm interested in the palimpsest created during the drawing process and the methods used to transfer information from master carpenter to journeyman and apprentice during the Gothic period, when few people were able to write or read. I have some friends who are Compagnons de Devoir who lent me some books on masonry stereotomy, which contained ancient systems of setting out for complex vaulted structures and that got me going.

I am able to read some of the text but it's not as interesting to me as the drawings are. It's not a secret even though Steve thinks it is, but I like to encourage others to go on their own geometric journeys instead of writing about mine on here.

What stage are you at on the stereotomy course?

EDIT: Shonky spelling.
 
Last edited:
here's my first scratch build guitar, I have dreamed of making one for many years, it needs a minor adjustment to the nut and final setup but other than that it's done, my own original design and entry for the great guitar build off 2023 scratch build.
 

Attachments

  • tyremanguitars_scratch2023_final10photos_completedbuild (10 of 10).jpg
    tyremanguitars_scratch2023_final10photos_completedbuild (10 of 10).jpg
    634.2 KB · Views: 0
  • tyremanguitars_scratch2023_final10photos_completedbuild (9 of 10).jpg
    tyremanguitars_scratch2023_final10photos_completedbuild (9 of 10).jpg
    609.8 KB · Views: 0
  • tyremanguitars_scratch2023_final10photos_completedbuild (8 of 10).jpg
    tyremanguitars_scratch2023_final10photos_completedbuild (8 of 10).jpg
    623 KB · Views: 0
  • tyremanguitars_scratch2023_final10photos_completedbuild (7 of 10).jpg
    tyremanguitars_scratch2023_final10photos_completedbuild (7 of 10).jpg
    564.7 KB · Views: 0
  • tyremanguitars_scratch2023_final10photos_completedbuild (6 of 10).jpg
    tyremanguitars_scratch2023_final10photos_completedbuild (6 of 10).jpg
    695.1 KB · Views: 0
  • tyremanguitars_scratch2023_final10photos_completedbuild (5 of 10).jpg
    tyremanguitars_scratch2023_final10photos_completedbuild (5 of 10).jpg
    637.2 KB · Views: 0
  • tyremanguitars_scratch2023_final10photos_completedbuild (4 of 10).jpg
    tyremanguitars_scratch2023_final10photos_completedbuild (4 of 10).jpg
    703.3 KB · Views: 0
  • tyremanguitars_scratch2023_final10photos_completedbuild (3 of 10).jpg
    tyremanguitars_scratch2023_final10photos_completedbuild (3 of 10).jpg
    510.5 KB · Views: 0
  • tyremanguitars_scratch2023_final10photos_completedbuild (2 of 10).jpg
    tyremanguitars_scratch2023_final10photos_completedbuild (2 of 10).jpg
    767.2 KB · Views: 0
  • tyremanguitars_scratch2023_final10photos_completedbuild (1 of 10).jpg
    tyremanguitars_scratch2023_final10photos_completedbuild (1 of 10).jpg
    981.2 KB · Views: 0
here's my first scratch build guitar, I have dreamed of making one for many years, it needs a minor adjustment to the nut and final setup but other than that it's done, my own original design and entry for the great guitar build off 2023 scratch build.

Wow. Hugely impressive. So many questions!

Is the F hole a real F hole or is it inlay? I.e. is the Guitar semiacoustic?

It looks like it has a through neck like a Jackson? Initially it looked like the neck was laminated, however, the laminate does not appear on the front of the headstock! So is that an inlay too? Where is the truss rod?

If the guitar is semiacoustic, how on earth does that work with the through neck?!

Didn’t Rickenbacker make some similar style 12th string semi acoustic guitars? I seem to recall that.

Awesome job, you need to post a sound file!

Edit …. Looking at the pictures more closely, it does appear that it is a real F hole, and the guitar has one semi acoustic side above the neck and an electric side below the neck. That’s a really interesting design, I’ve never seen that before.

Edit edit …. The more I look at it, the more innovative and insanely well-made. It appears to be. for example, the blending of the neck into the back. Once again, like a Jackson. The innovative positioning of the Jack socket. Steve Vai would be proud of that one if he thought of it. If you’re saying this is the first guitar you’ve ever made, you’re having a laugh!
 
Last edited:
Wow. Hugely impressive. So many questions!

Is the F hole a real F hole or is it inlay? I.e. is the Guitar semiacoustic?

It looks like it has a through neck like a Jackson? Initially it looked like the neck was laminated, however, the laminate does not appear on the front of the headstock! So is that an inlay too? Where is the truss rod?

If the guitar is semiacoustic, how on earth does that work with the through neck?!

Didn’t Rickenbacker make some similar style 12th string semi acoustic guitars? I seem to recall that.

Awesome job, you need to post a sound file!

Edit …. Looking at the pictures more closely, it does appear that it is a real F hole, and the guitar has one semi acoustic side above the neck and an electric side below the neck. That’s a really interesting design, I’ve never seen that before.

yes real f-hole, it's semi-acoustic, the headstock is veneered with flamed ash, truss rod is a barrel type so you adjust it at the end of the fretboard with a metal barrel/spoke wheel, yes it's a through neck, the right side of the body is also semi hollow to bring the weight down.
 
Last edited:
yes real f-hole, it's semi-acoustic, the headstock is veneered with flamed ash, truss rod is a barrel type so you adjust it at the end of the fretboard with a metal rod, yes it's a through neck, the right side of the body is also semi hollow to bring the weight down.
Ok I can see how you did it , through neck, glue on 2 routed boxes, then glue the top on.
 
It's early days for me and it's a progression of a fan vault project that I have been looking at for the last couple of years.

I'm interested in the palimpsest created during the drawing process and the methods used to transfer information from master carpenter to journeyman and apprentice during the Gothic period, when few people were able to write or read. I have some friends who are Compagnons de Devoir who lent me some books on masonry stereotomy, which contained ancient systems of setting out for complex vaulted structures and that got me going.

I am able to read some of the text but it's not as interesting to me as the drawings are. It's not a secret even though Steve thinks it is, but I like to encourage others to go on their own geometric journeys instead of writing about mine on here.

What stage are you at on the stereotomy course?

EDIT: Shonky spelling.
I am on stage 3 so no vaults yet but things are getting interesting with lots of diverse pieces. I got into it after getting curious several times I on site when I was realising that noone really knew what they were doing while roofing and it has snowballed since. I can't get enough, just very difficult with minimal information in English.
 
I need a pair of track saw guides for a job in a couple of weeks, they aren’t something I’ll get a lot of use out of so figured I’d save my money & make some. I’m guessing something like these would fit to quite a few brands of track.

BED61468-F576-4201-BE79-1DEBA76AC44E.jpeg


The two clamps were machined from a block of aluminium.

BEDA01AC-E5EF-49D9-8737-A1F94AB0F497.jpeg


They were then cut to shape & cleaned up.

42BCA32A-95D3-408B-89E5-1748108FE5C1.jpeg


I planed up some scraps of oak to act as rods, the little clamping plates were off cuts of steel tapped to accept a 5mm counter head screw the rods where bolted on again with 5mm countersunk machine screws.

A81D422F-E1DC-4A3C-B0E9-B314C7AF2C87.jpeg


The stop blocks are oak & ash scraps made to fit snugly around the rod with a 6mm screw in insert for the locking hand bolts.
 
Last edited:
I need a pair of track saw guides for a job in a couple of weeks, they aren’t something I’ll get a lot of use out of so figured I’d save my money & make some. I’m guessing something like these would fit to quite a few brands of track.

View attachment 171035

The two clamps were machined from a block of aluminium.

View attachment 171032

They were then cut to shape & cleaned up.

View attachment 171033

I planed up some scraps of oak to act as rods, the little clamping plates were off cuts of steel tapped to accept a 5mm counter head screw the rods where bolted on again with 5mm countersunk machine screws.

View attachment 171034

The stop blocks are oak & ash scraps made to fit snugly around the rod with a 6mm screw in insert for the locking hand bolts.u
I need a pair of track saw guides for a job in a couple of weeks, they aren’t something I’ll get a lot of use out of so figured I’d save my money & make some. I’m guessing something like these would fit to quite a few brands of track.

View attachment 171035

The two clamps were machined from a block of aluminium.

View attachment 171032

They were then cut to shape & cleaned up.

View attachment 171033

I planed up some scraps of oak to act as rods, the little clamping plates were off cuts of steel tapped to accept a 5mm counter head screw the rods where bolted on again with 5mm countersunk machine screws.

View attachment 171034

The stop blocks are oak & ash scraps made to fit snugly around the rod with a 6mm screw in insert for the locking hand bolts.

Good thinking. I was going to say that with the price of aluminium today, it might be cheaper to buy such things from the appropriate manufacturer. But with Festool, maybe not!

it turns out that having a milling machine and a block of aluminium is the solution to many problems! Last week I made a jig for making plane blades using almost exactly the same technique. Note, the jig is underneath, the mill is about to cut the plane blade.

IMG_4463.jpeg
 
Good thinking. I was going to say that with the price of aluminium today, it might be cheaper to buy such things from the appropriate manufacturer. But with Festool, maybe not!

it turns out that having a milling machine and a block of aluminium is the solution to many problems! Last week I made a jig for making plane blades using almost exactly the same technique. Note, the jig is underneath, the mill is about to cut the plane blade.

View attachment 171036

And here are a pair of tapered moulding plane irons I made with the above jig today. These will go in a pair of #6 H&R. Can you tell I don’t have a job?


I needed to drill a load of pocket holes today and didn‘t fancy using the face clamp so made this. This is the kreg kphj320 pocket hole jig and with preset depth stops removed and the jig bottomed out it works out right for 3/4” material.

With a bit of modding it’d work for thicker/thinner material but I only tend to use pocket screws with 3/4” and even that isn’t often. Worked surprisingly well and the extraction also has a slight work holding effect.
 

Attachments

  • IMG_0339.jpeg
    IMG_0339.jpeg
    2.8 MB · Views: 0
  • IMG_0342.jpeg
    IMG_0342.jpeg
    2.5 MB · Views: 0
  • IMG_0343.jpeg
    IMG_0343.jpeg
    2.7 MB · Views: 0
  • IMG_0341.jpeg
    IMG_0341.jpeg
    2.5 MB · Views: 0
Still working my way through the ipe decking my neighbours gave me. Latest order were 3 planters and a small outdoor table (to go with the numerous adirondacks) for my mum. Table has a bit of staining that just wouldn’t plane/sand out so that’s a feature and it needs another coat of osmo. Planters are progressing slowly due to not much free time at the moment.
 

Attachments

  • IMG_0336.jpeg
    IMG_0336.jpeg
    2.4 MB · Views: 0
  • IMG_0321.jpeg
    IMG_0321.jpeg
    2.8 MB · Views: 0
Back
Top