Pine Chest of Drawers - Finished

UKworkshop.co.uk

Help Support UKworkshop.co.uk:

This site may earn a commission from merchant affiliate links, including eBay, Amazon, and others.
looking good olly - i'm damn glad i got you to do this rather than doing it myself (see my cd cabinet build thread for an example of why this is so)

with regard to the compo could you not enter the dining table you've already built - as its fairly similar in design to the one you were suposed to be entering
 
Going back to yesterday, the back panels were stained, lacquered and screwed in place. I'm quite pleased with the way they've turned out. I've used those tiny Reisser hinge screws for now and I'll replace them brass ones before the piece is finished.

4032622492_f6f3ee7dbd.jpg


Bad news is, I'm almost out of stain as well as sanding sealer - there certainly isn't enough to do all those drawer bases! :x While I'm there, I suppose it would pay to add some lacquer and thinners as well, I suppose... :roll: Classic Hand Tools have 10% off Chestnut products right now although, the stain I require would have to be ordered specially. I'll have to weigh up the cost of this plus their delivery charge against a complete order with Tilgear (damn those special offers! :D).

This morning felt 'comfortable' without the aid of heating and this is how the drawer fronts are looking now, after a coat of cellulose sealer. I'll lacquer them next week at the same time as doing the top. Some how, one drawer came out darker than the rest... They do still look a bit blotchy in places (almost unavoidable when staining pine). But, going against something I said earlier in this thread, I think mailee's tip [applying a thin 50/50 coat of sanding sealer before the stain] does work quite well if you if you start applying the stain before the sealer has dried. This idea suddenly clicked in my head when I was watching The Wood Whisperer recently. He was talking about doing something similar with a different finish.

4031870267_ec55d02419.jpg


My Bosch mitre saw's potential buyer wasn't able to come and take a look today so, that left me with plenty of time to get some work on the top done. Edges were hand-jointed after going through the thicknesser, following the advice in John Lloyd's recent article in
. I'm going to have to move that vice inwards a bit at some point - I keep backing in to my pillar drill... :?

4031900577_e6a2bd4a2c.jpg


It was raining outside so, for once, I got to do a glue-up on my workbench (...well, just about!!)! :D

4031870073_0197fd2b9d.jpg


(Now that I think about it, I'm running out of 'cascamite' as well! :roll: :))

While the planer was set up and running, I took advantage of this to do a quick PAR job for a friend who's looking to make some boxes but doesn't currently have access to the right machinery.

4031870147_cc3739dda0.jpg


Now, before any of you others start getting ideas, I'm reluctant to start selling off any other offcuts right now as I need to get a couple of pieces done for an exhibition in February (see my Blog for more on that). 8)

Yes, even looking at this next photo, I am still reluctant to sell anything. It is also from behind here that I will need to dig out the 6mm ply I bought weeks ago for the drawer bases! :shock: :wink:

4032622398_2478c30c33.jpg


Next week, I'll try to get hold of some daylight tubes which will hopefully stop me from messing around with the settings on my camera!! :x :wink:
 
by the way i'm thinking of buying one of these http://www.axminster.co.uk/product-Axmi ... -21973.htm if I do you'd be welcome to borrow it to do the drawers

Now that i have my woodrat i have one very similar to this one you can have for a tenner and shipping if you want. I don't know what brand it is but it is blue. I've cut quite a few drawers with it and it works fine. Let me know.
 
olly - "the management" says that you dont have to stain the drawer bases as no one is going to see them anyway - so if youve enough stain to do the top you neednt buy anymore
 
Thanks for that, Pete. :) I still intend to V-groove them, as I think this would go well with all the panelling. I'll upload some photos next week so you can see - she may still change her mind, if she doesn't like the partially exposed core of the plywood, created by the V-grooves. :wink:

I personally think it would be a little strange not to stain them, seeing as everything else has been done. I've got to buy some more sealer at some point anyway so, it's only an extra £5 on top of that...

We'll see. :)
 
Everything is currently on course to see this one completed by the end of the coming week (thanks to the half-term break from college). Over the weekend, I've cleaned the top up and got it stained and sprayed with lacquer. I'll add a third coat in a few days, once the last one has had more time to harden.

While scraping off the dried glue, I noticed this odd lump of metal inside what I thought was a knot hole! :shock: No wonder my planer knives are looking so bad at the minute... :oops:

4043091419_ee10c52cc8.jpg


It doesn't take much to dent a large panel of softwood. And, as sod's law would dictate, all these imperfections were present on the show face! :roll: This is nothing that a few drops of water couldn't fix. No iron required! :wink:

4043091521_76bee09703.jpg


I still prefer using the router to square up the ends of tops and panels like this. The finished cut is near-perfect, requiring nothing more than a slice with a sharp plane. As with the blanket chest, I used my belt sander to get everything flat; starting at 120g and doing the rest (up to 240g) sanding by hand. I still find that both my random orbit sanders (5in. and 6in.) leave a 'lumpy' finish on pine (something to do with the early/late growth, IIRC). Shortly, I intend to buy a 'hard' pad for my Metabo SXE450 so I can see whether that will make a difference.

4043091673_f80eec1047.jpg


When it came to securing the top, I was somewhat pleased I didn't try to sell off my small Metabo drill-driver a few months ago. It is low-powered and doesn't feature the latest li-ion technology but, it was the only drill I had which would fit in between the rails, here, with the nifty 90º angle attachment. One day, when funds allow, I'll replace both this one and my two larger 9.6v drills with a pair of either the Bosch or Makita li-ion drivers...! :twisted: :wink:

...Which reminds me - anyone else heard about Trend's Scrappage Scheme on routers? I'm very tempted to see if they'll accept my fake Makita against the purchase of a ¼in. router... :wink:

4043091883_1ed3ce723d.jpg


Whenever I buy 6mm WBP/hardwood ply, the other face is often littered with bore holes and signs of previous infestation. :x Fortunately, I only need one face on show with the drawers bases and the other one, which happens to be lighter in colour (a better match for the pine, after staining), is defect free.

4043836960_06fc0400b4.jpg


Even after hand-sawing the ply to approximate size for the drawer bases, they weren't perfectly flat. So, I've left them in a stack with several beech 'overs sat on top, which will hopefully see them in a better shape for machining in the morning... :?

4043837086_8f8c1f1a60.jpg


And so, this is all I really have left to do now - the drawer bases! :D I've already begun beeswaxing the drawers, drawer rails, runners and muntins. I'll probably spend most of tomorrow making a jig for cutting the V-grooves. Before that though, I still need to rout out a slot in my table for a track and prepare a length of wooden 'bar' to fit. :roll: Once that's all sorted though, it should be a breeze! :)
 
Its like you've got a proper furniture production line going.

About the draw bases, a lot of women now like to put draw liner in the bottom of the drawers. Maybe ask if that is something that might happen and it will save you some staining and routering time.

Looks brilliant as always, I think your set to make a killing when you start working full time.
 
The faux planking will look nice when the drawers are empty but will add chance of splintering catches on clothing :shock: or be hidden with liners
save a step leave them plain.
 
Olly, surely it is quicker, easier and more accurate to do your final dimensioning/squaring cut on the table saw. I did consider the router when cross cutting some oak shelves this weekend as hefting 200x35x3 pieces of oak is not funny.

However, the 80 tooth Freud blade gave a straight cut and smooth finish that laughed in the face of the router. Plus it was a lot quicker than setting up the router each time
 
Ironballs":pkdmn08p said:
Olly, surely it is quicker, easier and more accurate to do your final dimensioning/squaring cut on the table saw. I did consider the router when cross cutting some oak shelves this weekend as hefting 200x35x3 pieces of oak is not funny.

You're right, Damien...Only problem is, I don't have a table saw! :D I don't trust my bandsaw for that kind of accuracy either. I intend to shoot one long edge in the vice and, as I'm making a cross-cutting sled for my router table anyway, I may as well use that to clean up the ends. All I need to cut the grooves is one straight reference and and another at 90°. They will need to be trimmed to fit each drawer afterwards, anyway. :)

LOL @ wizer!! :D

We've already previously agreed that the drawer bases should be V-grooved to match the panelling. The only question that remains is whether or not I should stain them... (Only because I would have to buy more stain).

Thanks for your comments. :)
 
wizer":214tok6z said:
Chems":214tok6z said:
About the draw bases, a lot of women now like to put draw liner in the bottom of the drawers. Maybe ask if that is something that might happen and it will save you some staining and routering time.

Chems":214tok6z said:

:-k ](*,)


:oops: I actually only learnt it was a mis-spelling by writing it here when talking about making some drawers :oops:
 
Another fine morning where the temperatures seem to be holding up in my unheated garage/workshop - surely, this cannot go on for much longer?! :?

First job was to rout-out a track in my router table top. I knew there was a good reason I kept this offcut from the last length of T-track I bought, nearly two-years ago! 8) I think it came from Rutlands... In which case, I'll add another length to my basket when I eventually get around to purchasing a WorkSharp 3000! :wink:

4046794435_5af206cda6.jpg


This jig I came up with is certainly not something Steve Maskery would've made. :wink: But, it was thrown together quickly from MDF scrap and was fit for purpose. With a false fence attached, I can use it for future jobs as well! :) First cuts were with a ¾in. straight cutter to square up each end, after straightening one edge in the vice (as I explained earlier).

4046794543_4a7436321b.jpg


Note the guard in place in the above photo but, not in the one below, when I was cutting the V-grooves. :oops: A T-track here is certainly desirable, after the sheer number of times I left it unbalanced and it fell on to the floor! Thankfully, it is was pretty well made and I did have my mask on the whole times so, the neighbours (hopefully!) couldn't hear!! :x :wink:

4046794643_8166ff7a20.jpg


Also worth a mention is my botched attempt at dust extraction in both situations... Some of my earnings from the past two jobs will go towards a new power tool extractor. The hose from my HVLP ADE1200 kept the router cool but, as you can see above, it didn't really keep the dust under control... :?

4046794783_d7c9e015e2.jpg


Despite a couple of slips [literally, only these two!], this deed is now done. I'm hoping they won't show up too badly once the bases are in place. :?

4047537950_388983e1bb.jpg


They still need to be trimmed to fit each drawer and that's probably all I'll have time for tomorrow, with a couple of hours sanding on Wednesday, due to other commitments.

4047538616_fcc732e272.jpg


My personal opinion is that they should be stained, sealed and waxed to match the rest of the drawers (another 500ml bottle would only cost £5 and I do 'need' some bits and pieces from Axminster anyway). I also think it would help to disguise the two slips I highlighted earlier and some of the voids left in the plywood core from the V-grooves. Earlier on, I did come across a forgotten jar of stain left over from the blanket chest build... :roll: Sadly, I don't think there's quite enough left even with that to do even just the show face on each base. :(
 
Olly,

To be blunt-

What is the purpose of these grooves? If they are for decoration then i think it is a bad idea, for lots of reasons, including- cleaning, splinters, aesthetics, strength and probably a few more, but maybe they have another purpose that you haven't mentioned or i have not read.

I really don't see how you could use such damages pieces for drawer bottoms, even if they were for the underside i would start again, especially for the cost of a sheet of ply.
I personally wouldn't go to the trouble of hand making a piece of solid wood furniture and then use ply- especially what looks like far Eastern ply.
Why not just use regular T&GV softwood boarding if you are determined to have the grooved look to the drawer bottoms? Though i personally would use either veneered Mdf or more likely solid timber.

A final note. I don't like the way your cutting the ply to size. To me it makes no sense. It actually think it would be quicker and easier to just cut it by hand (assuming you don't have a table saw), i realise there are concerns over splintering but these can be minimised by a scribe line and/or masking tape and besides, any potential damage will be in the groove/slip and permanently hidden.

One of the many things i like about you wip's is your warts and all honesty about your builds. This is both brave and honest, and an attitude that i'm sure will pay dividends. I hope my post doesn't cause offence.
 
Mattty":gp2nh80m said:
I really don't see how you could use such damages pieces for drawer bottoms, even if they were for the underside i would start again, especially for the cost of a sheet of ply.
I personally wouldn't go to the trouble of hand making a piece of solid wood furniture and then use ply- especially what looks like far Eastern ply.
Why not just use regular T&GV softwood boarding if you are determined to have the grooved look to the drawer bottoms? Though i personally would use either veneered Mdf or more likely solid timber.

matty - to be equally blunt - the reason olly is using ply is because the client (that is my wife) specified a price this was to be built to, therefore he doesnt have a free hand on materials - i'm sure olly would be capable of building it in solid oak with walnut detailing if he wanted to - but that would have put the price through the roof which was not what the client wanted

(likewise t&g or veneered mdf would inflate the price unnecessarily)

we dont have a problem with groved drawer bottoms if thats what olly feels works best - but equally we are happy for them to be left plain if needs be too as they will be out of sight once the drawers are in use - likewise with the staining we are leaving that at ollys judgement but have no problem with them not being stained if that is the decision reached.

the most important thing is completion by the deadline so i'm not going to suggest olly remake all the drawer bottoms at this stage if he is happy with the ones hes just made.
 
big soft moose":ngqnu06k said:
Mattty":ngqnu06k said:
I really don't see how you could use such damages pieces for drawer bottoms, even if they were for the underside i would start again, especially for the cost of a sheet of ply.
I personally wouldn't go to the trouble of hand making a piece of solid wood furniture and then use ply- especially what looks like far Eastern ply.
Why not just use regular T&GV softwood boarding if you are determined to have the grooved look to the drawer bottoms? Though i personally would use either veneered Mdf or more likely solid timber.

matty - to be equally blunt - the reason olly is using ply is because the client (that is my wife) specified a price this was to be built to, therefore he doesn't have a free hand on materials - i'm sure olly would be capable of building it in solid oak with walnut detailing if he wanted to - but that would have put the price through the roof which was not what the client wanted

(likewise t&g or veneered mdf would inflate the price unnecessarily)

we dont have a problem with groved drawer bottoms if thats what olly feels works best - but equally we are happy for them to be left plain if needs be too as they will be out of sight once the drawers are in use - likewise with the staining we are leaving that at ollys judgement but have no problem with them not being stained if that is the decision reached.

the most important thing is completion by the deadline so i'm not going to suggest olly remake all the drawer bottoms at this stage if he is happy with the ones hes just made.

Bsm.
I realise that you have commisioned this and i realise that he is working to a design and budget you have approved.
If you would rather i made no comment on this because it is something you have commisioned then thats fine.
I'm not questioning olly's craftsmanship, i have seen many fine examples of his work on here and he comes across as very knowledgable and helpful. I'm merely giving (hopefully) constructive criticism of what i have seen.

Firstly- Yes the budget will always dictate a lot of details, however unless you specified v grooved ply then your point makes little sense. As un-grooved ply would be cheaper (less labour), and as you have just stated it wont be seen. I honestly think the labour element in grooving, and the purchase of the ply would be similar to buying and fitting T&Gv if that is olly's desired look.
T&Gv matchboard cost's around £6 per M sq. 6mm ply around £4

Completion to a deadline (this is none of my business) will also be easier to achieve if less time is spent V grooving ply.

I admire you standing up for Olly in what i assume you see as an attack on his work. If that is indeed your opinion you are wrong. I am just giving an honest appraisal of what he has put on public display.
 
Matty, as always, thank you for your comments. :)

I think Pete has cleared up most of the issues surrounding cost and working budget. With regards to the quality of the ply, I could've possibly done something about this when I went to pick it up. Trouble is, I ordered it to be cut to size, waited, and everything was done 'behind closed doors' (you know how it is; there aren't many places who will let you nose through their stock). I assumed it wasn't just me because, whenever I've bought 6mm ply, it always seem to have this problem on the lower-grade face (I forget whether it's a B or C). I was actually able to cut around most of the holes, as I only required little more than half a full sheet for all the bases.

The V-grooving is my own 'Craftsman's touch', inspired by some ideas I got from forum members in another thread, several months ago. Worst case scenario is that the bases could always be replaced at a future date. I never really gave much thought to using thin TGV boards. My first reaction was that it would be expensive; second that, because of its thickness, it could be unstable... At least, with ply, that isn't an issue. But, I can see your point with regards to extra time and labour. One to consider for the future though, fortunately, I'm not charging an hourly rate here! :)

Without a table saw, I'm often keen to explore my own ideas on how I would do things different and cross-cutting/squaring up the ends of small panels on the router table is one of them. You are quite right; I could quite easily have done these by hand on a shooting board (they're roughly 9in. wide). But, as you probably know, planing Far Eastern ply isn't as satisfying as taking a shaving from a length of oak. :? This method was convenient to me also because I needed to make a jig to cut the grooves. Although, I may hesitate to use it like this again...

No offence taken and I always appreciate constructive criticism like this (sometimes, I wish I received more! :D). Everyone has their own ideas and some will approach certain situations in a different way or using an alternative method to the next woodworker. It is great to be able to share thoughts and ideas like this so, thanks for taking the time. :)
 
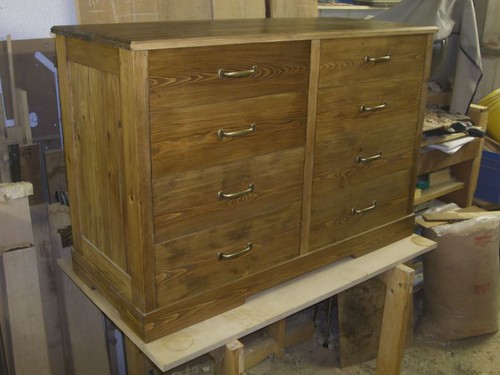
Despite a bit of a personal fiasco over how I was going to stain the drawer bottoms (I almost wish I hadn't bothered, now! :x), the chest of drawers is now complete and ready for Pete to collect next week! :D (...As long as he remembers that all-important cheque!! 8) :wink:)

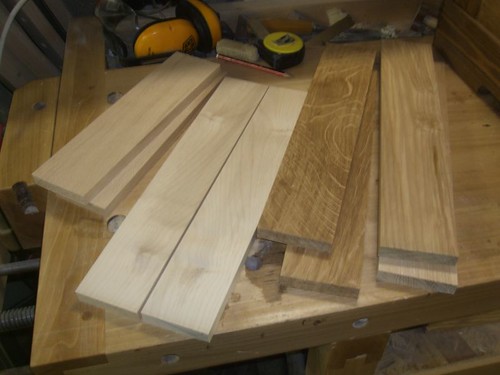
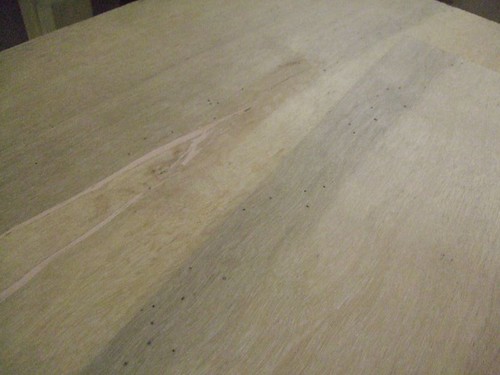
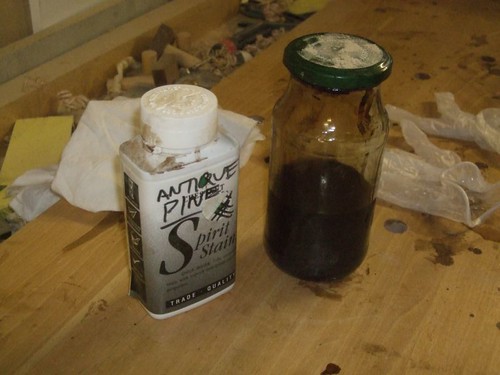
I decided earlier this week that I would need to buy some more 'mid oak' spirit stain if I wanted to stain the bases as well (which I did, as I felt they wouldn't look right otherwise, even if they weren't to be on-show). They say you should always measure twice before picking up and tool and, well, I've learned that I should start taking stock of my finishes more often than once - at the deepest, darkest part of my shelf, I found this tub of 'antique pine' stain (I remember dropping the old tub months ago, it exploded and I had to save the remaining contents by emptying it in this empty mid oak tub). I did a test on some scrap plywood and decided this stain was a 'good enough' match for the drawer bottoms. :roll:

4056322012_e4eac091a1.jpg


...I should point out that this discovery was made only one-hour after placing a £50 order [free delivery! :roll:] with Axminster - for £5 of spirit stain I didn't actually need!! :x

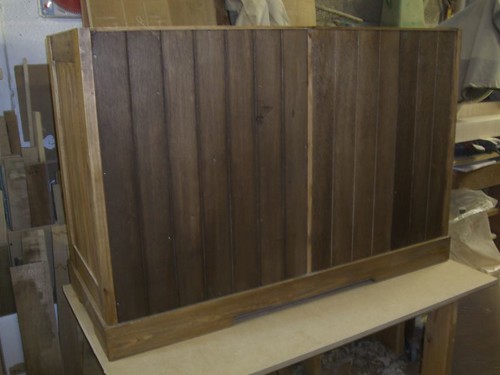
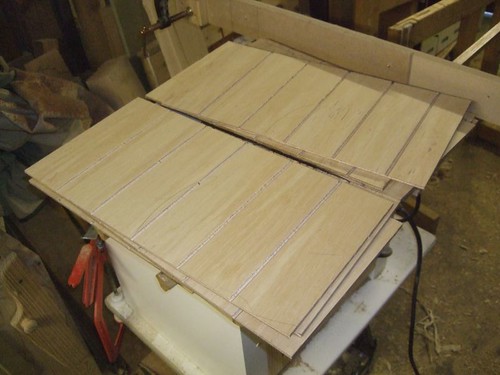
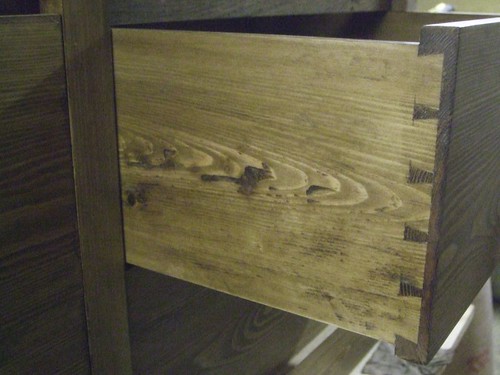
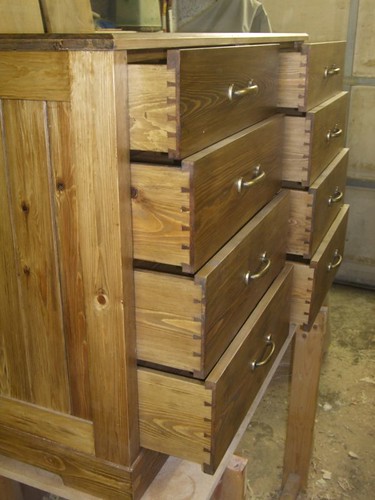
Although I've yet to photograph a complete drawer, I'm pleased with how this now looks. Looking at how dark the back panels came out, I'm pleased to say the drawers remain much lighter inside.

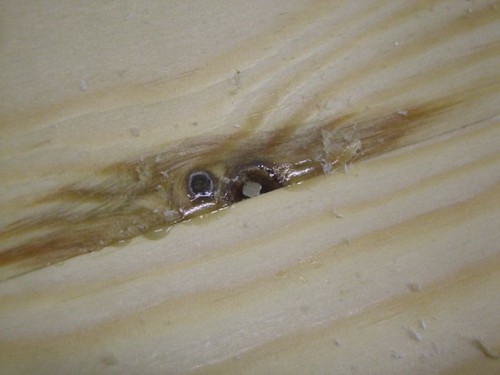
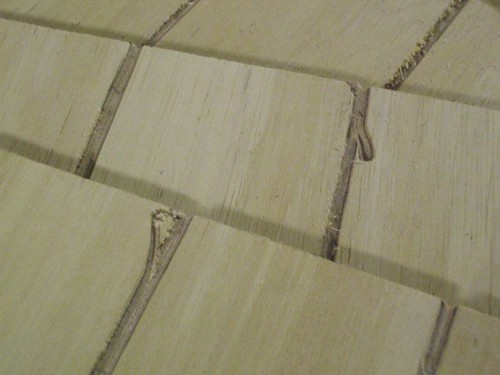
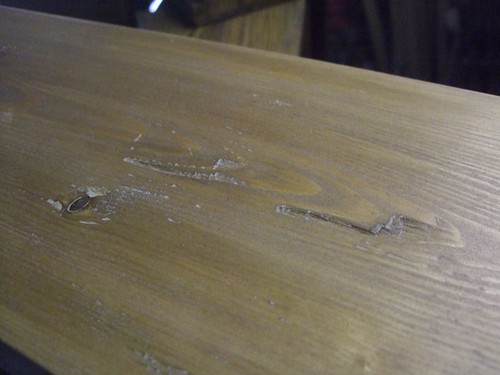
As I was getting ready to apply a finishing coat of beeswax to the outer drawer sides, I suddenly realised I still hadn't done anything about this horrific tearout on two of the drawers! :shock:

4055579127_105e247e90.jpg


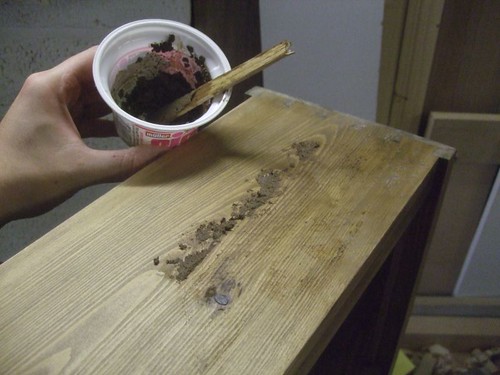
So, I mixed up some filler, stained it and stained it again after a couple of hours drying time.

4056322296_c484a80b52.jpg


To be honest, it's done little (if anything!) to make to hide these scars. :oops: Fortunately, on both drawers, this is only evident on the two 'inner' faces in relation to the cabinet, where it is least likely to be seen. Sorry Pete, I hope this doesn't bother you too much. Repair isn't really my thing... :?

4056321878_50ab0275e4.jpg


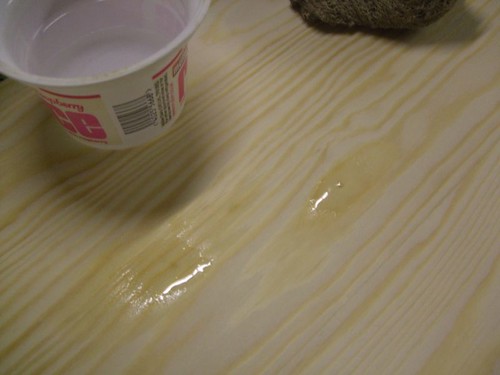
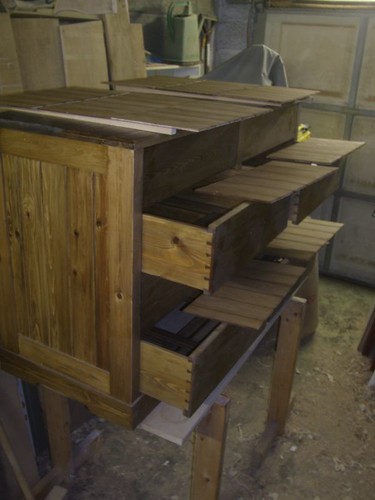
If there was one item from Axminster that I did need then, it was another tin of cellulose sanding sealer... Which was out of stock!! :x So, instead, I've sealed the drawer bases with shellac sealer, which is fine as a base for a beeswax finish. Again, the near-complete chest of drawers came in handy as a drying rack. :wink:

4055579009_3ae6bdbefd.jpg


One thing I have noticed is that, since screwing the top on, the top two drawers have tightened up a bit in their openings. It shouldn't cause Pete much trouble - if anything, it's another lesson to me in that I should attempt to fit drawers until the whole carcase is complete! :oops:

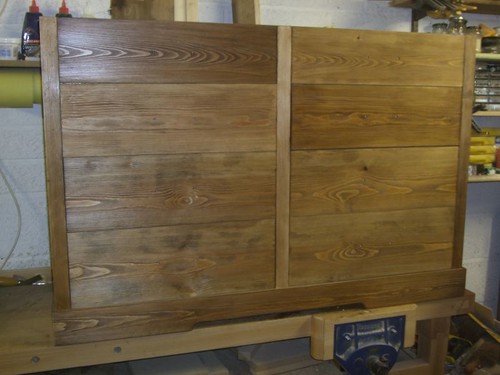
Here we are then with the handles on, which were Pete and SWMBO's choice. They may have come from B&Q and they are sold as door handles but, I think they work quite well (nice one, Pete! :D).

4055578539_a9ef83ef6f.jpg


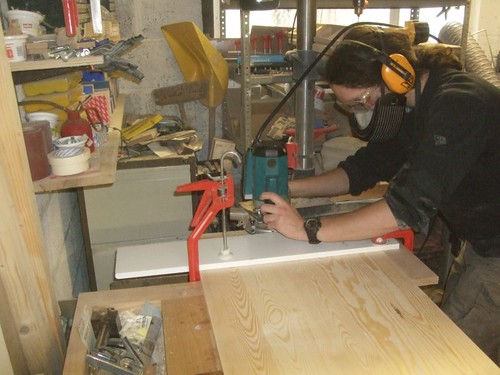
After this job, I'm not keen to start hand-cutting dovetails again in the immediate future! :shock: :D

4055578735_77f6010127.jpg


The sides aren't really that light in contrast with the fronts, it's the flash on my camera (yep, been playing around with the manual settings again). I should be getting some daylight tubes tomorrow, which I hope will improve the lighting indoors...

Only thing left to do is to photograph one of the completed drawers and also to get this thing indoors tomorrow, so that I can start cutting up some more beech for what was my competition entry... :)

Thanks to everyone who's followed this and commented along the way. And, of course, a big thanks to Pete and SWMBO! :D
 
OPJ":2zauobft said:
(...As long as he remembers that all-important cheque!! 8) :wink:)

you mean you want payment as well as the joy of making it - some people are downright unreasonable ;) - i'll be there tuesday with a cheque for this and mums table.

It looks as though i may be building a wardrobe to match so i'll buy the ordered stain off you if you dont want it (this build will also occasion a wip thread with lots of wtf do i do now type questions )
 
Well Done Olly, I like it. I'm not wild on the handles, but then I'm not really into this style of furniture. But I do think you've achieved the look you were shooting for.
 
Back
Top