Pine Chest of Drawers - Finished

UKworkshop.co.uk

Help Support UKworkshop.co.uk:

This site may earn a commission from merchant affiliate links, including eBay, Amazon, and others.
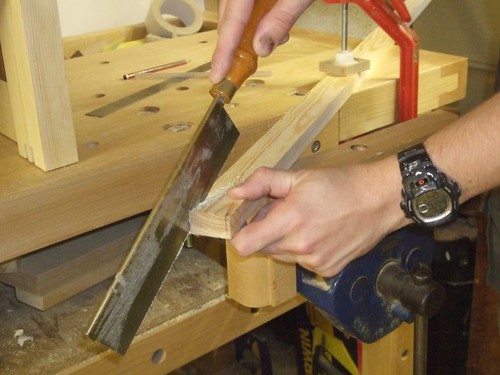
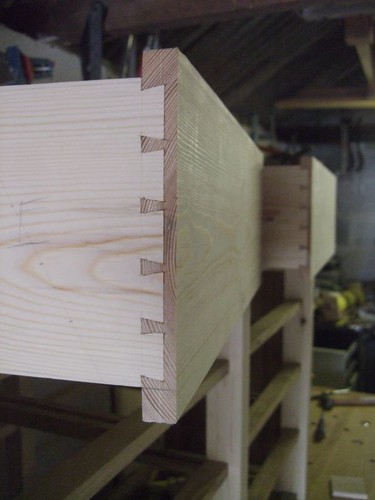
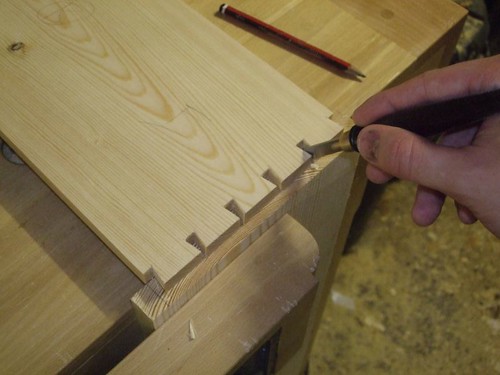
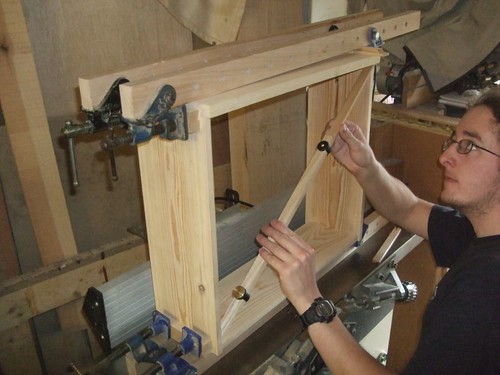
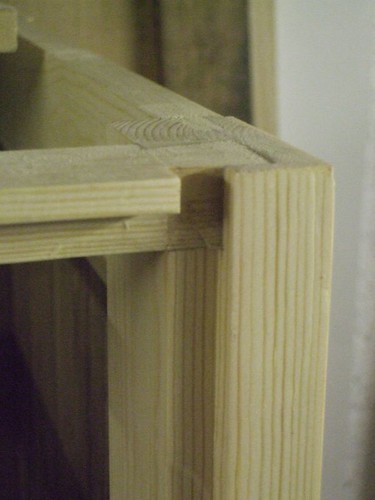
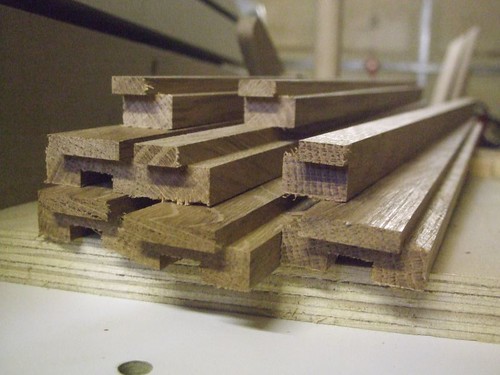
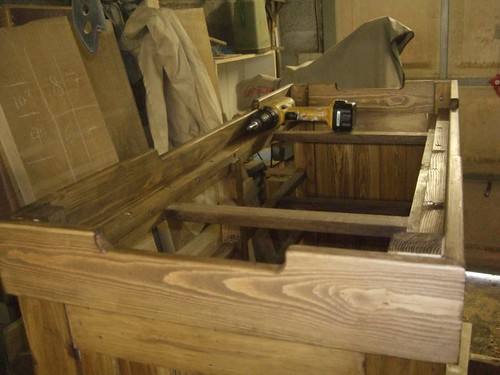
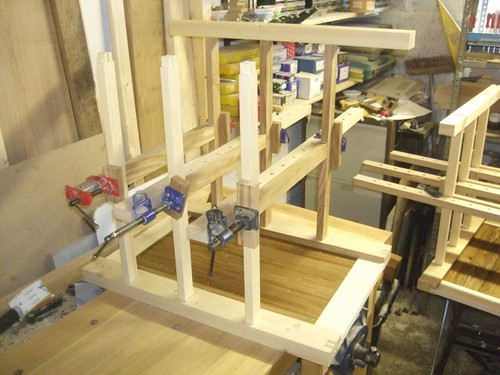
Gluing up a 'complex-looking' carcase like this doesn't need to be difficult; you need to step back, look at it carefully and break it down in to a sequence of smaller, more manageable assemblies. With that in mind, I started by gluing the central runners between the front and back drawer rails.

3830319849_15a2252447.jpg


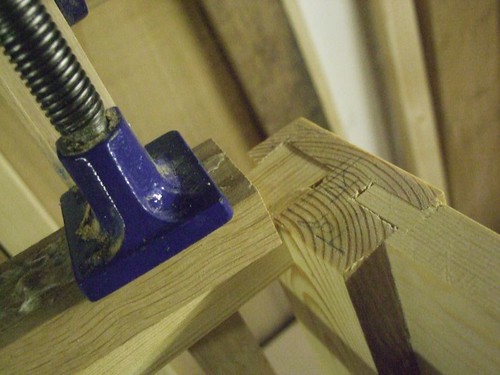
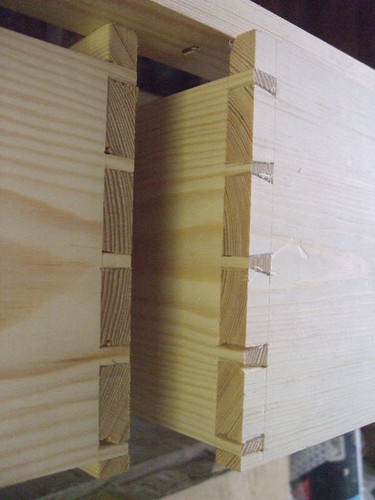
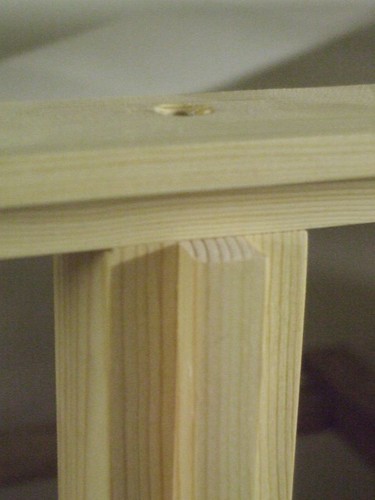
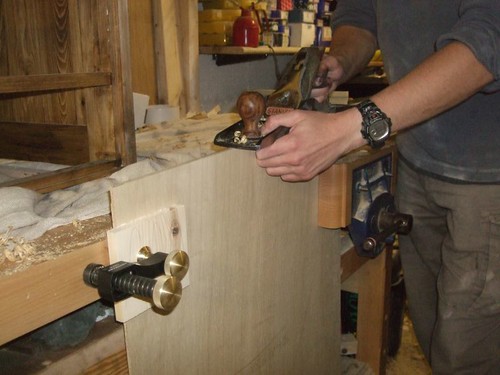
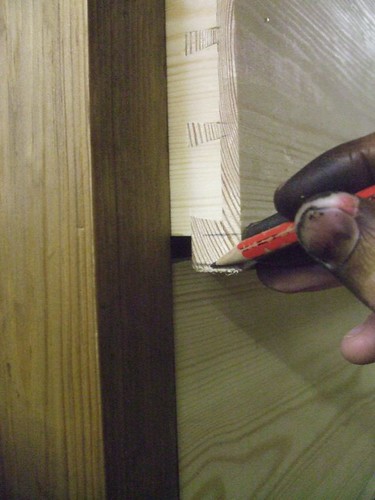
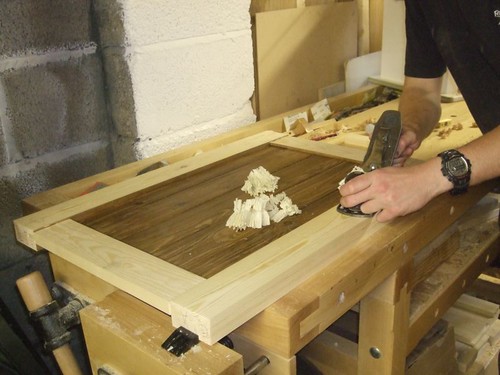
You could argue that this isn't necessary. The shoulder lengths were spot on 8) and, since both sets of rails are glued in to the relevant stiles, these runners aren't going anywhere! :) This also meant that, once the glue was dry, I could cramp each assembly flat on my 'bench and plane the joints flush. This way, the drawers should be less likely to bind or catch inside.

Speaking of planing and cleaning up, I'm so glad I waited until after the 'bench build to start this job - no more messing about with wobbly trestles for me!! :D

3830320185_78c7cb4380.jpg


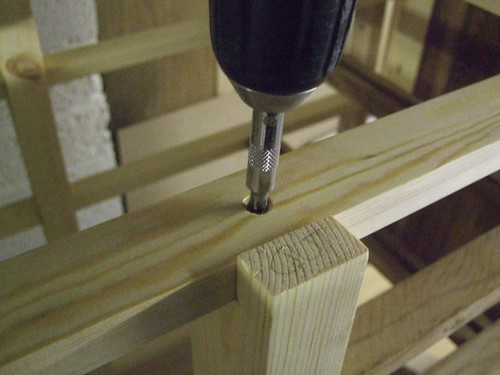
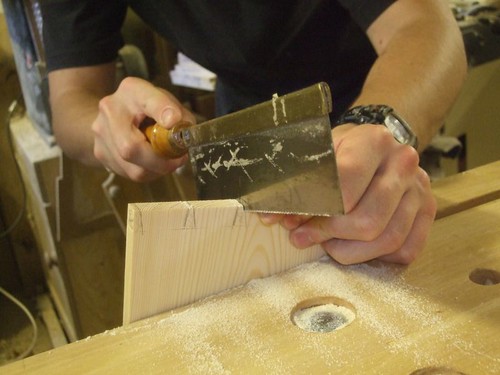
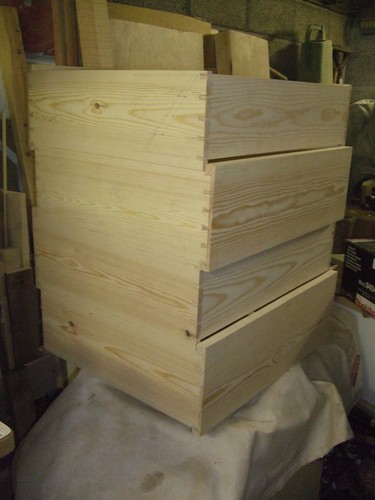
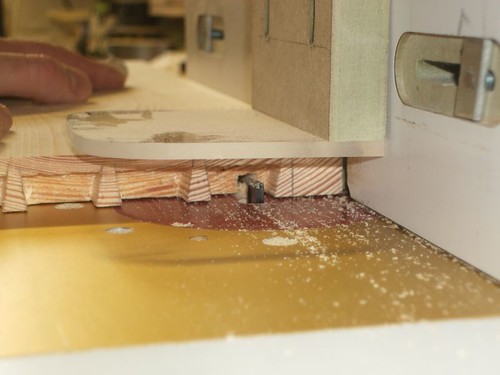
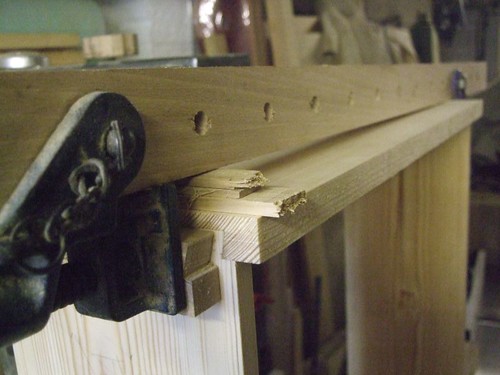
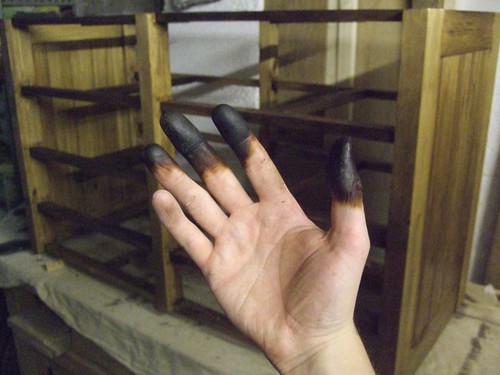
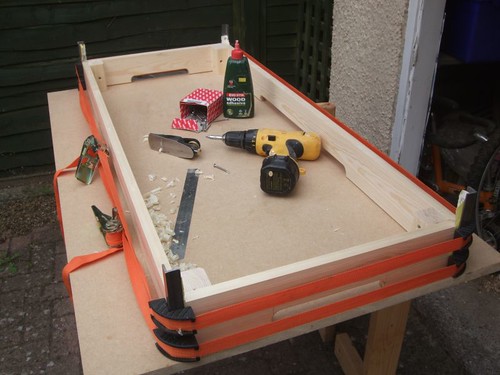
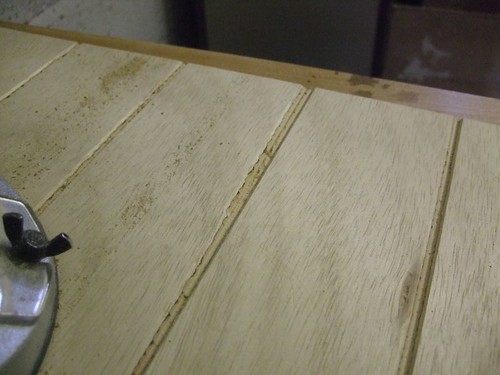
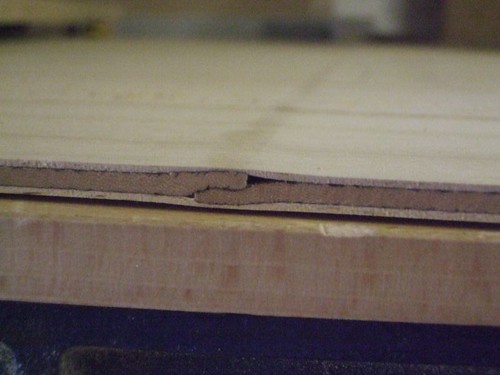
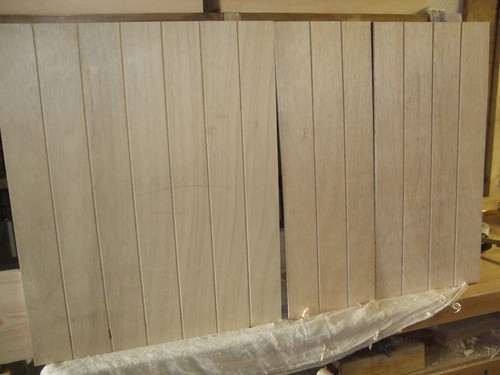
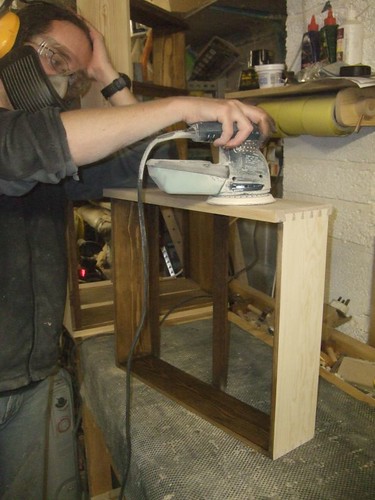
The back panel will simply be screwed to the rear of the carcase. I almost forgot to cut the rebates before gluing the lot up :wink: - please note, this is probably about as 'dangerous' an operation as I would ever perform in my workshop... :oops:

3830320279_5bed3fb50d.jpg


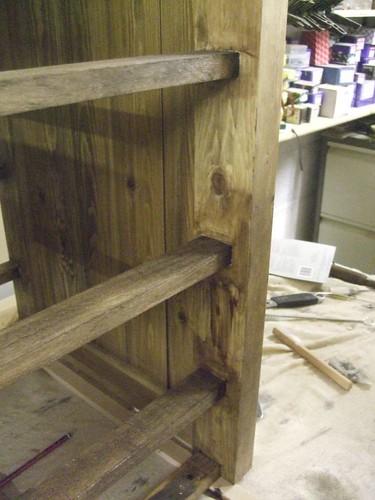
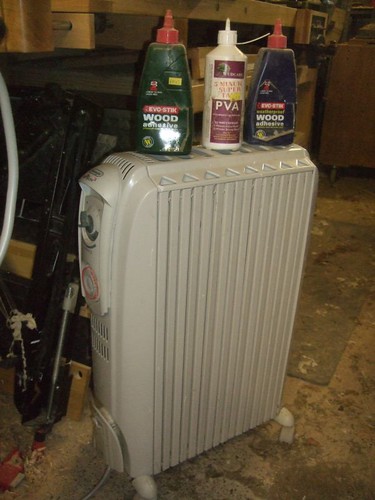
One half assembled, all the joints pulled up nicely. A coat of thinned sanding sealer was applied before assembly, which aids excess glue removal. I'll give it another hour before I attach the other half. This way, I should be able to look at sizing the drawer components in the morning.

3831116220_a0d35b8ff8.jpg


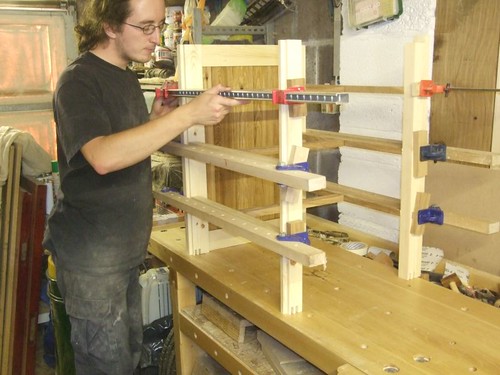
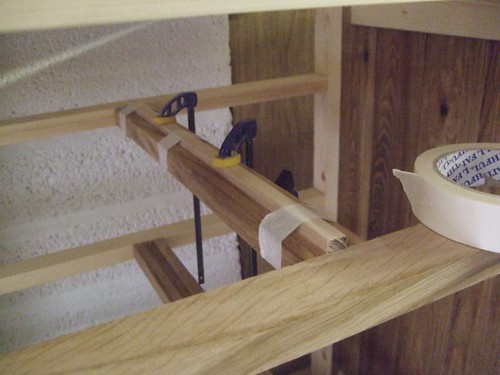
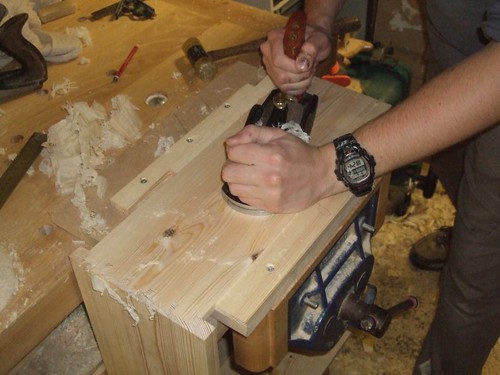
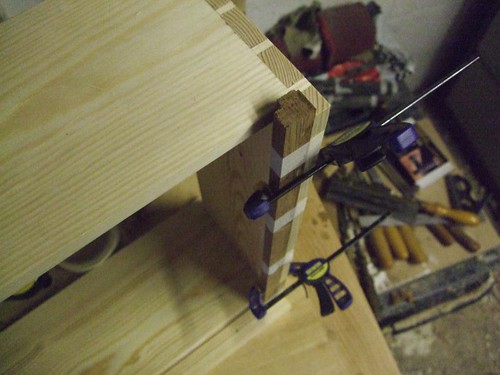
This combination with wooden bars and sash cramp heads works quite well although, I do have a couple of problem cramp heads - where you tighten them up (not too tight!) and the b******s start sliding off the job!! :x (That's why I'm using only four from my collection of six.)
 
Olly,
For your pipe on the spray gun, how about one of the cleaners you can get for cleaning the feed pipe on a drinking bladder, the type you use for walking and cycling etc. They have a very thin bottle brush affair on a super long and flexible rod. Probably overkill and they are not cheap but if all else fails it may be worth thinking about.
 
I've been really pressed for time the last couple of days but, I am pleased to say that carcase is almost out of the way. :D

Both full-length top drawer rails were dovetailed in to each stile, which presented its own problems in cutting the joints on something so long and yet almost 'spindly'!

3837337533_b9c292216d.jpg


It's fair to say these aren't the tidiest I've ever cut and the drawer joints will turn out much better! :oops: Also, it would've been so much easier had I chopped the sockets out after doing a dry-run and before final assembly! :roll: Ah well - at least it wasn't hardwood! :)

3837337723_9098f675a2.jpg


Over the centre stiles, each rail is fixed with a single screw - kind of makes you wonder why I went to the effort of dovetailing each end, doesn't it?! :D

3837337623_24d0760bc9.jpg


So, this afternoon, I started planing up the drawer sides and backs. It wasn't long until I hit this staple!! :x Despite removing it with some pliers and re-positioning the fence, I only heard that 'bzzzz' noise again, minutes later, when I realised half of it was still stuck in the wood!!! :evil:

3837337891_85824a08b0.jpg


Drawer fronts will be between 150mm and 194mm finished width.
Drawer sides will be 119mm to 164mm.
And the backs should be between 99mm and 142mm (all sizes allowing an extra 1mm or so for final trimming).

Anything wider than 125mm, I would like to rip down in to three parts (to remove the stresses) and rejoin with cascamite. Trouble is that, with a limited clamp supply, this part alone is going to take me DAYS! :(

Unless anyone has a better suggestion?

At least the assembled carcase came in useful as a dead-handy wood storage rack!! :D :wink:

3837337987_e169c1a180.jpg


8)

All it needs now is a coat of stain, knotting and sanding sealer (must clean that gun!).
 
Looking good Olly. I like the draw frames, it gives a real craftsmanship aspect. What thickness are your draws sides going to be? I'm thinking of going for 15mm on that kitchen job. I've ordered a Jap Dozuki-me saw for my softwood dovetails as my tenon saws leaves rough finish on softwoods. I'll let you know if it's any better, probably just me. :oops:
 
I know you've already ripped the timber down and bought it but what about just buying a few of the pine panels I use for the draw sides?
 
OPJ":1jbls0x5 said:
Anything wider than 125mm, I would like to rip down in to three parts (to remove the stresses) and rejoin with cascamite. Trouble is that, with a limited clamp supply, this part alone is going to take me DAYS! :(

Unless anyone has a better suggestion?

.

my suggestion would be to buy more clamps ;) they dont need to be besseys or anything even the aldi type would be sufficient surely , and you know you can never have too many.

that said couldnt you make a jig to allow you to clamp several up at the same time with the compression cominf from a car jack or similar ?
 
Hi Alex,

I spent a few hours today preparing all the boards for the drawers and the sides and backs have finished at 13mm thick, with the fronts at 19mm. I then spent another hour or so sanding both faces to remove all machining marks before setting out and cutting any dovetails! The only saw I have (aside form the bandsaw) is an 8" long gents saw from Footprint. It's not bad but, with a crosscut tooth form, it isn't the most ideal for cutting dovetails... :? I'm very tempted to buy the Veritas saw at some point. :wink:

Chems, that's actually not a bad idea. I wish I'd considered it much earlier! :roll: After some encouragement from another forum, I've left all the boards whole without cutting up and jointing or any of that. I'm still a little concerned the sides may want to move in time but, as the fronts will be joined with lap dovetails, there shouldn't be any noticeable movement, really. I was very careful to ensure I removed an equal amount of material from each face, also.

Pete, you're right; you can never have too many cramps!! Which is why I now almost regret selling a few of my spares to Mailman not long ago... :oops: :D

Right. I've got a job interview in the morning which, although only three-days a week (to suit college), could really set me back with this project and 'the next one'... (all going well, of course!). I have a very good feeling about this one, even thought it's a good hour away... I really must crack on with these drawers then, in case they do try to move! :)
 
Not really read this thread as its so long, but glanced at the pictures and a few of the captions and comments. Really liking how the work-in-progress is coming along nicely! :wink:
 
I seem to be spending less and less time on this project but, the drawers have finally started going together.

It took about half a day to prepare all the wood. I'm unhappy with the results I get from my thicknesser, on one side only. As you'll see below, it leaves this 'irregular' surface. Which suggest to me that either; one of the three knives is proud of the rest at this end or, as I have suspected for a while; the tension needing adjusting on the feed rollers at this side - one of those tuit jobs, you know how it is! :roll:

3849691460_892a6bc6b3.jpg


So, I've been doing lots of sawing, chiselling and, surprisingly, very little swearing! :D

3848895317_9eacfd2925.jpg


Where as, at college, I've always cut the pins first, I'm now finding it much easier to cut the tails first and mark the pins from them. I also had a chance to use my 1:6 marker from the Great British Tool Company. Please note, I'm only marking the vertical lines here, having marked the the angled ones directly from the tails.

3849691164_ba50d93026.jpg


One thing I love about dovetailing in pine - you can make the joints a tight fit, hit them with a hammer and they won't split! 8) All the inner faces were thoroughly sanded before any marking out.

3848895551_c8cbc3bd57.jpg


The through joints at the rear, by my own admission, aren't nearly as tidy-looking... :oops: Once the drawers been glued up, I'll cut some splinters and slithers to hide those erroneous holes! (I hate cutting through dovetails!! :x)

3848895809_8e5896e9c9.jpg


These first two were completed in about a day... Which I feel isn't bad, considering just about everything is done by hand - including shooting that b*****d end-grain!! :twisted: Only reason I haven't yet assembled them is because I need to cut some grooves for the plywood bases. But, I can't do that until I've actually bought the 6mm ply - which won't be until Tuesday. :( Made a good start on the second pair of drawers this evening though.

In the mean time, I need to buy some oak tomorrow for the next job, so that I can bounce straight on to that in a couple of weeks. I really should add some beech to that order for my competition entry [do not mention the competition entry!! :?].

:D :wink:
 
Just a brief update to say that I'm on to the final pair of drawers. As you'll see below, these things are taking over my small 'shop...

3861676188_d236bc279a.jpg


That's four on top of the planer with another two sat on top of the carcase (there isn't much headroom between there and the joist).

Fingers crossed, I'll have be able to spend the whole day in the workshop today (first time this week! :shock:). I want to say I'm almost going to miss hand-cutting those tails and pins... :wink:
 
They look really good Olly, pine is just hard to dovetail, so easy to break bits of when pushing together. Looking forward to tonights update.
 
Hi Olly, I see you've been busy! I've only started back on that reclaim kitchen job this week.
The half lap dovetails look the business 8) . Any chance of a few WIP pics of those. I, like you always cut tails first. I've just completed 12 of for the kitchen job,through dovetails.Got a few cheats to get them spot on now.I must get round to putting my WIP of the Kitchen job.
Yip, massive space eaters. Probably have to store them round the house. :lol:
Regards your planner. When planning pine watch out for gum build up on the back of the blades/chipbreaker and lube table often. This stuff is ACE and it's an excellent pine gum remover for you blades. Shake and apply with tooth brush . 8) 8)
http://www.axminster.co.uk/product.asp? ... =1&jump=44
 
Hi Alex,

As far as more WIP shots go, these are the only others I have on the lap dovetails...

I found the centre line of the two outer pins and from that, divided the space between to create centre lines for the intermediate pins.

3868142702_f9bca06177.jpg


Shoulder lines were deepened next with a cutting gauge, which works very well provided the ends are square. Otherwise, there's no reason why you can't square them around with a marking knife.

3868142796_e182759d5d.jpg


After cutting away the waste, I lay one over the other and marked the pins out very carefully with a marking knife. This is why I prefer to cut the tails first - it's easier than trying to balance the pin board on end! :wink:

3868142902_d1deb23789.jpg


Got the last drawer done and dusted yesterday. As these things often go, it was the most frustrating one of the lot and I ended up re-cutting three of the joints twice, before I was satisfied! :x :roll:

I'm not planning to do much on this over the weekend - it is a bank holiday, after all! :wink: I will try and get the carcase stained tomorrow some time and would rather leave the other noise-making operations (like grooving) until Tuesday, when the neighbours are back at work (whatever that is...). :)

I've been using that very Liberon wax for several years and, yes, it does work very well. My only gripe is that it doesn't seem to last long in the tin before the wax turns in to a useless liquid that ends up splashed all over the workshop floor!! :x This usually happens during the summer - perhaps it just needs to be kept in a cooler place? I now have a small stick of beeswax which works well. With pine, I tend to use PTFE spray (the stuff from Toolstation is much cheaper than Axminster's equivalent).
 
Hopefully, you're all wondering what I've been up to the past few days... :D Truth is, I've been a bit quiet and progress has been steady. I'm in the middle of getting all the drawers glued up so, you know, how many times could I post a photograph of two drawers and eight sash cramps?! :wink:

In no specific order then...

These beech strips (guides) were glued in to the central runners. It wasn't until today, just when I was looking to start staining them, that I discovered the the fit was a bit tight with the grooves in the muntins! :oops: I don't know what happened here... All were machined at the same time and some were fine. Only about half of them needed trimming with a shoulder plane - that could be something to do with my thicknesser, actually.

3878272555_ee29370e59.jpg


Grooves were cut in the drawer fronts to receive the plywood bases later. Notice the growth rings and how the heart side is facing outwards on my drawers. I may have gotten this wrong but, this way, there's a reduced risk of the outer pins 'pinging off', should the fronts shrink and try and want to cup! (That, and the fact the others faces have shallow splits on the wide boards).

3878272053_00278340d4.jpg


I dug out my ¼in. diameter straight cutter (from Wealden) and realised that, as it has an 8mm shank, I couldn't use it as I still hadn't ordered a collet reducer since the last time I hit this brick wall! :roll: :x So, I had to use a 7mm cutter (don't ask me why I have one of those!!), which should provide a little leeway in case I later discover the grooves are slightly off! 8)

With that big carcase on my workbench, I set up my trestles and a sheet of MDF to create a temporary assembly bench outside... And it started raining immediately! Even better (!!!), having bought everything back under cover, the rain disappeared and wasn't seem again for another couple of hours! :x So, I ended up using my planer. These Veritas Bar Gauge Heads are excellent for checking the diagonals.

3879066854_6c9b8ea9c9.jpg


The first drawer needed squaring up slightly so, I used some scraps to 'offset' the cramps along one side. Much to my delight, the other drawer was spot on first time! 8)

3879067282_6240b4dc46.jpg


I also highly recommend making simple MDF cauls like this, whenever assembling a through or lap dovetail joint.

3879067374_9214b2b343.jpg


Before I get on to the second stage of staining, a couple of cock-ups needed sorting in the rebates around the back...

3879067604_104816e513.jpg


3879067692_b7341f0199.jpg


:oops:

Once again, these cheap vinyl gloves haven't saved my fingers from turning black! Well, at least they seem to last longer than the latex ones - pull the vinyl gloves out from the box and they remain in one piece! :wink: I made a thoughtless decision earlier not to stain any of the interior components before assembly - I spent ninety-minutes staining these ins and outs and, to be brutally honest, I'm disappointed with the quality of the staining on the inside... At least it won't ever be looked upon too closely! The outer faces aren't as bad - that's the worst part of the job out of the way!

3878272229_72dfc4fbd9.jpg


Despite heeding mailee's advice on first applying a thin coat of sanding sealer before the stain, I don't feel like I'm getting anywhere with this pine... Chestnut's Spirit Stains take to the brown oak very nicely and give an even coverage. I still get quite a blotch finish with pine so, I'm sorry Alan but, I don't think this sealer trick makes much of a difference... :S Maybe pine just doesn't like to be stained. Next time I do a piece of furniture like this (stained pine), I'll do some more research and may try oil stains, or something.

To end this update on a real downer, I took my previously assembled plinth out to the workshop earlier to see how everything was looking. With the carcase upside-down, I somehow managed to knock the plinth off the 'top' and on to my 'bench - there was "crack" and all four biscuited-mitre joints have come apart!! :evil: The mitres are fine; the glue and biscuits alone clearly weren't strong enough. It's my own fault. I've been meaning to add corner blocks for a while now but, like the staining, I've been putting it off. :(

On the other hand, I'm actually pleased this happened here and not after delivery in Pete's home!! :shock: :wink:

As each pair of drawers goes together, I'm left with another two drawers to be trimmed to fit their openings. I'll do the knotting and sealer thing tomorrow some time and will probably be looking at the back panels also. All going well, this should be done and dusted by the end of next week! :D
 
OPJ":10kgm4zh said:
Maybe pine just doesn't like to be stained. Next time I do a piece of furniture like this (stained pine), I'll do some more research and may try oil stains, or something.

Do let us know if you find an answer to successfully staining pine, Olly - I reckon it has to be the most difficult of all woods to stain. Fingers come out very well, though :)

Cheers :wink:

Paul
 
Still on the subject of staining, this is how the insides were looking the other night:

3894434212_a7ea551a74.jpg


:shock:

Don't worry. though - I put a little thinners on to a clean cloth and was able to even things out for a second coat. :wink: (Sorry, not photo yet.)

I've been quite fortunate with dead knots in this build. This is the only one to have fallen out (so far!) and I soon replaced it with a tapered wooden plug.

3894433320_1da5926cf3.jpg


All rebates have been cut on the drawer muntins and slips. These are now ready to be glued inside the drawers. I decided against using grooves as I wouldn't be confident in the strength of 6mm ply bases if the edges were rebated 3mm deep... Oh, and they've also been tenonned to fit in the grooves cut in to the fronts.

3893644357_19fe779820.jpg


Working these ply back panels allowed to put my latest toy from Veritas to good use - no, it's not the plane!! :D

3894433204_57b680e365.jpg


My second attempt at gluing the plinth together appears to have gone well. I glued and screwed some 45mm² corner blocks in place, as I should've done before... :oops:

3893643747_671052df4c.jpg


Part-inspired by Grinding One's advice in another thread yesterday, I made up a dead-simple MDF and pine jig to hold the drawers steady as I planed the sides and backs. You probably can't see this clearly but the drawers are locked in place with sliding wedges. 8) Not sure whether the Veritas BUS gloat is really necessary here, though... :roll: :D (Second time I've used it, now!)

3893644241_72f0b4234d.jpg


One downside to building drawers in this way (where the fronts overlap) is that you cannot easily reduce the width of the sides if the fit's a bit tight. Most of the length can be done with a block plane... Then, I finally found a use for that 'second function' of all shoulder planes! :)

3893643899_2d831bc9dd.jpg


I'm still hoping to get this chest finished this week. Otherwise, with college resuming on Thursday and Friday, I will have to leave it to one side while I get another urgent job done. A jig has been made for V-grooving the back panels so, I can crack on with that tomorrow. I also need to set my router table up to groove the drawer bases. On Thursday morning, I ordered some drawer handles from B&Q online - yet, despite paying £5 for NEXT DAY delivery, they haven't turned up!! :x
 
Looking great Olly, when I did my draws I couldn't plane the sides, goes to show what a good plane does for you! What sort of block plane is that in the picture outside? Nice tip on the shoulder plane I'll have to try that.
 
That's a Veritas Apron Plane. I bought it a year ago right before the prices jumped almost 100%! :shock: It's smaller than a standard block plane and I find it more comfortable use, which is why I sold my Record and Stanley planes a while ago. :wink:

I'm yet to see any real benefit in using a bevel-up smoother though. I can't complain as it was a prize from Good Woodworking last year or the year before! I like the wide sole and chunky of the blade but I still suffer quite badly with tearout. Even on this pine, today!! :x Maybe it's just me... :? One day, I'd like to have one of their low-angle planes, which is probably the best solution.

By the way, drawer handles turned up at 9am this morning. I'm still not happy, having payed for next-day delivery! Spent a couple of hours in the morning roughing out some oak timber for my next project, which will begin next Monday, regardless of what stage I am at with this chest of drawers. (Busy, is the word!) :)
 
So, yesterday, after roughing out the English oak for my next job, I set about V-grooving the back panels and not without at least one mis-hap along the way... :oops:

3901101652_a7c2f61619.jpg


This error occurred because I had only bothered to cramp the jig in place at one end! Because the ply was slightly warped, the jig didn't locate properly in the far end and was free to move a bit. Very frustrating but, I decided it would be best to re-do this panel anyway as soon as I saw this 'lapse' in manufacturing... :x

3901101522_1c6e43f620.jpg


Can you believe it?!? :shock: No wonder my router kept riding up and over something halfway along the cut! Actually, the other end is far worse, where they appear to have driven a thin length of timber in between!

Going through my offcuts of 6mm ply [not wanting to spend any more money!], I couldn't find one sheet which matched this one for size and colour. So, I had to take two smaller sheets with an off-centre join. I think they've turned out well, even though I'm yet to stain or fit them here.

3901101040_dc92e37603.jpg


Since then, I've been planing, planing and producing endless mountains of pine shavings on the floor as I attempt to fit these drawers! As I mentioned in my last post, I'm still getting bizarre tearout using my bevel-up smoothing plane on pine! :x

3901101396_34d6a982f7.jpg


Drawer slips have been attached and, although I haven't yet found a clear way to photograph this, the muntins are being attached with a dab of glue. I'll reinforce the fixing to the drawer backs with a small screw later.

3901101160_d136b492ae.jpg


Tomorrow, I'm expecting to achieve even less in terms of progress as I'm off down to Dorchester to pick up this mortiser I bought on eBay last week. That could easily take four hours all round and it looks as though it'll need a bit of de-rusting before I can take any oak to it next week (sounds like an order to Workshop Heaven is on the cards! :roll: :wink:) College starts again on Thursday and I'll only have so-much time to work on this over the weekend.

In short; don't expect another update on this one for too soon! :)
 
It's been a while but, after finishing off another commission for someone with greater urgency, I'm back on track with this chest of drawers. And, I'm pleased to say, there isn't too much work left to do!

I must be getting weaker as I grow 'older'. Last year, I'm sure I was able to hang on until November before I had to switch the heating on... Spending two-days in a bone-dry, moisture-free environment with twenty-four hour heating [the college workshops] probably doesn't help much! :roll: This is a good way to keep your glue warm and, I must admit, even I was surprised by how warm things got in my uninsulated 'shop. This is much better than the halogen heater I had - if only it didn't take so long to warm up. And, with my new 'bench and reorganised workshop, I can actually situate the radiator next to where I am working! 8)

4026415693_7541b5aa13.jpg


There were still two drawer runners to attach and, this is how I did it. A couple of dabs of five-minute PVA at each end before sliding the fitted drawer fully in to its opening. Afterwards, I drove a small screw in for reinforcement.

4027169190_3be5431bd3.jpg


The base has also now been properly attached using the last of my 1¼"x8 screws. It's been stained but it will need some sealer and lacquer before it's completely finished.

4026419077_57af77a0f7.jpg


I got bored of staring at these unfinished drawers so, in order to remove some of the monotony from the prospect of all that staining, I stained all the inner faces of the drawers first, before trimming the fronts to final width.

4026415571_650cebc4fd.jpg


Like the carcase before, this is quite probably something else that I should've done before assembling the drawers... :oops: It would've made life that bit easier and some of the internal corners wouldn't have turned out quite as messy as they are now... :? Well, since the stain is dark, it doesn't stand out too easily. Besides, no-one really admires the insides of drawers, do they? Especially once they're full of clothes. :)

Then, I later spent the best part of two hours sanding all the outer faces - no, I don't enjoy sanding any more than the rest of you!! :D Most of this time was spent trying to remove the signs of tearout I had suffered with previously. I couldn't get it all out as I would've been in danger of ruining the fit (creating a larger gap at the sides of the drawers). For this same reason, I was also reluctant to use my belt sander! :?

4027169290_653fa0af75.jpg


These have, of course, been stained and I've left them with a coat of knotting to dry overnight. In the morning, I'll cover them with sanding sealer before I have to go out. I can see myself having to buy some more sanding sealer though... :? If it's from Axminster then, I'll "have" to fill my trolley so that I can get free delivery. Then again, Tilgear have a sale on at the moment which is tempting me. Plus, they stock Chestnut's products... Yandles would be my nearest stockist. So, as you can see, it's a win-win-win situation for someone. Though, possibly not me...! :roll: :wink:

I'd like to get the top prepared and glued on up Wednesday. Saying that, I should have a potential buyer coming to view my Bosch mitre saw [at last!!! :D]. Then, the back panels still need to be fitted and stained. That's not forgetting the work to be done on the drawers bases, for which I'll have to cut a groove in the top of my router table for a jig... Not forgetting that I still need to buy a new vacuum for that. Otherwise, all the waste from the V-grooving operation will end up either inside the router or deep inside my lungs! :shock: :? :wink: With next week being half-term, that should give me plenty of time to get this job finished. Unless, of course, I do something stupid like, err, get a job!! :roll: :D

Sadly, I'm going to have to withdraw from the competition this year (well, yes, you probably realised that several weeks ago... :oops:). However, I will keep you up-to-date on that once I'm properly under way. :)
 
Back
Top