Kid's storage unit

UKworkshop.co.uk

Help Support UKworkshop.co.uk:

This site may earn a commission from merchant affiliate links, including eBay, Amazon, and others.

SPinonit

Established Member
Joined
24 Feb 2009
Messages
92
Reaction score
0
Location
Suffolk, England
Please be gentle - this is my first ever attempt at a proper bit of furniture (if you call storage units furniture..?). I made it for my youngest son's bedroom, which badly needed some good strong (he's a 6yr old bruiser! :roll: ) storage that actually fits his toy and books etc.

The tat you buy from the warehouses either seems to cost the earth, or is made from paper and just not worth the money. They are also fixed sizes, so making my own was a breath of fresh air and a bit of a baptism at the same time.

I got the desgn from a free template somwehere on the interweb, but I adapted the sizes to better suit my son's room and toys. I also added a couple of bits to strengthen it from the original design, but in doing so I appear to have complicated it slightly above my rather amateurish woodworking skill levels. Hopefully, what I've learnt from making this will benefit the next project.

Anyway, it got a thumbs up from the customer so here's a few pics from start to finish:

4300947486_224ee1ea86.jpg

This is a layout of all the base pieces of the unit, which has kickboards set back from the front to allow feet under. I used biscuits as that was supposed to be the easiest way to do the joints, however, as I have a pretty cheap jointer and my jointing experience was low-to-nil, it was perhaps not as simple as it should have been. Leesons learned and next time should be better.

4300111223_79303f872d.jpg

This shows the base built up and primed. on the corner at the bottom of the photo, you can just about see the cut-out (rebate?) that I made so the unit sits over the carpet gripper rods, which allows it to be square with the wall. Furniture always seems to have be be packed at the front with cardboard just to make it stand upright.

Now the base is painted:
4300200759_7446be7b55.jpg

You can see the biscuits that I use to [try] to align the three vertical dividers. In theory it should have been easy enough - that was another lesson learned - make sure the jointer cuts the biscuit slot halfway through the board thickness. The sigh-line on my jointer is supposed to show [i Would have thought] a line where you could expect the slot to be cut. Fail - it appears to be factory graffitti and nothing to do with slots, as it is nowhere near the right location.

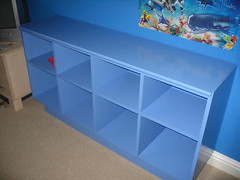
There's a bit of a gap in photos, but this is the fiished article, along with that thumbs up from its new owner:
4300111759_5cfb7a7abd.jpg

My son wanted blue, so he got blue. He wanted this shade of blue, so he got that too. He didn't get whatever colour the unit was sold in, which is obviously the other great advantage of building these yourself. As you can see from the top photo, his room is blue too, so this unit's colour fits in well. I had grand designitis and was planning to paint it in Arsenal colours, with the gunners logo airbrushed, but it's been a good few years since I airbrushed anything, so that can wait for another project (maybe the one in my other son's room).

4300858808_903a6e817b_m.jpg
4300111915_c5bd05219b_m.jpg

4300859008_901f1ca169_m.jpg
4300858636_a2cca160af_m.jpg


I hope it's not a too bad first attempt.... :oops:
 
Thats super, you may say its your first piece but I think MDF furniture in painted finish no less is one of the hardest things you can do!
 
I'll admit that the painting was far more difficult than I ever imagined. I primed and painted every piece separately, which threw up a few of my lessons learned:
1. There is a reason why paint manufacturers say not to apply temperatures of less than 10C - the paint doesn't dry and harden for days!
2. Clamps and places to rest workpieces. It would seem that you almost cannot have enough clamps (although I actually have very few anyway). Neither can you have enough places to store pieces whilst they dry.
3. Workspace tidiness is essential. I have a double (width) garage and yet I was climbing over all sorts of junk and clutter like Stig of the dump, rather than stop and tidy up. I worked amongst all of the debris from when I made the workbench (the one in the picture), but I had planned to clear up and move the workbench to create a bit of a mini workshop.
4. Dust. There's no point trying to apply lovely smooth paint, if no soomer than your back has turned, the wet paint is busy absorbing all of the dust that's floating around. Hence, my most important task will next be to finish my dust collector.

I painted everything in at least two coats of primer, sanded in between. The cut edges were painted in three to four coats of primer, but one cut simply would not level. It kept the roughened finish that seems to be a thing with MDF cut surfaces. I tried and tried to get this one cut level and to look the same as the others, but for some reason it was more obstinate than I (a feat in itself). All the other cuts finished nice and smooth. I noticed that the finish to the rounded over top panel never seemed to raise or go fluffy in the same way as the saw cuts, even though I'd routed the round over. Is that something to do with the fine / fast way that routers cut? It could be that I need a better/finer blade in my circular saw?
 
SPinonit":2uk547rp said:
3. Workspace tidiness is essential. I have a double (width) garage and yet I was climbing over all sorts of junk and clutter like Stig of the dump, rather than stop and tidy up. I worked amongst all of the debris from when I made the workbench (the one in the picture), but I had planned to clear up and move the workbench to create a bit of a mini workshop.

I find if I'm working in an utter mess it effects the work I'm doing, maybe like a cluttered mind. I work in a similar space to the one you describe and have found making just a big long fairly narrow table (about 700) wide has been a HUGE help to my work.
 
SPinonit":1atcjbo0 said:
The cut edges were painted in three to four coats of primer, but one cut simply would not level. It kept the roughened finish that seems to be a thing with MDF cut surfaces. I tried and tried to get this one cut level and to look the same as the others, but for some reason it was more obstinate than I (a feat in itself). All the other cuts finished nice and smooth. I noticed that the finish to the rounded over top panel never seemed to raise or go fluffy in the same way as the saw cuts, even though I'd routed the round over. Is that something to do with the fine / fast way that routers cut? It could be that I need a better/finer blade in my circular saw?

I'm shortly going to be painting a load of MDF myself. I've read that PVA is the way to go for the first couple of edge coats. We'll see. . . . . .
 
Nice work, I'll be looking to build a similar unit for a wardrobe.

Do you have any tips on how you biscuit in the middle of a board? edges are obviously no problem with the fence on the biscuiter but how do you get consistant results without the fence?

thanks,
steven
 
billybuntus":38d1ok66 said:
Nice work, I'll be looking to build a similar unit for a wardrobe.

Do you have any tips on how you biscuit in the middle of a board? edges are obviously no problem with the fence on the biscuiter but how do you get consitant results without the fence?

thanks,
steven

Hi Billy,
I never used my BJ across the centre of a board, but I know if I remove the fence, there is an indicatiuon where the centre of the blade is.

Once you know that, you can mark the board where you want the biscuits to go, and then use a temporary fence across the board, checking that both ends are equidistant from the line of cut.

The other answer is to dowel the centre partitions.

Make yourself a square wooden dowelling gauge from hardwood, long enough to span the job. Find true centre of the hardwood and drill through for dowels (say four to a 12" width.) Line that up with the line on the workpiece, where the dowels need to go. Nail or screw it in position then drill through for the dowels. The nail or screw marks won't show as they will be covered by the partition after glue-up.

You can always bin the dowel gauge afterwards.

HTH
John
 
Hi,

I have made stuff like that before with a BJ, if you use it with out the fence regestering from the sole all you need is a line marked across you pannel to layout for the slots then hold the BJ with the sole lined up on the line, make sure the uprights are places flat and the right side down when you cut the slots then the edge of the upright will line up with the line.


Pete
 
I follow you Pete,

However my BJ is an Elu, and they register differently to models like the 'Lamello'. They also operate slightly differently. Mind you, it's some months since I used mine, so I might be able to do as you suggest. But I am hoping to build a 'tool-wall' this weekend, so I will give myself a refresher! :lol: :lol: :lol:

Regards
John
 
billybuntus":31gv28x6 said:
Do you have any tips on how you biscuit in the middle of a board? edges are obviously no problem with the fence on the biscuiter but how do you get consistant results without the fence?

Since I was a total novice at using a BJ(?), I just kinda made it up as I went along. I measured the centre line of the middle and the shelf which is just under the top (the tope is made of two pieces of 18mm MDF - I just followed some interweb plans...). Then I measured the height of the cut made by the BJ, using a sacrificial piece. That way, I knew where the base of the BJ needed to be and I clamped a batten across the board and used that as the reference/rest for the BJ. I just used the BJ upright, ie the board was lying flat on the workbench and the BJ cut straight down into it using the fence to keep it at 90degrees.

It seemed to work, in that I got the right height and the shelves all went in straight and easily. I did the end boards separately, but in future I think I would try to do them side-by-side to make sure the heights are truly level and because it would also seem more efficient.

One thing I learnt with the BJ, was that the centre line marked on the tool, did not appear to exactly match the centre of the cut. This resulted in a few wasted attempts and much head scratching #-o , as I could not work out why my biscuits were not lining up. ](*,) I reverted to measuring the cut line manually and writing it down. I have a MacAllister BJ from B&Q, which is very much at the budget end of the market and, as I can now testify, you only get what you pay for. Until I get better at woodworking and can afford better equipment, I am sure it will suffice - with some compromise to ease of use and accuracy.
 
I just remembered something else that caused me a few headaches whilst building this unit. I had all of the larger pieces cut at B&Q using their big panel saw. I just assumed the saw would be perfectly square, however, I discovered (too late) that it must have been out of true by some margin. The largest panels were just under 60" long, but the panel saw cut them about 3-4mm thinner at one end. All of the panels were out in a similar way, but I assumed it was my inexperience that caused misaligned joints, rather than the cuts on the panels.

Had I realised earlier, I would have returned the wood, however, I had already sealed the cuts with PVC and applied primer. It seemed too difficult to return,but as I got further into the build, the problems this caused became more of an issue. Next time, I will demand some evidence that the saw is true, before the cuts are made.
 
I've been using a Wickes bj that Chems sold me this weekend, also very much a newb with them. Like yours, it doesn't hit dead centre - but it does have a registration mark dead centre on the side of it. This notch actually lines up with the bottom of the cut. I intend to biscuit the top on simply by offsetting the line by 4mm.

I found on a test piece that the alignment is a little counterintuitive - and please excuse (and correct!) me if my terminology is wrong. I marked up two inside faces, first slotting the face and then the edge, registering the jointer off the face that would face the face (phew!) but found that this way, the board slotted on the edge would stand proud of the face slotted board. By registering the edge jointed board from the reverse face, the face jointed board stands approx .5mm proud - easily and neatly solved with a router and a bearing guided bit.
 
Back
Top