General advice about choosing timber size for loft bed.

UKworkshop.co.uk

Help Support UKworkshop.co.uk:

This site may earn a commission from merchant affiliate links, including eBay, Amazon, and others.

HarryCrumb

Member
Joined
19 Nov 2020
Messages
7
Reaction score
0
Location
Manchester
Hi,

I'm hoping that I can get some general advice here (and obviously I'm not going to hold anyone to any advice given on here, I am responsible for my own work). I'm just designing a loft bed for a room in my house. I built one before many years ago but I'm trying to put a bit more thought in to this one and not 'over engineer' it. What I really want to know is how best to gauge what size wood to use for the legs and the frame itself?


The mattress is a small double - 6' x 4' x 9" apparently about 20kg. I'm looking to have the bottom of the mattress at about 58" height.

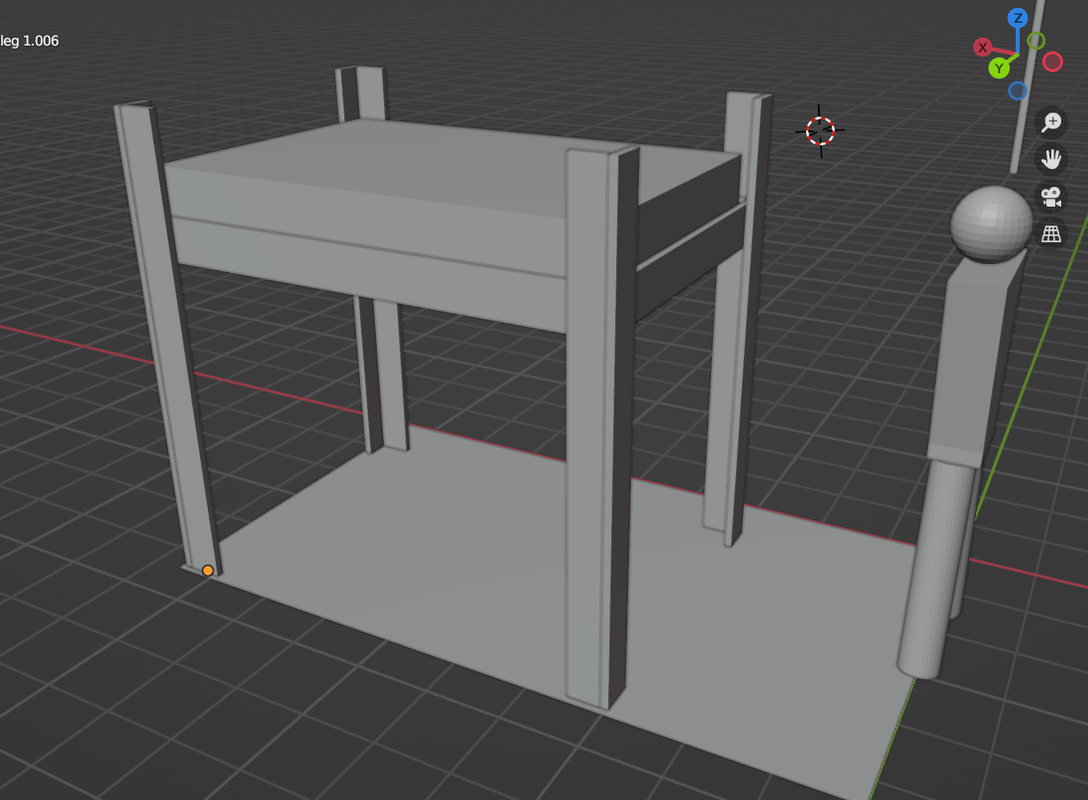
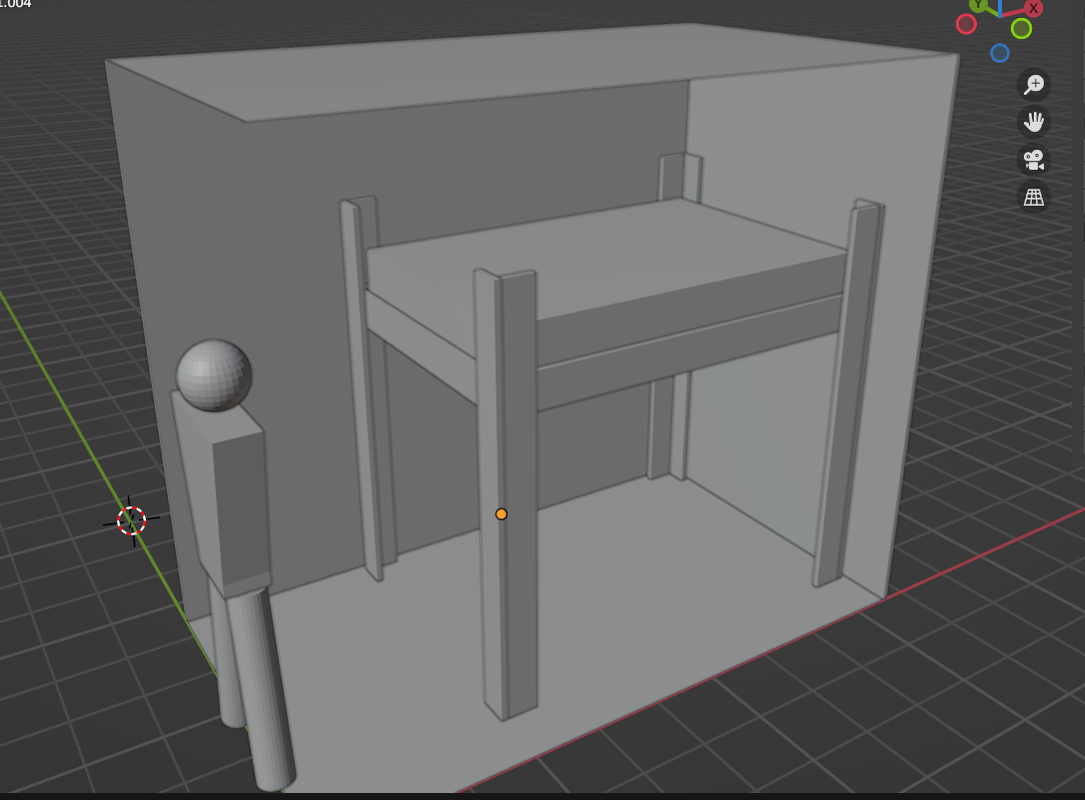
Essentially I'm looking to have a frame (sides/ends/slats) and then four L-shaped legs. I'm planning to attach the legs to the frame using coach bolts.

For the legs I'm presently looking at using 32mm x 144mm (finished size) redwood lengths. And I am thinking about 27mm x 170mm for the frame edges. The legs will be approximately 6'3" tall.

My instinct tells me that it's strong enough, but is it possibly more than I need? If anything, I'm concerned about how much weight I'm creating on the floor.

One other thing that I'm wondering about; when building the frame (sides and ends) would a butt joint suffice, or is it better to do something more secure like a dove tail?

Any advice very much appreciated,

H
 
I can't visualise what you are describing. However, in terms of timber size I've found a bit of google image searching usually terns up something similar to what I am planning on building, from which I can normally get a timber size estimate.
 
Thanks. I'll try to attach a screen shot of my basic idea. The legs are two lengths of 32 x 144mm glued together to make an L-shape upright. My thinking here is that it will take the weight and also minimise any rocking motion that might arise from weaker legs. But I'm not sure if I'm overdoing it with the size.

Screenshot-689.png
 
No scientific method, but the legs look strong enough to me to support the vertical load; though consider a load spreading foot? However with no form of stretchers between the legs (or diagonal braces) under the frame supporting the mattress you are placing all the load on the coach bolts connecting the frame to the legs; so the number and diameter of the bolts also needs to resist racking forces. You might want to consider using a few toothed timber connectors between the legs & frame; or some diagonal bracing? This may depend on how you plan to use the space under the bed.
 
My gut feel is this is overengineered if you are using a "sensible" design to begin with.

Are the feet anchored in place or the entire thing potentially moveable? Are there are walls this can be secured to to prevent racking? My sense is you need either something at the bottom to prevent splaying or some form of cross bracing to keep things square. Without knowing I wouldn't feel comfortable suggesting sizes.
 
It'd be wobbly IMHO. Not the strength just the geometry. Enormous stress on the rail to post joints. Top heavy.
Doesn't do to design from top of the head - have a look at some other designs first?
These all have a bottom bunk too, which would add a lot to the stiffness and make it less top heavy.
Fixing it to the wall is another alternative
 
Last edited:
Thanks for the answers. The image I posted isn't a complete design. I am planning on diagonal bracing, and probably a 5th leg in the middle along the back wall (perhaps a 6th leg on the frontside?). I will also probably incorporate a storage staircase at one end of the bed, and a desk underneath.

The image posted below shows two walls that the bed will be up against (but does not show the rest of the room). The long wall is solid and could be fixed to, though I would prefer to avoid it as it'a mid 1800's house with a mixture of building materials.

I should have mentioned all that in the first post, sorry. Thinking about it, it's a bit of a silly question to ask people online.


Screenshot-692.png
 
It'd be wobbly IMHO. Not the strength just the geometry. Enormous stress on the rail to post joints. Top heavy.
Doesn't do to design from top of the head - have a look at some other designs first?
These all have a bottom bunk too, which would add a lot to the stiffness and make it less top heavy.
Fixing it to the wall is another alternative

I did have a look online at quite a few images, but the funny thing is they all appear quite flimsy to me, compared to the size of the wood I'm considering using. Of course, I realise that the images I've posted are of an incomplete design. I will try to finish the design off in this software and post back again.
 
Many years ago I did bunk beds for the kids using similar construction. I used 25x150mm pine so your's will be strong enough. At one time I found about half the kids in our street plus a big dog in the top bunk playing castles or something. Screw and glue joinery was simple but effective.
Stability as pointed out by the others will need looking at but as its sitting in a corner fixing it to the 2 walls would be my way of doing it.
I would also be thinking of a top rail to keep the sleeper from falling out.
Regards
John
 
If you can fix it to two walls you only need one post.
Or if also one of the rails can span from one side of the room to the other you need no posts at all and the whole thing could be off the floor,
 
Thanks for the answers. The image I posted isn't a complete design. I am planning on diagonal bracing, and probably a 5th leg in the middle along the back wall (perhaps a 6th leg on the frontside?). I will also probably incorporate a storage staircase at one end of the bed, and a desk underneath.

The image posted below shows two walls that the bed will be up against (but does not show the rest of the room). The long wall is solid and could be fixed to, though I would prefer to avoid it as it'a mid 1800's house with a mixture of building materials.

I should have mentioned all that in the first post, sorry. Thinking about it, it's a bit of a silly question to ask people online.


Screenshot-692.png
Since two of the sides will be against walls you can put in complete panels on those two sides, no matter how thin (6mm+) that will immensely strengthen the framework so you are left with one leg that needs something at the bottom. You could put in a low plinth that would lock that leg into place. As long as the sides are wide enough you will not need a 5th leg in the center back as the rear panel will provide sufficient support and rigidity
 
Hey HarryCrumb... and hello everbody else.

My name's Martin, and I've never actually posted here, but this query caught my eye on account of I've just finished building 2 platforms (for my twin boyz) very similar to the one you're describing Harry.

I also used corner-angled leg-posts, and I also didn't want to anchor into the walls of my old house. I also wanted 6'2" clearance underneath, which I figured was quite high for a free standing structure. My platforms are a little wider than yours at 130cm (x 200cm long), so that the boyz would have some space beside their mattresses, and so it's easier to change the sheets.

Anyway, the result, happily, is rock-solid.

(Nota bene and a caveat: I am a classic over-builder at home, seeing as I built flimsy scenery for years in my previous life.)

I used 40mm thick Hevea (Rubberwood) finger-jointed panels for my stock. I don't own a jointer or a planer which is why I went with panels not sawn stock. The next thickness down is 20mm thick, so I went with the 40. If you don't know it - and I didn't - Hevea is a sustainably-sourced semi-hardwood, noticeably cheaper than oak, and is really nice to work with. Needs finishing though.

I was gifted a Domino XL for my 50th, so I was spoiled for joining. I can't say enough about how great this tool is for this application. The loose tenons allowed me to quickly and accurately butt-joint everything. I did not use any glue except for the angled posts, as I want to be able to move these beds or sell them if necessary. With 40mm stock I was able to use the beefy 14mm beech Dominos, all cinched in place with the 14mm Domino-Connects.

I used (2x) 40mm polystyrene tatamis from the local futon-store for the actual platform, and 40mm wide x 4mm thick aluminum slats to keep those up... all to keep the weight down while maximizing strength. To be honest, this caused me a lot a worry... but on their very first sleepover their were five 10yr olds up there bouncing. Made me sweat... but it held. And no creaking with the aluminum.The tatamis were a splurge at about 200euros per bed... but the top finish is really nice. But any kind of rigid panel (like 13mm ply?) would have worked IMO.

I didn't do any kind of drawings for these structures, otherwise I'd be happy to share them with you... but I'll post some pictures below. The second ladder is still under construction though, so you won't see that.

Please note:

1) that the upper rails ARE very important, not just for holding in the sleeper, but also as stretchers to keep the structure rigid. You want a minimum of three points of contact for each leg-post.

2) I added more stretchers at the bottom of the structures to keep the leg-posts from splaying (obviously only by the walls). That means 2 of my leg-posts have 6 points of contact. No wobble = good.

3) I added "feet" to the bottoms of the leg-posts, and used 2mm thick rubber pads under them to keep the posts from moving, though a carpet would prolly do the same - keeping things firmly in place. The rubber is nice though, because if your floor's not level, you can use thicker pads to level it all out. Level = good for tall structures.

4) I mentioned the finishing earlier. Very important. Take the time. Kids throw up. 10yr olds don't pee any more thank god, but vomit on raw wood sucks b*lls. I'm gonna have to take apart that ladder completely to sand the smell out. And then... I will oil the b*stard.

Hope these two cents help your decision making Harry. For reference, the project cost me about a grand (euros) per bed in materials, not including the head-scratching. Good luck!!!

Martin in Bordeaux

312C07ED-D518-4736-AA34-6D4DAAF15DD4_1_102_o.jpeg

6E7609F9-AD67-4DB7-A316-0A0A71AE0449_1_102_o.jpeg

2DCE5611-C5EE-4972-808D-19FA099CA8A8_1_102_o.jpeg
8426DA9A-33B0-4BE4-9230-9C4D5B7D81C2_1_102_o.jpeg

EC90D606-DA0F-4F86-BA8E-057055C92752_1_102_o.jpeg
 
I like the idea of the L section legs - I’m doing the same on a workbench I’m building. Especially as it’s going against a wall, I’d simply add a horizontal timber between the rear legs, say 30cm up from the floor. This will reduce any wobble massively. Good luck - sounds an interesting project.
 
Another option if you can attach two sides to the walls is to hang the corner from the ceiling above. e.g. a length of steel rod threaded at each end. The whole thing free of the floor, though you'd still need a step ladder of some sort.
 
Personally I think you are over engineering the size of the timbers. I build my son a bed last year like this Junior Treehouse Bed - Rainbow Wood but higher. I used 2x2 inch timber for the legs and 20mm x 200mm (I think) for the rails. The rails are far deeper than I've seen on many production pine beds. It also increases in strength as it needs a rail inside to hold the wood slats.

If you look at something like this MYDAL pine, Bunk bed frame, 90x200 cm - IKEA you can see how small the timber is they are using.

Another thing you should do is add a rail to stop a sleep rolling out as a 4-5ft drop is going to hurt. the railings would also prevent racking. With the L shape legs on your design you would effectively have a 3-4 inch leg (depending what width timber you use) which is going to provide a lot of support.
 
Hey HarryCrumb... and hello everbody else.

My name's Martin, and I've never actually posted here, but this query caught my eye on account of I've just finished building 2 platforms (for my twin boyz) very similar to the one you're describing Harry.

I also used corner-angled leg-posts, and I also didn't want to anchor into the walls of my old house. I also wanted 6'2" clearance underneath, which I figured was quite high for a free standing structure. My platforms are a little wider than yours at 130cm (x 200cm long), so that the boyz would have some space beside their mattresses, and so it's easier to change the sheets.

Anyway, the result, happily, is rock-solid.

(Nota bene and a caveat: I am a classic over-builder at home, seeing as I built flimsy scenery for years in my previous life.)

I used 40mm thick Hevea (Rubberwood) finger-jointed panels for my stock. I don't own a jointer or a planer which is why I went with panels not sawn stock. The next thickness down is 20mm thick, so I went with the 40. If you don't know it - and I didn't - Hevea is a sustainably-sourced semi-hardwood, noticeably cheaper than oak, and is really nice to work with. Needs finishing though.

I was gifted a Domino XL for my 50th, so I was spoiled for joining. I can't say enough about how great this tool is for this application. The loose tenons allowed me to quickly and accurately butt-joint everything. I did not use any glue except for the angled posts, as I want to be able to move these beds or sell them if necessary. With 40mm stock I was able to use the beefy 14mm beech Dominos, all cinched in place with the 14mm Domino-Connects.

I used (2x) 40mm polystyrene tatamis from the local futon-store for the actual platform, and 40mm wide x 4mm thick aluminum slats to keep those up... all to keep the weight down while maximizing strength. To be honest, this caused me a lot a worry... but on their very first sleepover their were five 10yr olds up there bouncing. Made me sweat... but it held. And no creaking with the aluminum.The tatamis were a splurge at about 200euros per bed... but the top finish is really nice. But any kind of rigid panel (like 13mm ply?) would have worked IMO.

I didn't do any kind of drawings for these structures, otherwise I'd be happy to share them with you... but I'll post some pictures below. The second ladder is still under construction though, so you won't see that.

Please note:

1) that the upper rails ARE very important, not just for holding in the sleeper, but also as stretchers to keep the structure rigid. You want a minimum of three points of contact for each leg-post.

2) I added more stretchers at the bottom of the structures to keep the leg-posts from splaying (obviously only by the walls). That means 2 of my leg-posts have 6 points of contact. No wobble = good.

3) I added "feet" to the bottoms of the leg-posts, and used 2mm thick rubber pads under them to keep the posts from moving, though a carpet would prolly do the same - keeping things firmly in place. The rubber is nice though, because if your floor's not level, you can use thicker pads to level it all out. Level = good for tall structures.

4) I mentioned the finishing earlier. Very important. Take the time. Kids throw up. 10yr olds don't pee any more thank god, but vomit on raw wood sucks b*lls. I'm gonna have to take apart that ladder completely to sand the smell out. And then... I will oil the b*stard.

Hope these two cents help your decision making Harry. For reference, the project cost me about a grand (euros) per bed in materials, not including the head-scratching. Good luck!!!

Martin in Bordeaux

View attachment 150580
View attachment 150581
View attachment 150582View attachment 150583
View attachment 150584
That's a hell of a first post! Great looking bed and super useful for the OP to consider. Your design and most of the online images contain a brace at the bottom end of the leg (either just a timber rail or a whole extra bed, ref Jacobs post). I expect your ladder design also brings a good degree of bracing.
 
I used 40mm thick Hevea (Rubberwood) finger-jointed panels for my stock. I don't own a jointer or a planer which is why I went with panels not sawn stock. The next thickness down is 20mm thick, so I went with the 40. If you don't know it - and I didn't - Hevea is a sustainably-sourced semi-hardwood, noticeably cheaper than oak, and is really nice to work with. Needs finishing though.

Rubberwood is a nice material, I use it extensively as it’s reasonably priced since I’m near the source, the majority of the panels I get are finger jointed and there are lower grades than the material you are using, these have various cosmetic defects and can look better than the AA grade you are using in some projects.
My approach to finishing is to first spray a shellac coat or 2 before the topcoats, I usually use a water based polyurethane for the topcoats. I will often add a little colour to the shellac as the rubberwood is almost white
Thanks SometimeWW… though TBH I don’t have space or time to spray and topcoat. With this project (as large as it is) I was always gonna build it in place, then rub in some Rubio. Only the stomach bug beat me to it 😆. As you prolly know, rubberwood, even the AA grade - which is all I can find here in France as an amateur - don’t take too good to being vomited on 🤮. Any moisture for that matter. Makes it all hairy, which is why I gotta re-sand it.

Have you had any experience with an oil finish like Rubio?

Does your shellac/poly treatment make it ding any less easily?

Personally, I like the platinum blonde aspect of the wood, but I doubt it’ll stay that way whatever I use.

Best regards,
Martin
 
That's a hell of a first post! Great looking bed and super useful for the OP to consider. Your design and most of the online images contain a brace at the bottom end of the leg (either just a timber rail or a whole extra bed, ref Jacobs post). I expect your ladder design also brings a good degree of bracing.
Thanks so much Fitzroy.

I’ve lurked on this site longtime, found many a clue… figured I owed a post.

Aaah the ladder. The best bracing you can give a ladder is a panel between the rungs, which is what I did. Just happens the panel also works well to protect books from puke 👍👍👍

The second ladder, not shown but on my workbench, has a quarter turn. We’ll see how that works out 😆

Best regards,
Martin
 
Thanks SometimeWW… though TBH I don’t have space or time to spray and topcoat. With this project (as large as it is) I was always gonna build it in place, then rub in some Rubio. Only the stomach bug beat me to it 😆. As you prolly know, rubberwood, even the AA grade - which is all I can find here in France as an amateur - don’t take too good to being vomited on 🤮. Any moisture for that matter. Makes it all hairy, which is why I gotta re-sand it.

Have you had any experience with an oil finish like Rubio?

Does your shellac/poly treatment make it ding any less easily?

Personally, I like the platinum blonde aspect of the wood, but I doubt it’ll stay that way whatever I use.

Best regards,
Martin
I just spray because I have the equipment and a dedicated finishing space, built for my retirement projects, however before I got all of this I brushed on the same, shellac (often tinted), then a German tech water based polly, it’s a very fast regimem.

I have used Osmo Poly-X on our doors and a table 8 years ago, it’s still in use having been repurposed several times. It’s a bunch more labour intensive task, that’s why I spray most things now.

The shellac first, is both a sanding sealer and a colour carrier, not required but easy enough to do, so why not?
As to dings, rubberwood is quite soft so it will take damage.

The only way to keep the colour will be a water based polyurethane or varnish, any oil based finishes will yellow the wood


like this

3DF012C3-E67C-471E-8706-821A005DF034.jpeg9D1FEFD3-E78C-4F2D-87F0-5BF44E82827F.jpeg
 
Last edited:
Back
Top