You are using an out of date browser. It may not display this or other websites correctly.
You should upgrade or use an alternative browser.
You should upgrade or use an alternative browser.
edge planing
- Thread starter engineer one
- Start date


Help Support UKworkshop.co.uk:
This site may earn a commission from merchant affiliate
links, including eBay, Amazon, and others.
engineer one
Established Member
well i wouldn't walk in them mate. the blades are too big thick and long :?
paul :wink:
paul :wink:
Skip J.
Member
Hello Paul;Mr_Grimsdale":2tubd79i said:No it's dead simple - if you don't know which one to use , use a jack.
If you get handy with a jack you hardly need any of the others - they're gilding the lily, adding value yes, but marginal.
cheers
Jacob
What Jacob says has merit. We all started with planes at some point before we got to "here" - where ever that is for each one of us. We've been through what you are experiencing now. Each of us worked through the problems the hard way. Most would change the way it was done if it could be done over...
One method is to concentrate on learning to plane first, and then start ww'ing with your planes and skills. You probably saw a bit of that learning to flatten... As has been said, jacks will do most any benchplane task; but perhaps not as well as a specialty plane. One of those is jointing edges. A longer sole jointer is certainly easier to use than a jack; but Jacob is saying that if you can learn how to joint with a jack, then you will really know what to do with a jointer when you have one.
Think of the neat little edge plane as a block plane. It does one special task very well if you know how to use it. You have to edge joint a board to the extent you think it is perfect first; then very carefully take one small shaving the full length of the edge, at all the same thickness. this is not a learner's technique.
Since you already have the little Veritas on hand, use a good straightedge to check and joint the edge of a spare practice board with your jack until it looks jointed to you. Check it with the straightedge to make sure. Then take one long chip with the edge plane and then check with the straightedge again.
You might be surprised how much you need to sharpen and fettle the jack and practice jointing with it to get to that point. But once you do, you'll never be a learner again (on that one technique).
Take care...
engineer one
Established Member
thanks skip, that's good advice
paul :wink:
paul :wink:
A
Anonymous
Guest
Radically improves performance if you stick a bit of 60 grit paper to the sole and put Fred Astaire on the sound system.Scrit":175j6h50 said:Sure they weren't klompen? (clogs) :roll:
cheers
Jacob
Hi!
My 2 ¢:
I own since a while some Veritas planes and I'm fine with them. For edge planing, to get a straight and square edge I'd suggest a low-angle jointer with the fence to straighten up the edge and get near to squareness, and then a edge-trimming plane.
Sure the edge-trimming plane is short, and not suited to straighten up long edges, but it is lightweight and the side id always perfectly square, so it's easy to trim with few strokes a perfect square edge.
For the tasks where it's required a perfecly square edge (as for glueing pieces on the edge) i find the edge-trimming plane very useful. Obiously the job can be done in different ways (eg with just a fine tuned and carefully used jointer plane with fence), but I find this one the fastest and easiest.
engineer one
Established Member
i actually have the veritas fence, but of course the problem is its depth.
if i had a different kind of vice, at the moment i am using a zyliss
then the fence would be good, but at this time would make it too high.
finally, last night, i ripped them, then clamped 3 sides together, and
used my no 6 finally got what i wanted. :?
anyway great thread, thanks for being helpful and sensible about it.
paul :wink:
Paul on a single boards edge width you can also use your fingers as a fence which is what I do. The thumb sits on top of the plane, centrally and just in front of the blade and the rest of the fingers curve under the sole with the tips pushing against the workpiece. Like so
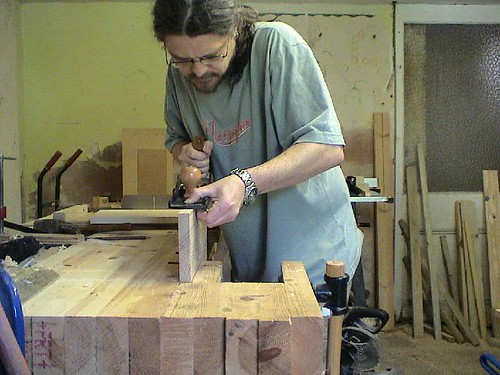
which leaves you with
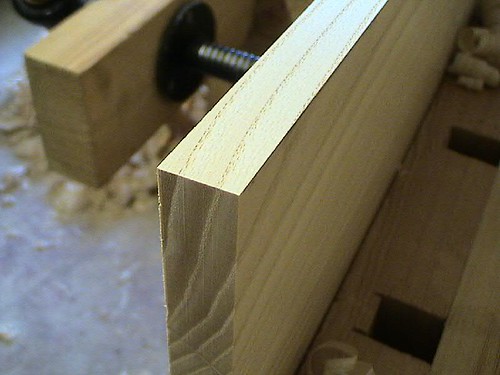
I havent got a picture of with a square in against the edge but that edge is square to the face. You'll just have to trust me")
Excuse ugly mug.
Cheers Mike[/img]
which leaves you with
I havent got a picture of with a square in against the edge but that edge is square to the face. You'll just have to trust me
Excuse ugly mug.
Cheers Mike[/img]
engineer one
Established Member
sorry mike couldn't see the ugly mug, so where do you keep your coffee??? :lol:
interesting and useful technique too. i will try that too.
it is i am sure practice that makes it work, but rather like 3d chess, unless you do it daily it becomes an acquired skill that needs sharpening (sorry)
regularly to ensure that you keep it up.
also i think it is something you can get taught by going on a course, and then enhance with practice.
still so far have moved forward again, so am happy that i continue to learn.
interesting bench top too :roll:
paul :wink:
engineer one":rvbr0ske said:interesting bench top too :roll:
paul :wink:
The bench is truly horrible isn't it
At least its flat and solid though. It was the first thing I ever made and it has served its purpose but apart from being generally badly made and designed, it's also showing signs of wear. That shoulder vice has pulled itself apart so many times that it's now beyond repair - I have to build a new one really - yet another thing on the list. Cheers Mike
engineer one
Established Member
if that doesn't put byron off making his own nothing will :lol: :lol: :twisted:
paul :wink:
paul :wink:
ByronBlack
Established Member
haha .. I thought my ears were burning! Nothing will put me off the workbench build, i've been wanting to do it for about 3 years!!
Paul - here's a little tip that might help you a little with the parallelogramawhatist problem. If you already have one square edge, you can use a panel gauge to scribe a line on the opposite edge, so when you come to joint it you have a reference scribe to work to and this will help keep the board parallel - now bear in mind i'm still a relative hand-plane newbie, but this is what I learnt when I went on a course and it's worked for me.
Paul - here's a little tip that might help you a little with the parallelogramawhatist problem. If you already have one square edge, you can use a panel gauge to scribe a line on the opposite edge, so when you come to joint it you have a reference scribe to work to and this will help keep the board parallel - now bear in mind i'm still a relative hand-plane newbie, but this is what I learnt when I went on a course and it's worked for me.
engineer one
Established Member
thanks mate, nice to see you are watching.
i think the problem is that you are actually trying to learn two skills at once,
holding the plane flat and square in the vertical plane, plus pushing it along at a horizontal state.
i have used a modification of that idea, and gotten where i want i think,
but it does re-iterate my thoughts about going on a course :roll:
paul :wink:
ByronBlack
Established Member
I went on the bruce luckhurst course, which is quite affordable and has a wealth of great tips/techniques - and he's a funny guy.
Newbie_Neil
Established Member
Hi mdm
Welcome to the forum.
Cheers,
Neil
Welcome to the forum.
Cheers,
Neil
Skip J.
Member
Hello Paul;engineer one":25ne9ddd said:i think the problem is that you are actually trying to learn two skills at once,
holding the plane flat and square in the vertical plane, plus pushing it along at a horizontal state.
i have used a modification of that idea, and gotten where i want i think,
but it does re-iterate my thoughts about going on a course :roll: paul :wink:
Using the LV edge fences is a great idea to progress now into ww'ing, especially glue-ups.
However, Jacob has stated; and Mike has shown a picture of how to go ahead and first learn to do without.
mr":25ne9ddd said:Paul on a single boards edge width you can also use your fingers as a fence which is what I do. The thumb sits on top of the plane, centrally and just in front of the blade and the rest of the fingers curve under the sole with the tips pushing against the workpiece. Like so
Cheers Mike[/img]
What some folks here are saying is that the various skills you have to learn to do what Mike is showing - with the top-of-the-line fettling and sharpening required - will benefit all of your efforts; not just edges...
And taking courses are great! Many starter courses teach both the plane set-up and the technique shown by Mike..
So eventually you wind up learning two or three techniques to do combined together; it just seems too much to learn it all at first when you want to get in there and glue some boards up...
bugbear
Established Member
mr":3g2stvdh said:Paul on a single boards edge width you can also use your fingers as a fence which is what I do. The thumb sits on top of the plane, centrally and just in front of the blade and the rest of the fingers curve under the sole with the tips pushing against the workpiece.
Yep - that's the classic way, as shown in every carpentry and joinery book I've got, pretty much.
One of my favourite little "touches" in my (ahem) "set" of planes is on my round sided #608 (*).
It's in generally good condition (**), the jappaninng is actually worn away to the bare casting in a small area... just where the thumb goes when jointing as described above. Methinks that plane has jointed a few edges in its time...
BugBear
(*) meep!
(**) meep meep!
Derek Cohen (Perth Oz)
Established Member
Listen here, if BB is going to gloat about his #608 (NICE one there, Paul!), then I will show off my 30" jointer again! :lol:
I have just finished viewing Chris Schwarz' new DVD in which he makes extended use of the LN #8. It does look like a very good plane, somehow larger and more solid that the Stanley #8 I have used (no longer have). Still, I can recommend the LV BUJ, which has the registration of the #8, and greater flexibility.
Remember BB, if we don't see it, it doesn't exist.
Regards from Perth
Derek
woodbloke
Established Member
Derek - don't gloat too much 'cos the next one I'm doing :wink: (unless Philly beats me to it) ......as a matter of interest, what's is the distance from the cutting edge to the front of the plane? - Rob
Jarviser
Established Member
The method of putting your fingers under the sole as a fence is surely for those who have a cambered blade, using the plane's position side to side to tune up the angle minutely. With a flat blade it's a bit pointless. I mean they put a handle there to hold onto didn't they?
It's also a good way to lose the skin off your knuckles on the vice jaws when you forget the workpiece is only 3x1 ! (I've done it)
However, how darned square does the edge need to be?? If you are just talking about the top edge of drawers, that is achievable by feel, planing to a line and using a try square, like wot we were taught. If however you are jointing boards, if you put them face to face it matters not a jot if they are even vaguely square if you plane both edges at the same time. Either way a no6 is the minimum length IMHO.
That's my two penn'orth. Back into the teapot for me. zzzzzzzzzz.