Workshop Design - well it's a build really.

UKworkshop.co.uk

Help Support UKworkshop.co.uk:

This site may earn a commission from merchant affiliate links, including eBay, Amazon, and others.
trousers":b2lxbj70 said:
Dibs

What are you going to use for a dpc over the slab, and where are you going to position it?

The thought was for some type of polythene sheet (whatever the builders merchants appear to sell) laid down on the slab, then 50mm insulation and then 50mm screed. The DPM would lap up and be taped to the DPC which probably will be 1 course of blockwork above the slab.

There didn't appear to be any reason why the DPM could not be laid after the walls have been built as long as the DPC in the walls was wider than the wall and allowed for the lapping.

Feel free to correct any of the above if need be.
 
Dibs

Your sand/cement screed is going to be what is known as an unbonded floor screed (as it obviously won't be adhering to the insulation board). In which case it will need to be 65mm thick minimum, and preferably reinforced with polypropylene fibres in the mix (4 parts sharp sand/ 1 part cement). Otherwise as the screed dries out it may "curl up" as it shrinks, or worse start to crack.
Lapping the polythene against the wall dpc is a definate.
What is going to be the wall finish inside? Your internal wall finish will need to cover and protect the 100mm or so of polythene that is exposed above finished floor level, protecting it from getting punctured.
 
trousers":1n449nxv said:
Dibs

Your sand/cement screed is going to be what is known as an unbonded floor screed (as it obviously won't be adhering to the insulation board). In which case it will need to be 65mm thick minimum, and preferably reinforced with polypropylene fibres in the mix (4 parts sharp sand/ 1 part cement). Otherwise as the screed dries out it may "curl up" as it shrinks, or worse start to crack.
Lapping the polythene against the wall dpc is a definate.
What is going to be the wall finish inside? Your internal wall finish will need to cover and protect the 100mm or so of polythene that is exposed above finished floor level, protecting it from getting punctured.

Internal - I was thinking of putting timber studwork up against the blockwork - with a vapour barrier between the studs and blockwork and insulating with batt insulation. Then plasterboard the studs.

I was also thinking of putting down 1 lot of coarsing concrete blocks (65mm + 10mm mortar) as a platform for the studwork. This would leave me only 25mm or so of exposed polythene, but that would be behind the studwork. For the little time and cost it would get the studwork off the floor and protect the dpm.

I spoke to Lafarge and they do a screed called Gyvlon (or something) as I was think of putting UFH pipes in the screed - ahead of the house getting them.

http://www.flo-screed.co.uk/lafarge-gyvlon.htm

It appears that for commercial apps and an unbonded floor - 40mm (min) is required. I think the cost is somewhere around £170\m3.

However, just spoken to the pump guy and Lafarge, and it's not a wearing surface, so requires a final flooring.

So either this Gyvlon stuff at 40mm then 20mm T&G flooring (timber or similar) as there appear to be a noticeable nbr of people with timber flooring over concrete.

Or go with a traditional 65mm screed as you suggested with fibre additives, etc. But then that leaves me with a concrete surface.

Hmm. Choices choices... :duno:
 
OLD":fv3g4kir said:
I have used springvale floorshield over a concrete base.
http://www.springvale.com/products.asp?InfoID=521&mySub=516
Then 18mm flooring over that it made a good floor might save some money as you seem to be getting some big bills.

I see what you've done - this "insulation" down first over the slab and a DPM (in my case) and then the timber flooring straight over. Hmmm - will have a ponder and a gas with the SE see what he says.

How much was the stuff?

Big bills - yes I'd much rather not, but so far stuff seems to be on budget and thankfully almost everything has been bought forward, so not a great dela left to pay for - perhaps the concrete for garage & basement.

Besides - I'm looking forward to selling all the building equipment when finished which should release a noticeable amount.

Can't be pineappled doing anything tonight - will start on the blockwork tomorrow eve.
 
I only have a 2005 price 2400x1200x50 £13.80 lots of different thickness available from 'buildbase'. I used a thin flexible dowel flush pull cut saw for its small kerf to make any cuts.
 
Blockwork Piers

I'm having to put 2 of these in on a 7.5m length. The question I have is for a stretcher bond block wall - I've seen the following on other constructions,

1. the pier appears to be constructed with the blocks laid in the normal manner, on top of one another - up against the main wall. I'm assuming mortar between the peir and the wall. I would also assume that there may also be wall ties crossing from the wall to the pier in the mortar bed.

2. I haven't seen this one, but suspect it would be stronger. Each odd course laid with the blocks in the normal upright fashion but each even course being 2 blocks laid on their belly.

I'm erring towards the 2nd on. Any advice for a blockwork novice?

Progress so far,

blockwork_2nd.jpg


might get the current course finished this evening, if I'm lucky.
 
Update - removed shoring. It no longer getting in the way makes life so much easier.

Poured the return - man I am so knackered. Must have done somewhere in the region of 9-10 mixes. At the end it was hard enough putting 1 foot infront of the other. The return was 12" high and 6" wide at the one end and somewhere around 9" at the other. The boundary wall doesn't follow the building.

In the end just put some DPM down and used blocks 2 deep to make the formwork. My previous attempts at using timber over a long length have been a bit of a pain. Made the return a little thicker where the piers will be. Hopefully get on with the blockwork tomorrow. Will post up some pictures on Monday (usb cable for the camera phone is at work).

DPC - was going to get the cheapy stuff until I picked up a roll of Hyload. 20m of Hyload weighs a damn sight more than a 30m roll of the cheapy stuff, for the same width. Any recommendations?
 
Cheers.

Yesterday evening got the DPC down and one layer of coarsing blocks - this levels up with the concrete return and it should just be normal blocks from now on.

1st_DPC.jpg


Will be around 3 hours every evening - so be interesting to see how many blocks I can lay - hoping for a min of 1 coarse an evening.

It's starting to look like something now as opposed to a large hole in the ground.

The door opening is 1300 wide - I felt I'd much rather have a wide doorway rather than wish I had one later. Also the windows will be around 1350 wide. Me thinks that's a little too wide - but then again you can never have enough natural light- so will leave them at that.

The 2 peirs on the front wall line up approx with inner side of the windows (sides closest to the door opening). I'm inclined to fit additional peirs (1/2 blocks maybe) on either side of the door and the other side of the windows. Not for structural stability but for a return so that the windows and door can be set in a bit without worrying about not having a great deal left for the fixings to bite. Any thoughts?
 
Dibs

Good idea making the door 1300, have a pair rather than one biggie to keep opening.
Don't forget, if you set the door frame and window frames back you will need to have wider sills to throw the rain clear of your blockwork. I'd stick with fixing them so they are flush with the inside face of the blockwork.
Make sure all the dpc's are continuous. Looking at the pics, and seeing your thread re tanking. Are you going to rely on the synthaprufe to stop water running off the concrete and against your blockwork on the drystone wall side?
I always like to see 150mm clear below any horizontal dpc in a wall.
Remember, synthaprufe type products are not really recomended for continuous exposure to outside weather conditions, as they will degrade with UV.
Dont shop where wizzer got his :shock: It's about £40 odd for 25litres.
 
trousers":22irb5kh said:
Dibs

Good idea making the door 1300, have a pair rather than one biggie to keep opening.
Don't forget, if you set the door frame and window frames back you will need to have wider sills to throw the rain clear of your blockwork. I'd stick with fixing them so they are flush with the inside face of the blockwork.
Make sure all the dpc's are continuous. Looking at the pics, and seeing your thread re tanking. Are you going to rely on the synthaprufe to stop water running off the concrete and against your blockwork on the drystone wall side?
I always like to see 150mm clear below any horizontal dpc in a wall.
Remember, synthaprufe type products are not really recomended for continuous exposure to outside weather conditions, as they will degrade with UV.
Dont shop where wizzer got his :shock: It's about £40 odd for 25litres.

The DPC is continious just under the coarsing blocks and then comes up 70mm or so to poured return. and then runs the full length of the return.

I'm after some sort of tanking material - only because it would be easier to apply it now rather than later. It's purely there just incase any moisture gets beteen the drystone wall and the blockwork - a gap of around 2". The bodge solution was fill it full of expanding foam! :shock: and then cover over the exposed elements with something (to be decided later).

The existing garage is built in the same manner - i.e. up against the drystone wall, and the 1st 2' or so of brickwork on that side is a slightly darker colour than the other side. Could be a denser brick possibly as the colour variation doesn't run thru a brick but is a whole section. Even when we've had a downpour - never had any water in the garage or moisture on the wall.

The whole run of blockwork by the boundary is very sheltered due to the 2 smallish trees on the other side but also due to the canopies of the much larger trees nearby.

On the drystone wall - I'll probably bridge the gap between the blockwork and the drystone wall. I'm thinking of removing the coping stones - cutting something into the blockwork (in the way you'd fix some lead flashing) and drapping it over the drystone wall and bedding the coping stones back on.

In fact I'm tempted to use some lead - I still have the old stuff left over from having re-roofed the house a few years ago, and the lengths from the old valley would do the job just right. In which case the "cavity" between the drystone wall and blockwork would be closed in and very little UV penetration. What do you think?
 
I see what you're intending.
Since that space is so well protected (roof overhang will also help), I'd be tempted to run in the horizontal dpc in the wall on the concrete level, then build the wall as normal.
I would then tank the inside of the blockwork up 1 or poss 2 courses along that side, and continue the tanking down to the slab.
If the void is open at each end to let a gale of wind through then you won't have a problem.
When the membrane goes in over the slab at flooring stage, you won't have to worry so much about the detail of lapping the membrane to the horizontal dpc on that side, as the synthaprufe is your insurance policy. Also it is inside, and will be protected.


ps See other thread re price of synthaprufe.
 
trousers":2sj2yn49 said:
I see what you're intending.
Since that space is so well protected (roof overhang will also help), I'd be tempted to run in the horizontal dpc in the wall on the concrete level, then build the wall as normal.
I would then tank the inside of the blockwork up 1 or poss 2 courses along that side, and continue the tanking down to the slab.
If the void is open at each end to let a gale of wind through then you won't have a problem.
When the membrane goes in over the slab at flooring stage, you won't have to worry so much about the detail of lapping the membrane to the horizontal dpc on that side, as the synthaprufe is your insurance policy. Also it is inside, and will be protected.


ps See other thread re price of synthaprufe.

I'd totally forgotton about the roof overhang - it'll be something in the region of 8", more than covering the gap.

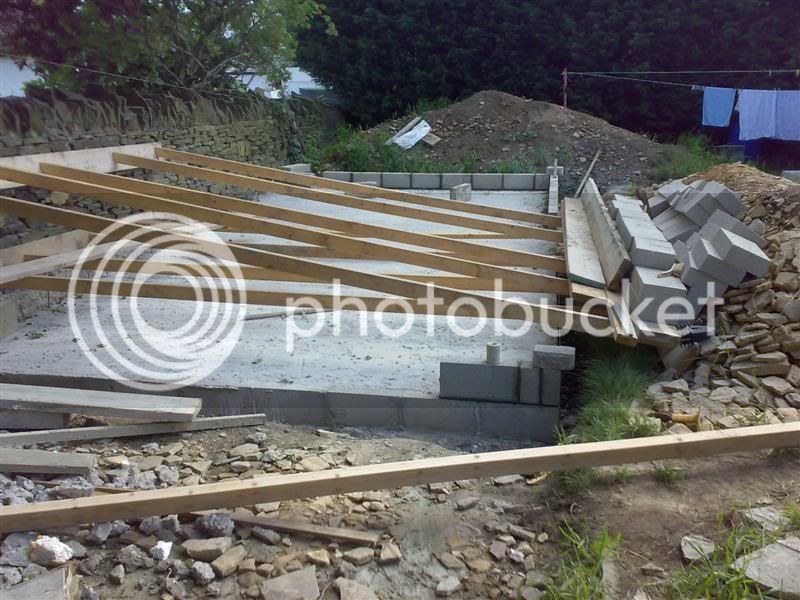
Below is a picture of yesterday's progress - was getting a bit late hence a bit on the dark side,

complete_dpc.jpg


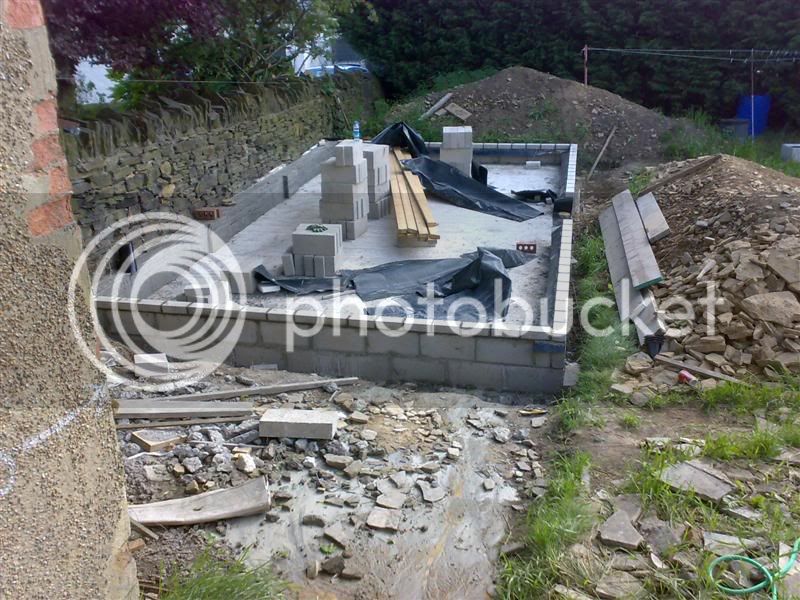
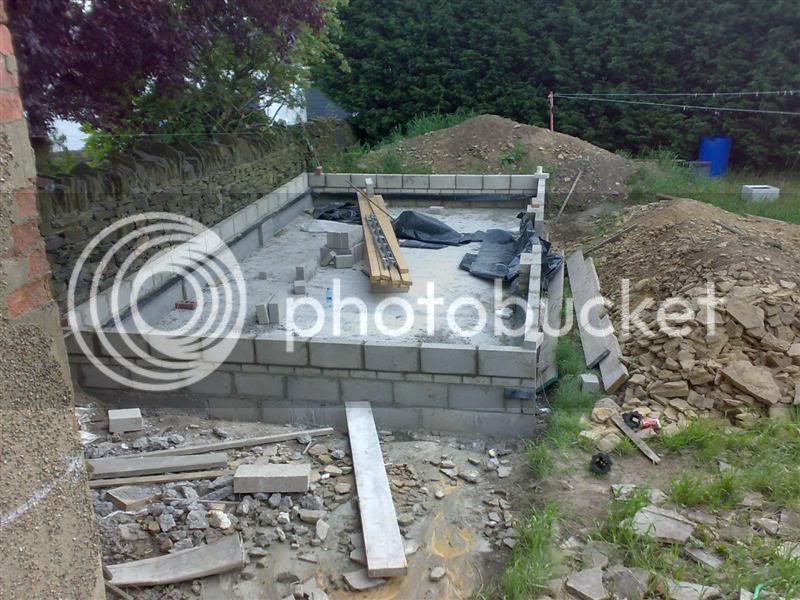
You can see the DPC on the boundary side - under the normal blocks but under the coursing blocks for the rest of it. So I suppose it's as per your suggestion.

I'll do as you suggest for the inside - but I may just put a coat or 2 on the back of the 1st row of blocks, as any moisture that is likely to make it's way into the cavity is likely to go down first than thru the blockwork.

It took around 1.5hrs to lay the 17 blocks and the DPC - which I think is a not too shoddy rate.

Picked up some s\s mortar re-inforcement this morning as the SE is suggesting that the calcs are not going to work based on the size of the long walls and opening sizes. B\C are wanting the calcs as well.

The feeling is with a 4"x2" inner skin becoming structural and bolted to a sill and header (was thinking of making the wall plate at the top wide enough to cover both the blockwork and the inner studwork) it should improve matters, along with the mortar re-inforcement every 2 courses to eaves height.

Hopefully have the calcs in a day or so - one less thing to worry about B\C getting the hump about.

Just nipping home - the joys of working 10mins from home - B\C are popping round at 12:30 to check the DPC etc.
 
Update - got the 2nd course done.

2courses.jpg


Quite chuffed really that the levels all tied up especially considering the return was poured and 1 course of blocks done before the short runs were done.

The B\C is happy with things - said he next wanted to come round at wall plate level, hopefully a few weeks from now.

The mortar mix is getting better too. Once or twice it's probbly been a bit on the stiff side - but yesterday added a little more water than I usually do and it was so much easier to work with.

The only thing is I'm going to have to clear some of the spoils in front of where the door is going. As the courses increase I can't just step onto the raft from the end. Hindsight and all that.

Hoping to get back home earlier today, so see if I can complete a full course this eveing.
 
Have some water in a plastic bottle next to the mortar spot board and add as required to make workable mix in with trowel.
 
Try some mortar add mix. (Feb mix + is a good one)

Makes your mortar more fatty & stays workable longer.

Not the best idea to add water & remix mortar that is already setting.
 
I forgot to mention as per Trouser's recommendations I am using Plasticiser in the mix as per the isntructions on the back of the 5L pack.

Yesterday evening was a long evening. Used bitumen paint on the outside of the blocks on the boundary wall side - will use Synthaprufe on the inside as suggested.

Then almost got all the way round with the next course.

3course.jpg


This evening - probably finish the course on the boundary side and then break down packs of blocks round the front and stack them on the slab ready for use on Sat and Sun.
 
I've been pondering over the roof this afternoon and the logistics of it. I've got a load of stuff off google regarding joints, etc for trusses. So some reading this evening.

Now the SE is suggesting a bottom cord of 6"x 8" and the same for the other 2. With slightly slimmer sizes for the struts (I think that's what they are called).

Now I'm thinking of stopping the blockwork (albeit temporarily) to construct the trusses and dryfit everything whilst it's at a manageable height, take everything down and then carry on with the blockwork. Knowing that when I come to fit everything for real there's no real ball-ache, or is that a little too "super-safe"?

I'm on my own - help is there for the odd thing, but I don't like asking too many favours - especially when the people in question have got their own stuff on.

Any thoughts\advice?

Plan B - carry on with the blockwork and construct the trusses on the workshop floor - it's big enough. After having dryfit, then do final assembly on the roof.
 
Back
Top