You are using an out of date browser. It may not display this or other websites correctly.
You should upgrade or use an alternative browser.
You should upgrade or use an alternative browser.
Workshop Design - well it's a build really.
- Thread starter Dibs-h
- Start date


Help Support UKworkshop.co.uk:
This site may earn a commission from merchant affiliate
links, including eBay, Amazon, and others.
Dibs-h
Established Member
trousers":26ih9nfs said:Dibs
Sorry, didn't realise the two structures were seperate, so no cavity wall as such.
Not clear in the drawing on p1 of this thread. In fact it looks like the two buildings are all in one!
The sneaky plan was to make them one building - but then got into conversations of expansion joints - right between the garage and workshop. And as the garage is a highly loaded building compared to the workshop - thought sod it make it 2 right up against each other. Less hassle in the long run.
BCO came round today and doesn't have any issues with what's being done.
Rang round several timber places that I use - the chaps that do the grading are either off ill or on holiday - which almost scarpered the plans to use C24 timber. Thankfully did manage to get it from someone else. £130 for both trusses - which can't be bad. Have to collect it in the morning - so might pause the other gable and get on with the trusses.
Probably still do 2 courses on the other gable - i.e. well short of the purlins.
Still thinking on this one - still tempted to go for the other gable - need the motivational boost! I know I'll have to cut them with the Still - but I already have to do one gable - so why not 2? What do you think - I know - still ar5e about face?
BigShot
Established Member
Dibs, I'd like to second the mention of gable restraints.
The issue with gables is pressure when wind blows, strong enough winds can damage (or demolish) the gable.
To restrain the walls you'll need 5mmx30mm mild steel or galvanised straps over at least 3 roof spars and taken down the wall a distance I can't remember - might be about a metre - confirm with your BCO.
The straps shouldn't be more than 2 metres apart centre to centre.
Start strapping at the highest point that will give a secure connection.
Then fit a row of noggins between the rafters and gable wall at restraint points.
If you've got ceiling joists you could do with strapping in the same way there too. (And to avoid spread you probably will have)
This is how it's done in Loft conversions even when the purlins are staying in. It's probably overkill, but better that than underkill and storm damage.
Purlins are there to stop the rafters bending, not to restrain the gables.
Usual caviats of course.
This isn't advice, it's opinion, you're not my client, get adivce from a professional and all that jazz.
Hate disclaimers but they serve as a good protection if I accidentally give it to the kind of clown who'd sue given an excuse - sure that's not you but I prefer to be on the safe side.
All that said - I'm getting workshop envy already. Think I might stop following this thread. Haha.
Dibs-h
Established Member
Cheers Bigshot.
The BCO mentioned the retraining straps - 2 on each side of the gable, going over a min of 2 rafters. I didn't bother asking about the depth down the wall - will do when I'm nearer to fitting them.
Overkill - you should see the groundbeams! I did fit similar ones on the floor joists when I did my loft conversion some yrs ago.
Don't worry - there's an SE on board this project, so advice isn't in short supply. But the more the merrier. :wink:
Right off home to do so more blocks. May well start with the trusses tomorrow - see how it goes.
BigShot
Established Member
Sounds like you're all set.
SE, BCO, and by the looks of it some pretty capable contractors too")
Nowt wrong with sone hefty groundbeams - I do rather like the Victorian approach to building.
Are you putting up a truss roof or a traditional one?
I've seen mention of both trusses and purlins which don't really get used together.
SE, BCO, and by the looks of it some pretty capable contractors too
Nowt wrong with sone hefty groundbeams - I do rather like the Victorian approach to building.
Are you putting up a truss roof or a traditional one?
I've seen mention of both trusses and purlins which don't really get used together.
Dibs-h
Established Member
BigShot":18adjmhd said:Sounds like you're all set.
SE, BCO, and by the looks of it some pretty capable contractors too
Nowt wrong with sone hefty groundbeams - I do rather like the Victorian approach to building.
Are you putting up a truss roof or a traditional one?
I've seen mention of both trusses and purlins which don't really get used together.
Contractors - just 1 novice = me! :shock:
I originally wanted a traditional purlin and rafter roof, but at 7.5m long was struggling for timbers big enough for the purlins. Not to mention the SE stating that the calcs weren't working for the building - i.e. no internal walls. So having thought about it for a while and seeing a shot of the inside of someone else's workshop - decided on 2 trusses and finally settled on King Post trusses, after having read till my head hurt.
The roof consists of 2 King Post trusses, placed on the piers, at 1/3 and 2/3 of the length. These will have purlins placed on the principal rafters at appox mid points, above the strut connections. Then common rafters over these, meeting at the ridge "plate" and birdsmouth'd over the pole plate. Almost like the roof shown here,
http://www.greenwoodoak.co.uk/roofs_tru ... 20roof.jpg
Did 2 more courses on the other gable this evening. All set to collect the timber in the morning for the trusses. Will have to spend a bit of time tomorrow fettling the new set of AI Firmer chisels (cheers Matt!). Will probably attempt a test joint or 2 in some lengths of 7"x3" (old joists) I have lying about. Although will probably complete the other gable first then crack on with the trusses.
Not to mention fitting the new blade to the Stihl and cranking it over - don't need a mis-behaving stihl when the time comes to use it. :shock:
I wish I hadn't sold all my scaffolding earlier in the year - but it was a choice of storing a new single phase 2 post car lift for the garage or the scaffolding - so the scaffolding had to go. But did agree the loan of it for free when needed - so probably leave that for the when garage is built, as it is taller.
Amazing progress on this Dibs considering you have done everything yourself.
The KP truss idea is deffo what i would do. It will leave you lots of head height for flipping 8x4 sheets and other long materials. Are you going to put a new electrical mains in or extend from the house?
The KP truss idea is deffo what i would do. It will leave you lots of head height for flipping 8x4 sheets and other long materials. Are you going to put a new electrical mains in or extend from the house?
Dibs-h
Established Member
Mattty":2fd6a5ud said:Amazing progress on this Dibs considering you have done everything yourself.
The KP truss idea is deffo what i would do. It will leave you lots of head height for flipping 8x4 sheets and other long materials. Are you going to put a new electrical mains in or extend from the house?
Initially there will be a 13a extension running from the house (existing garage) to power the odd light as I will have to empty out half the garage before I flatten it and then build the new garage and basement. I only need to flatten the back half of the garage as the half closer to the house isn't affected. Thought it would serve as a bit of a store and keep stuff away from prying eyes. Then just flatten that at the end. Initially it will be a pseudo workshop but more like a store - SWMBO wants the house finishing! And my "stuff" is taking up a lot of space in the house.
I've bit the bullet and will be going for 3ph - runs right past the end of my drive, and as that is coming up for the new block paving early next yr - seems oppurtune time to do it. Will also allow me to equip the garage with a screw compressor and a nice TIG.
You're not the only person who mentioned flipping 8x4 sheets - that somehow became a top 3 design requirement. :wink:
Dibs-h
Established Member
Weekend's Progress:
Sat - did 3 trips to the wood yard to collect the timber for the trusses - 4.8m 4"x8" weigh more than I want to lift. Thankfully the roof bars on the estate paid off. But could only put 1 length on at a time - as the timber yard is < 2miles - I didn't mind. So 2 trips for the 2 tie beams and then a final one for the principal rafters and king post sections.
Then got on with the other gable. I appreciate there has been advice on pitching the roof and then doing the gables, but as the spot is very sheltered - threrisk of issues should be minimal and as 1 was already done before it was pointed out that my approach was un-orthodox. Thought sod it - get the other one up - be big motivational boost.
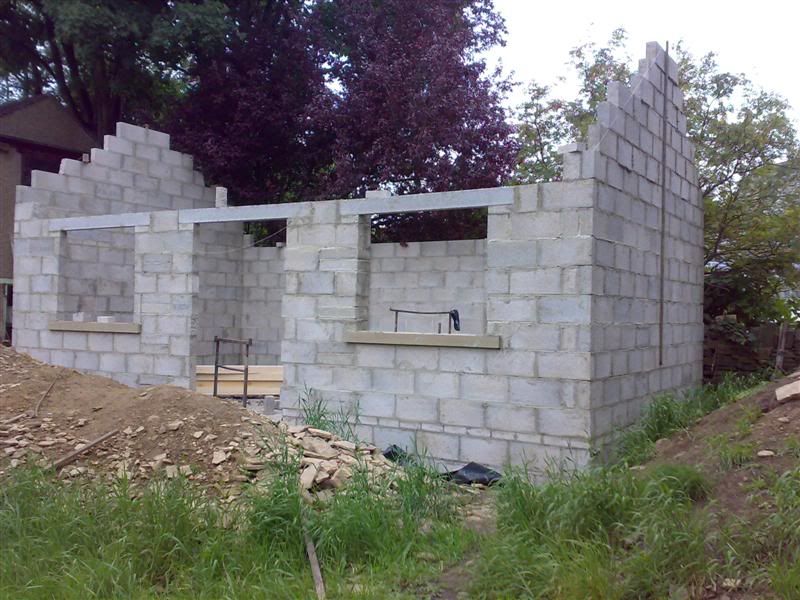
Sun - on with ripping a 100kg+ cast iron antique gas guzzling boiler out of the loft. Don't want to be doing that again! So no progress - but hopefully a massive saving on the winter gas bill - so maybe some more tools, etc. you never know.
So hopefully this week will get on with the trusses. Probably plan out the specifics of the joints and get on with those test joints I've been meaning to do for a while.
I am so looking forward to next Wed\Thur eveing - will be taking an evening off and going to the Turkish Baths in Harrogate!!
Sat - did 3 trips to the wood yard to collect the timber for the trusses - 4.8m 4"x8" weigh more than I want to lift. Thankfully the roof bars on the estate paid off. But could only put 1 length on at a time - as the timber yard is < 2miles - I didn't mind. So 2 trips for the 2 tie beams and then a final one for the principal rafters and king post sections.
Then got on with the other gable. I appreciate there has been advice on pitching the roof and then doing the gables, but as the spot is very sheltered - threrisk of issues should be minimal and as 1 was already done before it was pointed out that my approach was un-orthodox.
Thought sod it - get the other one up - be big motivational boost.
Sun - on with ripping a 100kg+ cast iron antique gas guzzling boiler out of the loft. Don't want to be doing that again! So no progress - but hopefully a massive saving on the winter gas bill - so maybe some more tools, etc. you never know.
So hopefully this week will get on with the trusses. Probably plan out the specifics of the joints and get on with those test joints I've been meaning to do for a while.
I am so looking forward to next Wed\Thur eveing - will be taking an evening off and going to the Turkish Baths in Harrogate!!
Russell
Established Member
over a week now we are all getting withdrawal symptoms, how's the progress or have you had a well earned rest this week?
Dibs-h
Established Member
Russell":i89rv7ch said:over a week now we are all getting withdrawal symptoms, how's the progress or have you had a well earned rest this week?
Sorry - it's not been a huge amount of progress this last week, what with removing the 30 odd year old gas boiler and fitting a new one. No rest unfortunately.
Managed to spend Sat on the workshop - doing the King Post trusses. Had to take Sun off (visit the inlaws) However, I'm off work today (to make up) so assuming all goes well - might have one truss made.
Thinking about it the other day - I haven't chopped out mortises for so long, but bit like riding a bike. Mind you, using a 5 lb lump hammer certainly speeds things up!
I've been taking plenty of piccies - will post them up later. Off out to the "workshop".
Russell
Established Member
Dibs-h":107t5w5f said:Had to take Sun off (visit the inlaws) However, I'm off work today (to make up) so assuming all goes well - might have one truss made.
dont think I would get away with that, thanks for the update
Dibs-h
Established Member
Russell":2z0f3vtu said:Dibs-h":2z0f3vtu said:Had to take Sun off (visit the inlaws) However, I'm off work today (to make up) so assuming all goes well - might have one truss made.
dont think I would get away with that, thanks for the update
I've just realised how that sounds -
What I meant was I've lost a day on the workshop - so I'm taking a day off off work to catch up on the workshop (as you all know it's on a tight schedule) - not a case of a reward or anything for yesterday. :wink:
Dibs-h
Established Member
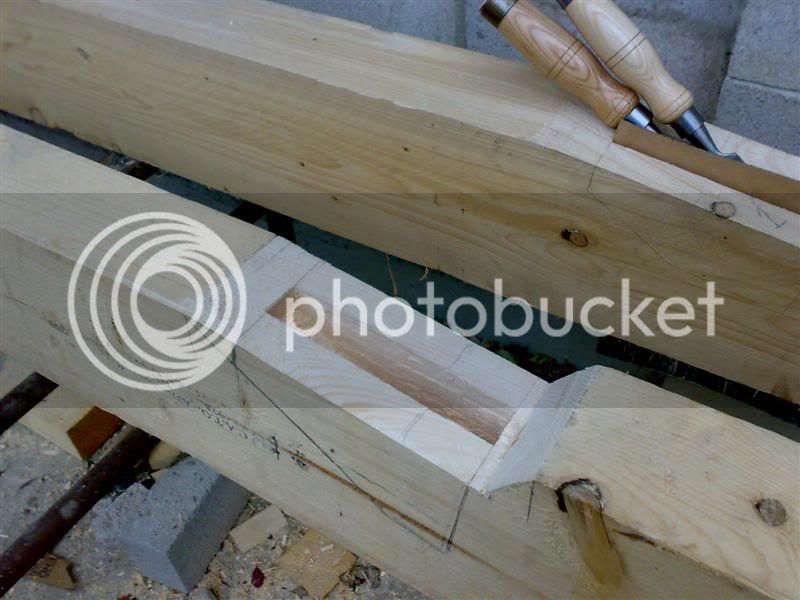
Update - why is it that the 1st one is always the most difficult to make (trusses that is)? Probably due to not having done one before, maybe. :shock:
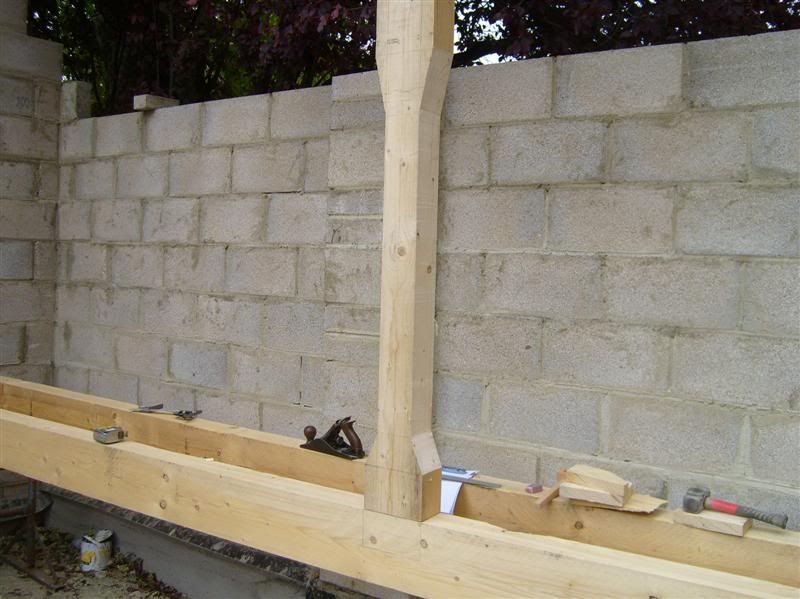
Below are 2 principal rafters - the top one showing the rafter\tie beam tenon and the lower one being the rafter\kingpost tennon.
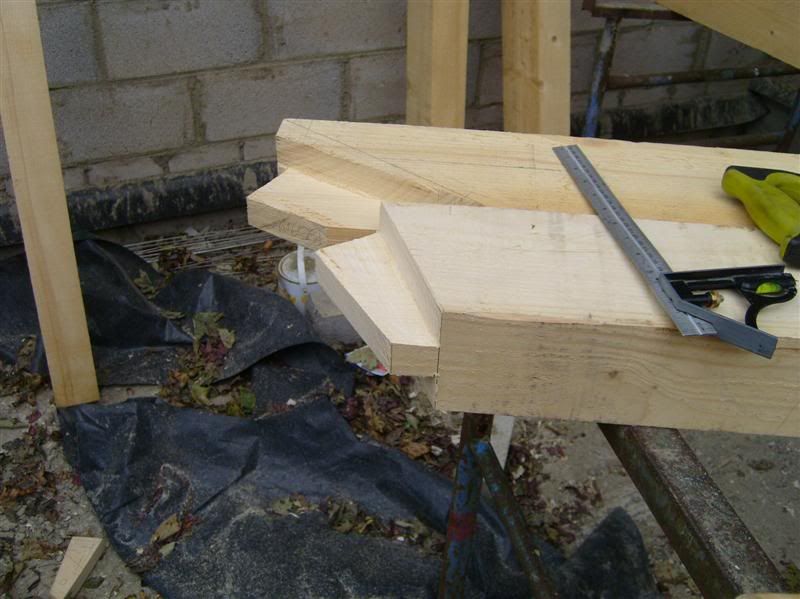
The rafter\tiebeam joint went fairly straighforward - both the mortise and the tennon. Here's the 2nd one underway,
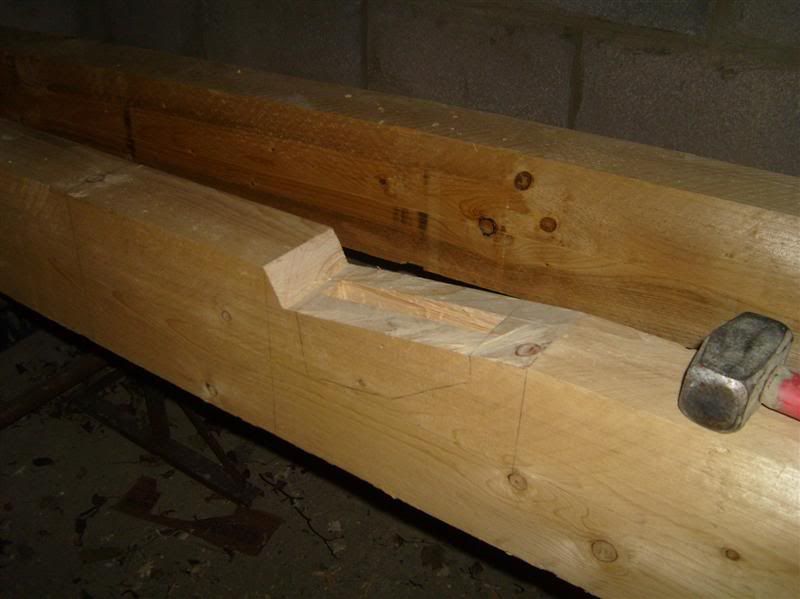
Did the kingpost mortise and the tennon - test fit, prior to shaping the kingpost.
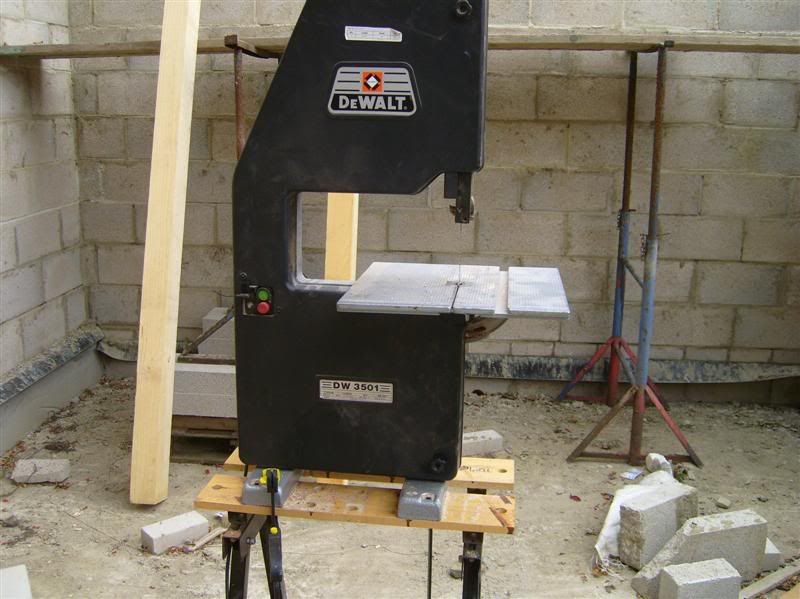
Then went & got the bandsaw - I'm sure HSE would have a fit, but neccesity and all that
did the "shaping" - bit of smoothing with a No4 and,
Test fit went ok. Then some procrastination - the rafter\tie beam tennon is "housed" in the tiebeam. was wondering whether the rafter tennon should also be "housed" in the kingpost. After much doodling (on the timber) decided that it shouldn't be housed in the same way. I'm referring to the mortice shoulder being inset into the tiebeam top surface.
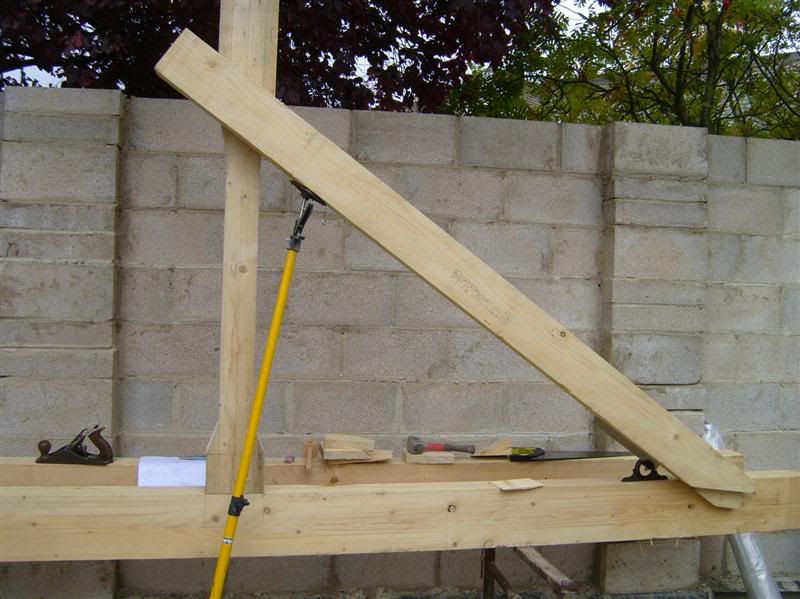
Another test fit or two, checking angles as well
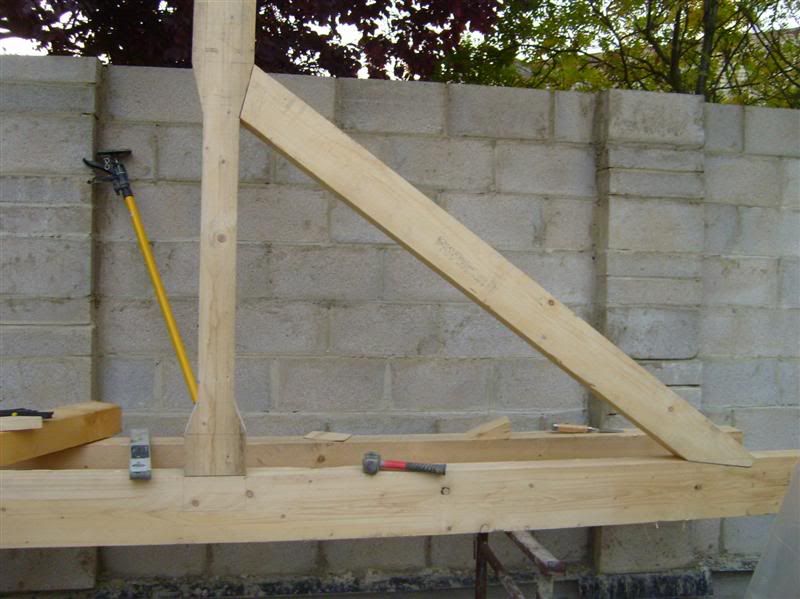
Then a final fit (not quite - but at least no more faffing about until the other rafter is done.)
I don't think it's too shabby. Bloody tiring tho - fitting, dismantling then shaving a tad bit off somewhere, then having another go...
I did end up drawing the tennon outline on the sides of the timbers having the mortices cut - seemed to help with working out depths, etc. in case anyone was wondering why all the pencil lines on those timbers.
Got the struts to come yet - hopefully might get this strut complete this week. Hopefully the other one should go quicker.
Below are 2 principal rafters - the top one showing the rafter\tie beam tenon and the lower one being the rafter\kingpost tennon.
The rafter\tiebeam joint went fairly straighforward - both the mortise and the tennon. Here's the 2nd one underway,
Did the kingpost mortise and the tennon - test fit, prior to shaping the kingpost.
Then went & got the bandsaw - I'm sure HSE would have a fit, but neccesity and all that
did the "shaping" - bit of smoothing with a No4 and,
Test fit went ok. Then some procrastination - the rafter\tie beam tennon is "housed" in the tiebeam. was wondering whether the rafter tennon should also be "housed" in the kingpost. After much doodling (on the timber) decided that it shouldn't be housed in the same way. I'm referring to the mortice shoulder being inset into the tiebeam top surface.
Another test fit or two, checking angles as well
Then a final fit (not quite - but at least no more faffing about until the other rafter is done.)
I don't think it's too shabby. Bloody tiring tho - fitting, dismantling then shaving a tad bit off somewhere, then having another go...
I did end up drawing the tennon outline on the sides of the timbers having the mortices cut - seemed to help with working out depths, etc. in case anyone was wondering why all the pencil lines on those timbers.
Got the struts to come yet - hopefully might get this strut complete this week. Hopefully the other one should go quicker.
Nice to see some more pics, still hard at it!
I have a really stupid question, why pay for a large timber and then trim about 1/3 off it, is it for the asthetics or am I missing something fundimental here.
In case you dont have a clue what I am on about
here black lined badly...

I have a really stupid question, why pay for a large timber and then trim about 1/3 off it, is it for the asthetics or am I missing something fundimental here.
In case you dont have a clue what I am on about
here black lined badly...
Dibs-h
Established Member
Oldman":24qcqubl said:Nice to see some more pics, still hard at it!
I have a really stupid question, why pay for a large timber and then trim about 1/3 off it, is it for the asthetics or am I missing something fundimental here.
In case you dont have a clue what I am on about
here black lined badly...
I know exactly what you mean. The surface where the struts abutt has to be as near to perpendicular to the end of the strut. All the reading done (and pictures I've seen) in the last several weeks show every kingpost done in the same way. Having said that - a fair few of the modern ones don't - but then neither are the rafter ends inset into the tiebeam.
But almost all the classical texts (i.e. Tredgold) state the they should and that the kingpost's waist should be narrower to allow for the strut to mortice into a surface that is as perpendicular to the end of the strut. Narrowing the waist allows one to do that. In my case it may well be overkill - but as no-one is liable for any cockups but me - went with the classical design of a truss, i.e. supersafe.
Dibs-h
Established Member
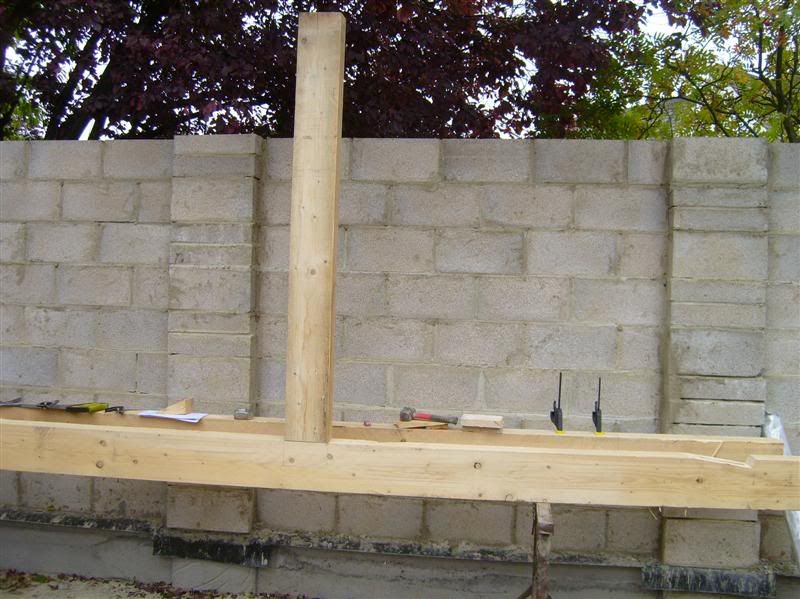
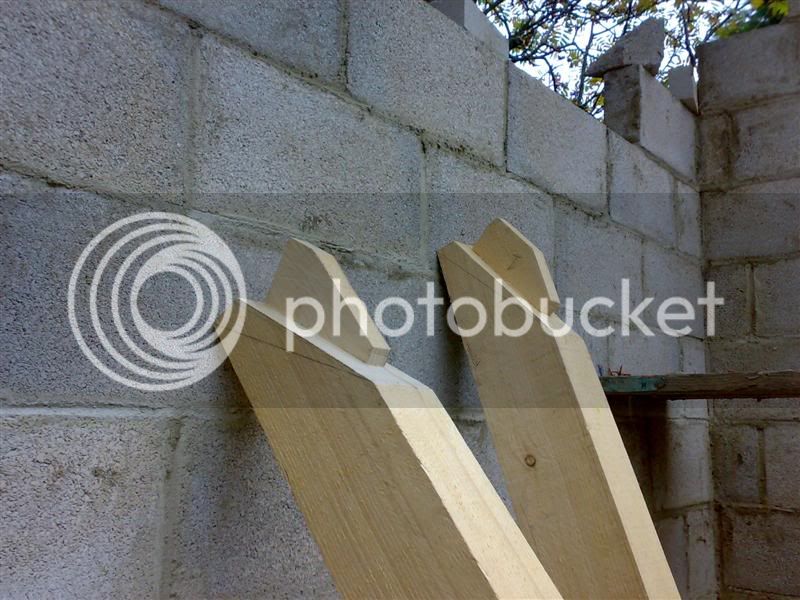
Update - got a bit more done. Fettled the existing joints and happy with the fit. Started on kingpost tennon on the other principal rafter,
Then decided to put it together to ensure the joint at the kingpost is in the right place,
Used a ratchet strap to pull\hold the completed side together. It's was also getting dark - i.e. time to knock off and go inside.
With a bit of luck should get the mortice done this evening. I haven't got the timber for the struts yet nor the purlins - so will probably use the weekend to start the other truss and then fit the struts during the week and create the cogged joints for the purlins as well.
Thumping a chisel is so therapeutic!
Dibs-h
Established Member
Update - didn't get anything done on Sat. Had to go collect a Bandsaw\Extractor from Carlisle and sold the Audi 80.
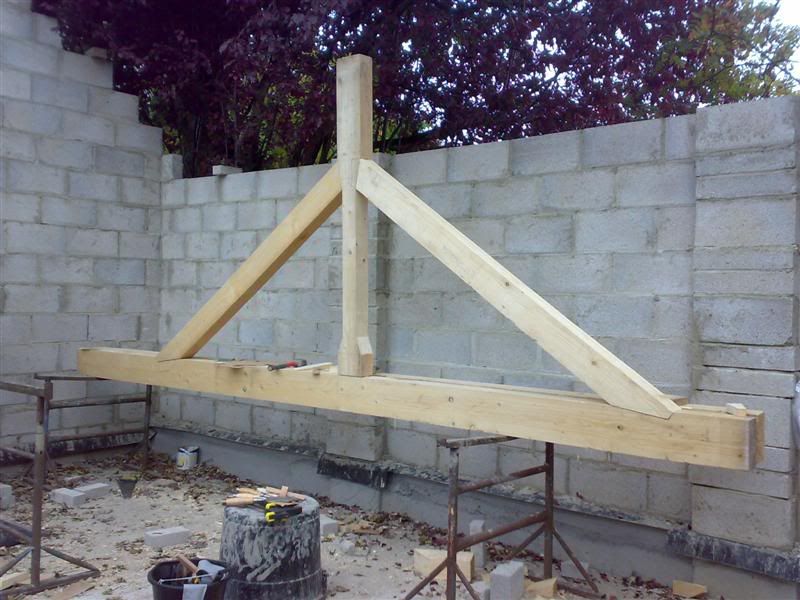
Sun - Got the 1st truss assembled (test fit). I haven't done the struts, will do the ones for both trusses together at the end.
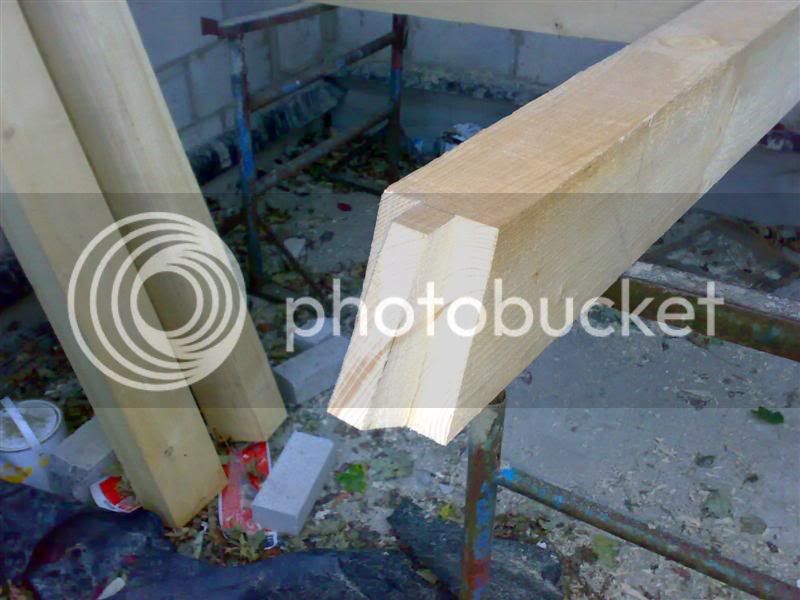
Started on the 2nd one - after having a chat with Simon (cheers for the docs), decided to leave the tennon as long as possible - you can see the 2 variations in the following picture,
Consequently the mortice is also slightly deeper for the "modified" tennon.
Also having mulled it over - I won't be drawing boring it nor using wooden pegs. There probably isn't quite enough relish left if one was to use 18mm (or larger) wooden pegs.
I've decided to use 10mm (or therabouts) S\S pins\pegs instead. From a strength perspective - shouldn't be an issue, and with the significantly reduced diameter - I should get closer to the suggested nbr of diameters (of the pin) from the shoulder and the amount of relish left behind.
Already thinking HTF that's going to get lifted up into place - brute force and pain and multiple bodies, most likely.
The timber for the tie-beam was a bit longer than required - I started from one end - reasoning that in case of a cock-up, could just cut the end off and start again. So in the 1st picture - the "longer" end requires trimming. Just in case anyone wondered why the tie beam was longer at one end. :lol:
Sun - Got the 1st truss assembled (test fit). I haven't done the struts, will do the ones for both trusses together at the end.
Started on the 2nd one - after having a chat with Simon (cheers for the docs), decided to leave the tennon as long as possible - you can see the 2 variations in the following picture,
Consequently the mortice is also slightly deeper for the "modified" tennon.
Also having mulled it over - I won't be drawing boring it nor using wooden pegs. There probably isn't quite enough relish left if one was to use 18mm (or larger) wooden pegs.
I've decided to use 10mm (or therabouts) S\S pins\pegs instead. From a strength perspective - shouldn't be an issue, and with the significantly reduced diameter - I should get closer to the suggested nbr of diameters (of the pin) from the shoulder and the amount of relish left behind.
Already thinking HTF that's going to get lifted up into place - brute force and pain and multiple bodies, most likely.
The timber for the tie-beam was a bit longer than required - I started from one end - reasoning that in case of a cock-up, could just cut the end off and start again. So in the 1st picture - the "longer" end requires trimming. Just in case anyone wondered why the tie beam was longer at one end. :lol:
Dibs-h
Established Member
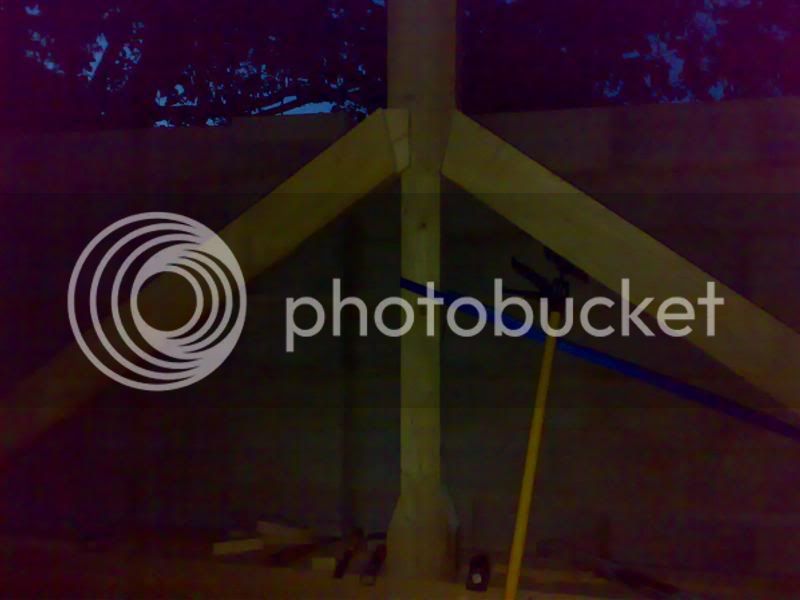
Update - got the kingpost M&T done last night - came to take a piccy and it was getting dark quick - rubbish picture.
I'll be spending about 1/2 day on the "shed" today - so hoping to get the Kingpost shaped and at least 1 prinicipal rafter completed - i.e. tennoned into the Kingpost. If I'm lucky I may get a start on ther other.
Just need to check the span tables and ensure the 6"x4" purlins on a 2.5m spacing and a 2.4m ridge-wallplate span are adequate - will be ordering tomorrow so no cockups.
Will post some piccies up tomorrow of today's progress.
Similar threads
- Replies
- 0
- Views
- 381
- Replies
- 10
- Views
- 2K