Wedged tenons

UKworkshop.co.uk

Help Support UKworkshop.co.uk:

This site may earn a commission from merchant affiliate links, including eBay, Amazon, and others.

No skills

Established Member
Joined
6 Feb 2011
Messages
2,559
Reaction score
3
Location
Hanging by my fingertips
When doing through and wedged mortise and tenons are the mortises always tapered? or sometimes is just relying on compression of fibres enough to do the job?

I'm not making anything in particular - just a question that popped into my head this morning..

Cheers
 
According to books, old and new, no the mortises are not always tapered. A tapered mortise will make for a more secure join of course because of the dovetailed tenon that results.
 
A tapered mortice is a bit awkward to do, morticing a bit wider on the outside of the stile works well, although it makes a bit of a step, but still helps to lock the tenon in place

If the mortice is not tapered or made wider, it makes it difficult to get a decent wedge in. Either the wedge has to be very thin, or the wedge wont bang in very far and snaps off (DAMHIK). I know its possible to cut a thick slot for the wedge, but that is weakening the tenon.
 
I've made non-tapered wedged mortises before just fine, but I used a softwood for the mortise and tenon, and a hard wood for the wedge

94f4ce5873b52daeb4a09115d9b0a21b.jpg
 
Matt, you've got your wedges running the wrong way, the way they're positioned they're acting to split the top, if you'd have made that piece from hardwood the build would not have had such a happy ending! They should be rotated through 90 degrees so the wedging pressure is acting against the end grain of the top.
 
Hello,

Was just about to say the same, but Custard beat me too it!

Alternatively, you can set the wedges across the diagonal. This way, gaps are taken up on all four faces of the tenon.

Mike.
 
Here's how I was taught to do wedged tenons for first quality hardwood furniture (the joinery boys may well do things differently, but this is a cabinet maker's wedged tenon), this is the Edward Barnsley method.

-The mortice is always tapered, typically by about 3mm on each side. Incidentally, this may bring an added advantage if you use a morticing machine, typically the augur will often run out minutely beyond the perimeter of the square chisel, leaving a tiny crescent shape which renders it unusable for first quality through-tenon work, however if you can arrange for the crescent to be located in the tapered part it doesn't matter as this will be chiselled away. If you can't then there's no alternative to cutting the mortice by hand, using precise setting out and chiselling in from each face.

-The taper is cut into the mortice with a hand chisel, and you aim to terminate the taper about 1 or 2mm before it breaks through to the other side

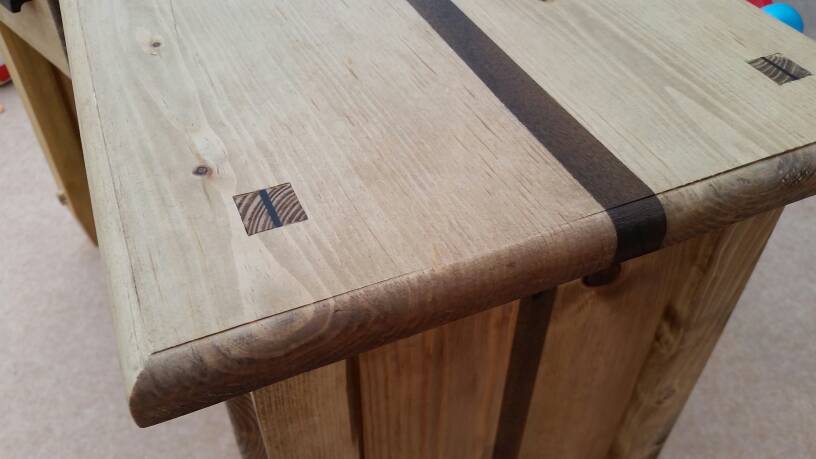
-The tenon has two saw kerfs (there are always two wedges) and they are angled and therefore terminate about 1mm away from the side of the tenon allowing the tenon to "hinge" open and to remove any risk of a crack propagating along the tenon component. The two kerfs are cut so as to divide the visible face of the tenon into three equal parts.

-The wedges are sized precisely to be 3mm thick (to correspond with the mortice taper) at about 1 or 2mm less than their fully inserted position. The wedges are also orientated so the end grain forms a pleasing herringbone pattern. Each wedge is numbered to correspond with its precise location.

-The glue up is arranged with elaborate cramping blocks that allow the wedges to be inserted and tapped home so that each wedge is the identical thickness. Great care needs to be taken so that the wedge enters square and doesn't tip over, which might bruise the edge of the workpiece surrounding the mortice. You're aiming for absolutely no gaps (which is why diagonal wedges aren't used, they almost always result in a pinprick sized gap in the corner) and invisible glue lines all round.

-After the glue has set the tenon (which is about 1mm proud) is flushed off.

This is a diagram of the general arrangement,

Wedged-Tenon.jpg


These are a couple of shots showing the typical cramping arrangements for wedged tenons,

Wedged-Tenon-Stool-1.jpg


Wedged-Tenon-Stool-2.jpg


Is this all a giant faff? Too right it is, but that's what first class cabinet making is all about!

Good luck!
 

Attachments

  • Wedged-Tenon.jpg
    Wedged-Tenon.jpg
    11.8 KB · Views: 133
  • Wedged-Tenon-Stool-1.jpg
    Wedged-Tenon-Stool-1.jpg
    81.4 KB · Views: 133
  • Wedged-Tenon-Stool-2.jpg
    Wedged-Tenon-Stool-2.jpg
    78.4 KB · Views: 133
Actually I have seen an alternative method that adds a whole new level of faffness. As the workpiece shrinks in the home the through tenon may become minutely proud. To prevent this the entire exposed face of the through tenon is cut back by about 2mm to sit below the surface with a neat chamfer worked around the mortice edges. The standards for zero visible glue lines are unchanged. I've never felt the need to go to this extreme but I tip my hat to those who do!
 
I have seen drawings of them being done with the mortice tapered and the tenon being tapered slightly inwards, the two wedges being hammered in on the outside. I suppose if you were working for strength alone this might well be the strongest - the tenon isn't cut in any way and the dovetail effect is ensured, the wedges being glued on the outside and not relying on spreading the tenon in any way.
 
phil.p":33z72yh7 said:
I have seen drawings of them being done with the mortice tapered and the tenon being tapered slightly inwards, the two wedges being hammered in on the outside. I suppose if you were working for strength alone this might well be the strongest - the tenon isn't cut in any way and the dovetail effect is ensured, the wedges being glued on the outside and not relying on spreading the tenon in any way.

I think that's the joiner's standard way but I couldn't be positive, certainly I've seen doors that have used that method. The problem is aesthetics, if someone's happy having the wedges right at the ends then okay, personally I prefer them inset like this,

Trhough-Tenon-Wedged.jpg
 

Attachments

  • Trhough-Tenon-Wedged.jpg
    Trhough-Tenon-Wedged.jpg
    62.4 KB · Views: 120
phil.p":2xgdmau0 said:
I have seen drawings of them being done with the mortice tapered and the tenon being tapered slightly inwards, the two wedges being hammered in on the outside. I suppose if you were working for strength alone this might well be the strongest - the tenon isn't cut in any way and the dovetail effect is ensured, the wedges being glued on the outside and not relying on spreading the tenon in any way.

Hello,

I believe this is for softwoods and the wedges set into saw kerfs is for hardwoods.

I have another variation on wedging in saw kerfs, which is slightly different to the one Custard has superbly described. In fact I used to use that method pretty much exactly for years, until I found another method I was happier with, and now I have changed. I will do some drawings later and describe an alternative.

Mike.
 
custard":3uxxsqoz said:
Matt, you've got your wedges running the wrong way, the way they're positioned they're acting to split the top, if you'd have made that piece from hardwood the build would not have had such a happy ending! They should be rotated through 90 degrees so the wedging pressure is acting against the end grain of the top.

Yep, thanks custard - these were my first project, so a good learning curve! Fortunately they held well :D
 

Latest posts

Back
Top