The "Corby" Workbench

UKworkshop.co.uk

Help Support UKworkshop.co.uk:

This site may earn a commission from merchant affiliate links, including eBay, Amazon, and others.

Shultzy

Established Member
Joined
10 Oct 2006
Messages
2,196
Reaction score
2
Location
Near Lichfield, Staffordshire
I, and many others, on the forum managed to visit Corby to purchase these science tables. I bought two of these frames and four tops...

Workbench001.jpg


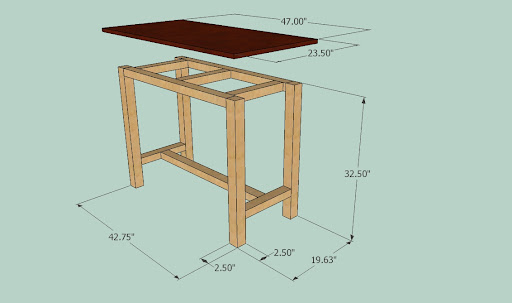
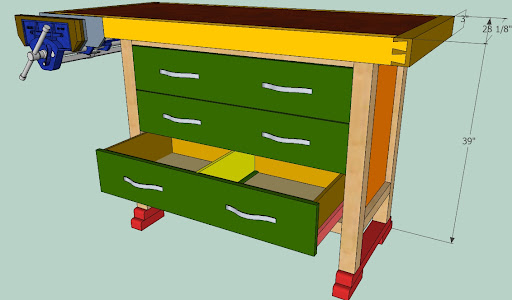
...and I'm going to convert it to this.

Workbench002.jpg


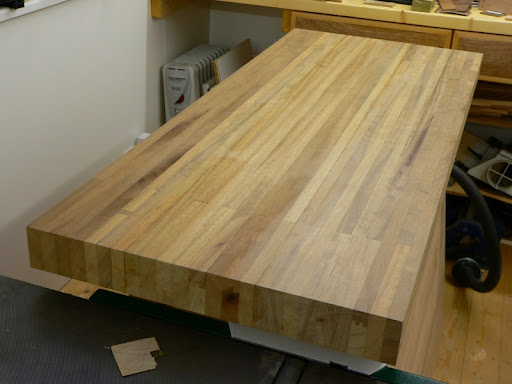
This is how they arrived, before cleaning, and after cutting the grooves...

Workbench000.JPG


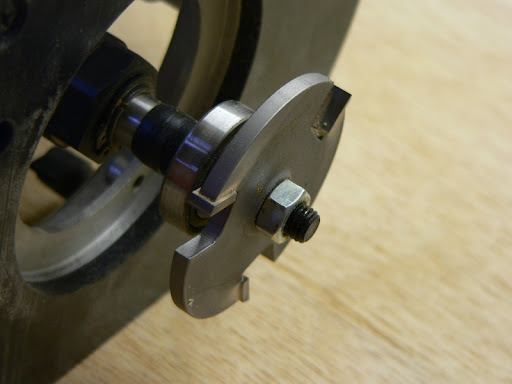
...with this monster. A bit scary to use "hand-held" but I cut the groove in three passes.

Workbench002.JPG


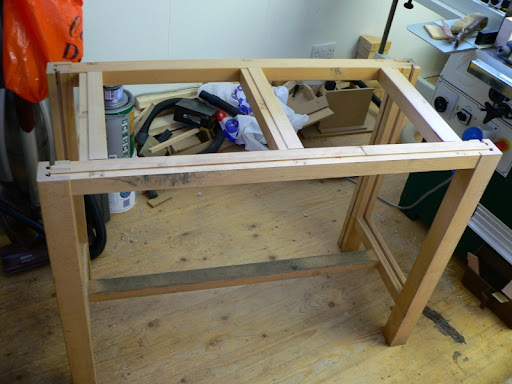
I cleaned up the original, made the end panels and the top and bottom rails.

Workbench001.JPG


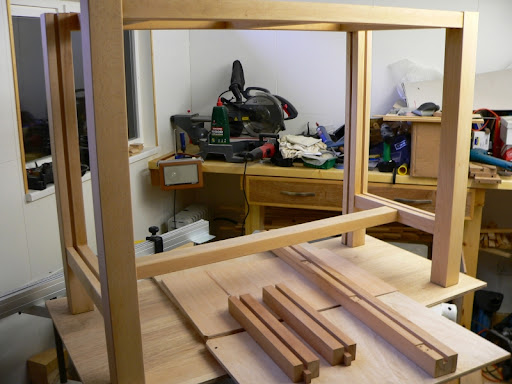
I glued the panels and the top rails. The bottom rails are from another bench and were pocked-holed and glued as they weren't long enough to put a tenon on. I made the feet to raise the original bench. I bored 25mm holes at each end of the long foot, clamped these to the legs and used the hole as a guide to drill into the legs. Same with the short feet. I then turned four 25mm dia dowels and glued all together.

Workbench003.JPG


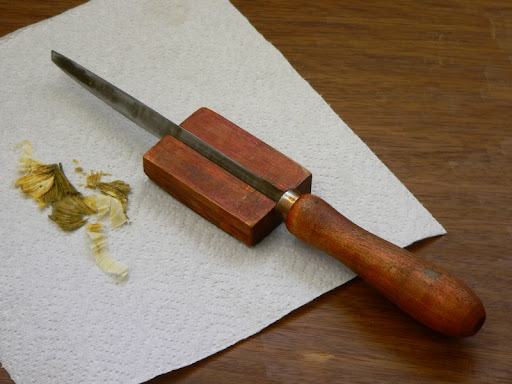
This is my 30 year old scraper which I used to clean off the varnish on the tops which I'm about to cut.

Workbench005.JPG


The drawers are 37 3/4" wide and I will use full extension slides and fronts similar to my other drawers shown in the fifth picture. I have lots of offcuts of 1/2" ply and mdf, so to get rid of these off-cuts what combination should I make the drawers out of :-
only the ply
only the mdf
ply base mdf sides
mdf base ply sides
I think it might be prudent to put a strengthening strip under the centre of each drawer base.
 
were your tops as 'minty fresh' as mine were? I cleaned them off with an old chisel and a toch in the middle of the night when it was cold enough to chip away at... nice.

Aidan
 
They weren't too bad Aidan as I'd left them outside for a month. One had a particularly "sticky" varnish but my scraper got all of it off before I cut the strips.
 
I don't think MDF would be sturdy enough for the sides so, leave that for the drawer bases and use the plywood for the drawer sides. Adding a muntin to the drawer base is a good idea. If you make it thick enough, you could have this in the centre and then add two smaller MDF panels for the base. :wink:
 
I finished gluing the top last night. Its made up of four desktops of either Mahogany, Iroko, or something else!

Workbench008.JPG


One had a particularly "sticky" varnish but my scraper got all of it off. I cut each top into seven strips, the seventh was cut into six shorter pieces and used to make the bench longer. I then put them through the thicknesser just to skim them ready for gluing. Although I checked the wood for any metal bits, unfortunately I missed a staple which nicked the planer blades. As I have "replaceable blades" and a new set cost £40, I'm going to invest in a metal detector. I glued them in three batches of eight, although in hindsight because of the weight, I should have made them in six batches of four. Gluing was a nightmare as the shorter pieces kept slipping when cramping up. I put them through the thicknesser again before the final gluing and I've only "lost" about 1/4" to leave me with a thickness of 2 7/8". I've had to make a few repairs to the top where screw hole and chips appeared but it doesn't detract from the overall look of the top.

I'm going to put a 2" wide by 3 1/2" or 4" deep beech apron around the top, dovetailed at each corner.

Is it cheaper to buy 1" than 2" thick boards or are they priced the same per cube.
 
Shultzy":2osui84r said:
unfortunately I missed a staple which nicked the planer blades.

Damnit! I got hit by this the other day. Managed to reduce the nicks considerably with one of those diamond planer blade hones. Stupidly, I hadn't got the spares sharpened yet, so I'll have to wait a couple of days to get them back in.

That top looks lovely, plenty substantial.

If anything I'd have thought it'd be cheaper the thicker you bought?
 
Afraid it is not cheaper the thicker you buy.

2" material will be substantially more expensive than 1" for the same cubic footage.

Wouldst that it were the other way round but alas not.

Cheers, Ed.
 
Shultzy":3mjv6kjd said:
Thanks Ed, can I assume what this is also true for widths? ie. 12" wide is more than twice 6" wide?

Yup, even more so for 6" to 12" wide than 1" to 2" thick in my experience.

If you need 12" finished, it is probably most cost effective to prepare & join 3 off 5" sawn boards. Much better chance of it staying flat too.

Bob
 
Yes Schultzy, but depends a bit on the yard where the break points in price are on width.

If you look here for example at SL Hardwoods you can see how the prices increase with width. Bear in mind these prices are per linear metre though, not cu ft, so the difference is not as bad as first seems. What you can see is that American White Oak 115mm is £16/m and 240mm is £37/m, which is a more than twice as much for the double width board.

http://www.slhardwoods.co.uk/looseboards.asp

I have found other more 'old fashioned' yards are sometimes less bothered about width.

Ed
 
Did you not use biscuits, splines or any other kind of reinforcement to help keep all the components aligned?

I'm assuming you glued the top up in smaller sections - otherwise, you must have one heck of a thicknesser to be able to thickness a 28" wide top!! :shock: :roll: :wink: :)
 
Hi OPJ, I didn't use any biscuits as I only needed to get the edges "near enough". The problem I had was the small pieces (about 7"") were either pulling away from the piece next to them or riding up as I put pressure on with the clamps. Remember there are two short pieces at either end, awkward when there is only one pair of hands :D .

I glued four lengths together at a time and then put them over the planer before gluing two "fours" together. My planer is only 10" wide.
 
Shultzy":7kbp2uzy said:
I didn't use any biscuits as I only needed to get the edges "near enough". The problem I had was the small pieces (about 7"") were either pulling away from the piece next to them or riding up as I put pressure on with the clamps.

I would always use biscuits or loose tenons for a job like that. In my experience, it's not always predictable which way the pieces are going to slide when you get glue on them and tighten up the cramps. Apart from the general hassle, you can sometimes have to remove a lot of material planing the work flat again if some pieces slide one way and some the other. Still, it looks good :)

Cheers :wink:

Paul
 
Back
Top