Steve's workshop - Painting the outside walls

UKworkshop.co.uk

Help Support UKworkshop.co.uk:

This site may earn a commission from merchant affiliate links, including eBay, Amazon, and others.
I went through a process with building control over fire proofing doors on a loft conversion once. The client wanted to keep her doors. We looked into it as someone had mentioned that Stately homes use a product to protect everything. I proposed it to the building inspector and he said he needed to see recent test results on similar doors to those that we wanted to use it on. They would need to stand up to the 30 minute test that a standard fire door does. It was a none starter.
 
Ref Beech1948

Not sure on the details of steves build (size or location on his property) but..

Outbuildings over a certain size and with certain distances from boundary's should be "constructed of substantially non-combustible materials"

Probably why Mr BC has an issue, hopefully an layer of cement board/woodwool etc under the cladding will avoid steve learning to lay bricks.
 
I'm sure it will all be fine.

UrbanSpaceman is coming over on Sunday and I plan to install the barge-boards. I've already prepped the mounting blocks and the barge boards themselves, although I haven't trimmed the bottom ends. I think I'll do that in situ.

Once they are up then the roofing itself can go on.

S
 
Hi Steve

My ex-neighbour built a 3 bay oak framed garage in his land and IIRC he had to finish it in some kind of fire retardant finish because it is within about 12 feet of my house. I have texted him to see if my memory serves well and if so the what the product was.

His concern was the colour but not a lot he could do about it, and it fits in so looks fine.

u7y9u4ah.jpg


Will report back ASAP.

Cheers
Mark
 
Sorry Steve, it appears I mixed up a couple of conversations we had!

The planners wanted it to be fire retardant but apparently my neighbour argued it and won on he basis that "char factor on oak was enough" whatever that means. :)

Strikes me then that if that argument could force a change of mind that their requirement was on fairly flimsy grounds n the first place...

Realistically, even if you had a fire guard behind the cladding you still have barge boards and timbers in the roof that could catch fire and bring the roof down anyway. Seems overkill to me...

Hope you get it resolved in the best and cheapest way for you Steve.

Cheers
Mark
 
Hi,

While you always want to keep BC officers onboard it always pays to ask questions. If a regulation is not clear cut, Individual officers may interpret them the way they would like to see a particular aspect of the project, not always a benefit to the applicant.

If you have not already, I would ask to see the regulation yourself and if it not obvious to you why he is taking his view ask for clarification.

You could always get advice from the local Fire Prevention officer, they are always helpful. If he thinks your structure is not a problem this is always useful ammunition with the council if there is a grey area.

In the last 2 years we have renovated & extended our property and were unfortunate to suffer a major loss in the December floods on another property in both cases we had help & hindrance from the local BC some with justification, others not including conflicting information. On the negative dealings with them with almost all when they were pushed for justification they removed their objections.

The BC officer may be correct and while you obviously want to be safe you need the correct info.

You do not need more expense or unnecessary work.

Good luck
 
Hemsby":2bs57u8h said:
..... On the negative dealings with them with almost all when they were pushed for justification they removed their objections.

.....

You are spot on. In my experience, all BCO's have their own 'pet' issue. In my case, while renovating an old B&W, all the casement windows were being replaced. In conversation with the BCO during one of his visits, he said in passing 'You are going to make them top opening as well for egress in the event of a fire'. When I pointed out (gently) that my understanding of the regs was that provided that the opening was no worse than what existed before then top opening was not mandatory. He backed down muttering ' Oh yes, you're right'.
 
Well we didn't get the barge boards up, but we did get all the support blocks up.

Urban Spaceman cam along to help today and he worked like a slave. He's a lot less of a wuss when it comes to ladders than I am, so I was grateful for that.

I made the support blocks weeks ago and should have fitted them before the roof membrane went on, it would have been so much easier.

The first problem was the ladder. The ground on the right is very uneven and the OSB is slippery. And as there is not a lot of room, it felt like the ladder was going to fall sideways at any moment. We fixed that by cutting a short length of 4x2 to fit just nicely between the top of the ladder legs. The once the ladder was over it, it was secure. It worked very well.

P1020907.JPG


So US held the block in place outside whist I was up another ladder screwing it from the inside.

P1020906.JPG


The screws had to go through a truss-plate, but I have a drill that is supposed to drill anything - wood, steel, brick. But I heard a Ping and one of the WC tips has broken off and now it wouldn't drill a watermelon. I'm a bit annoyed as the set wasn't cheap and I've not had it long.

So the blocks support the barge boards by sticking out a bit like the end of a purlin, if we had them:
P1020908.JPG


We could nail up the short bit of BB:
P1020910.JPG


but the longer, full length was just too heavy. We could get it up but not hold it safely and nail it as well. It will have to wait until there are three of us. I've got another couple of offers of help this week, I hope the weather is good enough to allow us to work. There is 40mm of rain forecast for tomorrow. What happened to summer?

TVM to Urban Spaceman, I could not have done it alone.
 

Attachments

  • P1020907.JPG
    P1020907.JPG
    228.2 KB · Views: 1,766
  • P1020906.JPG
    P1020906.JPG
    212.8 KB · Views: 1,766
  • P1020908.JPG
    P1020908.JPG
    217.3 KB · Views: 1,766
  • P1020910.JPG
    P1020910.JPG
    202.4 KB · Views: 1,766
I had both Ray and Brian Habby today and we got quite a bit done. Not as much as Ray wanted, but what we've done is good and right.
There was a bit of remedial work to do from the work that Urban Spaceman and I did on Sunday. Basically I'd made the support blocks an inch too deep, so we had to shorten them. It didn't take anywhere near as long as it did to put them up in the first place, so although it was a nuisance, it wasn't too delaying. At least now there is space to fit soffit boards underneath.

Once we had them up right we fitted the barge boards on the left hand side. Note the join near the top. It is bevelled so that water drops away rather than inwards.

P1020911.JPG


P1020912.JPG


Access is tight on the RHS. I'm beginning to wish I'd left more ground. It's OK for the walls, but the eaves stick out so much that it becomes impossible to access them comfortably. So Ray decided it was easier to fit those barge boards from above. Brian helped him to get dressed. I wish I'd videoed it, it was hilarious.

P1020917.JPG


Once the RHS was done the same as the left, Ray decided that whilst he was up there he may as well trim some of the laths, while Brian and I fitted the fascia boards at the front, but they are unwieldy, so after a couple of failed attempts we tackled the job with the three of us, two holding and one nailing. Easy-peasy.

P1020921.JPG


P1020922.JPG


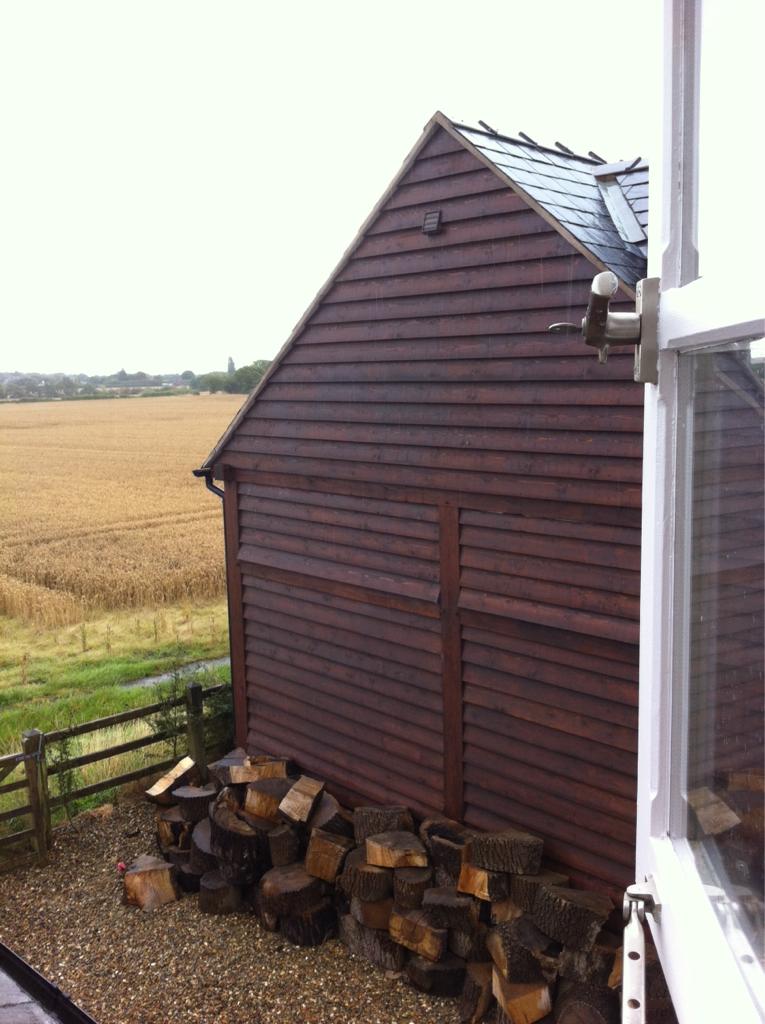
We didn't have time to finish the front fascia, because I need to fit another support block at the front left corner first, but it now looks like this:

P1020928.JPG


It was great to see Brian again, and, as ever, I've very grateful for the help. Indeed, he spotted that I was about to cut one of the boards in exactly and precisely the wrong place, so that saved me a board, paint and a lot of time. If he'd done nothing else, that was worth his journey over. (He did do rather more than that, of course, but you know what I mean).

Ray is back on Saturday, all being well. We could do with another pair of hands, if anyone can help out.
 

Attachments

  • P1020911.JPG
    P1020911.JPG
    197.5 KB · Views: 1,586
  • P1020912.JPG
    P1020912.JPG
    240.3 KB · Views: 1,586
  • P1020917.JPG
    P1020917.JPG
    214.9 KB · Views: 1,586
  • P1020921.JPG
    P1020921.JPG
    210.2 KB · Views: 1,586
  • P1020922.JPG
    P1020922.JPG
    225.7 KB · Views: 1,586
  • P1020928.JPG
    P1020928.JPG
    199.2 KB · Views: 1,586
Won't be long till your kitting out the inside Steve !

Great to see the build progressing :)

Cheers, Paul
 
Wizard9999":2423fgbt said:
No skills":2423fgbt said:
Ref Beech1948

Not sure on the details of steves build (size or location on his property) but..

Outbuildings over a certain size and with certain distances from boundary's should be "constructed of substantially non-combustible materials"

Probably why Mr BC has an issue, hopefully an layer of cement board/woodwool etc under the cladding will avoid steve learning to lay bricks.

Steve

I can't see you having reported back that you have resolved the issue with building control. Has it been resolved but it is just too dull a topic to report back on? If not I really would suggest you get this sorted out before you get much more done. I have looked back at some of your early pictures and whilst it is impossible to be certain it does look as though you are within a metre of the boundary. If that is the case then you really need to bottom out what they want you to do to comply with "constructed of substantially non-combustible materials", as others have pointed out different people interpret things differently and if you are unlucky a coating or material behind the cladding might not be what they are thinking of and you could just be doing work that will have to be undone later.

I have to confess a vested interest in this myself as I am thinking of a workshop within 1 metre of the boundary and I was told that if I go over 15m2 about the only way I can comply is if the whole workshop is of masonry construction. Admittedly I was told this by a local builder he may not be an expert, but he did seem pretty certain. Note the reg quoted does not say the area that is within one metre has to be of non-combustible material, but rather it implies the whole building. If you get the go ahead to just coat a predominantly timber structure with a fire resistant coating on the wall nearest the boundary I'd love to know as it could mean my workshop can be at least 33% bigger!

Wizard9999.

Wiz, I think you'll find that these things can vary greatly from area to area. Always a good idea to check with your own guy. If Steve is allowed to use a coating you can always mention it.
 
Grayorm":f2t1w2f1 said:
Wiz, I think you'll find that these things can vary greatly from area to area. Always a good idea to check with your own guy. If Steve is allowed to use a coating you can always mention it.

Grayorm

Agreed, one of the fundamental problems with planning and building control is that so often the fate of your project is determined by the subjective interpretation of the rules by the individual dealing with your case. That's my primary concern here, that Steve 'cracks on' only to find that when Mr BC comes back he digs his heals in for a solution that means a whole lot of work has to be undone.

Before I start anything I'll be looking to get something in email from the local authority confirming my proposals will be OK, or at the very least if I can only get verbal confirmation to take a note of date of discussion and person I spoke to. But then I'm under no illusion that even that will give me 'cast iron' certainty of problems down the road.

Wizard9999.
 
Hi Wizard,

Have you considered getting an independent company to do the inspections? Because I undertake projects covering many boroughs, I find it much easier to deal with the same company and being private I find them more pragmatic in their approach. I use BBS building control.

If you did a full plans submission, if they are approved, then there shouldnt be any surprises during the build. I certainly share your concern with local authority BC, you could agree verbally with one inspector only for another to do later inspections that has a different viewpoint.

Not wishing to hijack this fantastic workshop thread of course!
 
We've had a good day at it today.

First we fitted the three remaining fascia boards. They meet roughly in the middle directly over a truss end. Each board is bevelled at 45 deg so that one overlaps the other and both are nailed together into the truss end. The ends are flush with the bottom of, and the outside face of, the barge boards. Then, while Ray went up on the roof, I went round with a paint brush to give the boards their second coat of paint. The nails and the joint itself disappear.

I really, really wish that I'd given the barge boards their two coats before we put them up. They are going to be a pig to paint in situ. Just having to dab over the nails would have been much easier, especially on the RHS. Ray reckons he can paint them OK from the rooftop. Where would I be without him?

Ray was up top trimming the laths and the membrane to the barge boards, and nailing the lath ends to the barge board itself. It's neatened it up no end. I'd cut a bucket load of short lengths that fit between the laths. They, too, got nailed to the barge boards. It means that there is 70mm of support for the tile edges all the way up the gable, and the membrane is secured along its full height.

The line of the gable looks nice and straight, more so than the photo would suggest, and the width of the roof at the front and back is the same to within 3mm, as far as we can measure with a sagging 8m tape. I think that's pretty good, myself.

P1020929.JPG


P1020932.JPG


P1020933.JPG


P1020934.JPG


He's back tomorrow, watch this space.
 

Attachments

  • P1020929.JPG
    P1020929.JPG
    180 KB · Views: 1,320
  • P1020932.JPG
    P1020932.JPG
    102.3 KB · Views: 1,320
  • P1020933.JPG
    P1020933.JPG
    215.6 KB · Views: 1,320
  • P1020934.JPG
    P1020934.JPG
    230 KB · Views: 1,320
Wizard9999":3aigmeud said:
Grayorm":3aigmeud said:
Wiz, I think you'll find that these things can vary greatly from area to area. Always a good idea to check with your own guy. If Steve is allowed to use a coating you can always mention it.

Grayorm

Agreed, one of the fundamental problems with planning and building control is that so often the fate of your project is determined by the subjective interpretation of the rules by the individual dealing with your case. That's my primary concern here, that Steve 'cracks on' only to find that when Mr BC comes back he digs his heals in for a solution that means a whole lot of work has to be undone.

Before I start anything I'll be looking to get something in email from the local authority confirming my proposals will be OK, or at the very least if I can only get verbal confirmation to take a note of date of discussion and person I spoke to. But then I'm under no illusion that even that will give me 'cast iron' certainty of problems down the road.

Wizard9999.


There was a guy in Stockport who was always dreaded. He was thrown in a skip once...so the story goes.
 
More progress today.

My friend Jen came to lend a hand and she has done lots of serious DIY over the years. So when we'd put the trim up over the ends of the roof laths she was up the ladder with a paint brush quicker than a Yorkshire ferret up a trouser leg. Ray had brought his ladder stabiliser, which helped enormously.

P1020936.JPG


It is a fine gable end, I reckon.

Then the three of us formed a chain gang to put 400+ tiles up onto the roof. I carried them about in the workshop and up some stepladders, Jen was on the scaffolding, passing them up to Ray on the roof, naturally.

P1020938.JPG


I'm rather pleased with that photo.

Then it was some brain-scratching time, working out exactly where the first row of tiles will be nailed. It's important to get this right as the rest of the roof covering will depend on it.

Some of the tiles needed to be cut. The main ones are 600 x 300, but we need a tile-and-a-half at the end of alternate rows, which means cutting down a double. Also, the bottom two "under-rows" (they probably have some fancy builder's name but they are there to continue the structure of the overlap of the tile on each other all the way down to the eaves) have to be cut, but one tile provides both layers, so it's very efficient. Some of the cut tiles have to be drilled to take the diamond-encrusted rivets. They might as well be, given the price of them.Then it's a case of starting at one corner and working in a diagonal fashion.

P1020939.JPG


P1020945.JPG


Sorry I cut his head off, I had the camera above my head and couldn't see what I was shooting.

And so the back looks like this:

P1020948.JPG


More on Wednesday, I hope.
 

Attachments

  • P1020936.JPG
    P1020936.JPG
    193.3 KB · Views: 1,233
  • P1020938.JPG
    P1020938.JPG
    223.2 KB · Views: 1,221
  • P1020939.JPG
    P1020939.JPG
    248.9 KB · Views: 1,221
  • P1020945.JPG
    P1020945.JPG
    240.3 KB · Views: 1,221
  • P1020948.JPG
    P1020948.JPG
    226.7 KB · Views: 1,221

Latest posts

Back
Top