Side Table - Finished Photos

UKworkshop.co.uk

Help Support UKworkshop.co.uk:

This site may earn a commission from merchant affiliate links, including eBay, Amazon, and others.
I have found your WIP thread very informative and like your references to your rod.

Still being a student in your final year and this being exam time are you not also busy with your finals? All credit to you and good luck'
 
Although you may've seen me online earlier today, I haven't had much time spare to work on this. I was out this morning until lunch time and then spent the afternoon doing some college work (which I meant to do last week... :oops: ;)). 5pm came and I realised I'd better do some real work and start making some noise - leaving it any later would leave the neighbours free to complain... :p

I needed to resaw some more 2mm oak veneers for another project and, at the same time, I decided to cut in to an "interesting" lump of partially-spalted English walnut:

4686506876_dd27fa742a.jpg


You may find it hard to believe that this lump of walnut started at 60mm thick! :eek: That gives you an idea of how much wood is wasted having to repeatedly plane/thickness both sawn faces.

Each veneer is just over 3mm thick and there's enough there to do both sides of the top - naturally, the pattern I like best will be the show face, meaning I can experiment a bit with the under side. This was using a Supertuff Fastcut blade from Tuff Saws which, after cutting a series of other 2mm oak veneers (9in wide) the other week, is still going strong. I found that all the spalting, the odd knot and the frequent diversion in grain direction made this a tricky one to cut, even with a sharp blade. There were no signs of stalling and any irregular marks you might be able to see are probably down to my awkward feed-rate as much as anything else (...maybe I should fit a power feed to this saw!!! :twisted:). It breezed through some areas, where the spalting was, and then I hit the real wood, where I had to take things more steady.

I won't make a decision on this before next week now but, to give you some ideas of what I could do, here are a few examples:

4685879693_a3ee6e1bc7.jpg


4686509532_20c6c9d6a8.jpg


4685881425_bd1c48f84c.jpg


4686515590_7a2d8e8c32.jpg


Yes, those knots will have to be filled, and probably with a dark-epoxy mixture - apparently, you can just use Araldite with a bit of dye mixed in...?
 
adzeman":xke0xy19 said:
I have found your WIP thread very informative and like your references to your rod.

Still being a student in your final year and this being exam time are you not also busy with your finals? All credit to you and good luck'

Hi Mike,

Thanks. :)

Yes, we have three weeks left on the course; two weeks in which to complete the practical exam and then one week to finish everything else off! :shock: There's no written exam this year though, I think we may have to do another risk assessment - one that's more thorough than the one we completed at Level 2...
 
Picked this one up again yesterday but, with the Word Cup now under-way, I'm afraid to say that my progress has been "interrupted" somewhat... :oops: I can't say it's been entirely worth it, either- the quality of this first week's games, overall, hasn't been that impressive - I'd have been better off in the workshop, most of the time. :p

Tenons on the top rails needed to be mitred so they didn't foul each other inside the legs:

4703831688_7a5663d957.jpg


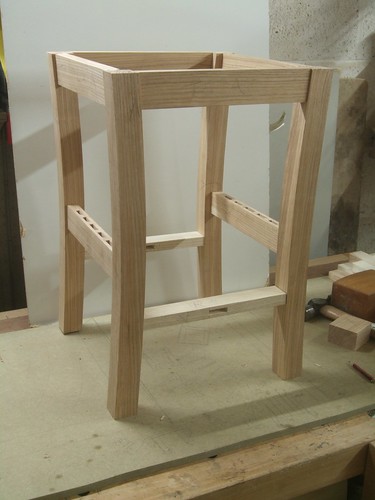
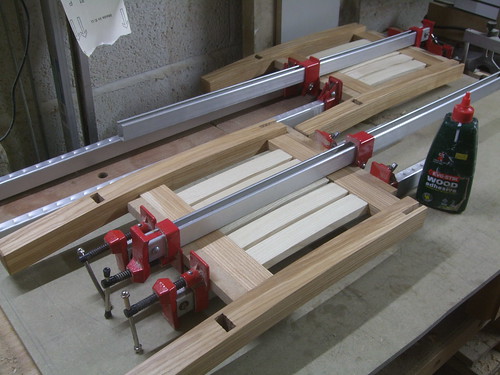
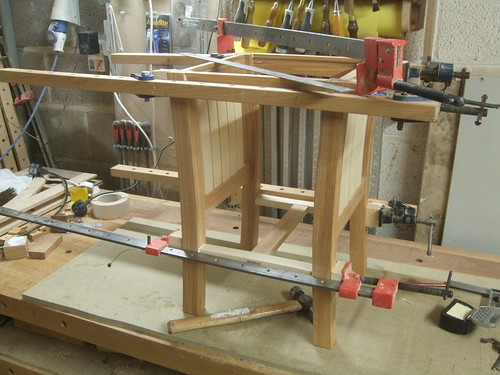
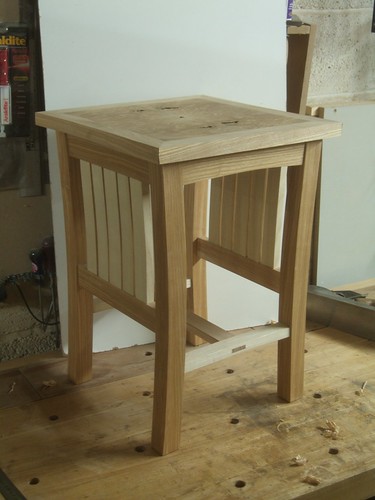
After which, I was ready for my first dry-assembly:

4703197333_da1b04c778.jpg


[Note - I hadn't shaped the stretchers or the front and back top rails at this point.]

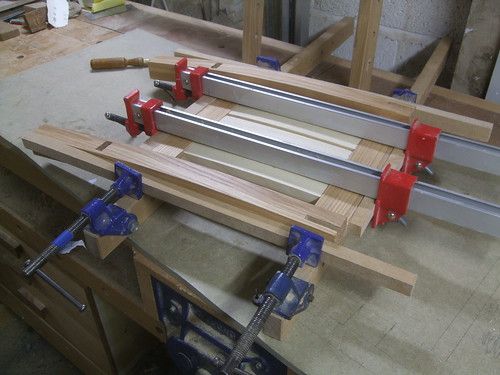
As I was lining up this shot, there was this niggling thought in the back of my mind that 
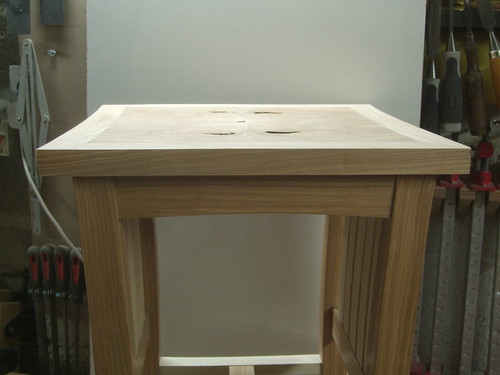
maybe Chris Knight was right... Perhaps these components are a little bit on the 'chunky' side... Looking at this photo now though, I'm not as concerned. I think we'll have a better idea once the top goes on and it's sat next to the finished chair.

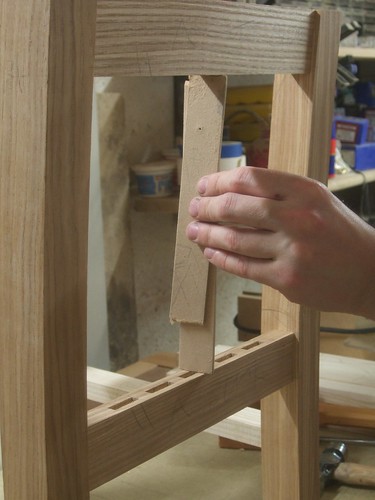
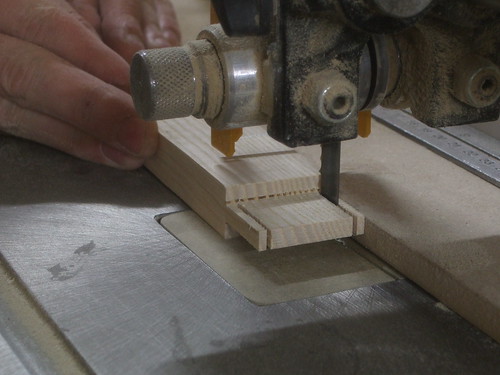
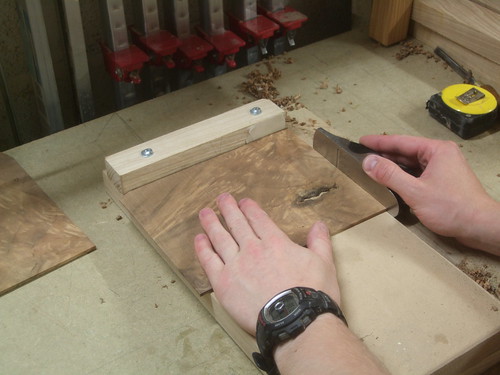
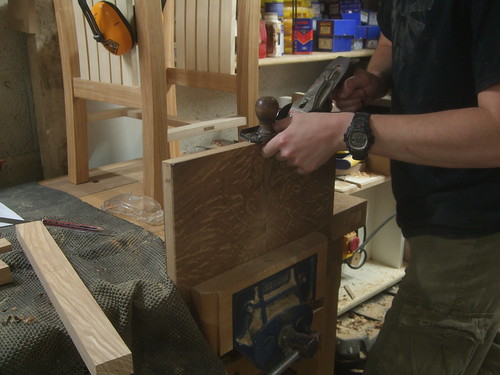
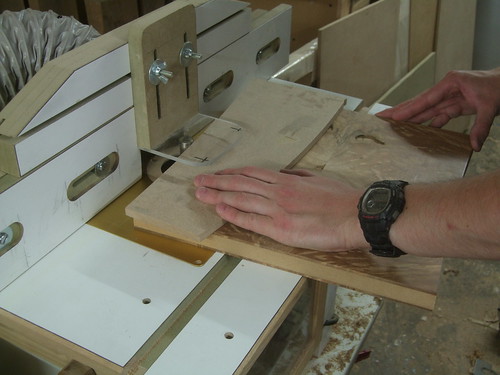
To get the correct length and angles for the tenon shoulders on the slats, I used a tried-and-tested method that work well with the chair - two scraps of MDF, taped together. This allows me to transfer the information directly on to the timber. Hopefully, you can see how it works:

4703834000_56d780f1bf.jpg


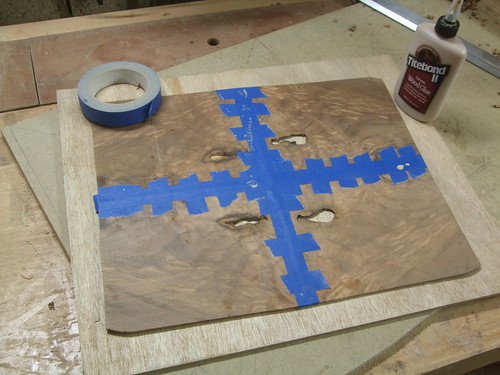
With those lines knifed on to the blanks, I could begin shaping. It took a good couple of hours in all - marking out, shaping, marking the shoulders, cutting the tenons, fitting and then sanding through the grits, ready for finishing - a very un-enjoyable process!! :roll:

4703835976_5a1e35786b.jpg


4703836776_c2bf8dd6b0.jpg


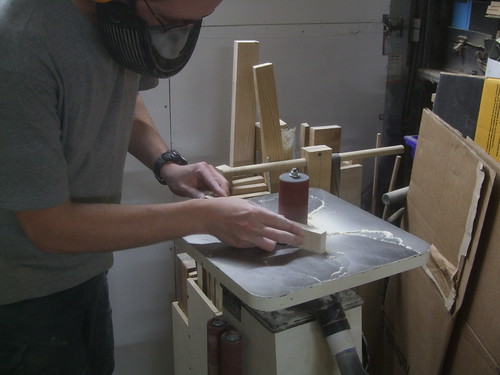
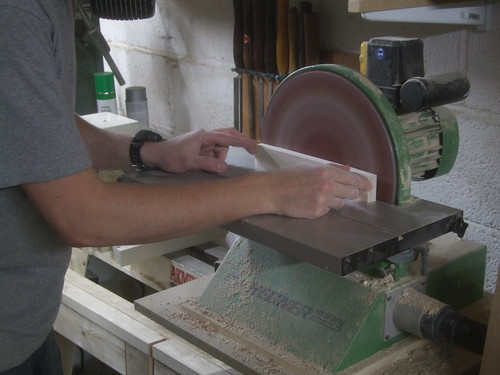
While a disc sander does a good job with convex curves, even with a fine-grit disc, you're going to end up with scratchers running perpendicular to the grain. They took some time to remove by hand, as I didn't feel I could use any form of power tool to do it for me, without affecting the curve. It's at times like this that I wonder whether a horizontal linisher would help... Then again, perhaps I should give the Mike Garnham approach another try - fixing a portable belt sander on its side!! :D

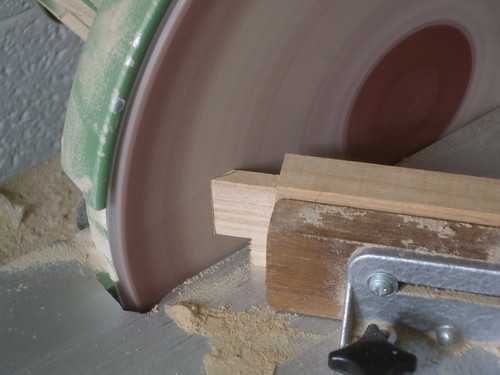
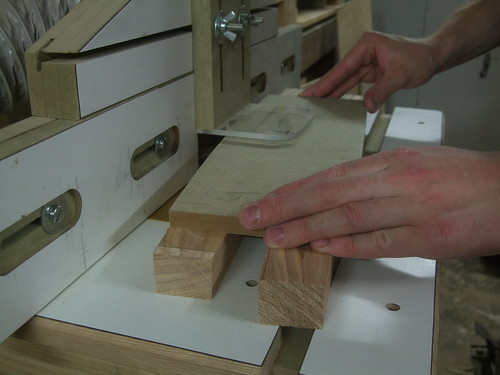
Trimming the tenons to width:

4703838108_f057a29429.jpg


So, I spent the last few hours of yesterday hand-sanding :roll: all the other components, ready for a first coat of oil this morning. I would've put the oil on last night but, after all that work preparing each surface, I didn't have enough energy (plus, I wanted to see Italy struggle against Paraguay, apparently... :p).

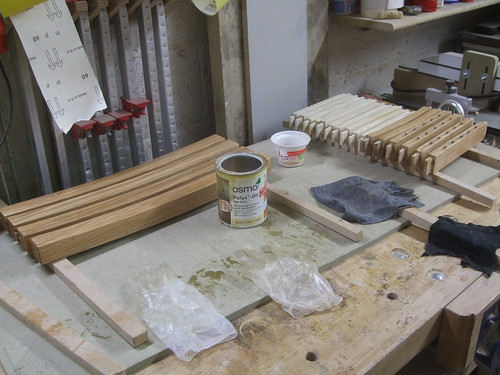
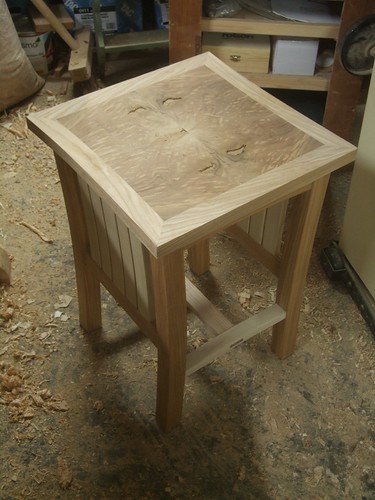
That first coat of Osmo Polyx (matt) went on this morning.

I don't like doing this first thing in the day because it means I have even less space to work in and I have to be cautious enough note to cover it all in fine dust! Not that I worry too much about first coats, anyway! ;) Over the weekend, I'd begun having a general tidy up and boxing up offcuts to give away as firewood on Freecycle so, I carried on and finished that off - ending up with three boxes, full :shock:.

4703839980_d1e22341dc.jpg


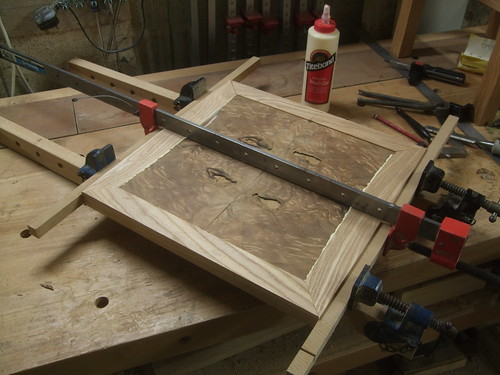
After lunch, I decided the oil was "dry enough" (although, it was still a little sticky) so, I got things ready for the first stage of the glue up.

4703842050_3b618a3909.jpg


I just used bog standard PVA to glue the slats in, with the legs fitted dry to help keep things aligned correctly and square. I could've glued the legs on at the same time but, I don't like having clamps on, sticking out everywhere. I then spent most of the rest of the afternoon fiddling around with my planer (the off buttons keep falling off inside!! :shock: And, it needed a bit of a clean.).

When I get back tomorrow afternoon, I'll make a start on the top. Once I've taken the dog for a walk this evening, I may have a go at gluing the legs on - it all depends on who's playing tonight and whether or not it's on ITV!! :D
 
Really nice work, I just wish I could produce anything half as good :)
...boxing up offcuts to give away as firewood on Freecycle...
:shock: I wish I lived in your neck of the wood too, I'd love to find some nice hardwood offcuts on Freecycle for making some small boxes; cheap pine gets a bit boring :D
 
Got a bit more done this afternoon. Well, that was after gluing the legs on to the rest of the frame, last night. I left a couple of cramps on the slats, as they glue had only been given a few hours to cure (they all need twenty-four hours, really) and I didn't want to risk forcing the joints apart.

4706784299_e0145f92fd.jpg


Started off with a bit of progress on the veneers for the top.

Squaring up on the shooting board:

4706786217_6ff17253a0.jpg


Then, sticking it all together with Titebond's Dark Wood Glue - each veneer is over 3mm thick so, I thought it might be worth it. There's a trick to doing this and I think I first saw it in one of the Wood Whisperer's videos (or, was it the Woodbloke??? :D) - tape them together securely with all the joints dry. Then, flip it over, carefully fold each joint to 'open' it, pour the glue in and leave it. It seems to work rather well and I've taken a liking to this blue tape... :roll: This roll came from Toolstation and it does seem to grab and hold a little better than the regular stuff. I find it slightly more reassuring.

4706788593_0c5a6f6d76.jpg


I've decided to leave these until tomorrow evening, so that the glue has the longest time possible to cure before I set about removing the slight discrepancies between the thickness of each leaf on the surface that'll be glued face-down on to the MDF substrate.

(Sorry, I forgot to photo the other one but, you will get to see it later. ;))

I finished off the stretchers (shaping, sanding, etc.), cut the tenons on my bandsaw (couldn't be bothered to drag the router table out) and then wedged them together (as I did on the chair), ready to glue up in to the rest of the frame.

4707432076_eba35065ec.jpg


As I was gluing up yesterday, I realised I'd completely forgotten to groove the top rails so that I could attach the top with wooden turnbuttons and screws! :oops: Never one to accept defeat, I reached for my biscuit jointer, which did a good enough job on the assembled frame. ;)

4707434092_4bfa93b44c.jpg


Then, progress came to an abrupt halt as my mum arrived home with this:

4706794317_57927dfbfc.jpg


We basically need to replace our "weathered" back door. I'd previously suggest that this one (made from hemlock) would've been the best "budget" choice, as she didn't want to spend a lot... The one she bought home this evening is half that price and, being made from cheap spruce, I don't expect it to last long at all... :p

I was going to have a go at her for buying a door that isn't suitable for exterior use except, I can hardly blame her as the packaging states that it is:

4706796611_8aba393b72.jpg


What exactly constitutes to a door being suitable for exterior use?! It must be the double-glazing, as the cheap, lightning-fast-growing timber aren't going to last long, especially if we have a repeat of the winter just gone. :?

4706796081_6d0e4e722d.jpg


You can see where they've joined two lumps of wood to create a wider rail but, it's the pith, there, that concerns me - that could open up 'nicely' if we have a dry, hot summer... This'll have to be stained or painted (I wish she'd make her mind up!! :x) and hung before I can get stuck in to too much woodwork. I would've put it indoors (where it belongs! :D) but, the kitchen's going to be redecorated shortly and all of her "machines" are going to fill up the rest of the space downstairs - as they certainly aren't coming anywhere near my workshop!!! :twisted: (I've already got one chest freezer in there!)

Sorry, I'm ranting again! I should be able to get the rest of the frame and the top panel glued up over the next couple of evenings, with a view to getting that door out of the way over the weekend.
 
Got a couple of glue-ups out of the way, this evening.

First, "flattening" the undersides of the veneers with my belt sander:

4710391132_262f34dd58.jpg


I was surprised by how strong the edge-joints felt, after a full twenty-four hours (...and a couple more). I wish I'd make a test piece now, so that I could try and snap the joint, to see which breaks first - the glue line or the timber! ;) Each veneer was secured to a sheet of 18mm MDF using double-sided tape (you probably know what belt sanders can do, otherwise! :D).

Then, it was time to put it in the cold press:

4709752513_6c75474a15.jpg


I'm using Titebond's Cold Press Veneering glue [only available at Rutlands?], out of curiosity (ie. I could've used PVA or even mixed up some cascamite). Apparently, you get a longer open time for correctly positioning veneers and laminations but, aside from that, I don't yet see what advantages it has over regular PVA (it's also slightly darker).

There are two sheets of 18mm MDF (either side) used to create the press; both of which were given a coat of wax to (hopefully!) prevent the veneers from sticking to them, wherever there is excess glue squeeze-out. I clamped a series of tapered cauls (tapering down from the centre to about 1mm at each end) to exert even pressure across the board, where it's otherwise very difficult to get any force in the centre. I didn't have enough solo or G-cramps to finish up here so, I've had to persist with these Irwin quick-grips... They should be okay. We'll have another look tomorrow evening (though, they say you can remove it from a press after only forty-five minutes!! :shock:)!

With that one out of the way and resting safely on the workshop floor (!) while the glue dries, I got the frame fully assembled and squared up using a sash cramp positioned diagonally (though, to be honest, it was only 1.5mm out before...).

4710394516_a12ca53b5e.jpg


Nothing left to do on the frame then, except to remove the excess glue, followed by another light sanding, in preparation for further coats of oil. It is nice to see that it's sitting firmly on the MDF sheet, with all these sash cramps on - I must admit that, while doing the dry-assemblies before (without cramps), it was wobbling quite badly. 8)
 
Looks really really nice Olly.

Can you explain the method with the diagonal clamping, I understand its to insure a square frame, and I've seen lots of people doing it. I just don't quite understand how it works?
 
There's not a lot to understand, really! :D

Obviously, measure the diagonals, first. If one is longer than the other (I wouldn't normally worry if it's less than 1mm difference between them), you want to place cramp across the diagonals of the longest dimension. Tightening this cramp will shorten that diagonal measurement but, at the same time, it will "lengthen" the shorter one. You're then looking for an equilibrium between the two.

On a table like this, you can used the method of attaching the top to hold it in place as well. That might work even after the glue's gone off, if the difference is only 2mm or so. :wink:
 
I see, very simple, I thought it was to maybe counter-act some force of the other clamps.
 
Looking very nice Olly. Just wondering if you needed to take any additional precautions when gluing the end grain to end grain sections of the veneer. I think thans the sample I'd want to try snapping.

Regards

Eoin
 
Hi Eoin,

On this occasion, I didn't take any further precautions with the end-grain joints and, to be honest, I didn't even think about it... :oops: But, it does seem to hold very well indeed. If you do something similar yourself, you might find it easier to glue them up in pairs (side by side). That way, you can then shoot the end-grain edges correctly for a tight joint. That's what I should've done. :roll: But, as I was rushing, I tried shooting and gluing all four at the same time - which isn't that easy although, it did come out alright on the top one (there's a slight gap on the underside, which could always be filled).

I also agree with your last comment - next time I do something like this, I'll definitely produce a sample/spare so I can fully test the strength of the end-grain to end-grain joints. As these were sawn at 3.5mm thick though, I didn't think there'd be much to worry about. :)
 
After gluing on the veneers last week, I made a fair bit of progress on the table top this morning.

Started by flattening both faces of the top with my belt sander and then trimming and squaring up the veneered-MDF edges by hand. At 324mm square, this was just outside the capacities of my sliding mitre saw. Lippings were also planed up to a finished thickness of 27mm (about 1mm thicker than the veneered top at present.)

4721950385_d39d8d3116.jpg


Two of the edges (let's call them "front" and "back") are straight and parallel but, the other two are slightly concave, by about 6mm. So, I needed a template to cut this accurately on the router table. To make the template, I first made a convex template of the curve (which was later used to shape the inside edges of the two side lippings), stuck this on to another sheet of MDF with double-sided tape and, using a guide bush to follow the curve and a little care taking shallow cuts, I ended up with a perfect female template. 8)

4722604296_e0e75a1d01.jpg


Though, in truth, it would've been easier had a made both templates longer...

So, shaping the edges of the top was safe enough on the router table, due to the size of the piece (though, I still like to have a guard in place):

4722606404_c77f742b02.jpg


And the lippings didn't require anything special either. Again, I could hole the template without my fingers getting too close to the spinning cutter (unlike the legs I cut at the start of this project, which were quite narrow):

4721957811_d12a5a9c21.jpg


While routing one lipping, I taped the other one close to the other edge to prevent either of the lippings from 'tipping' in to the rotating cutter and ruining the edge. With the benefit of hindsight, it would've been more efficient to have put the convex curve on both edges of this template (almost like a 'double-station' jig), so that I could've shaped both parts without having to remove and re-stick anything.

4721960065_c0f01a5c36.jpg


I first glued the two straight lippings in place, which had mitred ends (sliding compound mitre saw) and were joined with no.20 biscuits, using Titebond I for efficiency (half-hour clamping time). I left the outer edges straight on the side lippings, so it would be easier to get firm pressure with the sash cramps. The mitres on these were scribed directly from the others (so, it doesn't matter if the saw was cutting slightly off 45°) and trimmed very carefully on the disc sander.

Since then, I've trimmed them flush and have roughly (being the key word! :oops: ;) ) shaped the outer edges. But now, I'm a little concerned that, with 25mm each side, I may have too much overhang on this small piece (approx. 660mm tall with a 400mm² top).

4721962277_40e623271b.jpg


So, until I make a decision, I've decided to put this one on hold (...a good excuse to come in and watch the World Cup!! :roll: :D). I'm also a little concerned the lippings may be a little too wide against the quartered-veneered top. At the moment, my plan is to trim 5mm or 6mm off the circumference - thereby reducing the generous overhang slightly and also the width of each lipping... At present, the lippings (at 38mm wide) are equal to the width of the legs. But, I think they need to "frame" the veneered feature, rather than to 'border' it.... I was going to make them narrower initially but, with the walnut I had available, I really would've been pushing my own luck to get veneers of this width.

4721964477_0fa59854c3.jpg


4722617906_905e12d300.jpg


What do you guys think?

Thanks for looking. :)
 
Wow that's really something, beautiful piece. Your finest work to date! That's going to be stunning when its done.
 
Hi Olly,

This is turning in to a fantastic piece, thanks for going to the trouble of putting up such an in depth WIP.

As regards your query regarding the overhang, IMHO I think it is slightly too large, and could be trimmed back a bit. 5 or 6mm sounds about right from looking at the photos, but I think I would be tempted to do it in smaller steps so that I could assess at each stage.

HTH

Malc :D
 
Myself I prefer the overhand at its present size, Perhaps you could put the photograph into an imaging program like Paint shop Pro and adjust its appearance there without doing any work on the top before making decisions such as suggested.
 
That's simply beautiful. I think perhaps the orderhang is a tiny bit much but without seeing the piece it's hard to tell.
 
Thanks for all your replies. :)

Unfortunately, I've left my camera in the workshop so, I won't have any more photos for you until tomorrow evening. :(

First, I decided to trim 6mm off the circumference. For this, I used a bearing-guided rebate cutter, which removed and equal amount of material all-round and gave a neat shoulder/rebate for the bearing-guided trimming cutter to follow in my table [I didn't photo this step, anyway]. 6mm's still quite a lot for one cutter to bite (especially when there's no 'lead-on' and it tries to throw the work back at you! :?) so I cut most of the waste off, first, on my bandsaw.

Setting it on top of the frame, the width of the lippings looked much better. And, also, I was quite liking the reduced overhang - except for the square edges... Which is why I decided to bevel them slightly (by 5° or 6°, to follow the curve of the legs) and I'm quite happy with how it was looking when I put the first coat of Osmo oil on this afternoon. The spalted areas still feel quite soft, though...

Sorry, photos for you tomorrow. :oops:
 
Back
Top