Side Table - Finished Photos

UKworkshop.co.uk

Help Support UKworkshop.co.uk:

This site may earn a commission from merchant affiliate links, including eBay, Amazon, and others.
OPJ":h9328dqu said:
4721960065_c0f01a5c36.jpg

Nice job so far Olly. I wincned a bit when I saw this pic as the bearer blocks ought to be a tad shorter than the length, with another pair of cramps at 90deg to the ones shown. As depicted in the pic, there's a danger that the cramping pressure will cause the mitre to 'spring but by having the other pair at 90deg to support the applied pressure, you can wind on as much as you like and the joint will stay put - Rob
 
No need to worry about the length of the cramping blocks here, Rob, as the two lippings being cramped were about 5mm wider than the others, where I hadn't yet shaped them. :wink:

I agree about leaving another pair of cramps on in the other direction though. While Titebond and other fast-acting glues are great for freeing up sash cramps, the joint won't fully cure for about 24 hours. I think I got away with it, this time. :)

One thing I didn't get away with was a small amount of staining from the steel bars :oops: - yes, I should've used masking or parcel tape but, it least I was able to sand it out.

Still got to fill those knot-holes but I won't have any time before the weekend.
 
Olly

Really nice work. How are you going to fill the holes in the top ? I once seen Norm on the Yankee workshop fill some holes with "epoxy" I think it was the 2 part like the west system & he put "graphite" in it to turn it jet black.
He poured it in all the open voids, left it to harden then sanded flush. When the finish was applied it looked stunning as the filler was jet black & i think the wood might have been "meskeet". I am pretty sure i have spelt the timber species wrong !

Anyway, the final effect was superb & i look forward to seing yours complete with the finish on it.

Thanks for sharing, Woodguy.
 
Morning Olly,

This table looks great!

I wondered that have you described the chair making earlier somewhere, the one you were gluing up on the first post?


Best Regards

Simo
 
Hi.

Very interesting work. Reminds me of my chair build.
I would have placed the slats wider apart. IMHO they look a little bulky the way they are now.
Was there any reason to cut shoulders on the slats? They would be much easier to make if they hadn't shoulders at all and also look slimmer.
I'm also intrigued about that wide tenon on the bottom stretcher. I've always thought it was good practice to use twin tenons on that occasions. Were you trying to make it easier on you or am i missing something?
The veneered top also looks excellent. It's a pity to have that large knot hole.
Aren't you concerned about the mitres opening in the long run with moisture changes? I've never got them right. In my experience if the boards are wider than 3cm the mitres will end up opening unless you're using a very table wood.

thanks and congratulations on the nice work.
 
Thanks again, guys. Sorry for the lack of response and photographs! I've got a couple of other jobs in the way at the minute that need to be done ASAP so, this one's almost on the back burner, for the minute.

woodguy7 - I'm also planning to use some kind of epoxy and I bought some really cheap "sample packs" of cement dye to colour it (apparently, this stuff's ideal and only £1 per bag). Apparently, you can just use Araldite. I keep looking at the Axminster website but there are so many options available in the West Systsems range, I don't know where to start... I'll probably be going for a darker colour, almost black, rather than trying to blend these "shapes" in with the surrounding wood.

Simo - welcome to the forum. Over the past few months, I've put a few photos and notes on the chair build over on my blog but, it may not be as in-depth as this table write-up...

cerdeira - I've kept the slats fairly wide so that they're almost in keeping with the slats on the back of the chair (and, the overall 'chunkiness' of the piece). You probably can't see this but, the central slats are wider than the outer ones. One thing I don't like is that I feel I've left the gaps either side of the slats too wide though, it isn't noticeable unless you're staring at the sides face on - hopefully, there's enough interest elsewhere to detract the viewer's eye away from this. :wink:

Not sure I understand your next point - do you mean making the slats thinner and fitting them directly in to a groove, with spacers either side; Arts & Crafts-style?

I only used one tenon because I felt it would look fine and, yes, it does save me a bit of work. :) As a general rule though, when the width of a tenon exceeds five-times its thickness, it's time to split it in two. That rail is no more than 38mm wide so, it shouldn't give me any trouble.

With regards to the mitres; ash is pretty stable and I've not personally had any trouble with mitres opening up before. They're also now only about 32mm wide so, again, it shouldn't be much of an issue.

Thank you all. :)
 
Apologies for the lack of updates; I've basically been working on or busy with other things.

Here's the table with the top, 6mm less of its circumference.

4739154146_7729a73ce9.jpg


I used a bearing-guided rebate cutter in my router to remove 6mm all round, and then trimmed the remainder flush with a straight trimming cutter. As you'll see in the next photo, I did decide to bevel the edges slightly (by 5° or 6°) to follow the curve of the legs. I think it works quite well.

4738522587_44ff4fef23.jpg


I've now put two coats of Osmo Polyx (satin) on the top and it's time to start filling these holes. Right in the centre, there's a small square that needs to filled though, I haven't quite decided what I'm going to do, here...

4738525067_d02ca6d32a.jpg


It was a piece that broke off while I was shooting the edges, earlier (ironic, that it would only happen on the best face! :roll:).

I'm toying with the idea of either trying to fill it to partially match in with the surrounding grain or, carefully removing a larger section (creating a void in the centre) and then filling that. Well, I've got about two-weeks to decide... :)
 
Stunning work OPJ, very nice piece. I like the curves and of course the top. Having just had a quick look at your website I can see that you make a habit of making nice things! I'd be interested to know how many hours it took you?

cheers
HM
 
Hawk Moth":221oc091 said:
Stunning work OPJ, very nice piece. I like the curves and of course the top. Having just had a quick look at your website I can see that you make a habit of making nice things! I'd be interested to know how many hours it took you?

cheers
HM

Thanks, Hawk Moth. :)

Well, I recently priced this at for an exhibition at £850! :shock: That basically breaks down to about three-days working on it [how long's a day?! :D], plus a bit of timber (not an awful lot of ash; walnut was cut from scraps, as I only needed veneers) and, erm, not a lot of profit... :oops: That's actually not far off the time it should take me but, at the same time, I'm not sure whether someone would be interested in this piece if it cost £1,000 or more (it is, after all, an "accessory" to a larger arm chair :) ). Anyway, now that I've made one and I have my rod and all the templates, it shouldn't take as long to reproduce this piece or one very similar to it.

In the last couple of evenings, I've had a go at filling the top and I'll try to upload some photos later on this evening.
 
Uummmmm, I take it this was for a client then?!! Well 3 days is pretty good for a first shot, like you say you now have the rod+temps to reproduce. But anyway, nice work and something for me to aspire to... :D

cheers
HM

OPJ":v2dcncxy said:
Hawk Moth":v2dcncxy said:
Stunning work OPJ, very nice piece. I like the curves and of course the top. Having just had a quick look at your website I can see that you make a habit of making nice things! I'd be interested to know how many hours it took you?

cheers
HM

Thanks, Hawk Moth. :)

Well, I recently priced this at for an exhibition at £850! :shock: That basically breaks down to about three-days working on it [how long's a day?! :D], plus a bit of timber (not an awful lot of ash; walnut was cut from scraps, as I only needed veneers) and, erm, not a lot of profit... :oops: That's actually not far off the time it should take me but, at the same time, I'm not sure whether someone would be interested in this piece if it cost £1,000 or more (it is, after all, an "accessory" to a larger arm chair :) ). Anyway, now that I've made one and I have my rod and all the templates, it shouldn't take as long to reproduce this piece or one very similar to it.

In the last couple of evenings, I've had a go at filling the top and I'll try to upload some photos later on this evening.
 
Well, it's for part of an exhibition in a few weeks, actually. 8)

I like to think someone will order/commission another - and 'set', with the chair in addition, would be very nice :twisted: (I think I priced that at £,1800, which is much better!) - but, I'm not prepared to sell the display model unless someone offers me a ridiculous sum of money! :wink:
 
***EDIT*** - I've fiddled around with three of the photos below, so that, I hope they're a little bit clearer now. :)

It's been several weeks since I finished this but, with both the side table and chair currently sat in an exhibition in Bristol, I'm able to share these few shots with you. Even with all the daylight flooding in through the windows, I clearly still need some assistance with my photography! :oops:

4821436363_f10d61d1dd.jpg


Only reason these two are so far apart is so that people can get around and view them from all angles - I don't like to create a fuss by moving things although, I am happy to play with drawers and slam doors! :D Everyone I've met who's sat in my chair has commented on how comfortable it is (more so than any other sea at this show!). 8)

4829873677_9566ec4f76.jpg


(This was the chair's second public appearance in a month, in case you didn't know. :))

People have also been complementary of how well this table goes with the chair (phew! :wink:)

4829886755_340ec8b88f.jpg


And the top, which is a bit of an eye-catcher:

4830516834_ac6c16d625.jpg


I had a bit of trouble finishing that, with it being spalted walnut. Each coat of oil was subsequently cut back to remove all the slight undulations and low spots, which were clearly visible under the light. It took a lot of work but, it was worth the effort. :)

Those are my only pieces at the exhibition, which ends tomorrow. If you want to see what else was on show, please have a look at my Flickr album - click here. Nope, the photography doesn't get much better, unfortunately - I may as well have taken them on my phone! :p :wink:

Thanks for reading and for following this thread. :)
 
Olly, thanks so much for this wip, you have created two beautiful designs and the build quality is just outstanding.

In fact I have been so impressed by the table and the chair as seen in this forum, that we drove down to Bristol today to catch the 'inspired' exhibition, and I can say, with no fear of contradiction ,that the pictures only show part of the story. In the flesh (as it were) these pieces are outstanding, and the chair is astonishingly comfortable - with the arms placed at exactly the right height for me. I went back over and over again to check the pieces out. Stunning and wonderful to explore with your hands - sorry but my fingerprints may be all over them.

There was some other great pieces in the exhibition, but this table and chair were the stars. Thanks for the inspiration.

What are you going to build next?

David
 
Another lovely piece of work Olly. Many thanks for the detailed write up and for all the "warts 'n all" photos that make it so informative. I have 4 very nice Golden Ash boards that are looking for a project - this has given me some great inspiration. Goes very nicely with the English Oak too!
 
Thank you all for your comments. :)

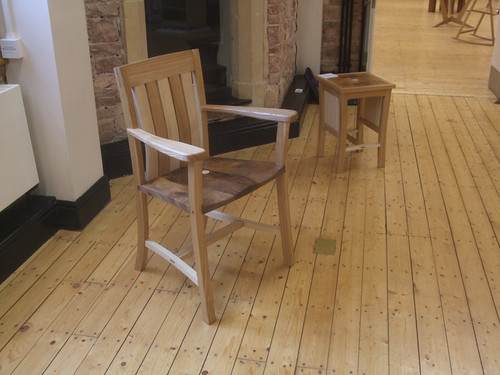
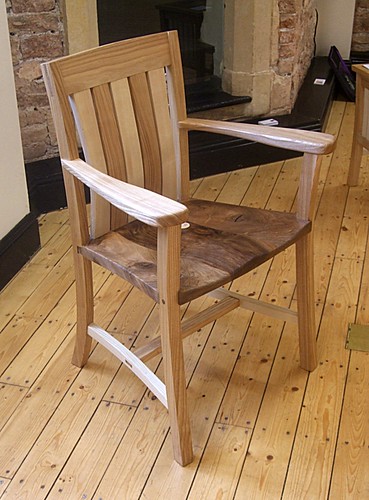
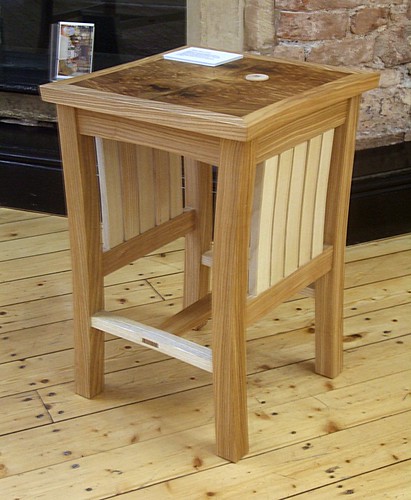
Delighted to hear that two of you were able to make it to the exhibition and see both pieces first hand - especially David; that's quite some distance to see a few bits of wood! :wink: Sue did mention your visit to me this morning. Glad to hear you enjoyed the chair as much as everyone else seemed to. :)

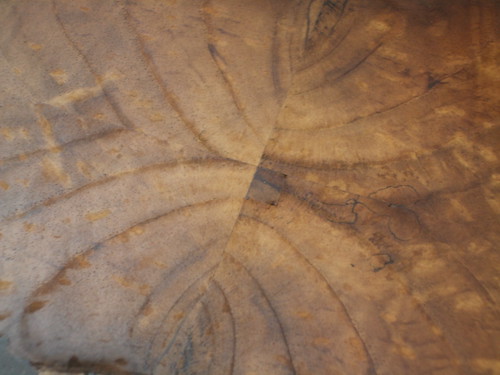
Sue reckons I could've had a buyer, if only things were a little tidier where the seat meets the back legs. :( ](*,) I definitely won't use that joint again! They were very touchy-feely as well; on their second visit, also. :( I didn't have time before but, I think now, I'll definitely have a go at splicing something in.

Ah, well. At least I get to enjoy my chair for myself now - it would actually be for the first time since I finished it! :)

Eric, sorry, I couldn't be there every day.

What's next? I've got a few DIY jobs to do at home :( and, I was hoping I might have gotten some work from these two shows (all quiet, at the moment). Someone was after a fold-away laptop desk but, even in pine, they can't afford it right now. Still, if I get some spare cash, I may end up making one for myself in beech.

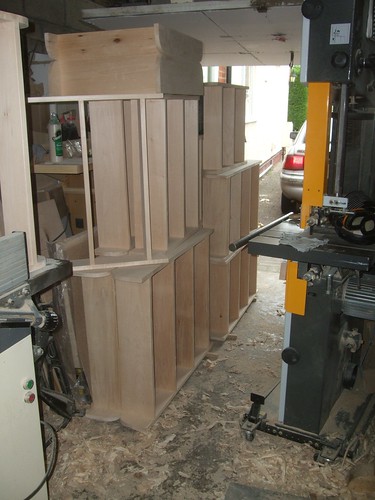
Based on all the comments I've received from both shows, I seemed to have got the hang of this chair-making lark, at least where comfort counts, anyway... I'd like to stick with this and try to develop a different chair every year. So, you never know; there may be another on show, this time next year! :wink:

Roger, thank you. I look forward to seeing what you come up with. :)
 
Back
Top