You are using an out of date browser. It may not display this or other websites correctly.
You should upgrade or use an alternative browser.
You should upgrade or use an alternative browser.
Project Noxom- A n0legs production
- Thread starter n0legs
- Start date


Help Support UKworkshop.co.uk:
This site may earn a commission from merchant affiliate
links, including eBay, Amazon, and others.
No skills
Established Member
Used to work in a place that had a punching machine, put the shaped punch in the top bit. Put the bit with the hole in the bottom bit. Bit of plate steel in the middle and push the foot pedal... Whiirrr bang.. and you have a shaped hole in the metal - it punched through 10mm plate like it was butter.
One day a bit with the hole was placed in the machine upside down, the holes are tapered you know.. Whiirrr bang... Bits of shrapnel fly out of the machine, somebody gets hit in the arm and a few minutes later they pass out (wasn't me).
So be careful doing this sort of stuff, you can get injured quite unexpectedly - that bloke was very heavy and I pulled a muscle trying to move him.
I won't go into what we used to do with the 40 ton armarda metal bending machine :lol:
No skills":1ibn7b4l said:So be careful doing this sort of stuff, you can get injured quite unexpectedly
Hi NS, thanks for the reminder =D>
The reason I have the hydraulics is for crimping some of the big conductors I used to play with (don't get me hands dirty anymore except at home (or if one of my darlings say "that can't be done" "outta' my way!! :roll: )
Over the years I shattered a few sets of dies, the hex crimps were the best for explosive destruction :lol:, and honestly just like your old workmate I've got the scars :lol:
Just a quick update.
I've actually managed to go buy some wood for this
Home from play early yesterday, so the good woman and I went for a little spin and ended up at the timber yard. The good woman thought I was taking her out to lunch :lol: :roll:
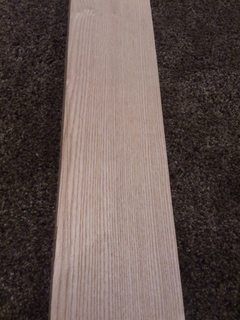
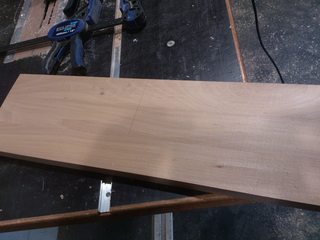
I got a lovely piece of ash 6" x 3" about 7 foot long and a piece of beech 3" x 2" at about 6 foot. Very pleased
They'll stay indoors for a week or two until I get time to work on the project. Also they're both at approx 14% MC, so a little more time to settle down.

I love the grain here
The good woman? Well, I took her out for dinner instead at a local curry house.
Right romantic begger me :lol:
I've actually managed to go buy some wood for this
Home from play early yesterday, so the good woman and I went for a little spin and ended up at the timber yard. The good woman thought I was taking her out to lunch :lol: :roll:
I got a lovely piece of ash 6" x 3" about 7 foot long and a piece of beech 3" x 2" at about 6 foot. Very pleased
They'll stay indoors for a week or two until I get time to work on the project. Also they're both at approx 14% MC, so a little more time to settle down.
I love the grain here
The good woman? Well, I took her out for dinner instead at a local curry house.
Right romantic begger me :lol:
Well it's been a while, but,,,,,,
Ladies and gentlemen I have a little update.
Last week, Thursday I think.
They say aluminium and lead affects the brain, they might be right :?
Isn't ash hard? Wow wee, that was a surprise :shock:
I would love to tell you that all the woodwork parts of Project Noxom were lovingly produced by hand from start to finish, but given I try to stay BS free (I'm not talking British Standards) I can't make that claim.
What I can tell you for fact is changing the thicknesser blades the day before was probably one of my finer decisions, closely followed by changing the planer (jointer if you're from the US of A) blades :wink:
Ha! just realised I need to point out the thicknesser on this side of the pond (the correct name I add) is a planer for our cousins in the Americas. (Right, that's enough of this multilingual nonsense).
I did use a hand plane, actually I used three hand planes. I started with the No7, changed down to a No6 and then to round the session off nicely I gave the No5 a little exercise. Why the changes N0legs?? Well, it was a nice day and I decided.......... Carp!
Bloodly blunted them all on the iron, oops, I mean ash.
Without opening up that can of worms, you know the one? Enjoyed by some, hated by others. The "S" word, shhhh. I can get a decent edge on my tools, not decent enough so it seems. Oh well, I'll have some more practice now I have three to sort out.
I do like a No7, I like the weight, the length and most of all I like, and some of you may or may not agree, I like the ease of a No7. It makes squaring up and flattening out so blooming easy. Well it does if the blade's nice and sharp!!
Being completely honest with you all, I only got so far with the hand planes. The need to get another stage completed was high up on the priorities list, so I was getting this timber dimensioned today no matter what. My love for the No7 comes in third place, behind electricity and the family.
"Electricity", say it,,,, go on try it?
E-L-E-C-T-R-I-C-I-T-Y. Exciting isn't it? Tingles don't it? Feels strong and powerful, yes?
Thank God, the stars, Buddha, Thor, Zeus, Venus, Poseidon, Lassie, Black Beauty and the King and Queen of Sweden. Seriously, thank the heavens for electricity and all the wonderful tools that feed from the font of volts and amps. Because dear reader without it I would not have got to this stage today. Having my fair share of bumps and bruises, collected on my passage throughout this life, I was getting right royally tuckered out.
Anyway, I've gone and got the pieces of ash to where I want them. They're both over length by an inch, I'm aiming for a 24" wide pair of jaws with either 20" or 18" between the threads. The front jaw is 1.5" thick, the back is 1 and 7/8" thick and they're both at 5" high/wide. There will be a mixture of religions (mm and ") here and there, I'm a little wonky like that.
I'm sorry but I've lost the pics from this stage
Saturday.
Managed a couple of hours play today, watched the F1 and then got my ass down the shed.
Plan in mind was to get the "jaws" cut to length and get some of the holes drilled.
With a bit of luck I discovered a virgin blade for the table saw, 48 tooth, so fitted that and got on to cutting. Sorry no pics of this but you all know what cutting a board to length looks like.
The rear jaw was cut to length with 90* edges and on the front I cut the ends at 85* or if you prefer 95* (or if you would prefer even further with a 5* bevel, I don't mind you choose).
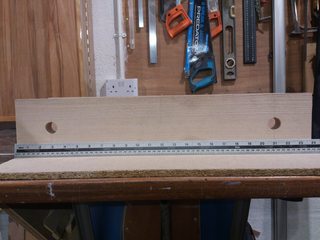
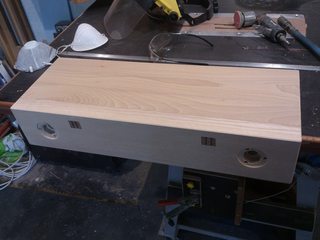
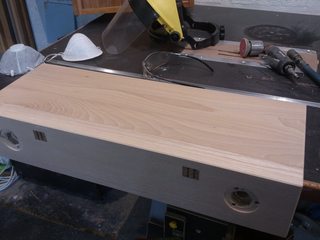
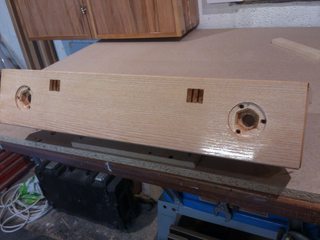
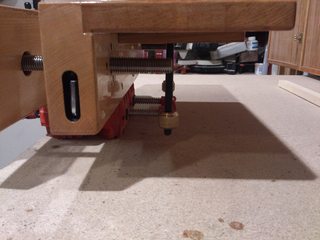
So very well pleased with myself, little things mean a lot, I set to with some marking out for some holes. Just a couple of holes in the front jaw for where the metalwork passes through.
Because I "found" a pair of oilite bushes (18mm ID 24mm OD) I drilled the front out to this (24mm) diameter. This was tackled with a nice new forstner and the pillar drill, two nice clean holes were the result on 18" centre. The bushes are a very very nice snug fit. No need to belt them, in just a firm push, LLLLUUUSSHHH!!! I expect this to change when I get some finish on the woodwork, but hey ho!
With this little hurdle now somewhere in the distance it was time for a little work on the rear jaw.
The setting in position of my retained nuts was the activity. I do like setting my nuts.
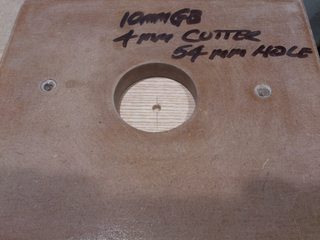
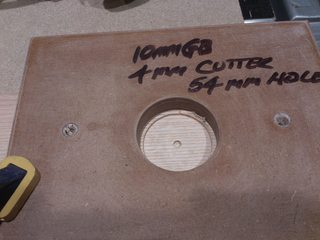
I had made a circle cutting template a few weeks back for use with the router. The template tells it's own story.
Quick question, does anyone else write down the cutter and guide bush sizes just in case for future use?
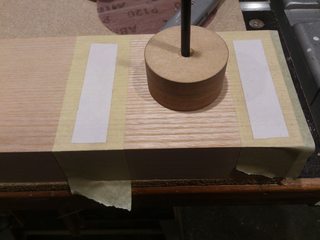
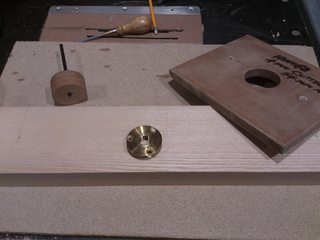
Anyway, with the aid of a guide "bobbin" that I had turned in the week, the template was set in place and secured with some double sided tape and one clamp for some extra security.
Quick tip, I use double sided tape on top of masking tape. Press the masking tape down hard.
Another quick tip, most tapes are pressure sensitive, ie, the harder you press the better it sticks. If they're any use to you take them, they're free. If not, just ignore. With the DS tape on top of the masking tape you avoid that horrible job of removing the DS, done it loads of times works a treat.
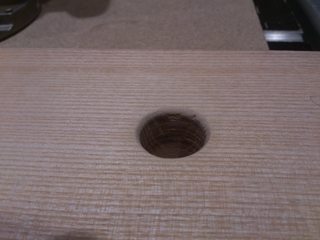
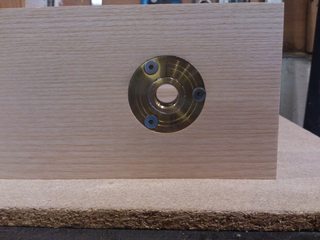
With the router two neat little recesses were cut for the washer part of the nuts to sit in. Hopefully these are set deep enough so as not to mark anything I clamp up later on.
While the router was out I changed bits and rounded over the rear of the holes in the front jaw. Quick buzz and the tiny teeny weeny breakout was taken care of
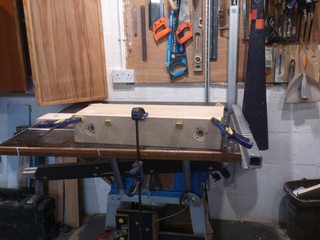
How the day ended
Fast forward to Tuesday.
Afternoon in the shed/studio/theatre of dreams/sanctuary/den of inequity/other office/workshop.
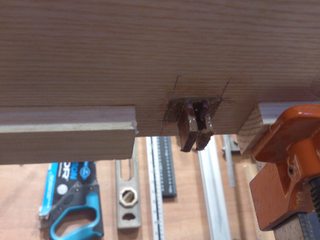
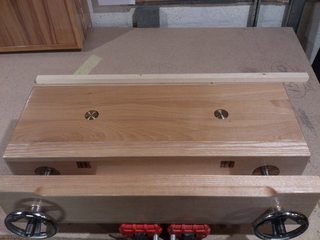
So on to some more drill work on the rear jaw. I needed to cut two recesses for the nut part of the retaining nut???
I drilled a 25 mm hole to the depth required then through drilled with a 19 mm bit so the threads can pass right through. Shaped the round holes to a hex shape and we're in business.
Next bit was drill for the stainless countersunk screws that would retain these back nut contraptions in place. This went without any incident, which was nice.
On first fitting the screws stood a little too high, not massively proud but enough to annoy me. I got my own back on them by sanding down their heads a little. There's a few people who need their heads sanding, but we'll save that for another day and it's probably classed as GBH anyway. Let's hope not eh?
Anyway, all I set out to do I did and I'm one happy bunny.
Time for coffee and a smoke.
The good woman had just arrived home from work, so my timing was immaculate.
Due to getting myself "proper sorted" today (kids speak is rubbing off) I did a few chores and had bought, prepared and was in the process (despite my absence down the shed) cooking dinner. Equals happy good woman, equals brownie points being bestowed on yours truly.
So after above mentioned coffee and a smoke I continued with a little bit more.
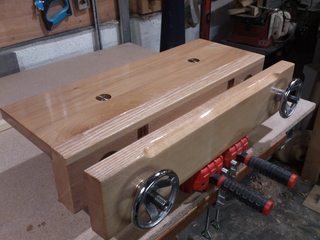
I had bought some beech along with the ash and the intent was to use this beech as a rear ledge/shelf/extension on the rear jaw. This vice is going to be a little like a mini bench. It's not a big extension at the rear but it will aid (I hope) things like laying out dovetails etc.
The beech had gone through the thicknesser the other day, so all I needed to get done was some cutting to length and jointing up the edges. Sorry once again, phone had died, so no pics of this.
With the necessary done, a little cascamite was mixed and a little glue up was done. I now have a beech board approx 7.5" by 25".
Wednesday, once again playtime.
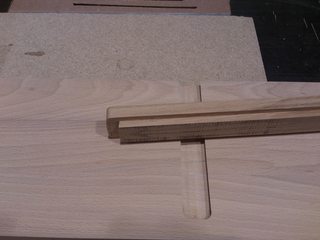
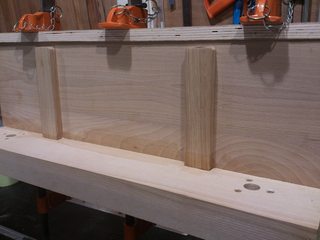
Today's adventure centered around getting my glued up beech board flat and cutting then fitting two sliding dovetails of oak as:-
a, reinforcement.
b, little "lifts/spacers" to keep it up (ooh er missus) off the bench.
So first things first I flattened out the top. The pieces were flat and square to start with, but lately I've been doing away with the usual biscuits and just gone for a rubbed joint. Well sometimes I achieve success, most of the time to be honest, but this particular time we had a little failure and ended up with a few little steps at the joints. Thankfully the thicknesser and her new blades remedied my faux pas. And for a change with only a tiny teeny weeny little snipe, honestly, which is on the underside anyway. What you loose in one place you win back in another. Maybe I am Earl?? Nope, I'm n0legs.
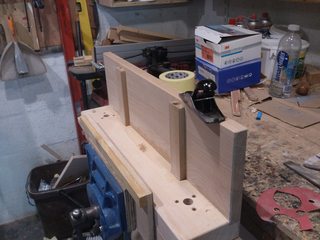
After a little marking out, mainly deciding where to put them, I cut the female part of the joints.
Well,,,, well, you know how you do your best to get it all nice and square and clearly marked out all accurate and such? Well I completely ignored all I had done with that regard and plonked the clamp&guide thingy away from the bloody line :evil: (By now you all know how I am don't you? Really calm and good natured like! You can imagine the colour of the air,, Yes?? Enough said)
Best part though it was pretty parallel to the line, so we went with it. Luckily the design, (Ha! design my pineapple) could absorb this happy little accident :lol:
With renewed care I cut the other one and moved on to cutting the male parts.
I've had this bit of oak kicking about for ages, so today it met its destiny and became part of this project. Thankfully without even so much as murmur of any impending incident, I crept up on my marking out for a really nice smooth fit. Oh, by the way I did this on the router table, just moved the fence back a little each pass until we got there.
I gave the board a quick sand (removing the evidence more like :-$ ) and gently sanded the oak dovetails on their sides.
Mixed a little glue. Yes I've glued them in, what will be will be, inserted and clamped into place.
Thus ended another successful day on this little project of mine
If you've got this far you've done well, I'll try not to leave it so long until the next chapter.
Thanks all, much love n0legs
Ladies and gentlemen I have a little update.
Last week, Thursday I think.
They say aluminium and lead affects the brain, they might be right :?
Isn't ash hard? Wow wee, that was a surprise :shock:
I would love to tell you that all the woodwork parts of Project Noxom were lovingly produced by hand from start to finish, but given I try to stay BS free (I'm not talking British Standards) I can't make that claim.
What I can tell you for fact is changing the thicknesser blades the day before was probably one of my finer decisions, closely followed by changing the planer (jointer if you're from the US of A) blades :wink:
Ha! just realised I need to point out the thicknesser on this side of the pond (the correct name I add) is a planer for our cousins in the Americas. (Right, that's enough of this multilingual nonsense).
I did use a hand plane, actually I used three hand planes. I started with the No7, changed down to a No6 and then to round the session off nicely I gave the No5 a little exercise. Why the changes N0legs?? Well, it was a nice day and I decided.......... Carp!
Bloodly blunted them all on the iron, oops, I mean ash.
Without opening up that can of worms, you know the one? Enjoyed by some, hated by others. The "S" word, shhhh. I can get a decent edge on my tools, not decent enough so it seems. Oh well, I'll have some more practice now I have three to sort out.
I do like a No7, I like the weight, the length and most of all I like, and some of you may or may not agree, I like the ease of a No7. It makes squaring up and flattening out so blooming easy. Well it does if the blade's nice and sharp!!
Being completely honest with you all, I only got so far with the hand planes. The need to get another stage completed was high up on the priorities list, so I was getting this timber dimensioned today no matter what. My love for the No7 comes in third place, behind electricity and the family.
"Electricity", say it,,,, go on try it?
E-L-E-C-T-R-I-C-I-T-Y. Exciting isn't it? Tingles don't it? Feels strong and powerful, yes?
Thank God, the stars, Buddha, Thor, Zeus, Venus, Poseidon, Lassie, Black Beauty and the King and Queen of Sweden. Seriously, thank the heavens for electricity and all the wonderful tools that feed from the font of volts and amps. Because dear reader without it I would not have got to this stage today. Having my fair share of bumps and bruises, collected on my passage throughout this life, I was getting right royally tuckered out.
Anyway, I've gone and got the pieces of ash to where I want them. They're both over length by an inch, I'm aiming for a 24" wide pair of jaws with either 20" or 18" between the threads. The front jaw is 1.5" thick, the back is 1 and 7/8" thick and they're both at 5" high/wide. There will be a mixture of religions (mm and ") here and there, I'm a little wonky like that.
I'm sorry but I've lost the pics from this stage
Saturday.
Managed a couple of hours play today, watched the F1 and then got my ass down the shed.
Plan in mind was to get the "jaws" cut to length and get some of the holes drilled.
With a bit of luck I discovered a virgin blade for the table saw, 48 tooth, so fitted that and got on to cutting. Sorry no pics of this but you all know what cutting a board to length looks like.
The rear jaw was cut to length with 90* edges and on the front I cut the ends at 85* or if you prefer 95* (or if you would prefer even further with a 5* bevel, I don't mind you choose).
So very well pleased with myself, little things mean a lot, I set to with some marking out for some holes. Just a couple of holes in the front jaw for where the metalwork passes through.
Because I "found" a pair of oilite bushes (18mm ID 24mm OD) I drilled the front out to this (24mm) diameter. This was tackled with a nice new forstner and the pillar drill, two nice clean holes were the result on 18" centre. The bushes are a very very nice snug fit. No need to belt them, in just a firm push, LLLLUUUSSHHH!!! I expect this to change when I get some finish on the woodwork, but hey ho!
With this little hurdle now somewhere in the distance it was time for a little work on the rear jaw.
The setting in position of my retained nuts was the activity. I do like setting my nuts.
I had made a circle cutting template a few weeks back for use with the router. The template tells it's own story.
Quick question, does anyone else write down the cutter and guide bush sizes just in case for future use?
Anyway, with the aid of a guide "bobbin" that I had turned in the week, the template was set in place and secured with some double sided tape and one clamp for some extra security.
Quick tip, I use double sided tape on top of masking tape. Press the masking tape down hard.
Another quick tip, most tapes are pressure sensitive, ie, the harder you press the better it sticks. If they're any use to you take them, they're free. If not, just ignore. With the DS tape on top of the masking tape you avoid that horrible job of removing the DS, done it loads of times works a treat.
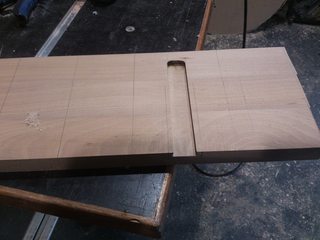
With the router two neat little recesses were cut for the washer part of the nuts to sit in. Hopefully these are set deep enough so as not to mark anything I clamp up later on.
While the router was out I changed bits and rounded over the rear of the holes in the front jaw. Quick buzz and the tiny teeny weeny breakout was taken care of
How the day ended
Fast forward to Tuesday.
Afternoon in the shed/studio/theatre of dreams/sanctuary/den of inequity/other office/workshop.
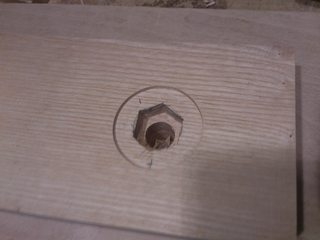
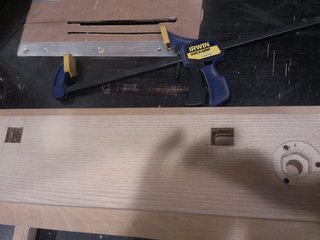
So on to some more drill work on the rear jaw. I needed to cut two recesses for the nut part of the retaining nut???
I drilled a 25 mm hole to the depth required then through drilled with a 19 mm bit so the threads can pass right through. Shaped the round holes to a hex shape and we're in business.
Next bit was drill for the stainless countersunk screws that would retain these back nut contraptions in place. This went without any incident, which was nice.
On first fitting the screws stood a little too high, not massively proud but enough to annoy me. I got my own back on them by sanding down their heads a little. There's a few people who need their heads sanding, but we'll save that for another day and it's probably classed as GBH anyway. Let's hope not eh?
Anyway, all I set out to do I did and I'm one happy bunny.
Time for coffee and a smoke.
The good woman had just arrived home from work, so my timing was immaculate.
Due to getting myself "proper sorted" today (kids speak is rubbing off) I did a few chores and had bought, prepared and was in the process (despite my absence down the shed) cooking dinner. Equals happy good woman, equals brownie points being bestowed on yours truly.
So after above mentioned coffee and a smoke I continued with a little bit more.
I had bought some beech along with the ash and the intent was to use this beech as a rear ledge/shelf/extension on the rear jaw. This vice is going to be a little like a mini bench. It's not a big extension at the rear but it will aid (I hope) things like laying out dovetails etc.
The beech had gone through the thicknesser the other day, so all I needed to get done was some cutting to length and jointing up the edges. Sorry once again, phone had died, so no pics of this.
With the necessary done, a little cascamite was mixed and a little glue up was done. I now have a beech board approx 7.5" by 25".
Wednesday, once again playtime.
Today's adventure centered around getting my glued up beech board flat and cutting then fitting two sliding dovetails of oak as:-
a, reinforcement.
b, little "lifts/spacers" to keep it up (ooh er missus) off the bench.
So first things first I flattened out the top. The pieces were flat and square to start with, but lately I've been doing away with the usual biscuits and just gone for a rubbed joint. Well sometimes I achieve success, most of the time to be honest, but this particular time we had a little failure and ended up with a few little steps at the joints. Thankfully the thicknesser and her new blades remedied my faux pas. And for a change with only a tiny teeny weeny little snipe, honestly, which is on the underside anyway. What you loose in one place you win back in another. Maybe I am Earl?? Nope, I'm n0legs.
After a little marking out, mainly deciding where to put them, I cut the female part of the joints.
Well,,,, well, you know how you do your best to get it all nice and square and clearly marked out all accurate and such? Well I completely ignored all I had done with that regard and plonked the clamp&guide thingy away from the bloody line :evil:
(By now you all know how I am don't you? Really calm and good natured like! You can imagine the colour of the air,, Yes?? Enough said) Best part though it was pretty parallel to the line, so we went with it. Luckily the design, (Ha! design my pineapple) could absorb this happy little accident :lol:
With renewed care I cut the other one and moved on to cutting the male parts.
I've had this bit of oak kicking about for ages, so today it met its destiny and became part of this project. Thankfully without even so much as murmur of any impending incident, I crept up on my marking out for a really nice smooth fit. Oh, by the way I did this on the router table, just moved the fence back a little each pass until we got there.
I gave the board a quick sand (removing the evidence more like :-$ ) and gently sanded the oak dovetails on their sides.
Mixed a little glue. Yes I've glued them in, what will be will be, inserted and clamped into place.
Thus ended another successful day on this little project of mine
If you've got this far you've done well, I'll try not to leave it so long until the next chapter.
Thanks all, much love n0legs
MattRoberts
Established Member
Coming along nicely! And it's not a mistake - it's creative license...
MattRoberts":1op3gmmu said:Coming along nicely! And it's not a mistake - it's creative license...
Amateur. It's 'Marketplace Research and Development Strategy' .
Looks very smart Nolegs.
MattRoberts":2a8h7elt said:Coming along nicely! And it's not a mistake - it's creative license...
Is there a fee for a creative license?
I hope not Matt, the amount I use it would bankrupt me :lol:
Bm101":k3h8maff said:It's 'Marketplace Research and Development Strategy'
Looks very smart Nolegs.
Cheers BM
I'm saving that one for the next time I'm having a meeting with the boss :lol:
Well we're getting close, real close. No sense in holding back now ...........
Yes ladies and gentlemen, by popular demand we have an update.
Been a busy little bunny, oh yes sir I have! But we have made a bit more progress, hooray, on Project Noxom.
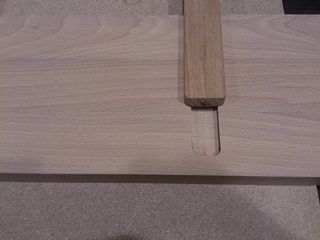
Well after getting the beech "shelf" board completed It was time to mate it up with the rear jaw. I wanted a really good connection between the two.
I cut a rebate on the rear jaw to match the thickness of the of the beech. Along with this rebate I decided on a pair of mortice and tenons, the tenons being cut on the oak reinforcements.
Marked up and cut.
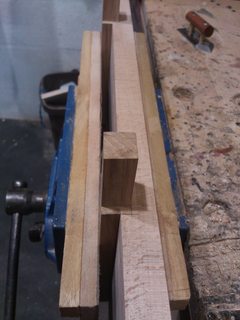
Then a pair of mortices cut in the jaw. I cut these by hand, just me, a chisel and mallet. To be honest it was good fun. The morticer would have sorted them out quick enough, but not with as much satisfaction. They turned out pretty good, but by god this ash is hard.
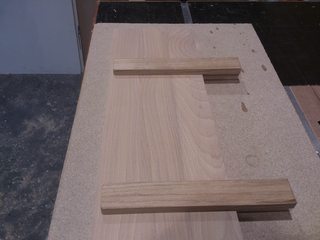
Assembly went well, to be honest I quite impressed myself how well it all went together. The only thing I'm not 100% about was my spacing for the wedges, I dropped the ball a little with my cutting. Anyway, with a good dose of glue and really jamming the wedges in I'm sure of the joint.
When it had set, cascamite was used so this was quite a while, I stood on it. Not a murmur or any movement, and I ain't no lightweight. Happy boy I am
The next day, Sunday the 10th I think.
This was to be an easy day, well so I planned #-o
I set to with cutting off the the excess and wedges from the tenons. Then deciding how much softening of the edges I wanted and exactly how. It's not a hard choice, round over or chamfer, but which one I wasn't sure of. After much deliberation, really, I went with the chamfers.
Being that this was supposed to be an easy day, which also includes trying to keep it a little quieter, I went with the handtool option. So with plane and rasp in hand (didn't really need it, but was nice to have) I added the chamfers. Really really went well, I'm pretty sure all round they're fairly even and if they're not it's tough :lol:
I did consider stopping here and packing up for the day, but hell I thought let's get on. So I did, and I'm glad I did.
Monster sanding session. No not really, a quick pass or two with some 180 and then the same with some 320 and it was all over. What's next me thinks? Well given things have a strange habit of getting dirty down the shed I decided on adding a coat or two of finish. So out with some cheap 2k lacquer, open the doors and run the extractor.
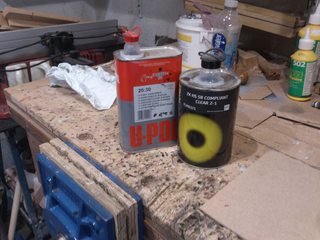
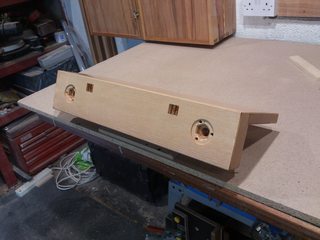
Bloody stuff stinks. I should be immune by now, but by golly it's got a scent and a half, just like Pepe le Pew. It is good though, two coats in 30 minutes and it's looking good.
The following day the brass back nuts were fitted with the stainless set screws. No individual pic of these, but I'm sure they'll show up somewhere.
Thanks for following =D>
Isn't it getting pic heavy? Wow wee, I've taken some pics lately :-s
More to come soon, over and out for now.
Yes ladies and gentlemen, by popular demand we have an update.
Been a busy little bunny, oh yes sir I have! But we have made a bit more progress, hooray, on Project Noxom.
Well after getting the beech "shelf" board completed It was time to mate it up with the rear jaw. I wanted a really good connection between the two.
I cut a rebate on the rear jaw to match the thickness of the of the beech. Along with this rebate I decided on a pair of mortice and tenons, the tenons being cut on the oak reinforcements.
Marked up and cut.
Then a pair of mortices cut in the jaw. I cut these by hand, just me, a chisel and mallet. To be honest it was good fun. The morticer would have sorted them out quick enough, but not with as much satisfaction. They turned out pretty good, but by god this ash is hard.
Assembly went well, to be honest I quite impressed myself how well it all went together. The only thing I'm not 100% about was my spacing for the wedges, I dropped the ball a little with my cutting. Anyway, with a good dose of glue and really jamming the wedges in I'm sure of the joint.
When it had set, cascamite was used so this was quite a while, I stood on it. Not a murmur or any movement, and I ain't no lightweight. Happy boy I am
The next day, Sunday the 10th I think.
This was to be an easy day, well so I planned #-o
I set to with cutting off the the excess and wedges from the tenons. Then deciding how much softening of the edges I wanted and exactly how. It's not a hard choice, round over or chamfer, but which one I wasn't sure of. After much deliberation, really, I went with the chamfers.
Being that this was supposed to be an easy day, which also includes trying to keep it a little quieter, I went with the handtool option. So with plane and rasp in hand (didn't really need it, but was nice to have) I added the chamfers. Really really went well, I'm pretty sure all round they're fairly even and if they're not it's tough :lol:
I did consider stopping here and packing up for the day, but hell I thought let's get on. So I did, and I'm glad I did.
Monster sanding session. No not really, a quick pass or two with some 180 and then the same with some 320 and it was all over. What's next me thinks? Well given things have a strange habit of getting dirty down the shed I decided on adding a coat or two of finish. So out with some cheap 2k lacquer, open the doors and run the extractor.
Bloody stuff stinks. I should be immune by now, but by golly it's got a scent and a half, just like Pepe le Pew. It is good though, two coats in 30 minutes and it's looking good.
The following day the brass back nuts were fitted with the stainless set screws. No individual pic of these, but I'm sure they'll show up somewhere.
Thanks for following =D>
Isn't it getting pic heavy? Wow wee, I've taken some pics lately :-s
More to come soon, over and out for now.
I see you use hardpoint saws - do yourself a favour (if you haven't already done so) and take the lacquer off. Isopropyl will usually do it, all sorts of other solvents will. It makes them so much sweeter to use.
A bit more for you folks
The front jaw has been chamfered all round. I started with the hand plane just like I did for the rear, but along the front the top edge I gave it a large chamfer with the router and bearing guided bit. Being that this was such a wide chamfer, and wanting it to look good, I wasn't quite so confident doing it by hand.
Hopefully we don't go blasting the saw into it too often. We'll see :roll:
Gave it a big bad sanding (not really, new blades in the planer remember) and then got some more of my favourite finish on it. How long this lasts given this is a tool I don't know, but it does make it look pretty.
Take a look at the finished product.
While we're working the wood.
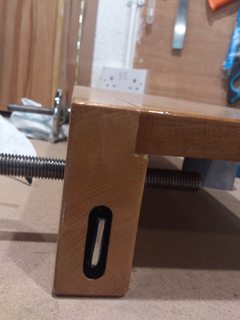
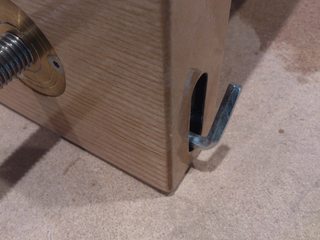
I decided I needed to do something with the adjustment allen key.
Go on, take a guess. Yup you've got it. I keep losing the bloody thing :evil:
Now if something's gonna send me into a spasm it's not finding that something. So seeing as I'm getting older and wiser (and partly due to now being banned from Sainsburys for toddler temper tantrums. No, not the kids, mine. I went the whole hog a few weeks back, threw myself on the floor, screamed, shouted rolled around a bit. The good woman just left me right there, in the cereal aisle. The staff took me to the desk and called over the tannoy for my responsible adult to come get me. While I waited they gave me sweets, result)
Anyway enough of that. I made a little storage slot for it on the rear section. To cover up the burn marks (pipper pipper damn!), I painted it black. Quick fix, nice.
My Noxom Vice is to be used as and when, it won't be permanently fitted to the bench. I've wanted this from the start, to be able to fit and remove easily and quickly.
Well as you might have guessed I've actually given absolutely no thought to this aspect of this project.....
Well not to worry dear friends, I'm a "cross that bridge when we get there" kind of guy. This attitude generally works out fine for me. There have been times when it hasn't, but I'll need my solicitor present to tell you more.
I've seen that many use a pair of holdfasts to keep their vice in the required position, but I don't have that kind of bench (it's an excuse I'll use on the good woman in time, wink wink!) So what's a boy to do?
Well given my hands on nature and I've thoroughly enjoyed using a lifetime of skills on this, we've welded, soldered, machined (sort of), filed, planed, morticed etc etc, I thought lets make something.
The easy option was to buy a pair of bolts. Yes easy, cheap, quick, but no.
The easy option would have been to buy a pair of big wing nuts, but no (that bit will be relevant later).
I wanted something:-
1, I'd made myself.
2, Looks good.
3, Strong and functional.
The n0legs solution!
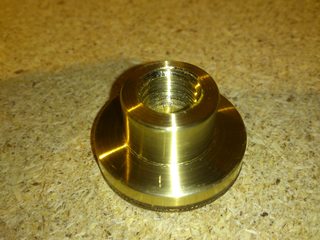
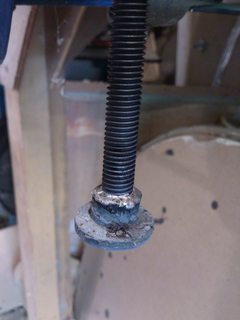
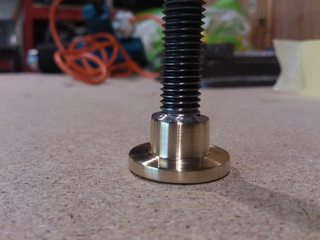
I decided to make a pair of shouldered retaining bolts.
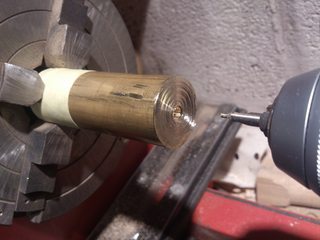
Brass was the choice, for the look and ease of working. A bit of brass 30mm dia was sourced and work on it was started.
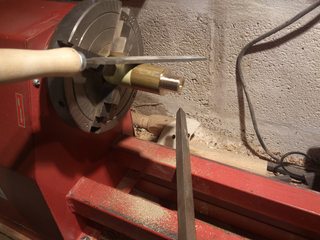
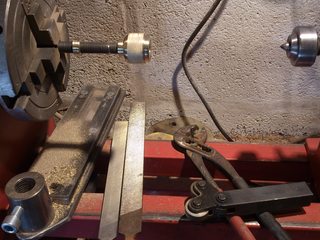
To create the shoulder I obviously needed to reduce some of the diameter. Turning any material when you don't have the correct tools gets interesting, so other avenues need to be trekked.
Rather than struggle, "machining" the excess material away (my poor turning chisels will never forgive me), I used a hole saw to assist me in removing some of it.
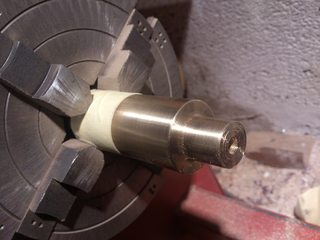
Centre drilled.
Then a 6mm hole was drilled.
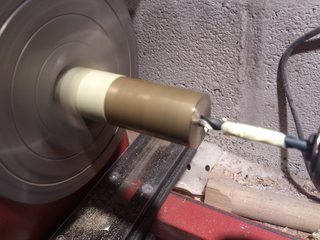
Then the hole saw was employed. Depth required marked with some tape.
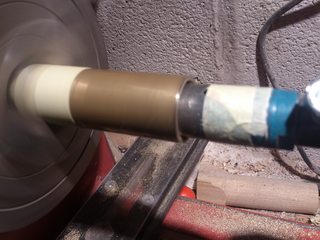
A hacksaw removes this ring of brass.
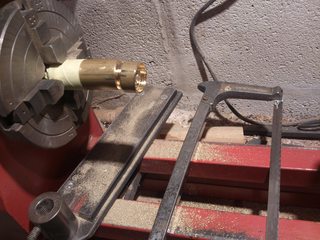
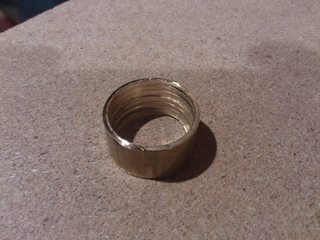
The shoulder was squared up with a few files.
The piece was drilled and tapped for a 12mm thread. This shouldered piece was given a sanding and then "parted off". Turned around, back into the chuck and finished up. Turned out pretty damn good I think.
The next stage involves one of my favourite jobs, a bit of soldering. Earlier in the thread I've mentioned how it's done, so no need for a repeat. Except this time, because I'd already really cleaned up these pieces, I decided to use some plumbers black to keep the solder where I wanted it, and avoid a hell of a job removing the inevitable overspill.
Plumbers black is masking tape for solders. It's made of lampblack (soot) , you spit on it or add a drop of water. Brush it on, allow to dry for only a few minutes and then get soldering.
I'm losing it,,,,,,, I haven't said what I'm soldering.
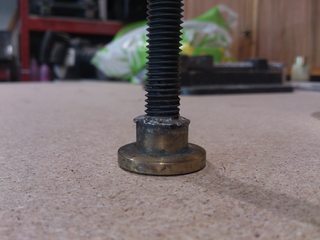
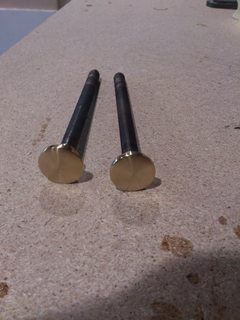
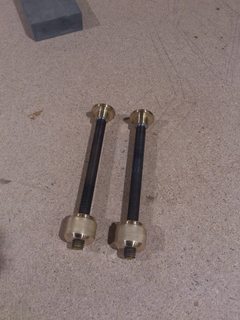
I'm using some HT 12mm studding for my bolts. To keep it all together I decided to solder the brass heads to the studding. Loctite is easier and superglue is even easier than that, but they're not fun like soldering.
Soldering was started, finished and thanks to the blacking clean up was nice and easy.
These bits are now finished, complete, finito, done, didded.

With only a few daylight hours left :lol: , I set to with some blue sky thinking about wing nuts over my favourite beverage and a smoke.
After much deliberation I decided I don't like wing nuts. Bit of a problem we have there then don't we?
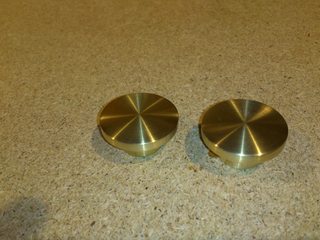
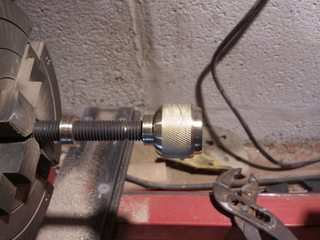
I checked out the remaining brass and decided there was enough left over to do something with. I decided I'd try and make a pair of hand nuts, so it was back to the lathe.
First the brass was drilled then tapped for M12. I didn't take any pics of this stage, sorry.
Whilst doing the drilling etc, I was pondering how tight I was going to be able to tighten these things by hand. I figured I'd get them tight, good grip, but I wasn't digging out the torque wrench for any testing.
For the shaping and cleaning up part I was going to use some of the studding as a mandrel. With the brass wound onto the mandrel I had a go at winding it up tight, not bad. Not too bad at all, but it could be better. I needed a quick fix for this, there was no time for skin slip tests and grip psi measurements.
Have a smoke.
In the past when I've gone to my mates workshop to play with his toys I have parted with cash and bought a few bits and bobs for use up there. One of the things I bought was a knurling tool. You might know where this is going. We'll come back to this in a minute.
Shaped the brass with some files and the odd turning tool. I've got to make it up to them, they've had a hammering. Then split the bar in half.
Smoke time, again.
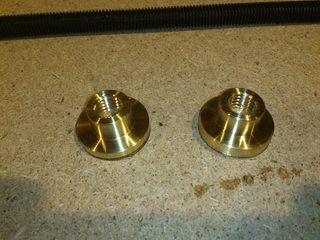
Whilst sat down I weighed up the knurling tool. Well, thinks I, "I reckon I can hang on to this well enough to use it". So I did.
Carefully, (yea now's the time for some H&S) I pressed the tool to the spinning brass and moved side to side.
We have a knurl pattern gentlemen!
It's not super deep or for that matter super grippy either, but it is better. Quite a bit better. When friendy-friend-friend gets his lathe repaired or replaced I'll take them up and do them properly.
Looking good I think.
With the bolts.
The last stage is nigh.
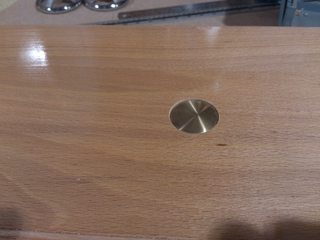
All I have left to do is drill some holes in the rear "shelf/ledge" for the bolts. This was pretty straight forward. Some marking out, a pilot hole or two and away we go.
A 30mm forstner bit first for the head of my bolts. A 3/4" auger bit for the waist and a 1/2" auger for the threaded portion, I won't bore you with pics.
A trial fit, followed by a light sand around the edge and a coat of finish and we're done.
Yup, that's it it's done.
Some pics.
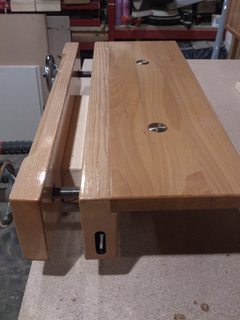
There's no more to do now except use it.
I've got a few ideas for some dog holes and dogs, but we'll see. One idea I have is using some cap head screws, fitted flush when not in use and wound out when needed, very much like David Barron's dovetail right angle jig.
I might. I might not, not sure yet but it won't end up like a Swiss army knife :lol:
It would only involve drilling a few holes, counter boring and tapping them for my chosen size. Two in the face of the rear jaw and then two in the rear shelf, bang on inline with each other.
Wind out the screws to act as stops, push up component (drawer side etc,) to screws, clamp vice shut. Wind out upper screws, push the other part against the screws and mark up the joint. It's easier in my head as an idea than explaining it. If I go ahead I'll do a mock up first so you can see where I'm going.
Here all done.
Thanks to all of you who have followed, read (and wondered no doubt) and commented. This one has been a fun project for me and I hope you've all enjoyed my thought processes, ramblings and activities :lol:
What's next??
I'll think of something :wink:
The front jaw has been chamfered all round. I started with the hand plane just like I did for the rear, but along the front the top edge I gave it a large chamfer with the router and bearing guided bit. Being that this was such a wide chamfer, and wanting it to look good, I wasn't quite so confident doing it by hand.
Hopefully we don't go blasting the saw into it too often. We'll see :roll:
Gave it a big bad sanding (not really, new blades in the planer remember) and then got some more of my favourite finish on it. How long this lasts given this is a tool I don't know, but it does make it look pretty.
Take a look at the finished product.
While we're working the wood.
I decided I needed to do something with the adjustment allen key.
Go on, take a guess. Yup you've got it. I keep losing the bloody thing :evil:
Now if something's gonna send me into a spasm it's not finding that something. So seeing as I'm getting older and wiser (and partly due to now being banned from Sainsburys for toddler temper tantrums. No, not the kids, mine. I went the whole hog a few weeks back, threw myself on the floor, screamed, shouted rolled around a bit. The good woman just left me right there, in the cereal aisle. The staff took me to the desk and called over the tannoy for my responsible adult to come get me. While I waited they gave me sweets, result)
Anyway enough of that. I made a little storage slot for it on the rear section. To cover up the burn marks (pipper pipper damn!), I painted it black. Quick fix, nice.
My Noxom Vice is to be used as and when, it won't be permanently fitted to the bench. I've wanted this from the start, to be able to fit and remove easily and quickly.
Well as you might have guessed I've actually given absolutely no thought to this aspect of this project.....
Well not to worry dear friends, I'm a "cross that bridge when we get there" kind of guy. This attitude generally works out fine for me. There have been times when it hasn't, but I'll need my solicitor present to tell you more.
I've seen that many use a pair of holdfasts to keep their vice in the required position, but I don't have that kind of bench (it's an excuse I'll use on the good woman in time, wink wink!) So what's a boy to do?
Well given my hands on nature and I've thoroughly enjoyed using a lifetime of skills on this, we've welded, soldered, machined (sort of), filed, planed, morticed etc etc, I thought lets make something.
The easy option was to buy a pair of bolts. Yes easy, cheap, quick, but no.
The easy option would have been to buy a pair of big wing nuts, but no (that bit will be relevant later).
I wanted something:-
1, I'd made myself.
2, Looks good.
3, Strong and functional.
The n0legs solution!
I decided to make a pair of shouldered retaining bolts.
Brass was the choice, for the look and ease of working. A bit of brass 30mm dia was sourced and work on it was started.
To create the shoulder I obviously needed to reduce some of the diameter. Turning any material when you don't have the correct tools gets interesting, so other avenues need to be trekked.
Rather than struggle, "machining" the excess material away (my poor turning chisels will never forgive me), I used a hole saw to assist me in removing some of it.
Centre drilled.
Then a 6mm hole was drilled.
Then the hole saw was employed. Depth required marked with some tape.
A hacksaw removes this ring of brass.
The shoulder was squared up with a few files.
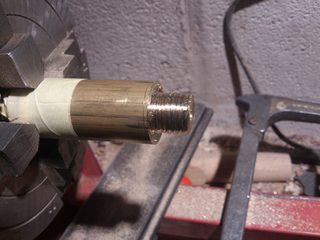
The piece was drilled and tapped for a 12mm thread. This shouldered piece was given a sanding and then "parted off". Turned around, back into the chuck and finished up. Turned out pretty damn good I think.
The next stage involves one of my favourite jobs, a bit of soldering. Earlier in the thread I've mentioned how it's done, so no need for a repeat. Except this time, because I'd already really cleaned up these pieces, I decided to use some plumbers black to keep the solder where I wanted it, and avoid a hell of a job removing the inevitable overspill.
Plumbers black is masking tape for solders. It's made of lampblack (soot) , you spit on it or add a drop of water. Brush it on, allow to dry for only a few minutes and then get soldering.
I'm losing it,,,,,,, I haven't said what I'm soldering.
I'm using some HT 12mm studding for my bolts. To keep it all together I decided to solder the brass heads to the studding. Loctite is easier and superglue is even easier than that, but they're not fun like soldering.
Soldering was started, finished and thanks to the blacking clean up was nice and easy.
These bits are now finished, complete, finito, done, didded.
With only a few daylight hours left :lol: , I set to with some blue sky thinking about wing nuts over my favourite beverage and a smoke.
After much deliberation I decided I don't like wing nuts. Bit of a problem we have there then don't we?
I checked out the remaining brass and decided there was enough left over to do something with. I decided I'd try and make a pair of hand nuts, so it was back to the lathe.
First the brass was drilled then tapped for M12. I didn't take any pics of this stage, sorry.
Whilst doing the drilling etc, I was pondering how tight I was going to be able to tighten these things by hand. I figured I'd get them tight, good grip, but I wasn't digging out the torque wrench for any testing.
For the shaping and cleaning up part I was going to use some of the studding as a mandrel. With the brass wound onto the mandrel I had a go at winding it up tight, not bad. Not too bad at all, but it could be better. I needed a quick fix for this, there was no time for skin slip tests and grip psi measurements.
Have a smoke.
In the past when I've gone to my mates workshop to play with his toys I have parted with cash and bought a few bits and bobs for use up there. One of the things I bought was a knurling tool. You might know where this is going. We'll come back to this in a minute.
Shaped the brass with some files and the odd turning tool. I've got to make it up to them, they've had a hammering. Then split the bar in half.
Smoke time, again.
Whilst sat down I weighed up the knurling tool. Well, thinks I, "I reckon I can hang on to this well enough to use it". So I did.
Carefully, (yea now's the time for some H&S) I pressed the tool to the spinning brass and moved side to side.
We have a knurl pattern gentlemen!
It's not super deep or for that matter super grippy either, but it is better. Quite a bit better. When friendy-friend-friend gets his lathe repaired or replaced I'll take them up and do them properly.
Looking good I think.
With the bolts.
The last stage is nigh.
All I have left to do is drill some holes in the rear "shelf/ledge" for the bolts. This was pretty straight forward. Some marking out, a pilot hole or two and away we go.
A 30mm forstner bit first for the head of my bolts. A 3/4" auger bit for the waist and a 1/2" auger for the threaded portion, I won't bore you with pics.
A trial fit, followed by a light sand around the edge and a coat of finish and we're done.
Yup, that's it it's done.
Some pics.
There's no more to do now except use it.
I've got a few ideas for some dog holes and dogs, but we'll see. One idea I have is using some cap head screws, fitted flush when not in use and wound out when needed, very much like David Barron's dovetail right angle jig.
I might. I might not, not sure yet but it won't end up like a Swiss army knife :lol:
It would only involve drilling a few holes, counter boring and tapping them for my chosen size. Two in the face of the rear jaw and then two in the rear shelf, bang on inline with each other.
Wind out the screws to act as stops, push up component (drawer side etc,) to screws, clamp vice shut. Wind out upper screws, push the other part against the screws and mark up the joint. It's easier in my head as an idea than explaining it. If I go ahead I'll do a mock up first so you can see where I'm going.
Here all done.
Thanks to all of you who have followed, read (and wondered no doubt) and commented. This one has been a fun project for me and I hope you've all enjoyed my thought processes, ramblings and activities :lol:
What's next??
I'll think of something :wink:
AES
Established Member
Well done "n0legs Noxom"!
=D>
Really enjoyed the posts, the pix gave a ringside seat, and the result is definitely something to be proud of.
Thanks for the posts.
AES
=D>
Really enjoyed the posts, the pix gave a ringside seat, and the result is definitely something to be proud of.
Thanks for the posts.
AES
=D> Brilliant mate. Fantastic work and result and a great read. Cheers for sharing, I've learnt a fair bit over the course of this wip too, so thanks. Well done fella, you'll be proud of this one I'm guessing. :wink:
ps: I spent an hour or two looking for my assorted allen keys last weekend too. In the end I bought a new set of wera because I never did find them. Now when I lose the new ones I can say 'Wera my ******** allen keys now' and with a little grammatical inflection it'll be both a statement and a question. I might have created a paradox. So that's nice. Let's hope the Universe doesn't collapse. :|
Cheers noLegs.
Chris
MattRoberts
Established Member
Lovely project, nice one! Came out looking fantastic, and love the custom made brass bolts and other touches
AES":3ops6wor said:Well done "n0legs Noxom"!
=D>
Really enjoyed the posts, the pix gave a ringside seat, and the result is definitely something to be proud of.
Thanks for the posts.
AES
Thanks for the support, it's been emotional :lol:
Bm101":33w5d4cc said:=D> Brilliant mate. Fantastic work and result and a great read. Cheers for sharing, I've learnt a fair bit over the course of this wip too, so thanks. Well done fella, you'll be proud of this one I'm guessing. :wink:
You've learned a bit?? Oh Christ! I hope not :lol:
No, seriously, if nothing else it shows possible ways round possible problems.
Yes mate I'm really pleased with it.
Thanks Chris
Bm101":33w5d4cc said:[/i]. I might have created a paradox. So that's nice. Let's hope the Universe doesn't collapse. :|
Cheers noLegs.
Chris
I worry about you 8-[ :lol:
Bm101":1n0besz3 said:=D> Brilliant mate. Fantastic work and result and a great read. Cheers for sharing, I've learnt a fair bit over the course of this wip too, so thanks. Well done fella, you'll be proud of this one I'm guessing. :wink:
ps: I spent an hour or two looking for my assorted allen keys last weekend too. In the end I bought a new set of wera because I never did find them. Now when I lose the new ones I can say 'Wera my ******** allen keys now' and with a little grammatical inflection it'll be both a statement and a question. I might have created a paradox. So that's nice. Let's hope the Universe doesn't collapse. :|
Chris
Wera my Allen keys? ... Wiha! I've found them?
Nice one, N0legs, I'd be 'fraid to use it.
MattRoberts":1fzghtvn said:Lovely project, nice one! Came out looking fantastic, and love the custom made brass bolts and other touches
Hey Matt, cheers mate
Thanks for the comments =D>
The bolts are something I'm really pleased with.
I'll post a pic or two in a week or so showing it in place. I'll add a little report on how the bolts and it work, some minor alterations need doing to it's intended location.