Plane Cabinet - WIP!!!

UKworkshop.co.uk

Help Support UKworkshop.co.uk:

This site may earn a commission from merchant affiliate links, including eBay, Amazon, and others.
Alf, perfect deduction. I found Cosman a good start but I hope to be able to change his method to suit my technique as I progress. I'm saving the saw dust from the dovetail cutting in case of an emergency...

Andy, that would have been the sound approach but I'm hell bent on using only glass on the door.

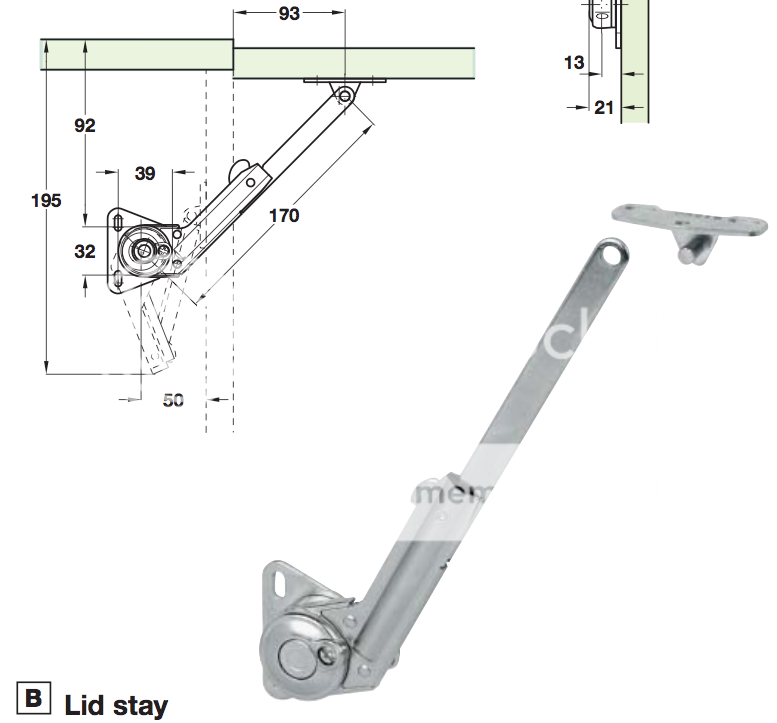
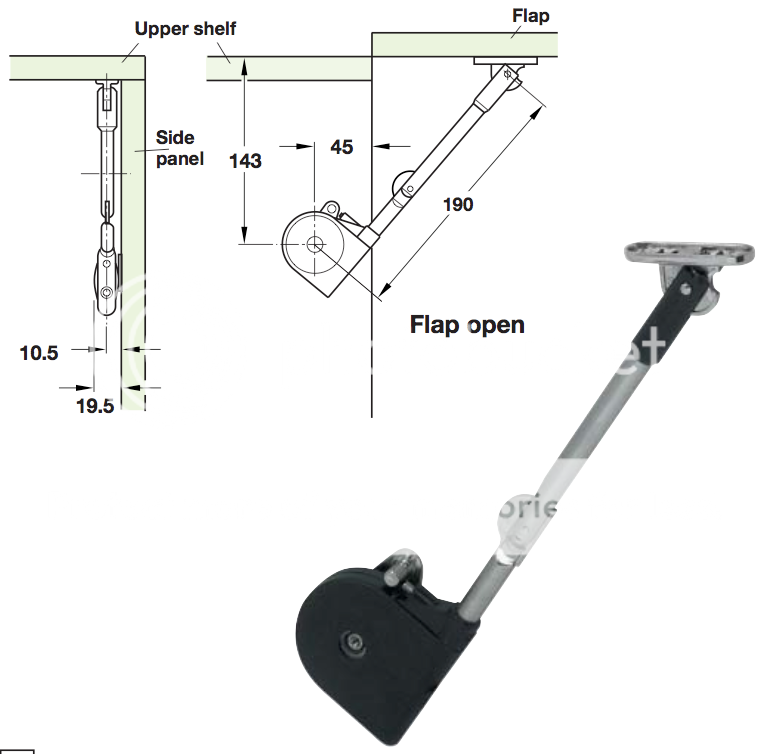
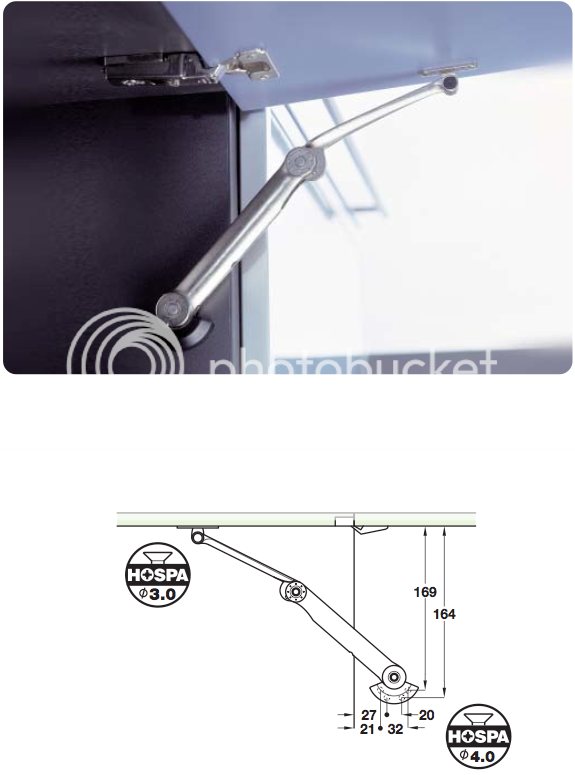
I've seen a type of hinge for glass thats almost identical to the standard kitchen door hinges. The glass would need to be drilled however. There's a cheap and reasonably common type of 'catch' for vertical kitchen doors. I don't know the name of it but its basically a bar that holds the door open and then a little push up releases the vertical door. Does this sound familiar to anyone and would it work? I've been looking on Issac Lord and a few other sites but I can't find it.

As an aside, any other Wallander fans out there?
 
Ok, I've found a number of fittings which I'd like to try for the glass flap door to the cabinet.
I'm not sure about the first two, as follows, but I must consider the cost...
LidStay2.png


LidStay1.png

But this one is my favouite...
FlapFitting.png

Will they work with glass? They are all Hafele products.

I have no experience with products like these so I would welcome some guidance.

Regards

Eoin
 
A bit of further chopping out of the dovetails.

IMG_0276.jpg


I've broken the blade on my piercing saw and I'm going to need it badly. I think I may have made my pins are far too small...

ECHO ECHO echo...
 
:D Thanks lads. Ha ha, I have been good to myself with my tools but let he/she who has not sinned cast the first stone...

I wonder how far down this slope I have gotten?

Eoin
 
eoinsgaff":2f4fhnps said:
:D Thanks lads. Ha ha, I have been good to myself with my tools but let he/she who has not sinned cast the first stone...

I threw away all my stones ages ago, for safety. :D Looks good. Moral of the story so far is always have a gaggle of spare blades for the piercing saw in hand. :wink:
 
...'specially that dovetail saw - Rob

Most certainly. I had a twenty something TPI Pax dovetail saw before that and the Lie nielsen was a revelation. I suspect it may have something to do with the way it was masterfully sharpened before I got it :wink:...

However, I must now learn to sharpen it myself... :oops:

Alf, I think a few stones in reserve are no load. For defensive purposes of course...

Eoin
 
Dovetail spacings look good to me...I'd have left the outside half pins a tad wider though. The general rule of thumb is half the thickness of the board plus a mm or two - Rob
 
Ok everyone, happy new year to you all.

I'm taken this project a little further over the holidays. I've missed a few steps with the camera which happens when one is engrossed in their work.

IMG_0280.jpg

Above I have glued up the dovetail joints and used a router to make stopped dado's for the shelves and to mill out a rebate, identical on back and front, for the backing and glass door. The dovetails were a challenge on the hard oak and were by no means perfect. However, they'll have to do. It may be worth noting that the rebate has actually highlighted a number of problems with the dovetail joinery, but, how's ever. We live, we learn.

IMG_0279.jpg

Here I'm touching up the planed finish after the glue-up.

IMG_0281.jpg

I have to square the corners of the rebate so I use the marking gauge to mark a neat line into these corners.

More to follow

Eoin
 
Looking rather tasty so far Eoin. That AWO can be a bit tricky to clean up effectively and although I've made one or two bits in it (courtesy of Waka) it's not my favourite timber of choice, but is available in good, straight sizes (for the most part) I assume that the back is going to be some sort of veneered panel p'raps, or maybe the full Monty with a solid oak boards in a frame :-"? For a piece of this quality it would be worth thinking about the latter - Rob
 
IMG_0283.jpg

I started to fit the shelves. I got myself a Veritas side rebate plane to help fine tune the dado's and I kept my router work tight to allow this plane make the fine adjustment. However I was struck with a problem then as I hadn't accounted for the fact that the dado's were stopped. I've asked this question on the Handtools Board so I won't go into the side rebate plane issue here.

At the time my first solution was to use the shoulder plane, guided by a knife line, to pare a little off the ends of the shelves...
IMG_0282.jpg

IMG_0284.jpg

However this was not very successful as the self didn't fit tight in places. The solution turned out to be easier than I thought. I just planed the self to fit.
Simples!!!
It can be so easy to over think something.

IMG_0285.jpg

This is how the end product might look. There is a couple of dividers missing from the shelves, which have not yet been glued in place. A back must be decided upon, a finish must be decided upon and the glass front fitted.

A gloat??? :shock:
Well, maybe. Subconsciously. :D

Key Lesson learnt!!! - when to leave a line and not to leave the line! The shelves are haunched to extend beyond the dado. They were marked out carefully by setting the shelves in place and marking with a knife. These were chiseled square and still a space was still evident. Even on the last shelf where I left most of the knife line, there was still a space. I had thought that using a knife meant that 'inside the line, outside the line' in terms of cutting was irrelevant. How wrong I was.

Thanks for looking in,
Regards

Eoin
 
Oh Rob. Hmmm, for the back I first considered a MDF/Ply with felt glued on. This then went to a leather hide finish that might be used on a writing desk. While thinking about these options I was also thinking about vertical lapped boards.

Now you've got me really thinking. My rebate is slightly less than 10mm deep. Could I get a frame in here? The shelves are not glued in yet so I could push them out a further few mm. I have used ash for the shelves with a very nice grain colour and figure. Would I fit this into a AWO frame? For movement, would it be enough to make allowances within the frame and then to fit this within the rebate or would I have to make an allowance in the rebate also.

Oh hell, so much to think of. While this is bugging the hell out of me, I must still offer my thanks Rob. You may have helped me save this piece.

Eoin
 
eoinsgaff":q38o6bt0 said:
Now you've got me really thinking. My rebate is slightly less than 10mm deep. Could I get a frame in here? The shelves are not glued in yet so I could push them out a further few mm. I have used ash for the shelves with a very nice grain colour and figure. Would I fit this into a AWO frame? For movement, would it be enough to make allowances within the frame and then to fit this within the rebate or would I have to make an allowance in the rebate also.

Oh hell, so much to think of. While this is bugging the hell out of me, I must still offer my thanks Rob. You may have helped me save this piece.

Eoin
Making a full paneled back from solid timber is a lot of work, no question, but in my view, it's worth the effort in the end. If the rebate a tad less than 10mm as you say (which is about right) then I'd make the corners of the frames using bridles with the tongue being a narrow 4mm or so. The groove for the panel would also be 4mm as well and the panels themselves need be no thicker than 6/7mm and fitted so that they're slightly below the level of the frame...easier cleaning up. I'd also add a central vertical rail as well as the cabinet is quite long. If you make the whole thickness of the back panel the same as the depth of the rebate, you'll find that you won't have to make any allowances in the width of the shelves - Rob
 
Just a small tip, if you route out a rebate its easier to round the corners of the back panel than to square the corners of the rebate. As its at the back either won't be seen.
 
Shultzy":123kvuls said:
Just a small tip, if you route out a rebate its easier to round the corners of the back panel than to square the corners of the rebate. As its at the back either won't be seen.
I'm not sure I'd entirely agree there Shultzy. I've tried both ways and I find it easier to square out the corner (not too difficult a job if the rebate's a narrow one) and then plane the panel for a good fit. If the corners are left rounded and the panel is shaped to fit, it can be a bit of a 'mare to get a really good fit in all four corners...I know it's the back and nobody's going to see it, but it would always irritate me if I knew that the fit in the round corners was sloppy - Rob
 
eoinsgaff":2a3toyqv said:
For those reasons I like idea of the absorbent crystals. I must check this out further. Is there a particular trading name I should look out for?


Eoin

There used to be a computer company opposite my workshop, and everything came in packed with large absorbent crystal pouches which they just throw away. I regularly pop in and see them and collect a handful which I throw in my plane cabinet - Have been doing this for years and have kept the dreaded rust at bay!

I also occassionaly put them near the woodburner (not too close) to dry them out fully again!

So try your local computer or electrical shop - I'm sure you will find they are happy to get rid of them.

Rog
 
Back
Top