New workshop build, with a difference!

UKworkshop.co.uk

Help Support UKworkshop.co.uk:

This site may earn a commission from merchant affiliate links, including eBay, Amazon, and others.
Hello folks,

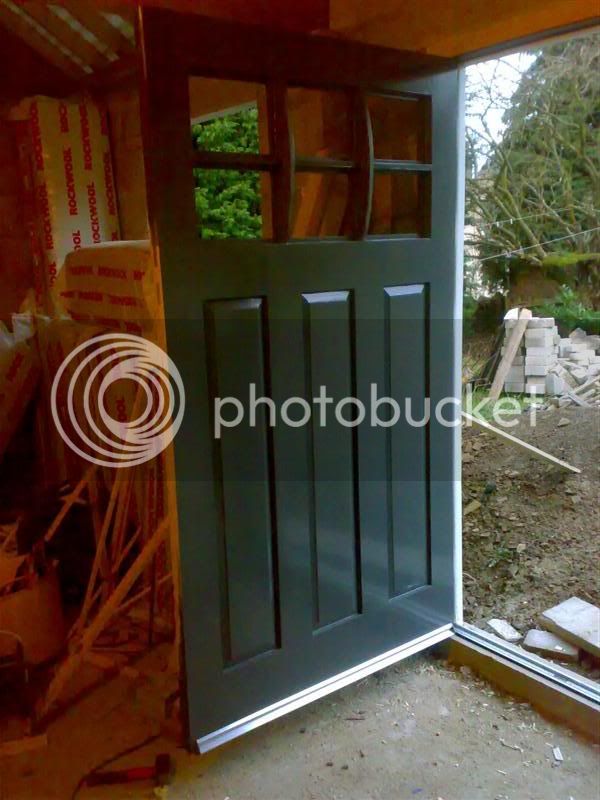
I was beginning to think that I would never get to this point; what with shaping the windows and then three coats of paint, rubbing down, and a week off with friends visiting.
See the finished products below, prior to installing. They are held in with neutral curing low modulus silicone, not the cheaper aceytoxy stuff that reeks of vinegar.

glazedwindows.jpg


Warning! If anyone is contemplating using Sadolin Superdec paint.....DON”T.
This was recommended on this forum a while back, but since then, it has been taken over by Crown, instead of Akzo Nobel. It is now officially ‘rubbish’ (a technical paint term), and very thin rubbish at that. N.B. rubbish is not the word I used...what a diplomatic program this is. Where two or three coats should have done, it would probably take six to get a decent cover. I wondered if I had an isolated case until a web search was done for ‘Superdec problems.’ This raised professional painters fora, and they were less than happy. Even worse was the treatment by Crown, who suggested they send them the 2.5 litre cans...and no they didn’t have a problem. Can you imagine the cost, and waste of time to a busy tradesman?

So I used Akzo Nobel’s Rubbol primer and top coat; first class stuff. I bought it from a Dulux centre, and asked about the Crown problem. They said that if there was ever a problem, that some of the offending paint should be put on a piece of paper and taken back to the shop, who would send it off to the manufacturer. What a different approach. Rant over.

It’s high time for an update on the costs.

Flooring and insulation (30mm) £618
Floor paint £50
Window wood £44
DG units ....four off £115
Rubbol primer and t/coat £48....2 off 1litre tins
Abortive Superdec £69 ....2 off 2.5 litre tins...used on the main windows and fascias, many, many times.
Plastic angle £57 50 x 50 x 2mm ..3 off 5m lengths. This will cover the window flashing and finish the face.

Total cost to date.....£5000.45p. :shock:

And I still have to insulate the roof and clad the whole inside...oh yes, and buy 600m of feather edging and paint it....glug. Not to mention two double doors with dg panels and ‘Spaniel’ locking.
I’m off to lay down in a dark room........and to rub it in, I became a pensioner today.

Regards...Dick.
 
Congratulations on reaching that milestone, Hurray, Hurray, Hurray etc.. The workshop should make up for the lack of a cake, even though you have made it yourself. Who said retirement is a time for relaxation, it seems to me to be the last thing you're going to be doing, for a little while at least.

xy
 
Rubol - good stuff. For the door, I wanted a topcoat the same colour as the primer (grey) and Akzo Nobel tech helpline were really helpful supplying the colour code, so the paint suppliers could mix it up. I get mine locally for just under £20 per Litre delivered. Sprays very well with a HVLP. Did my door and windows with it. Not to mention the fascias and bargeboards. Your windows look spanking.

Dibs
 
Hello folks,
I have managed the ‘first fit’ on one of the roof windows today.
However, all the other cut lines are marked on the liner, so if it is dry tomorrow, I might manage a few more.

Instead of the usual tucking into the hole, of the roof fabric (in a sloping roof situation, that is). I have opted to make the fabric part of the weatherproofing system. As you will be aware by now, I am not one to obediently follow ‘the rules’.....unless they make good sense :shock:

So, the order of events was as follows.
First....Cut the fabric to the size of the hole.The spare, to wrap up the side of the window as a first layer ‘flashing’ will be from the fact that the window fits with overlap onto the roof ply. See photo below.

p1000984a.jpg


Second ....Make sure that the window will fit in the hole, and sit upright. I found that when I had cut out the hole, that I didn’t cut close enough to the frame edge on the right hand edge and top. Out with the trusty rasp to fettle the ply back; clean up and try again - good fit this time.
Third....Use silicone mastic all round the overlap area of ply, and lay in the window. Fit a slim wedge from the inside to hold the window vertical.
Fourth....Cut two L shaped pieces of fabric to insert under the corners where I had cut the 45 degree angle and mastic all round the window/roof joint. The edges of the insert can be raised up a bit as there is some give in the fabric. Mastic over the top and lay the roof fabric in place. Pump more mastic along the window where the fabric ends, so that it doesn’t flap about. See the finished job below. I do hope that all that makes sense; it took longer to describe than to actually do.

p1000987x.jpg


Hello xy,
Thanks for the congrats, you were right, but how did you know that I didn’t have cake? :wink:
You were also correct about retirement being a time to relax......not. If we sit down for more than a few hours, we get restless and want to do something. When we come back from a holiday we usually need a rest. A typical example was walking round Pompeii, which is massive, and then hiking up Vesuvio.

Just in case you thought that we were slacking :shock: whilst the glazing mastic was curing....
We had a large multi branched damson split in the wind and crash down in what was the shaded area...ho hum.

p1000974.jpg


p1000981i.jpg


p1000982.jpg


It took us two days to cut off and shred the smaller branches, and then fire up Charlie chainsaw (if you remember Kenny Everit that is) to sever the, now, firewood. I know how to give a girl a good time......

Hi Dibs,
'Spanking windows' is this a new form of BDSM :lol: Thanks for the kind words though. Could I pick your brains on the spraying front, please?
I would like to try spraying, as I hate painting; what would you recommend as a first piece of kit? You mentioned HVLP, is that the best method for general use? I have noticed that there seem to be two methods - airless and pressurized, does any one method work better? I would appreciate any guidance that you could give.......P.S. I won't be spraying cars....just woodwork orientated stuff. Thanks in advance.

TTFN for now....Dick.
 
Dick, I think it's still looking great. The windows came out very well, and you can't be too careful when preventing leaks. I bet you're really tired of that green roof by now.

Kirk
 
Dick

Pressurised HVLP is what you want. The kind that comes with a small turbine - not the the kind that where the gun plugs into a normal compressor. Something like an Earlex HV5000 - http://www.earlex.co.uk/Concepts/Profes ... 0Home.html or an Apollo 1500 (the successor to the 700 or 800). Or an older 700 or 800 is fine. I have the one of them (700 I think) and it's got plenty of grunt! Steve Maskery is selling his - for-sale-apollo-800-professional-hvlp-system-t51916.html. Worth the money!

Rubbol needs to be thinned down about 20%. I used the water based versions of Rubbol Satura and it sprayed perfectly. I also used the non-water based one for my workshop door thinning the paint down by about 20% with white spirit (IIRC) and it came out awesome. Here's a picture -

door1.jpg


Admittedly I've sprayed cars in the past - so my requirements were somewhat anal! :oops:

For the paint get some of these -

21HqLy4kCdL._SL250_.jpg


Saves getting the gun tip blocked up and some plastic mixing cups which make thinning it so much easier-

mixing_cups.jpg-022c7c7ce5cd408a0ab38b75c2259b2b076ae5fbimage.jpg


There should be a local Autopaint franchise - which sells the filters and a pack of 50 cups for < £20. If you struggle - let me know and I can get you some from my local place and post them put. I know 50 cups sounds a lot, but they are so handy! DAMHIK!

HVLP is perfect for trim, windows & doors - not to mention finishing other "furniture" projects.

I also have a Wagner airless sprayer - where the pump squeezes paint out of the gun, but these are really best suited to larger areas such as walls. I'm getting some matt emulsion for my walls and will be using the airless sprayer rather than paint by brush\roller. Airless sprayers aren't cheap - quite a few 100 quid, but keep an eye out on the Bay for ones by manufacturers such as Wagner or Graco. Again £500+, but I have the whole house to paint at some point, so will pay for itself.

HIH

Dibs

p.s. I'll post some piccies when I paint my walls\ceiling so you'll get an idea of how good they are.
 
Hi folks,
All the roof windows are now fitted; so tomorrow I can carry on with the shingle and flashing fitting.
Typically, one window hole was very tight, and would not allow the window to be set dead vertical and I could not bring myself to plane the sides and repaint. So in the words of the Beatles....Let it be, let it be..........
So, what happened to the rods that I made so that this wouldn’t happen :oops: :oops:
With my memory, I probably forgot to check :cry:

p1000989h.jpg


The light level inside now is definitely better; and when the walls and roof are painted white, the reflections will improve it.

p1000988mm.jpg


Hi Kirk,
Glad that you approve, what do you mean, tired of the green roof......it’s lovely......on a dark night :smile: At least one side of the roof is done, so once the window flashing and tiling is completed I can have a ceremonial unveiling....closely followed by a Viking funeral :shock:

Hello Dibs,
Thanks for the advice and offered help. Do I take it that I would dilute the paint and then filter it? The door looks superb; did you use the primer that goes with the Satura, and if so, how many coats of each achieved that sort of quality finish? Thanks in advance.

TTFN....Dick.
 
Cegidfa":3njboi3l said:
Hello Dibs,
Thanks for the advice and offered help. Do I take it that I would dilute the paint and then filter it? The door looks superb; did you use the primer that goes with the Satura, and if so, how many coats of each achieved that sort of quality finish? Thanks in advance.

TTFN....Dick.

Looking good Dick.

Yes - pour the required paint into the cup, thin it by about 20%, mix it, pop the filter in\over the gun's paint cup and pour into the filter. For the door - I used the primer that goes with the Rubbol, thinned by about 20% with white spirit. As I painted the door in the shed (hung up from one of the trusses) ventilation wasn't an issue as the door was fitted. :mrgreen:

Door - probbaly about 3 coats of primer, flatted most of the 1st 2 off with a ROS, and then just wiped the final one down with a Scotchbrite pad. On with the top coat - lightly ROS'ing the 1st coat, & Scotchbriting the 2nd coat, before the final coat. With a HVL setup, multiple light coats are infinitely better than less thicker coats. For the door - about 1L of each was enough.

HIH

Dibs

p.s. fired up the airless sprayer - took a while to get it going as I'd left it dry as opposed to primed with oil. Stuck the tube in some matt emulsion and propped up a scrap piece of plasterboard outside and what can I say - other than awesome!! Certainly should make life so much easier painting the walls & ceiling. I'll put some piccies when I paint later this week.
 
Dick, Cake? I reconned if you'd had cake there would be gloating, pictures or a piece each :lol: . Seriously though the workshop is looking better then some places I've stayed in, all be it very briefly. It will truly be a pleasure to spend time in there.

xy
 
Hi,

I have been following this thread with the greatest of interest and find the whole process inspiring.

However, as a Woodturner I am apalled at your phrase 'Fire Wood' for some freshly felled wood (with the aid of Charlie Chainsaw) :lol:

Seriously, what a wonderful project.

Have you given any thought to adapting this WIP into a book. I know the project isn't complete but it would be such a wonderful treat to all those who have shown such interest so far and quite a few others besides, I am sure.

Aw the best for a safe and enjoyable comletion,

Lee.
 
Hi folks,

At last, a ‘not green’ roof :smile: :smile: :smile:
It has either been too hot to fix the shingles, or wet...how frustrating is that.
A word of warning to anyone using shingles....don’t walk or even, just stand on them when it is hot. They go squidgy and are easily damaged.
Today we started fitting the roof vent, not forgetting to cut out the breather membrane as we went along :smile:
It comes in four foot lengths that slot together, so I made a gauge, to help keep it in line.
The instructions recommend starting 50mm in from each end, so I cut a saddle piece of shingle to cover over the end of the roof, the depth of the gap and the width of the vent, stuck on with Iko stickall. I will then fabricate an end piece to fit in the end of the vent so that no plastic shows.
Diane had the unenviable job of making a template and cutting about seventy tabs for placing on top of the vent to improve the appearance (well, we can’t offend the many passing helicopter pilots) . We will also have to cut long strips to go under these to extend the width. This wide vent should be used with three tab shingles, they would fit in one go. But mr belt/braces and several pieces of string, err..me, bought the wide vent to give more protection.

The other job is to fit flashing round the windows and cover this with thin right angled white plastic. This will hide some of the flashing and protect the paintwork and the mastic, holding the windows in, it gets very hot up there, as we know to our cost.

roofvent.jpg


Thanks for the info Dibs, look forward to the pics.

Hello xy,

Had I actually had a cake, I would have e-mailed you some of course :smile:
Thanks for the complement....I will now have to make the double doors wider........

Hello skeetoid,

I am glad hat you are enjoying the project. I did wonder at the start whether to even write it up, but we have had so much encouragement and fun, that I am really glad that I did.
Had I known that woodturners were watching, I would not have used such foul, heinous language, as (cover your eyes) firewood :wink:

I hadn’t given any thought to adapting this load of old tosh into a book. Did you mean, with all the comments by fellow woodaholics? Mind you, if you could see the list of things that we have, or, would like to do to the house and garden.......We haven’t enough life left at the rate we work at.

Regards...Dick.
 
Looks great, Dick. By the way, they actually make specially shaped shingles for the top of the ridge vent. But don't tell your wife that--she won't want to know.:)

Kirk
 
:cry: :cry: Hello Charlie,

Thanks for the kind words. The trouble is, I don’t feel like a skilled worker,
more like a failed perfectionist :(: Ok, I’m happy with the roof, but the rebating of the windows was not good....but it doesn’t show. I have a long way to go to learn how to use a table saw, and router table(again). It’s not just a matter of shoving wood through the blade. However, I was chuffed to bits with the bridle joints from the bandsaw......So much to learn, so little time.
But, the encouragement is very welcome, and effective. It boosts the sometimes flagging morale on a long job like this....It’s a year in the building now :shock:

Hello Kirk,

Thought that you would be glad to see the back of the jolly green turtle :smile:

As it happens, the special shaped shingles aren’t available in the UK :cry:
All the manufacturers advise that which we are doing...i.e. cut your own. But Diane did laugh at your suggestion anyway...she’s a game girl.

To make up for the lack of width, we have cut long straight strips and stuck them down the sides. The shaped shingle will then sit over these. We could have bought a few packs of three tab shingles and they would have done the job, but we have two packs of four tab left over....waste not, want not, or, get inventive...so we did :smile:

Regards...Dick.
 
Hi folks,

In between showers of rain and sun, I found time to finish the roof vent shingling.
The first pic shows how we overcame the too wide vent.

ventshingle1.jpg


The second shows the finished article.
ventshingle2.jpg


And this shows a side view.
ventshingle3.jpg


All that is left to do on the roof now is is to fit the flashing to the windows and then cover it with the white angled plastic. We can then take down the scaffolding and erect it at the ends for the fitting of the barge boards.

That’s all from one knackered puppy.....Dick.
 
Hi, Dick & Diane, It's taken me almost as long to read up on what you've been doing, as it has the build todate... :lol: ... all the links and rabbit trails, I've learnt from it all.

It has been more than interesting and that's not just the build, but the highs' with removing the chimney, the lows' the trench and wet feet.. #-o .... to the cold and the very cold an no boiler... thankfully it has only been the damson that has fallen to the wind, for until you had now finished the roof anything could of happened.... could have seen you pass over the Midlands here.

It's been at times a wet build and still is, I now see your prepared.. with the Kayak... evans' above you or any of us should have that much rain.. it's hoped we can all have warm dry weather at this time.

Will now be watching to keep up todate with the next and final stages... Thank you both for an informative build and good read (a book.. 8) ...) and to everyone, who has put forward ideas and advice.. well done all.. =D> ... :eek:ccasion5: ...

David
 
Hello David,

Welcome to the ‘madness’ that is our build. When I called the post, ‘with a difference’ I didn’t realise that it would meander through our daily life. It was meant to be loosely modelled on Dibs’ format (my superhero :wink:), but, whilst I know that we are ‘technically’ meant to stay ‘on post’, patently, the Stasi that invigilate the posts use a very light touch...... joking, honest..Mike.C, Noel, CHJ :smile:

I have posted the off topic subjects partly to explain why there have been no updates, and also because I thought that they may be of interest and help, that being the raison d’etre of this forum. They do seem to have attracted interest, so my paradigm must be working.
The canoe came with the house, so we have called it ‘the escape pod’ as the house flooded once in 2000 - only a foot deep. The only drawback is that it is a single seater :smile:

We are only part of the fun, as it is the other contributors that have livened it up.
There is help, advice, leg pulling - usually Kirk :wink: and general morale boosting.
What more could one ask for. It might also spur someone on to build something, on the premise that if we two old farts can do it, anyone can :smile:
I am reminded of Mcluma’s strap line ‘Everything can be achieved if you put your mind to it.’

Best wishes... Dick and the ‘herself’

PS. You have reminded me that I never showed the finished roof without scaffolding, so, for all the ‘meanderers’.......

housesanschimney.jpg
 
Hi Dick, Again this has been a very inspiring read.. other that putting down the base, my wooden workshop was the best at 12' x 10' we could find to buy.. :oops: ... so to see your build.. I look forward to hearing as to what you do with the Electics.. as I'm still without a power supply to mine, the biggest cost will be the 10m armoured cable.. but then I think it is more like I'm being charged for the whole drum, but they'll only use 10 yards.. had that once, paid for hundreds of boxes of screws.. few got used.. the carpenter cleared the lot when he left.. :x ...

Nice job the house roof as the workshop, well waterproofed.. need to look back as to when the scaffold was up, because it most have been a problem with that end outhouse or was the roof strong enough to take a board with the pole on that.

We must get back to the topic... of the build.. on wards .... and round with the paint brush and cladding.. =D> ..... Eyes down I see a full house.. well workshop..

David
 
Hi folks,

We have just completed the window flashing.....and we never want to do it again :shock:
Standing on the scaffold with one foot on a piece of insulation(on the kick out) and trying to reach across is no joke. It then dawned that we had allowed the shingles over the top of the window to coalesce on the glue line...bad move. The first window was lifted carefully with a pallet knife and white spirit, this marked the bend line a bit, and was a pig to fit the top flashing. So next time we used the very little, grey cells, and a hair drier. It worked well. if messy.
We fitted the bottom flashing first. This entailed laying out on the scaff. to get to it...what a pig. So we did all the bottoms first, then at least we could stand up.

The sides were next; this time we drew lines with a chinagraph pencil, rather than just marks every so often. The backing tape was removed and replaced with about 12mm of goo showing. It was still a ....... to fit, as it was very flexible. We also had to allow enough for the step of each shingle as it was pressed to the line. The top was not too bad to do, as the shingles had been lifted out of the way. So the tops were remasticed, and pressed back down, only to find that we hadn’t allowed for the extra thickness of the flashing. So the tabs didn’t sit flush.....grrrr. So, lift the tabs and insert a length of wood so that we can knife off sufficient shingle. We ended up looking like something out of a Tom and Jerry cartoon, with each slice, goop, and press, we became ‘one’ with the asphalt. I’m not saying that we were clarted in sticky black stuff, but I wouldn’t have picked that moment to pick my nose or scratch my itchy head.....Do’h.

Tomorrow, we will be mostly cutting, and maybe bending 50 x 50 x2mm white plastic angle, to cover the sides and front of the windows. Yet another chance to make an almighty c..k up. Watch this space.

Regards, two tired puppies....again.

windowflashingdone.jpg


It has just dawned on me, that if I click on a picture, it get larger, in a new screen.
Not a lot gets past me.........
 
Hey Dick:

I was over on the OWWM.org site and saw a tour posted of the Purdue University Wood Research Lab, in Lafayette, Indiana. The guy posting it is the manager of the lab. I saw this picture, and immediately thought of you:

Panda Dan":2cuyvvdf said:
This is our "medieval torture chamber". Here we cyclicly test models and furniture for fatigue failures. The procedures for doing this were modeled after the same kind of tests that were developed for aircraft frames.

DSC06773.JPG

The full thread is here: http://owwm.org/viewtopic.php?f=1&t=98504&start=0

(For those of you who haven't heard of it, Purdue University is one of the premier engineering schools in the United States. Both of my in-laws graduated from there with mechanical engineering degrees after they returned from WWII. My mother-in-law was one of only two women in her class.)

Bummer about the flashing around your windows. I bet that's a mistake you only make once--unfortunately, you won't be able to apply the learning experience to anything in the future.

Kirk
 
Back
Top