


engineer one
Established Member
having talked a lot, i thought it was about time to learn how to post pictures, and also show my attempts to learn handcrafts
so here we have my first drawer with hand made dovetails on each corner.
 [/url]


so because i am still learning, the pictures are not really in the right order.
however, what we have here is a complete series.
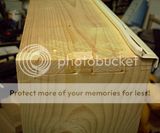
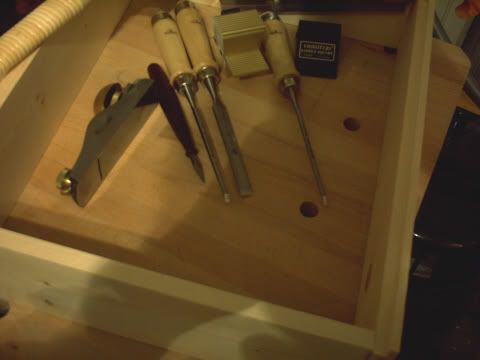
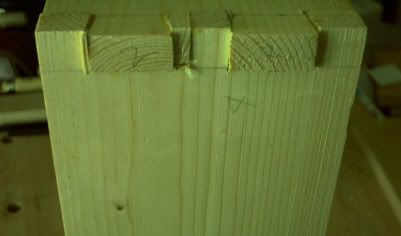
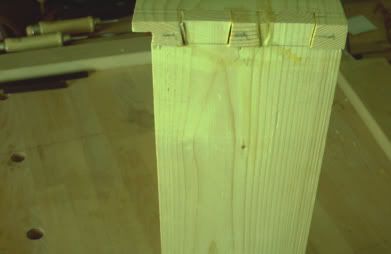
first couple of pictures show the finished drawer, and the tools used to make it (not really a gloat honest :twisted: )
one of the tools you can see is the veritas dovetail guide which holds your saw with a magnet so you can keep the angle nice and true. best used with a thin japanese style saw, not least because the block is too big for the ln dovetail saw. the jig is able to be placed on both sides of the joint so you can do the tails and pins, you just change where the clamp fits on the back.
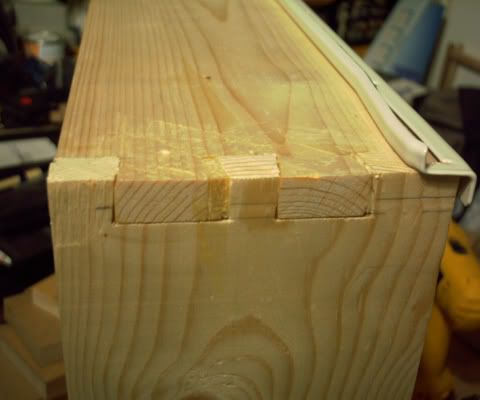
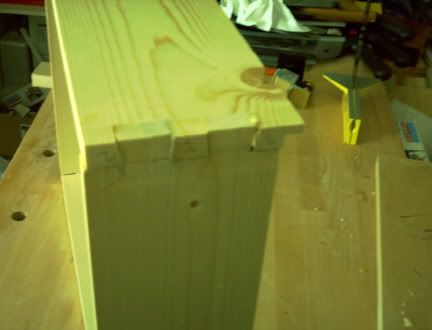
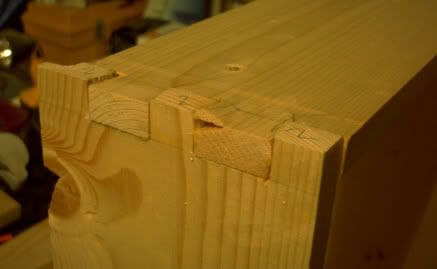
next you can see the four corners, the first couple which were real dogs after first making, but remember i did cut the sides so that they were about 1/16th too long outside. second couple of corners were getting better, and the final corner ain't too bad at all.
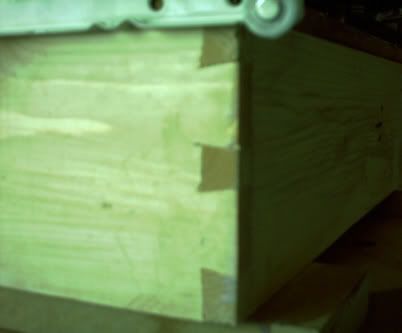
next i fudged the really big gaps, and filled them with offies. what is interesting is that although some of the gaps were quite big, the corners would not pull out without glue(phew :roll: )
finally i shaved back all the corners and ended up with a drawer which is ALMOST square, in both dimensions, ie the error is about 1/8th in the corners, my mistake because the bessey clamps got in the way of measuring :? and one of the corners is a little low.
the base is a piece of 10 mm oak faced mdf which i have finally started using from the stuff i got from jcb ages ago. i cut the sides and rear to the same size, and then a rebate in the front. (sorry scrit i did it on my table saw :? )
so what have i learnt, well spacial awareness, making sure that you lay out the various parts of the dovetail properly otherwise you cut the tails or the pins in the wrong angle :shock: , so instead of staying together, it comes apart :lol:
and maybe contrary to popular belief, it is better to learn on quality wood not cheap rubbish like i used, since it is easier to cut cleanly and not have break out.
my sawing is still pants, but i was using japanese saws for it all, and to cut the shoulders, next time i will try to use a euro saw, it may for me make it easier. but in particular the centre waste removal is quite difficult, and i need to figure a better way to get that done.
so the work started out as rubbish, but i think has improved somewhat, and the last corner was not too bad. the drawer actually fits where it is supposed to, and is strong enough.
finally, i cleaned up the corners with my block plane, next time might use the chisel first, and a sander :?
anyway, having been brave enough to show it i will be interested in the general view. until now most of my work has been casework using manmade boards, so this is still the beginning of the learning curve, but i now feel relatively confident that i can hand plane to a decent standard, and with a little more practice, i can make some halfway decent dovetails. once i am a bit more confident in my sawing, then i will go to complete freehand and see what that does, but i must get some decent hardwood offcuts so i can practice more.
finally hope those who went had a good day at steve's bash today.
paul :wink:
so here we have my first drawer with hand made dovetails on each corner.


so because i am still learning, the pictures are not really in the right order.
however, what we have here is a complete series.
first couple of pictures show the finished drawer, and the tools used to make it (not really a gloat honest :twisted: )
one of the tools you can see is the veritas dovetail guide which holds your saw with a magnet so you can keep the angle nice and true. best used with a thin japanese style saw, not least because the block is too big for the ln dovetail saw. the jig is able to be placed on both sides of the joint so you can do the tails and pins, you just change where the clamp fits on the back.
next you can see the four corners, the first couple which were real dogs after first making, but remember i did cut the sides so that they were about 1/16th too long outside. second couple of corners were getting better, and the final corner ain't too bad at all.
next i fudged the really big gaps, and filled them with offies. what is interesting is that although some of the gaps were quite big, the corners would not pull out without glue(phew :roll: )
finally i shaved back all the corners and ended up with a drawer which is ALMOST square, in both dimensions, ie the error is about 1/8th in the corners, my mistake because the bessey clamps got in the way of measuring :? and one of the corners is a little low.
the base is a piece of 10 mm oak faced mdf which i have finally started using from the stuff i got from jcb ages ago. i cut the sides and rear to the same size, and then a rebate in the front. (sorry scrit i did it on my table saw :? )
so what have i learnt, well spacial awareness, making sure that you lay out the various parts of the dovetail properly otherwise you cut the tails or the pins in the wrong angle :shock: , so instead of staying together, it comes apart :lol:
and maybe contrary to popular belief, it is better to learn on quality wood not cheap rubbish like i used, since it is easier to cut cleanly and not have break out.
my sawing is still pants, but i was using japanese saws for it all, and to cut the shoulders, next time i will try to use a euro saw, it may for me make it easier.
but in particular the centre waste removal is quite difficult, and i need to figure a better way to get that done.so the work started out as rubbish, but i think has improved somewhat, and the last corner was not too bad. the drawer actually fits where it is supposed to, and is strong enough.
finally, i cleaned up the corners with my block plane, next time might use the chisel first, and a sander :?
anyway, having been brave enough to show it i will be interested in the general view. until now most of my work has been casework using manmade boards, so this is still the beginning of the learning curve, but i now feel relatively confident that i can hand plane to a decent standard, and with a little more practice, i can make some halfway decent dovetails. once i am a bit more confident in my sawing, then i will go to complete freehand and see what that does, but i must get some decent hardwood offcuts so i can practice more.
finally hope those who went had a good day at steve's bash today.
paul :wink: