Les Paul Guitars x2 (lots of pics)

UKworkshop.co.uk

Help Support UKworkshop.co.uk:

This site may earn a commission from merchant affiliate links, including eBay, Amazon, and others.
Bainzy":322uh4pg said:
Looking great, I never realised there were any others that built guitars here in West Yorkshire

Hi Bainzy, I don't even know if I can build guitars yet. This is my first try.

I will follow your build with interest. You may receive a few questions about the neck if that is ok?

I found the mahogany when I emptied my grandfathers workshop. I have (had) two large planks about 4"x8"x70". They have a hole through them half way along as if the have been bolted to something. Luckily there is enough length to get the neck out of it before the hole.
 
Sure, more than happy to help - this is the first time I've built a Les Paul style guitar, and I can safely say already difficulty wise it's a totally different ballgame from building a Strat, but much more rewarding.

Nice score on the Mahogany, I searched around quite a bit to find a supply for Les Pauls until I discovered genuine Mahogany is banned from import here. I think Sapele is a great sustainable substitute for the neck wood though, and Idigbo sounds very close to genuine lightweight Mahogany tonewise so is a good sustainable source for backs - I'd highly recommend them if you decide to carry on building once you've exhausted your Mahogany supply.
 
Hi Bainzy,

Doesn't my username help with my location :wink: , Or were you asking which part of town I live in ?

Thanks for the offer of the templates, I'd like to take you up on that.

Cheers
Chris.
 
Well I guessed there was either a 90% chance you lived in Bingley, or a 10% chance you were just a fan of Pride and Predjudice. :lol:

I'll send you a PM when I get some free time for template building, I might have some other templates by then (such as some '59 Les Paul ones).
 
[geordie accent]Day 3 in the Les Paul building house[/geordie accent]

Well, we got another weekend's work on the guitars. I suspect that we did things a bit in the wrong order, but it seems to be turning out quite well so far. (touch wood)

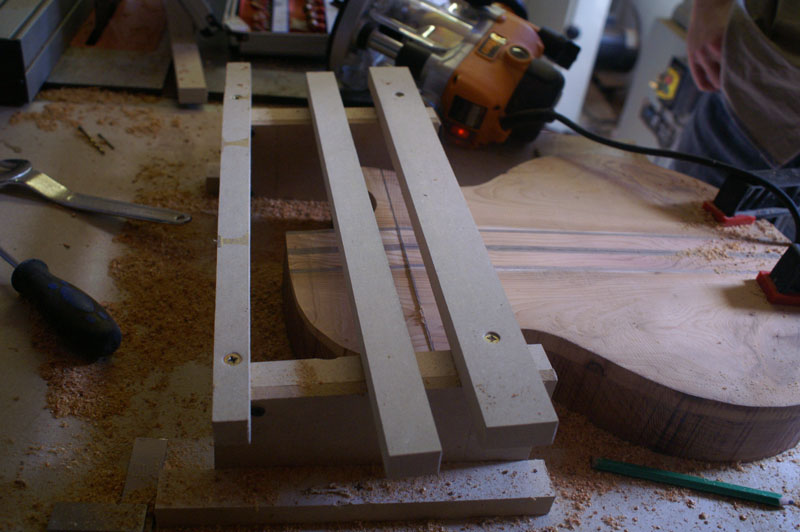
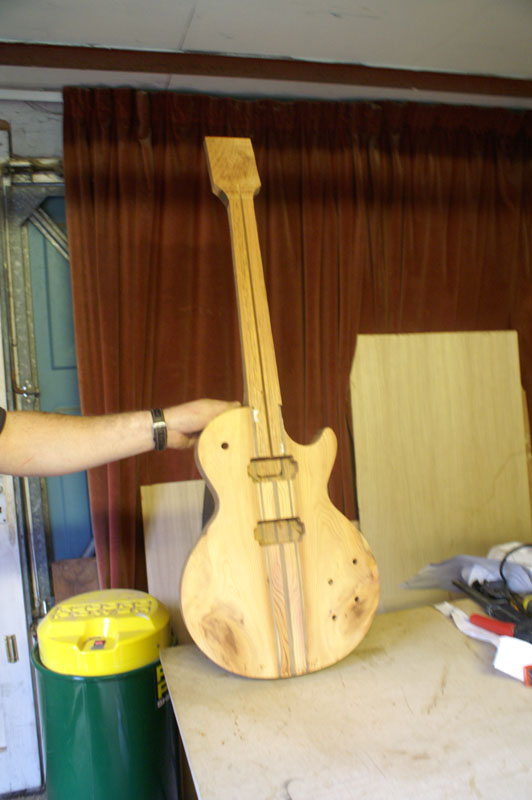
Our first job was to put a 4.5 degree angle on the front of the guitar. This gives the 4.5 degree neck angle. It was a bit of a head scratcher as to how we would do this accurately. We ended up building a jig for the router.

1174498814_0003daa392_o.jpg


1173656179_d36a768aba_o.jpg


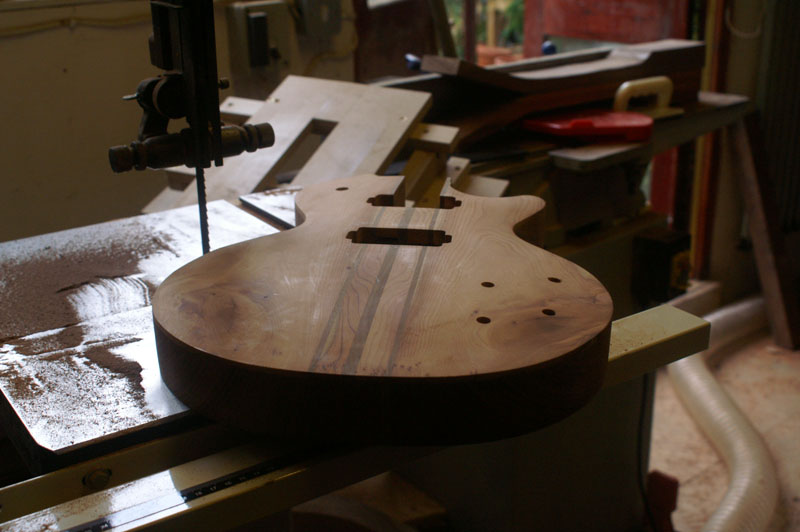
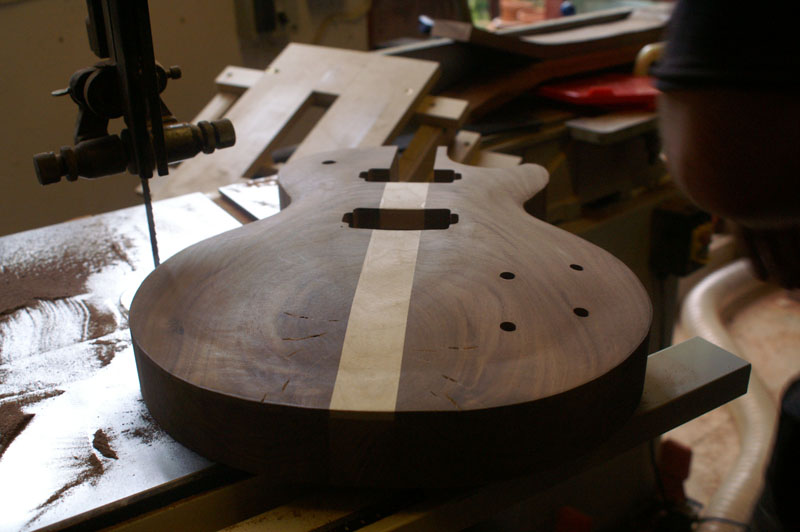
Then we routed the pickup cavities. For this, we bought an acrylic template from stewart macdonald.

1174536834_bf6dfb1e7b_o.jpg


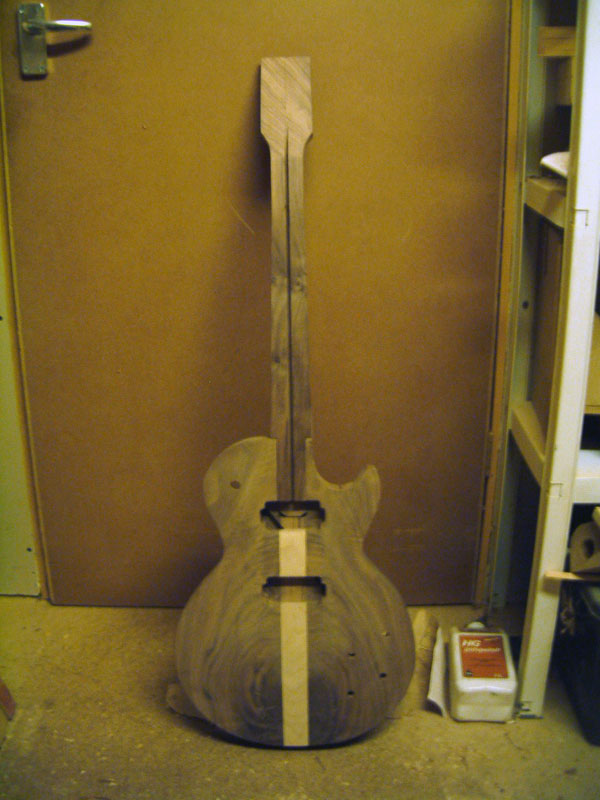
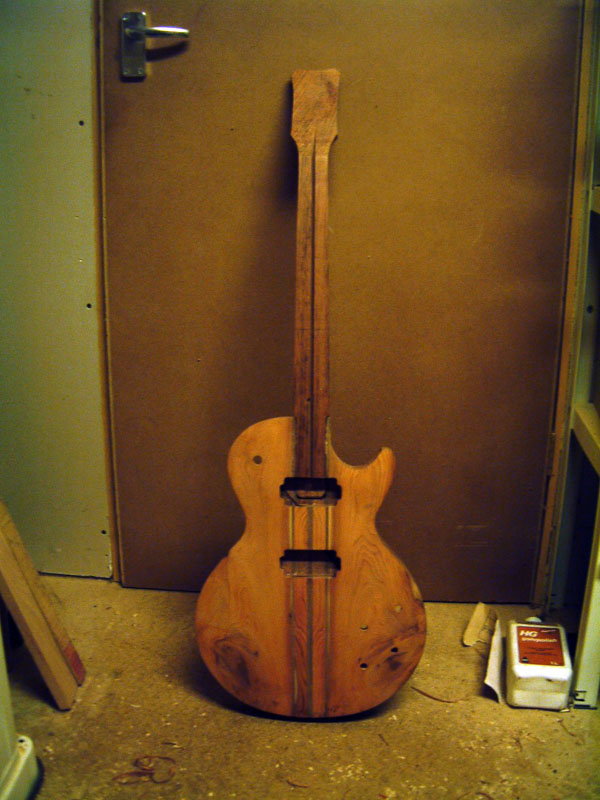
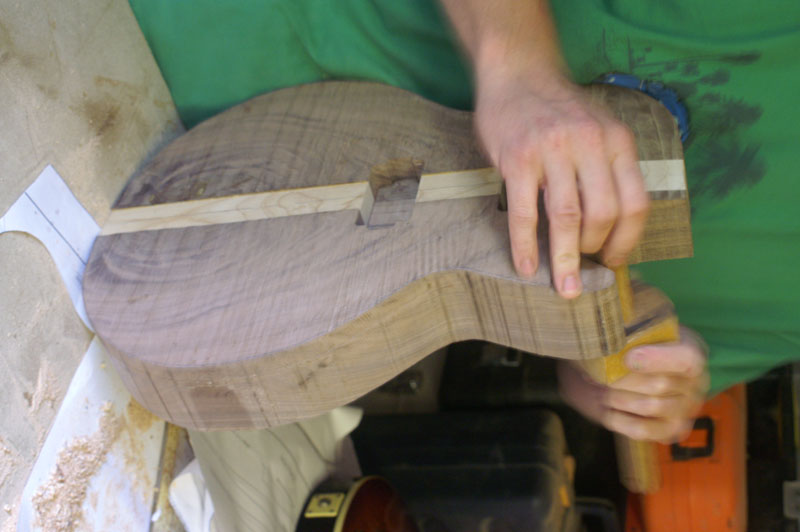
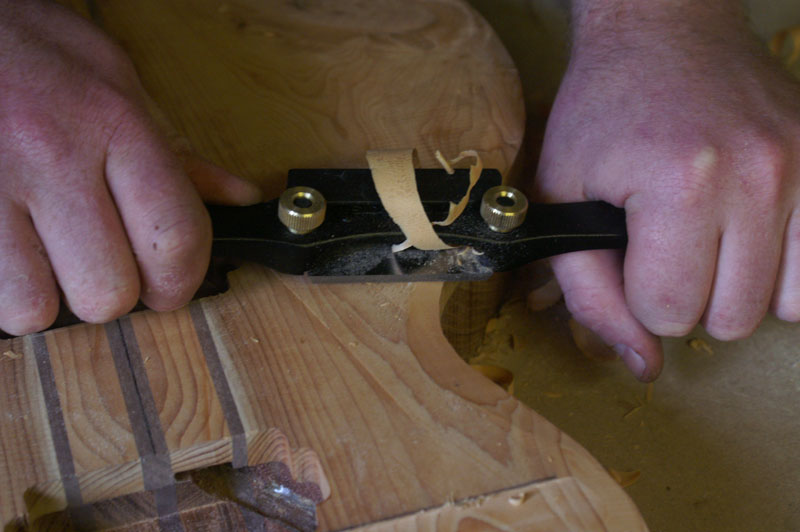
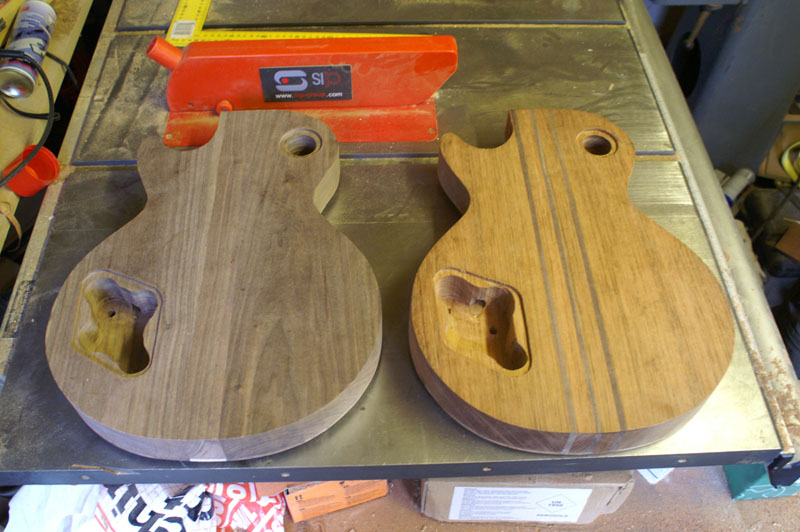
At this point, we should have routed the mortice for the neck tenon while the top was still flat. We never thought about it though and went straight on with carving the top. Most of this was done with a spokeshave and cleaned up with a ROS. We scribed a line all the way round witha mortice gauge. This was the lowest point of the carve.

1174599138_3397af2136_o.jpg


1174598116_9c80d0f6a3_o.jpg


1173741277_dc698788de_o.jpg


The veritas low angle spokeshave did a very good job. Matyn's guitar has some very awkward grain and a large knot, so it took him much longer to carve his. He ended up just wasting as much wood as he could with the router and some very course sandpaper. It turned out well in the end though. It's quite difficult to see the carve in these photos.

1173879721_8506051c4e_o.jpg


1174737242_fe5a5ebb20_o.jpg


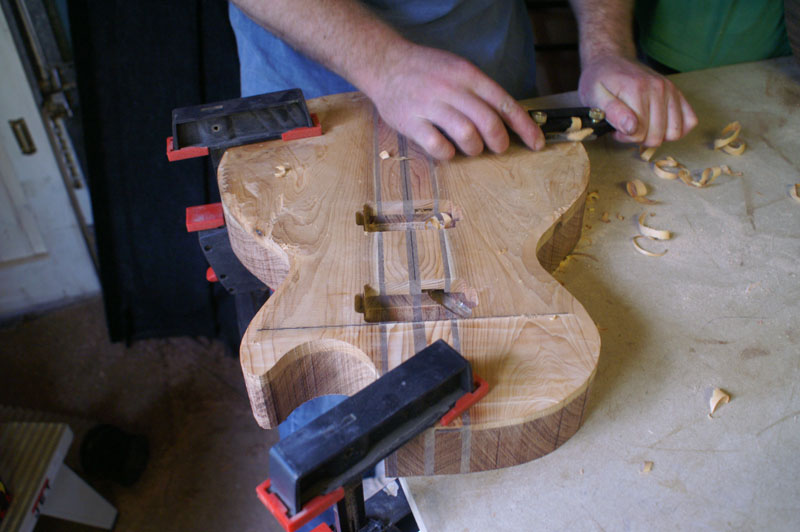
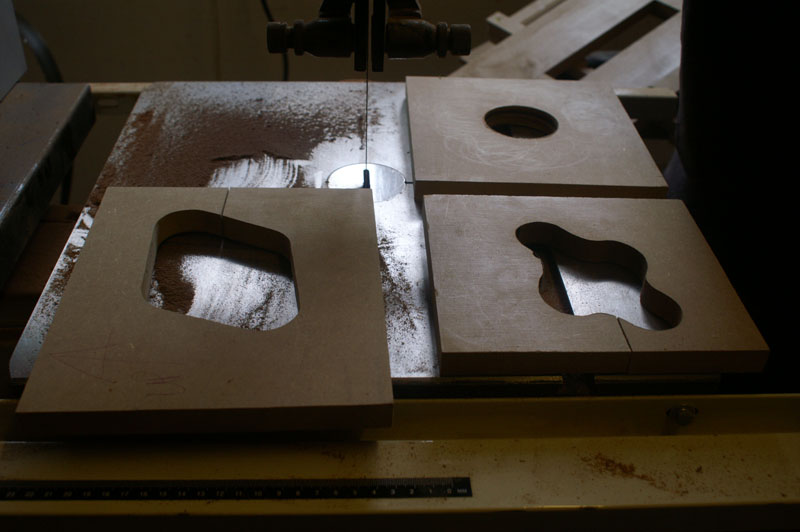
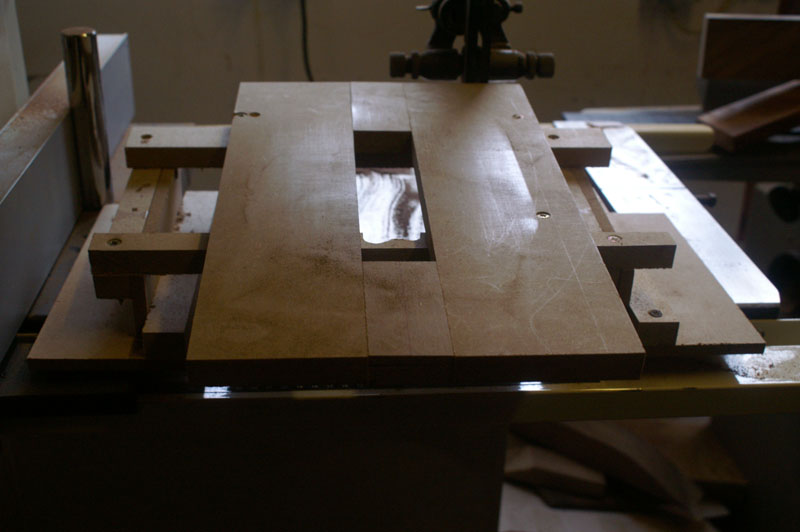
We made some MDF templates for routing the cavities in the back for the electrics.

1173821087_73318fa68c_o.jpg


1173821781_c07ef707a8_o.jpg


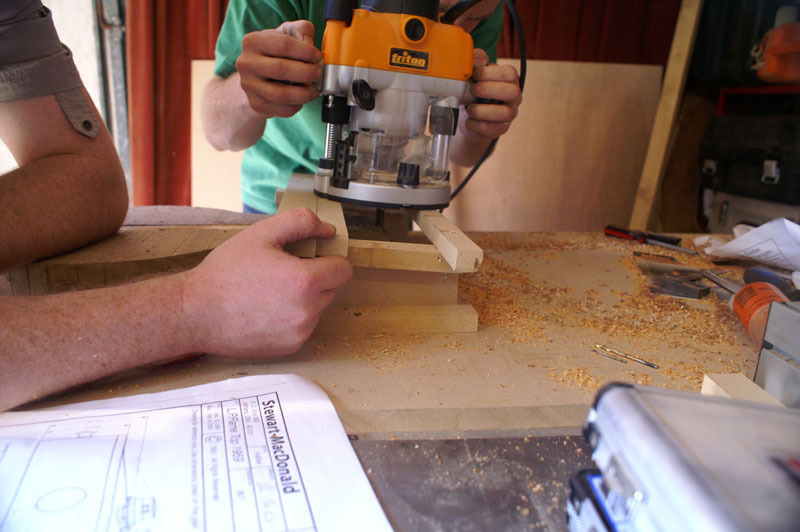
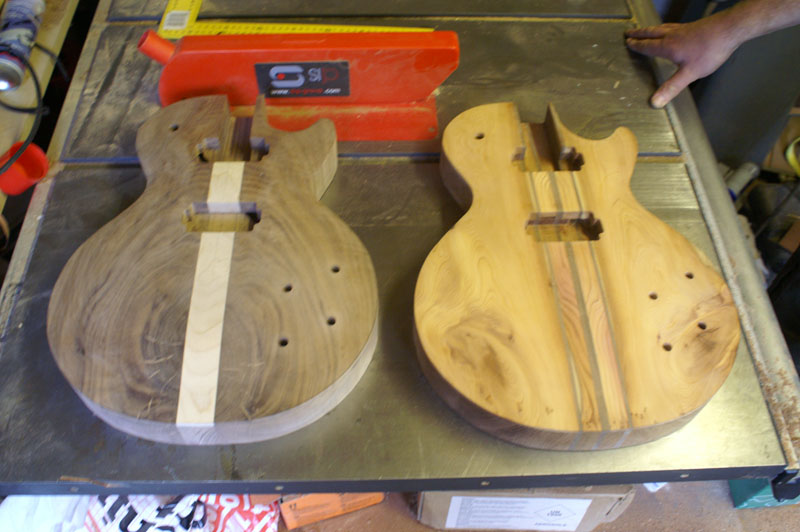
Then of course, we discovered that we should have routed the neck mortise whie the top was flat. Luckily we had our 4.5 degree jig and we made a temple to sit on it.

1174736194_91bbf1db01_o.jpg


After drilling the holes for the pots an the switch, this is what they looked like.

1173880763_d3f86d72f2_o.jpg


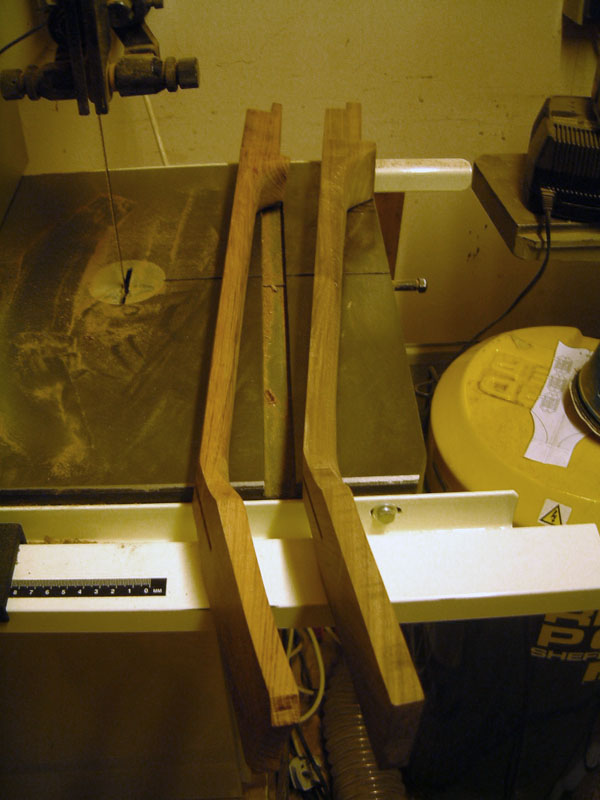
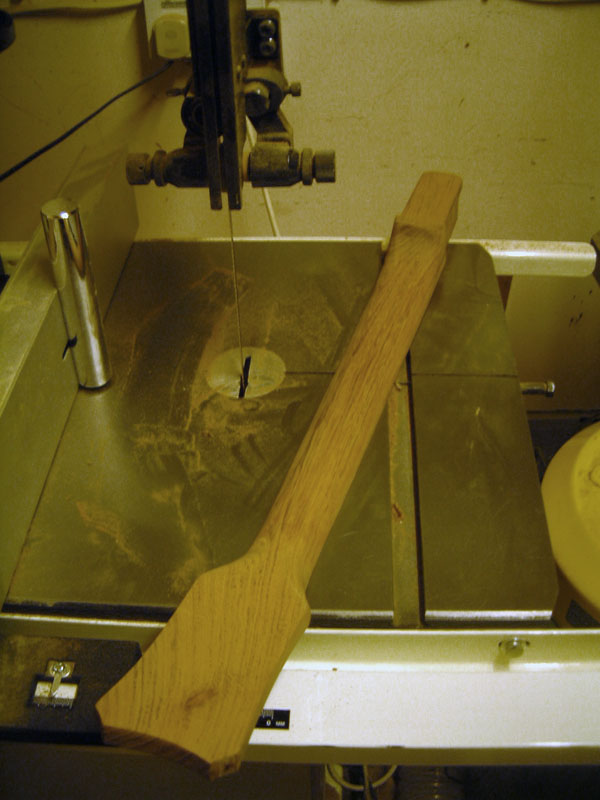
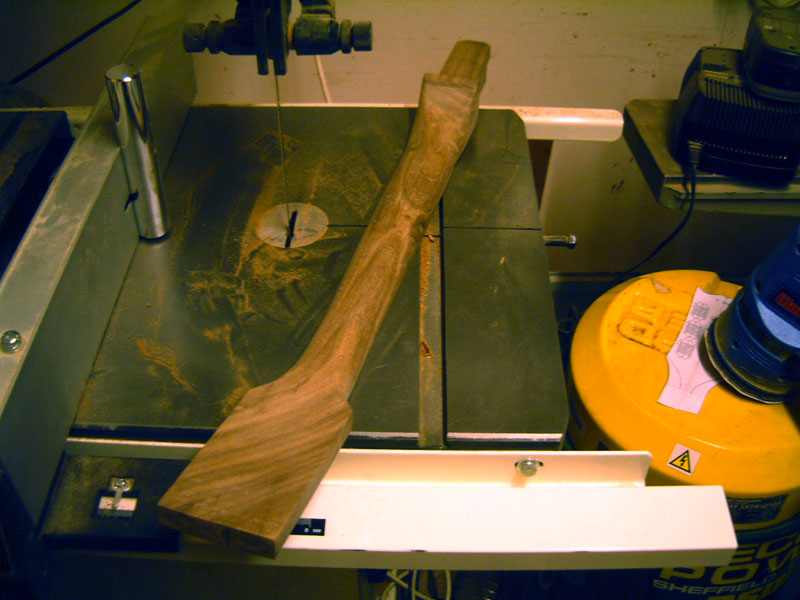
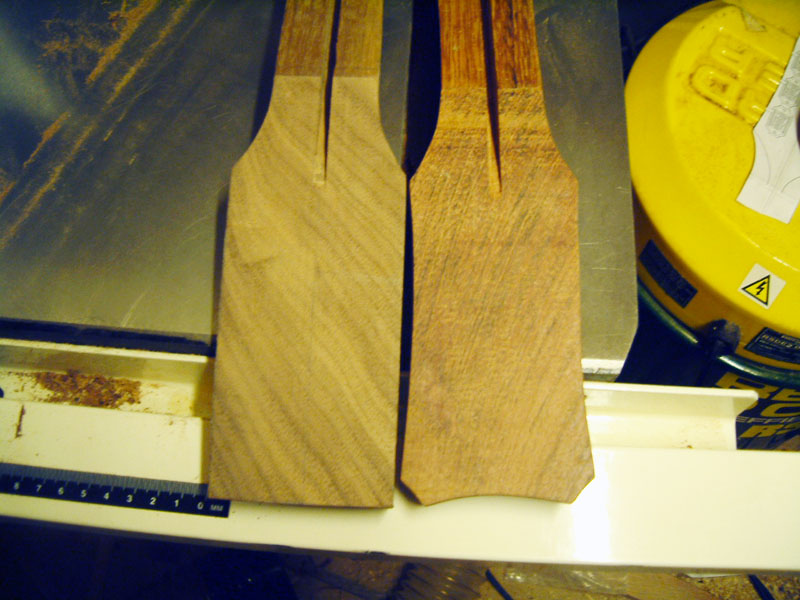
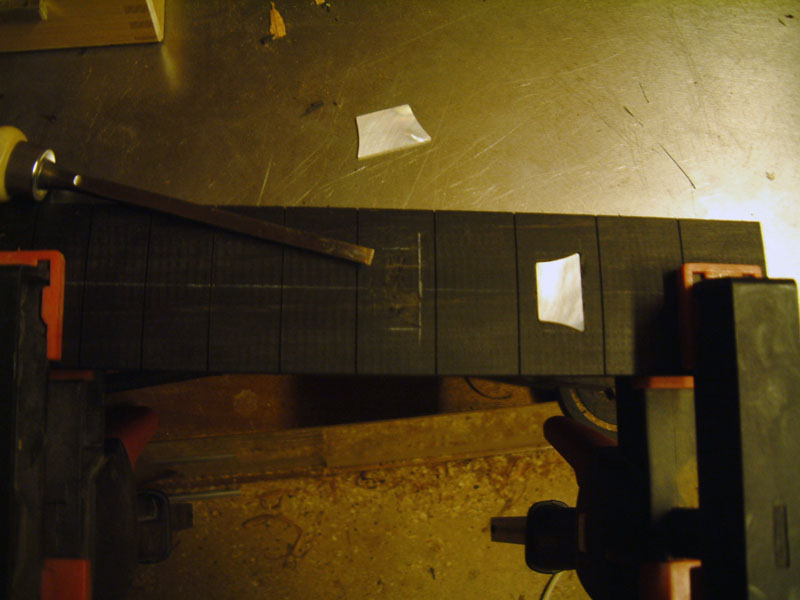
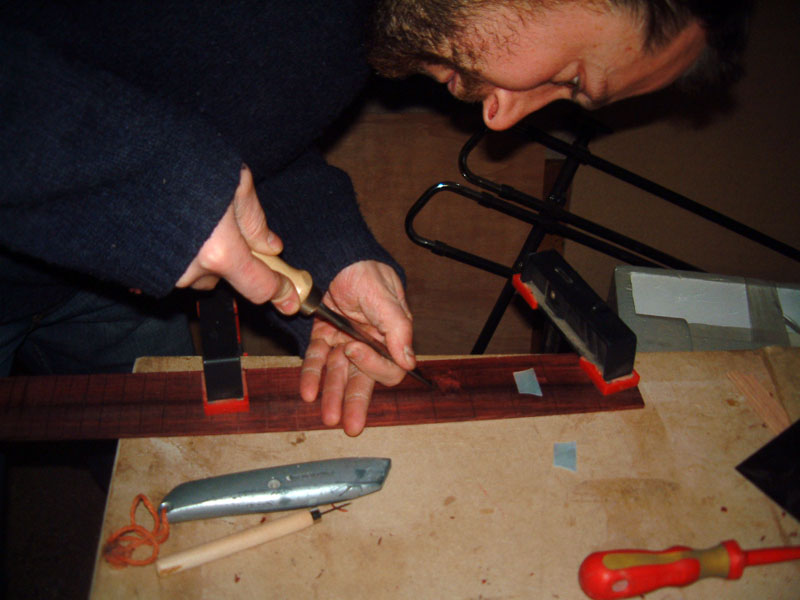
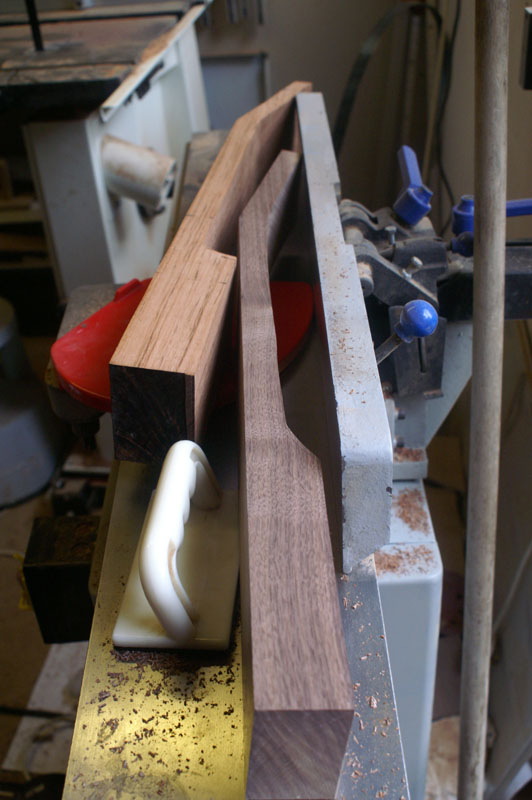
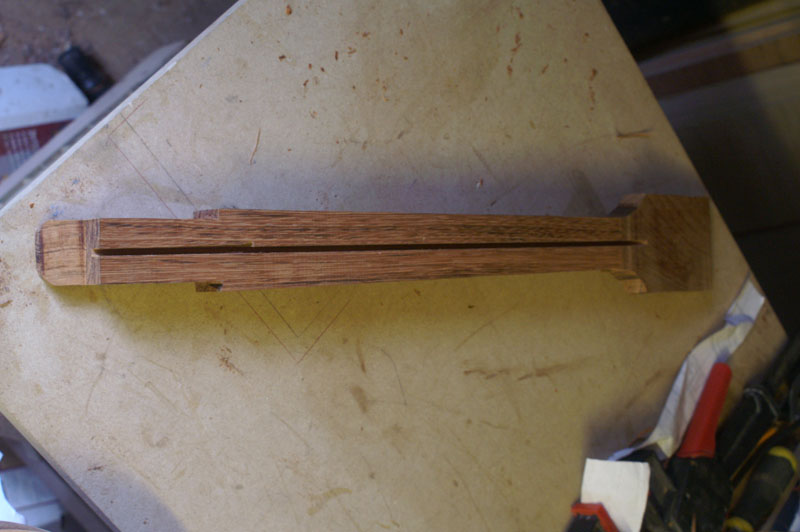
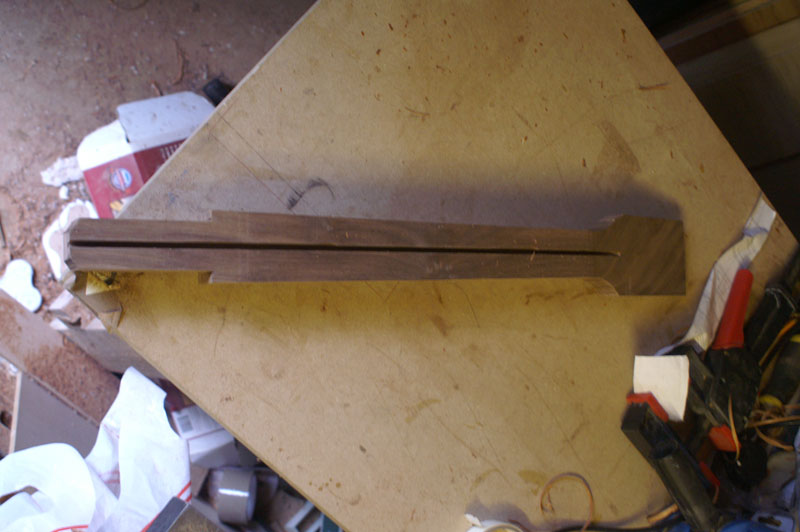
Then, on to the neck. We didn't get very far with the necks as time ran out. We got them roughed out on the bandsaw, routed the truss rod slot and cut the neck tenon.

1174821164_76d96e0a31_o.jpg


1174821642_f43274b6b8_o.jpg


1174822110_8cf8defbbd_o.jpg


All in all, we are very pleased with the progress. but we are amazed that nothing has gone horribly wrong yet. This is how they looked at the end of the today.

1174822624_bb8b33864f_o.jpg


1173966011_83a9ac0adc_o.jpg


Next time, we will be finishing the neck and hopefully getting onto the binding and inlaying.

Cheers for looking.
 
Looking very nice, not jealous at all !

As for the angle, on my last guitar I routed the angle in the neck pocket thus avoiding having to angle the body, was there a specific reason why you altered the angle on the body? Is it due to the carving? (i've not done a carved body yet, so just trying to get my head around that detail).

How do you find the stewmac templates? What size bushing/cutter do you use (I have the same router as you so i'm just being nosey).

How many cans of Boddingtons did this stage of the build require? :)

Finally - how did you go about determining the size of the neck pocket? Did you use an abitary size and fit the neck to that, or was there a set size that you stuck to for both pocket and neck? The reason I ask is because the last neck pocket I did was with a jig to a specific size, it didn't work to well and I had a lot of cleaning up to do with a chisel.
 
Hey Byron.

I'm not quite sure what you mean about the angle. On a Les Paul, the neck is angled back at 4.5 degrees. This angle has to be put on both the top of the body and the neck pocket as the fretboard sits on the body as well.

Stewmac template was fine. IIRC we used a 1/4" bit with a 3/8" bush.

The neck pocket should be 1.5" wide by 1.45" deep, which is what Martyns is. Mine ended up about 1.6" wide. If your wondering why I am using decimal inches it is because that is what the plans use. Some measurements are fractions which I can just about cope with, being of the metric generation, but I can't get my head around decimal inches. :?

I think the decimal inches is the reason for the cans of Boddies. :wink:
 
No, we bought fretboards. We decided that it was such a critical part that is wasn't worth the risk of us cocking them up and ending up with out of tune guitars. We got them from stewmac. The exchange rate is so favourable at the moment that it only cost £15 for mine (ebony) and £8 for Martyn's (rosewood). We were lucky to avoid import duty on our order aswell.

I would like to see the guitars you have made Byron, if you have any pics?
 
Great work! They are really starting to take shape now. Have you thought about what finish you are going to put on them?

I too would be interested in seeing some pics of your guitars Byron.
 
Simon/Davy

I'll have a look see if I've still got the pics, it was a while ago - when I first joined this forum infact (I needed help with the scarf joint). I lost a fair few of the photo's when an old computer died, but I think I have some around somewhere.

The main guiter I built was a mahogany neck-thru explorer. I've got a custom shape gutar body at the moment which i'll get back to, it's english yew with a curly maple top and will be very simple (fixed bridge, single bridge humbucker, no tone knob, just volume).
 
davy_owen_88":1hc2yw03 said:
Great work! They are really starting to take shape now. Have you thought about what finish you are going to put on them?

Cheers Davy. I am considering putting a burst on mine. Mybe something like this:

lpcsvs.jpg


However, I doubt I will make up my mind until it comes to the crunch.

I don't know what Martyn is thinking for his, but black walnut is such a beautiful wood I think I wood just finish it with clear laquer.
 
Got another weekend working on the guitars. Well one and a half days, because the Harrogate show was on.

I completely forgot to take WIP photos for the rest on the neck, sorry :oops:, so I will describe the process.

We had only got as far as roughing out the shape of the neck the last time, so we cracked on with shaping them. We began by making two cross sectional templates, one at the first fret and one at the eleventh. Using these templates we cut the cut the curve on the back of the neck at these fret positions with a rasp. Then using a drawknife and a spoke shave we joined the two cuts together creating a smooth continuous curve.

This is how they looked after shaping the neck, heel and headstock. (Martyn's on the right, mine on the left)

2062914959_7c56d22e90_o.jpg

2062914373_1311e9db4e_o.jpg

2062914201_0e1eb17bec_o.jpg


Rather than copy the Gibson headstock shape, we are creating our own.
(Mine on the right)

2062913965_f4cb12f33c_o.jpg


After finishing the necks, we moved onto the fretboards. We had bought pre-radiused and pre-slotted fretboards from Stewart Macdonald as we needed these to be completely spot on. The fretboards are being inlayed with the Les Paul Standard's trapezoid mother of pearl. Unfortunatly we ran out of time and only got a couple of inlays done. The process basically involved scribing round the pearl with a marking knife and then chiseling about 3mm deep.

2063708268_7ea34b6963_o.jpg

2062914557_f81cd63aa1_o.jpg


This is how the guitars looked at the end of today.

2062913409_46723ee964_o.jpg

2062913627_8d84e15061_o.jpg


We are still amazed that nothing has gone wrong yet (touch wood). They seem to be taking ages, but we have really only had five and a half days in total, so I am pretty pleased with the progress.

Thanks for looking. :D
 
Lovely progress. I'll also be using a pre-slotted stew-mac fretboard for my project when I get round to it. Did you purchase their fretting press, or are you going to do it by hand?
 
Philly":30panxyf said:
Looking good!!
I can feel another guitar coming on.....
Philly :D

You haven't got time! Get back to those planes. :)

Cheers Mike
 
BB - The stewmac fret press' are ridiculously overpriced, even for America and with the exchange rate. Such as this one, which is basically locking pliers for £100. Or this F clamp at £60. Its definitely a case of a specialist tool, a specialist price. I think we are just going to use a fretting hammer.

Phil, You can make another guitar as long as you don't finish before we do. :wink:
 
Back
Top