Help!!!!! My first chair

UKworkshop.co.uk

Help Support UKworkshop.co.uk:

This site may earn a commission from merchant affiliate links, including eBay, Amazon, and others.

Inkdchippie

Member
Joined
12 Jul 2016
Messages
8
Reaction score
0
Location
Norfolk
So the time has come.... My commitment to attempting a chair build is now at the point of no return :shock:
I'm a fan of clean, contemporary lines and after trawling the old interweb, a David Savage design, named "Swinger" is my inspiration. As my account is new I'm unable to post links to the design.
Chosen for it's "simple" appearance, it seemed like a good place to start for my first pair of chairs (the base section at least!!!!) I would love to conquer the shaped back rest, but for now the base is where my journey begins.

Like "Swinger", my material of choice is Sycamore. I've already dimensioned the material for the legs, with current dims of 480mm x 42mm x 42mm.

I've set out a 1:1 template on plywood in plan view for the seat. Unfortunatley I don't have the dimensions with me as I write this post. The seat profile narrows from front to back in plan view. I've also decided to include a 1.5 degree decline on the seat from front to back. The rail width I feel best compliments the aesthetics is 60mm (the rails haven't been machined yet) This is where my problems begin.

I have 2 points where I am struggling, and would really appreciate some feedback as to the best way to move this project forward.

1. The thickness I should finish the 4 rails on the seat base. Should I match the rail thickness to the 42mm x 42mm leg dimensions? Or. Going thinner with the stock, perhaps as thin as ex 1" boards, keeping the outer face of the rails flush with the outside faces of the legs? While the latter option will allow for longer tenons into the legs, they will be offset from centre. Will this lead to potential problems with weakness in the leg material or concerns of any twisting and the risk of the joint opening up where the tenon shoulder meets the leg.

2. Which method to adopt to fix the seat base down to the frame. I plan to use birch ply for the base, which will be upholstered in a material yet to be decided.
My research so far has found 2 approaches. The first which I'm not a fan of, is to attach a bearers (4 in total) mounted at 45deg across the inside corner of each leg. The second (which I'm thinking will have a direct relationship to the rail thickness) is to rebate all the rails on the inside of the seat frame, providing a surface to sit the ply base on.

Any wisdom on executing the seat back would also be welcome. But for now the seat frame is the first phase of this project.
Any advice on how to approach this would be greatly appreciated.
Many thanks in advance...

PS. Mods? Wasn't sure where to post, here or in design?? Apologies if I've got it wrong
 
Do you mean this one?

swinger.jpg
 
Make the rails as thick as you can aesthetically, the joint to the back two uprights takes the most laid and strain when someone inevitable rocks back in two legs.

The two methods you describe should both be used. The rebate to support the seat and the blocks which are to strengthen the rail joints not support the seat (but sometimes do on 'cheap' designs). Without the blocks the chair will not last long before the joints become loose. Make the blocks at least 4" deep into each rail.
 
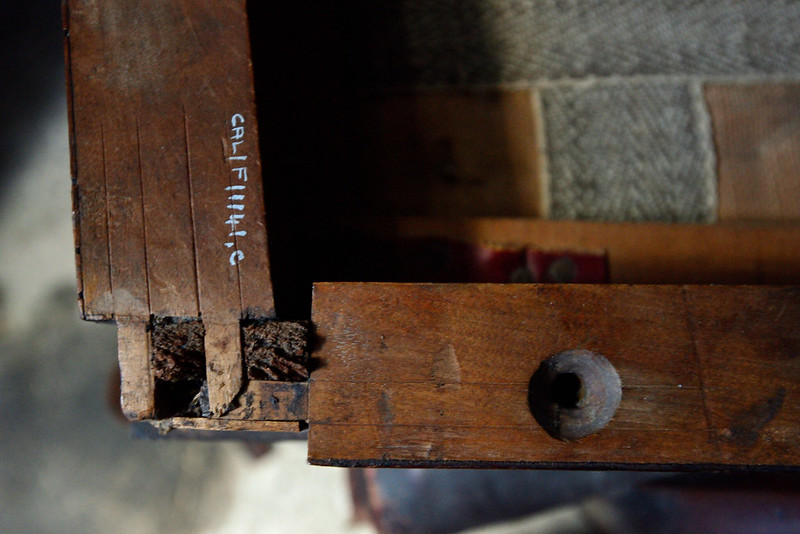
+1 on the corner blocks and rebated rails, you can use barefaced tenons to increase the thickness of the tenons but don't go to thick or this might happen.

Chair leg joint by Racers, on Flickr

Pete
 
Hello Inkdchippie, I'm a bit busy in the workshop at the moment but I'll get back to you later today.

I love chairmaking (not so much the David Savage designs but hey ho, each to their own), for me a jointed chair with all the complexity of angles and curves is the ultimate challenge for a cabinet maker, so I'm delighted someone on this forum is having a go and I'll be happy to help you out any way I can.

But to give you least one quick answer. It sounds like you're planning a drop in upholstered seat like this,

Walnut-Chair-1.jpg


in the majority of cases with this type of design the seat is supported by a rebate in the front rail and the two side rails, it's possible that there's also a rebate in the back rail too but generally there isn't. There will almost certainly be corner blocks underneath the seat to add strength, but they should be set about 1mm below the rebate so they play no part in supporting the seat. The rebate in the front rail is straight forward enough, and curving the rebate around through the front leg is a bit nerve racking but with a well made jig and a router t's not particularly difficult, however depending on the design there may well be an interesting little twist to the side rail rebates that, as far as I know, you won't find detailed in any book or on the internet, however I can help you deal with that if it's necessary.

Good luck!
 

Attachments

  • Walnut-Chair-1.jpg
    Walnut-Chair-1.jpg
    59.1 KB · Views: 181
  • Pear-Chair-1.jpg
    Pear-Chair-1.jpg
    51.5 KB · Views: 181
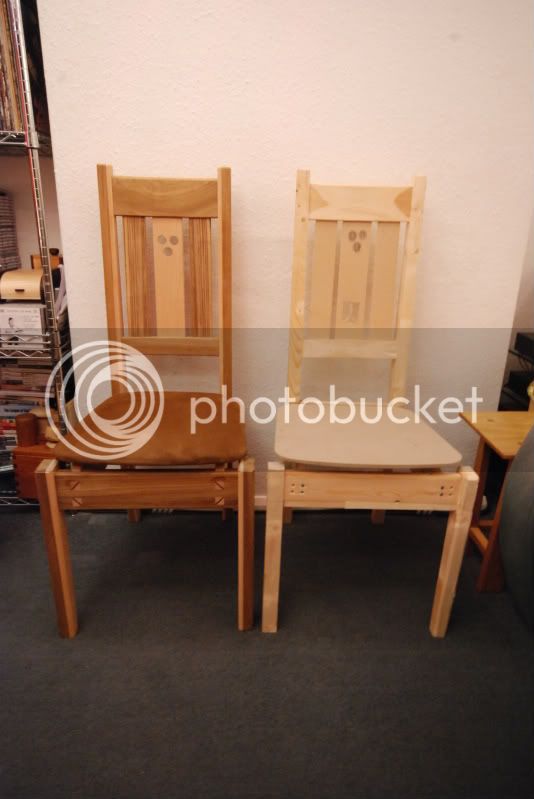
Or you could do a chair with out the tricky angles.


Note the pine and MDF mock up.

Pete
 
Inkdchippie":3d35g0ut said:
So the time has come.... My commitment to attempting a chair build is now at the point of no return :shock:
I'm a fan of clean, contemporary lines and after trawling the old interweb, a David Savage design, named "Swinger" is my inspiration. As my account is new I'm unable to post links to the design.
Chosen for it's "simple" appearance, it seemed like a good place to start for my first pair of chairs (the base section at least!!!!) I would love to conquer the shaped back rest, but for now the base is where my journey begins.

Like "Swinger", my material of choice is Sycamore. I've already dimensioned the material for the legs, with current dims of 480mm x 42mm x 42mm.

I've set out a 1:1 template on plywood in plan view for the seat. Unfortunatley I don't have the dimensions with me as I write this post. The seat profile narrows from front to back in plan view. I've also decided to include a 1.5 degree decline on the seat from front to back. The rail width I feel best compliments the aesthetics is 60mm (the rails haven't been machined yet) This is where my problems begin.

I have 2 points where I am struggling, and would really appreciate some feedback as to the best way to move this project forward.

1. The thickness I should finish the 4 rails on the seat base. Should I match the rail thickness to the 42mm x 42mm leg dimensions? Or. Going thinner with the stock, perhaps as thin as ex 1" boards, keeping the outer face of the rails flush with the outside faces of the legs? While the latter option will allow for longer tenons into the legs, they will be offset from centre. Will this lead to potential problems with weakness in the leg material or concerns of any twisting and the risk of the joint opening up where the tenon shoulder meets the leg.

2. Which method to adopt to fix the seat base down to the frame. I plan to use birch ply for the base, which will be upholstered in a material yet to be decided.
My research so far has found 2 approaches. The first which I'm not a fan of, is to attach a bearers (4 in total) mounted at 45deg across the inside corner of each leg. The second (which I'm thinking will have a direct relationship to the rail thickness) is to rebate all the rails on the inside of the seat frame, providing a surface to sit the ply base on.

Any wisdom on executing the seat back would also be welcome. But for now the seat frame is the first phase of this project.
Any advice on how to approach this would be greatly appreciated.
Many thanks in advance...

PS. Mods? Wasn't sure where to post, here or in design?? Apologies if I've got it wrong


Answers to your questions,

1. 25mm is plenty thick enough for the front and side rails, that's the thickness I use in almost all cases. By going thicker you'll be adding weight but not strength. On a design like that, where the rails are flush to the legs, I'd expect to be using an 8mm thick tenon. Make sure you draw up full size or double size jointing diagrams in plan and side/front view, you don't want any surprises when you start morticing.

Getting back to the rails, you'll often go a bit thicker for the back rail, maybe 30-32mm, in order to have some extra meat on the bone for handling any curves and for the splats and back bars, plus the tenon that joints the back rail into the legs is often a stub tenon with dowels, so a bit of extra width can be an advantage there too. If you have a problem with the dowels let me know and I'll show you a design for a neat little workshop made jig that I use and that gets the job done very precisely. On your (somewhat dodgy!) design I'd certainly go for the slightly thicker back rail, as you'll need the screws that attach the back rest to the back rail to be as thick and as long as possible, in order to have any chance whatsoever of the back rest remaining attached for more than about 15 minutes!

2. The seat in the photo is a drop-in upholstered seat, it isn't actually attached at all. It stays in place with friction and can be knocked out at some future date for re-upholstering. This type of seat usually sits in a rebate in the front and side rails, there generally isn't a rebate in the back rail. This is what the construction normally looks like for the back corners,

Chair,-back-corner.jpg


And also for the front corners,

Chair,-front-corner.jpg


The corner blocks sit about 0.5 to 1.0mm below the rebate, they are not involved in supporting the seat. In the highest quality work the corner blocks are neatly scribed in place, then glued, screwed, and plugged. Personally I'll usually cut the seat support to size before installing the corner blocks, it just makes access a bit easier, but it's not critical and I know craftsmen who fit corner blocks before sizing and installing the seat insert.

You have a choice when it comes to running the rebate around through the front legs. You can make the rebate with square corners and then knock off the front corners of the seat support, I think this is poor work as the upholstery usually ends up creasing. Or you can do the job properly by making a little jig like this,

Chair,-Rebate-Jig.jpg


clamp the jig to the rails and use a router with a top bearing bit to run the rebate around through the leg in a nice curve, this is by far a superior solution as long as you're confident enough with a router not to b@lls it all up (take it in two bites by repositioning the jig and you'll be fine!).

The seat insert is generally 12mm ply (some people prefer 15mm but I've never had problems with 12mm) size the rebate to the thickness of the ply plus one mill (so a 13mm deep rebate for a 12mm thick seat insert). Make sure there are 5 x 15mm holes drilled through the ply to allow the air from the foam padding to escape. If you don't drill these holes the client will wobble around on top of the chair like they're on a space hopper! You need to vernier the thickness of the seat covering plus a layer of calico, and then make sure the seat insert has this exact gap all round. It usually comes to about 1.5 or 1.6mm with a decent leather seat fabric. I hand over the ply seat insert to an upholsterer, they're not expensive and they usually do the job just that bit better than we can, plus they'll have a good selection of calico, seat coverings, foams, etc.

A few additional points,

1. Leave the front legs a few mill over length at the top. Because the side rails are sloping down to the back you need to continue that angle right through the top of the leg, so the leg needs to be proud of the top of the rail and then flushed down. It's a faff but it just looks that bit nicer.

2. When it comes to assembly you normally glue up the front legs and front rail as one sub-assembly, then glue up the back legs and back rail as a second sub-assembly, and only when they're dry do you join the front to the back, usually with a band clamp. When you dry fit the front and back sub assemblies take real care that there isn't even a hint of wind (lay them on a flat surface and check the legs are precisely parallel), if there is any wind you'll have problems getting the seat insert to sit flat without it rocking.

3. The critical joint in any chair is where the side rails join the back legs. This is where chairs generally fail. So when designing your joints give priority to this, if the back rail then only has room for stub tenons so be it, two or three dowels on top of the stub tenon will give all the strength required, that joint almost never fails.

4. With angled components you need to decide if you'll have straight tenons and angled mortices, or angled tenons and straight mortices. There isn't an absolutely clear answer but on your design I'd be looking at straight tenons and angled mortices.

5. The design would look a lot nicer if instead of the legs being square in section the side faces were angled to the same degree as the side rails. Have a close look at the photo I posted called "Chair, front corner", you can see there it's all smooth and flush where the outside of the side rail joins the leg in a continuous line.

6. I can't leave off without making a comment on the design. I'll avoid the aesthetics because that's subjective and it's you that has to live with it not me. But from a constructional point of view that back arrangement is just awful. Basically it's a chair for displaying in a hallway rather than actually using. However, it does have the huge advantage of simplifying construction and letting you cut your teeth on an easier project. But, once you've cracked that and have more confidence, then please make sure you go back and make a proper chair!

Good luck!
 

Attachments

  • Chair,-back-corner.jpg
    Chair,-back-corner.jpg
    91.6 KB · Views: 138
  • Chair,-front-corner.jpg
    Chair,-front-corner.jpg
    90.8 KB · Views: 138
  • Chair,-Rebate-Jig.jpg
    Chair,-Rebate-Jig.jpg
    69.5 KB · Views: 138
A small amount of progress today...

*IMAGE TO FOLLOW ONCE I GAIN PERMISSION ON MY ACCOUNT*
All the pieces dimensioned over size, until I'm fully informed on the next steps going forward in this project.

Frustratingly, I'm one piece short for the rails :(

This means having to cut into my last 2" piece of Sycamore. At 16" wide its a fair piece, and I'm reluctant to get it out for just this one piece!

*IMAGE TO FOLLOW ONCE I GAIN PERMISSION ON MY ACCOUNT*
The templates for this design on plywood, with the joinery elements still to be determined.

*IMAGES TO FOLLOW ONCE I GAIN PERMISSION ON MY ACCOUNT*

MattRoberts - Yes, they're the ones

deema - Thanks for the info. I've run the material for the rails today. They're currently sitting at 44mm, ready for a final pass to match the 42mm leg dims.

Racers - Thanks for your images and suggestions. I've never been one to start off with easy. The way I look at it, if I can yield a successful result with the angles on this first attempt. Then it should bode well for future attempts with the same method.

custard - A wealth of information! Thank you very much. As you have stated, a chair is the ultimate challenge. It has been my nemesis for as long as I can remember. So enough is enough, and it is now time to have at it. Your pictures and responses are extremely helpful. It'll take me a few reads, over and over to fully absorb your response. I can imagine your suggestions, except for the dowel on the stub tenon you describe for the back rail. In my mind, I had planned to carry the rebate through the top of the leg as your picture shows. Nice. Next, it's just a case of interpreting them onto my templates before finally going to work on the dimensioned lumber. Since committing to the design, I agree. As a fully functioning chair the design is a little "dodgy". With that being said, I'm happy for it to end up as a decorative showpiece if nothing else. At least it'll mean I pop my "chair" cherry!

As I get further into this project, I will keep adding pictures of my progress. Thank you all for your input so far.
Whilst the back design is a contentious subject, I would like to try and create as faithful attempt as I can to the original brief.
I can honestly say I have no clue where to start with the back. Any suggestions greatly appreciated.
 
custard":wrp89tto said:
Hello Inkdchippie, I'm a bit busy in the workshop at the moment but I'll get back to you later today.

I love chairmaking (not so much the David Savage designs but hey ho, each to their own), for me a jointed chair with all the complexity of angles and curves is the ultimate challenge for a cabinet maker, so I'm delighted someone on this forum is having a go and I'll be happy to help you out any way I can.

But to give you least one quick answer. It sounds like you're planning a drop in upholstered seat like this,


in the majority of cases with this type of design the seat is supported by a rebate in the front rail and the two side rails, it's possible that there's also a rebate in the back rail too but generally there isn't. There will almost certainly be corner blocks underneath the seat to add strength, but they should be set about 1mm below the rebate so they play no part in supporting the seat. The rebate in the front rail is straight forward enough, and curving the rebate around through the front leg is a bit nerve racking but with a well made jig and a router t's not particularly difficult, however depending on the design there may well be an interesting little twist to the side rail rebates that, as far as I know, you won't find detailed in any book or on the internet, however I can help you deal with that if it's necessary.

Good luck!

Can I just say, I've been studying this subject for nigh on 2 years now and I have not the slightest clue how you would go about making those chairs.

Absolutely superb.
 
custard":55eqtnce said:

5. The design would look a lot nicer if instead of the legs being square in section the side faces were angled to the same degree as the side rails. Have a close look at the photo I posted called "Chair, front corner", you can see there it's all smooth and flush where the outside of the side rail joins the leg in a continuous line.

Good luck!

This suggestion is a feature I have incorporated into the design already.
Once the mods grant permission on my account to post pictures, you will see the angle on the outside faces of the front and rear legs my template.

If I choose to angle the mortices, should I do this before I angle the outside faces of the legs? Or, if I angle the legs first, and use a wedge to reference the leg face back to square on my morticer clamp, then machine the mortices. I guess either way, I'm gonna have to wedge the workpiece one way or the other, as I cannot angle my morticer. As I've never done angled mortices before, I'm unsure of the best way to execute them.

Also, looking a little closer at the front corner image. I can assume that the tenon must be below the depth of the rebate. On the lower edge, how high up is the bottom the tenon. I'm guessing only 2-3mm to give the tenon as much surface as possible???
 
1. The normal rule in woodworking is "joint first, shape second". But these chair legs are an exception, you shape the angle on the outside faces and then cut the mortices. Use angled packing pieces in the morticing machine to hold the leg at exactly the correct angle, like this,

Morticer.jpg


You may also need angled packer pieces underneath the workpiece, don't trust the morticing machine hold fast to do the job, the workpiece must be supported underneath if necessary.

2. I've looked at a few on line photos of the "Swinger Chair" and I can't decide if the back is a bent lamination, or just a flat board with cleverly worked bevelled edges that give the optical illusion of it being curved. In one respect it doesn't really matter, both are fairly easy options to execute. Honestly, the back isn't that tricky either way so I wouldn't worry about it.

3. I forget to say in my previous post, when you glue up the front and back sub assemblies you should have made some softwood plugs covered with brown parcel tape, these need to go into the mortices that will hold the side rails as a snug friction fit. It's yet another chairmanning faff, but if you don't do it you risk crushing or splitting the side rail mortices as you tighten the cramps during the glue up.

4. Dowelling the stub tenons on the back rail. These stub tenons are often only about 5 or 6mm long, much longer may seriously weaken the back legs. So for a bit of extra security most makers introduce two or three 8mm dowels into the ends of these stub tenons. But to do that you'll need to make a dowelling jig that looks like this,

Dowel-Jig.jpg


It's a block of stable hardwood that you've made perfectly square. At one end you mark the mortice outline and then transfer those lines right around the block, so effectively you've got a stub tenon marked on one end and the corresponding stub mortice exactly lined up on the other end. Cut both the mortice and the tenon on the jig, then take it to the drill press and drill two or three 8mm holes through it. This is now a dowel jig that fits tightly over the stub tenons on the back rail and tightly into the stub mortices on the back legs, allowing you to strengthen the stub tenon with a few perfectly aligned dowels. Pretty clever eh? If you're a careful worker it's not as difficult as it sounds, but it has to be said that if you're not capable of making this jig precisely then you're probably not ready to make a chair!

Good luck!
 

Attachments

  • Morticer.jpg
    Morticer.jpg
    92.9 KB · Views: 58
  • Dowel-Jig.jpg
    Dowel-Jig.jpg
    90.4 KB · Views: 58
custard":c6g6qzit said:
1. The normal rule in woodworking is "joint first, shape second". But these chair legs are an exception, you shape the angle on the outside faces and then cut the mortices. Use angled packing pieces in the morticing machine to hold the leg at exactly the correct angle, like this,


You may also need angled packer pieces underneath the workpiece, don't trust the morticing machine hold fast to do the job, the workpiece must be supported underneath if necessary.

2. I've looked at a few on line photos of the "Swinger Chair" and I can't decide if the back is a bent lamination, or just a flat board with cleverly worked bevelled edges that give the optical illusion of it being curved. In one respect it doesn't really matter, both are fairly easy options to execute. Honestly, the back isn't that tricky either way so I wouldn't worry about it.

3. I forget to say in my previous post, when you glue up the front and back sub assemblies you should have made some softwood plugs covered with brown parcel tape, these need to go into the mortices that will hold the side rails as a snug friction fit. It's yet another chairmanning faff, but if you don't do it you risk crushing or splitting the side rail mortices as you tighten the cramps during the glue up.

4. Dowelling the stub tenons on the back rail. These stub tenons are often only about 5 or 6mm long, much longer may seriously weaken the back legs. So for a bit of extra security most makers introduce two or three 8mm dowels into the ends of these stub tenons. But to do that you'll need to make a dowelling jig that looks like this,


It's a block of stable hardwood that you've made perfectly square. At one end you mark the mortice outline and then transfer those lines right around the block, so effectively you've got a stub tenon marked on one end and the corresponding stub mortice exactly lined up on the other end. Cut both the mortice and the tenon on the jig, then take it to the drill press and drill two or three 8mm holes through it. This is now a dowel jig that fits tightly over the stub tenons on the back rail and tightly into the stub mortices on the back legs, allowing you to strengthen the stub tenon with a few perfectly aligned dowels. Pretty clever eh? If you're a careful worker it's not as difficult as it sounds, but it has to be said that if you're not capable of making this jig precisely then you're probably not ready to make a chair!

Good luck!

Thats a whole lot of information custard, thank you.

Square and flat, such simple words, yet so so difficult to achieve with true precision.
 
custard - your replies are priceless, thank you.
It all makes good sense to me, and i cannot wait to move things along with these chairs.
It'll be a few days before I can take action as I'm having surgery tomorrow. As soon as I'm mobile and more comfortable, i will start shaping the legs in preparation for the mortices.
Hopefully by this time, my new account will have permission to post links and pics, allowing me to show my progress
 
Inkdchippie":2qkn110x said:
It'll be a few days before I can take action as I'm having surgery tomorrow.

Good luck with your surgery. Best wishes for a swift and full recovery!
 
Back
Top