Hand Cut Dovetails

UKworkshop.co.uk

Help Support UKworkshop.co.uk:

This site may earn a commission from merchant affiliate links, including eBay, Amazon, and others.

Slim

Established Member
Joined
4 Feb 2006
Messages
1,736
Reaction score
0
Location
Trossachs
Hi all.

I am a bit of a novice when it comes to dovetails. However, I am managing to get nice clean looking joints. My question is, how tight should they be? I have just cut some half blind dovetails for a drawer and I had to hammer the tails in using a block and quite a lot of force. Should they be this tight? or should I be able to assemble them by hand?

Thanks in advance.
 
Simon
Tight is good - until you split the joint :lol:
Try fitting the joint half way, pulling them apart and then check for the shiny areas - these will be the high spots. Gently relieve them with a chisel and fit again.
The denser the timber the easier the joint splits - Rob Cosman always uses Poplar for the sides which compresses very nicely thank you very much :wink:
Hope this helps (and lets see some photo's)
Philly :D
 
I'd say a 'push fit' if you know what I mean ?

light taps with a hammer and block to assemble/disassemble.(if you cant disassemble , its too tight)

but I am no 'expert' :) - only made a few and read alot !
 
If you follow the Cosman rule you only fit the DT once and a tap with a block of wood and a mallet is acceptable.

If you haven't seen his DVD or the book then I'd recommend them.
 
I subsribe to the practise of fitting the joint a third or half the way in to get a general idea of the fit - I find this works well. I would only fit it all the way in once, as Waka says. I think the Cosman suggestion of paring away the leading edges of the tails on the unseen part of the joint makes a lot of difference in getting it started when assembling.

I usually tap onto a wooden block to fit them, although this is a bit subjective I would say a reasonable knock is OK. I will admit to rather more of a clout on some occasions when the glue is setting on a partially assembled joint and theres no way its coming apart again. Provided you don't split the joint I would say thats OK.

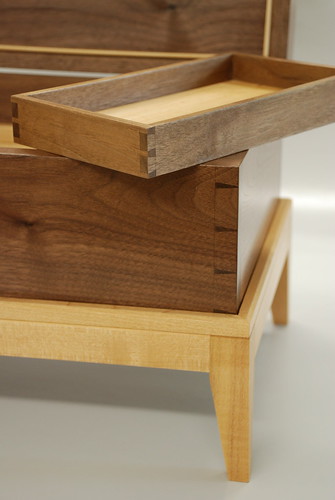
Since we are talking dovetails, here are some of mine

2549297040_4f07ef1981.jpg


Cheers, Ed.
 
They should go together with light taps. Sometimes by tapping lightly in different positions you can find the tight spots by their higher pitched ring.

If the joint is going to split anywhere it will probably be at the half pins. A trick that David Charlesworth taught me on his (excellent) dovetailing course was to place a ruler along the edge by the half pin to to see if it was being deflected. If it was, dissassemble and refine the joint.

Unfortunately we don't all cut thousands of joints like Rob Cosman, and I need all the help I can get, so I now do a partial test fit, say half engagement.

the other thing to remember is that the water based glue will swell things up a bit, and after a clean up with the plane the joint will look even better.

Here is one of mine:


1_G.jpg


OK, I cheated, you can't tell how it fits, because it's a secret mitre dovetail.

In fact it is one I haven't glued up so that I can astound my friends. 8) Probably explains why it is so grubby and the mitre fit isn't all it could be. Too many pineappled up friends trying to wrench it apart. :cry:
2_G.jpg

3_G.jpg


But in the interests of full disclosure I should probably show you these as well
4_G.jpg


Without a doubt, practice is one of the main factors in improving your dovetails.
 
Well thanks very much fellas. I think I have them a little too tight, although I didn't split the timber. I think, as I am not very experienced at this, I am maybe erring on the side of caution. I don't want to take too much off and have a loose fitting joint.

Philly, you expect me to post a pic, after seeing the dovetails Paul and Ed posted? Well... ok, i'll show you all my next effort. :wink:

Thanks again.
 
Slim":1qubw30q said:
Philly, you expect me to post a pic, after seeing the dovetails Paul and Ed posted?

Just post a fuzzy low res picture, like I did, no one can see the difference.

The other thing I learnt from cutting a few is that I am my own worst critic, and most people are astonished at my work when I am disgusted.

If you want to boost your ego, just go to an antique shop and open some drawers. Piecework dovetails weren't that great.
 
Slim":1g6hmyjc said:
Hi all.

I am a bit of a novice when it comes to dovetails. However, I am managing to get nice clean looking joints. My question is, how tight should they be? I have just cut some half blind dovetails for a drawer and I had to hammer the tails in using a block and quite a lot of force. Should they be this tight? or should I be able to assemble them by hand?

Thanks in advance.

Dovetails should fit just once. Perceived wisdom is to fit them half way and tap them in with a block and hammer, I generally pull them up half way with a sash cramp which seems a bit kinder. If there is too much pressure (they usually squeak at this stage) then the high shiny points need to be eased carefully with a chisel. Using a very soft wood for sides makes the fitting much easier as it compresses when fitted...looks good when demonstrating :wink: but it's a bit of a cop out really. As others have said, practice is the best way...a certain person will be getting loads of practice now with his new d/t saw :lol: - Rob
 
PaulO":wdtcozgk said:
Unfortunately we don't all cut thousands of joints like Rob Cosman, and I need all the help I can get, so I now do a partial test fit, say half engagement.

Yeah; important to remember that.

BugBear
 
Cheers Rob.


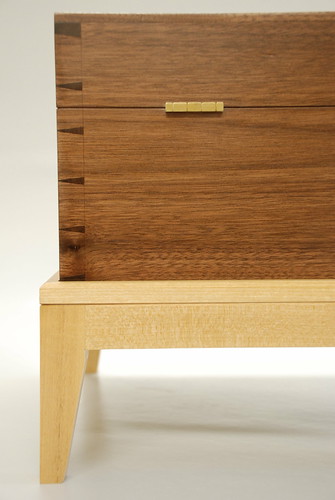
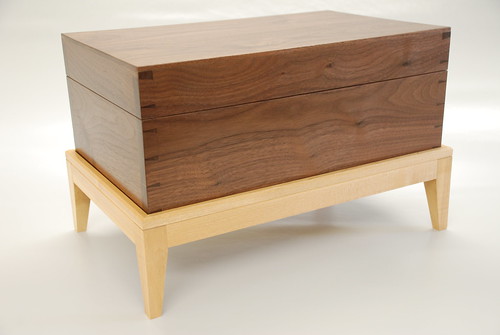
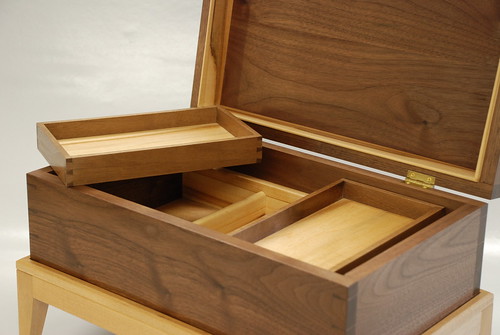
Ed, I do like the look of that chest (is it a chest?) Have you any more pictures?
 
Well, if you insist slim :wink:

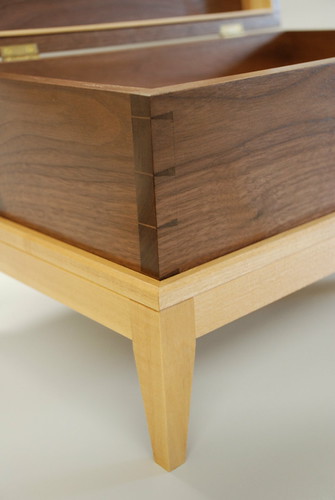
Its a jewellery box that appeared in the article 'Hidden Treasures' which I wrote for Furniture and Cabinetmaking Magazine, issue 134.

2556977280_83c1ac80e5.jpg


2556975344_5741ae4090.jpg


2556979606_828eb2674d.jpg


2556160245_00f008ffa1.jpg


Made of American Walnut and English Lime (almost sounds like a dessert!)

Cheers, Ed.
 
did you leave the score lines on to show off the 'hand made' dovetails ?

I always look for them on antiques !

nice work :)
 
I don't often venture on to this forum but I'm glad I did.

Paul's secret mitred dovetails took me back to my college days when I built a drinks cabinet from walnut with SMT's at all four corners of the carcass. Now that I do it for a living I'd use biscuits!

Ed's box is absolutely beautiful - fantastic work, Ed!

One question though;

Why do all you hand tool guys leave the marking lines visible on such a lovely piece? It ruins it!

Have you never heard of a random orbital sander?

:D

Cheers
Dan
 
Dan Tovey":28n37o75 said:
Why do all you hand tool guys leave the marking lines visible on such a lovely piece? It ruins it!

Have you never heard of a random orbital sander?

:D

Cheers
Dan

SSssshhhh.......

You might get hung for that round this place...... :lol:

Cheers

Karl
 
Dan the T wrote:
Why do all you hand tool guys leave the marking lines visible on such a lovely piece? It ruins it!

Dan - I was going to say something along those lines as well but thought I'd better keep my big mou :wink: :roll: ...glad you noticed that feature on an otherwise wonderful job. For me, leaving knife lines on a show surface is a non-starter, acceptable in drawer making for lapped d/t's but only in that situation. When I do something like this I cut the shoulder line very, very lightly with a knife (didn't someone make you one a while back :lol: ) so that it's hardly visible, then once the tails are marked out I go over the pin sockets again but this time scoring heavily with the knife as a location for the chisel. The very light knife line visible on the tails is removed in the normal course of cleaning up with a smoother etc :wink:...spacing of the tails and pins looks slightly out as well, or is it me just being piccy? :)

These are secret mitres as well:

11fgw3r-1.jpg


Teak Casket - Rob
 
Well, firstly I should say I don't purport to be a dovetailing expert; I am self taught based on reading and experimentation and would consider myself to be on a constant learning curve, probably in common with many forum members.

I think the only conclusive comment you can make on visibility of scribe lines is that opinion is divided. I'm not sure that it is possible to define 'correct practice', only differing points of view.

Personally I don't find the visible lines visually offensive, although as it happens its not an aesthetic feature I have specifically set out to create either. I will probably experiment with alternatives on future pieces and see what effect it has on the overall visual harmony of the piece.

I don't have a fixed view at the moment and don't know if I ever will have. Looking at the wider picture, I think its important to leave your mind open to all possibilities regarding technique if you really want to keep moving along that learning curve.

On the spacings, with hindsight I would have made the half pins slightly more slender. Also with hindsight I should have made the tail that the kerf passes through when the lid is cut off 3mm bigger so that once the cut is made it ends up the same size as the rest, but then its easy to pick up on this when the finished piece is sat in front of you.

Cheers, Ed.
 
Ed S wrote:
On the spacings, with hindsight I would have made the half pins slightly more slender. Also with hindsight I should have made the tail that the kerf passes through when the lid is cut off 3mm bigger so that once the cut is made it ends up the same size as the rest, but then its easy to pick up on this when the finished piece is sat in front of you.

Ed - the issue as to whether to leave knife lines on or nae is subjective as you say. I would always try and remove them on a show surface...personal view :wink:
I was referring to the spacing at the top and bottom of the box. I think the top half-pin is about right but the bottom half-pin should have been made the same size for visual balance, in addition as you say the pin with the kerf thru' could have been made a tad larger...you lives and you learns though, as with all projects. Excellent piece though and a good article in F&C BTW =D> - Rob
 

Latest posts

Back
Top