Extending 'Flip-Top' Dining Table - Finished!!

UKworkshop.co.uk

Help Support UKworkshop.co.uk:

This site may earn a commission from merchant affiliate links, including eBay, Amazon, and others.

OPJ

Established Member
Joined
31 Jul 2005
Messages
5,566
Reaction score
1
Location
North Somerset
Without counting, I know there aren't very many weeks left until the deadline and I do not honestly fancy my chances of finishing this table in time. I'm in the middle of doing two other jobs for two other people so, we'll see how far this one goes...

As it happens, one of the other pieces I'm making also happens to be a dining table. That extends on a 'drawer leaf' mechanism where as, the table in this thread (which is for my mother :roll:) will operate one what's commonly know as a 'butterfly' mechanism (I'm sure you've all seen it - where two leaves unfold and swing out from underneath the centre). Progress on the drawer-leaf table was going very well indeed [there's some brief information in my UKW Blog :wink:], until yesterday when I was looking at preparing boards for the top... To cut a long story short, some of the boards I had weren't fit for purpose and I hadn't bought enough spare to get on with (very unlike me, as anyone from college will agree! :oops: :D). This morning, I took a trip Interesting Timbers for some more 1in. oak and, while I was there, I decided I would fill my car with the remainder of beech I required.

3944703869_fd1dd93296.jpg


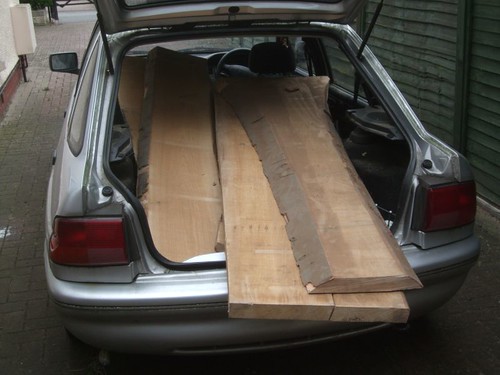
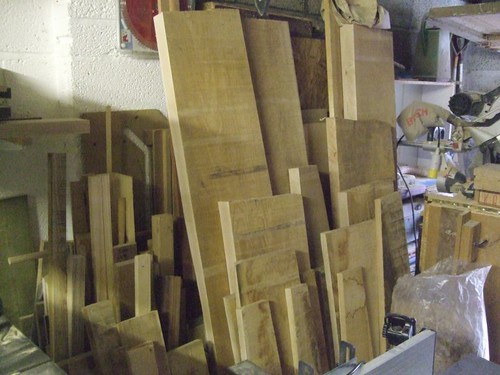
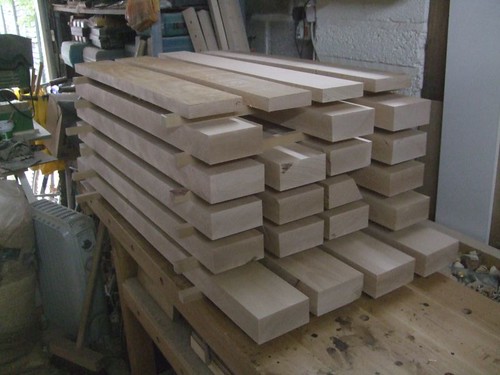
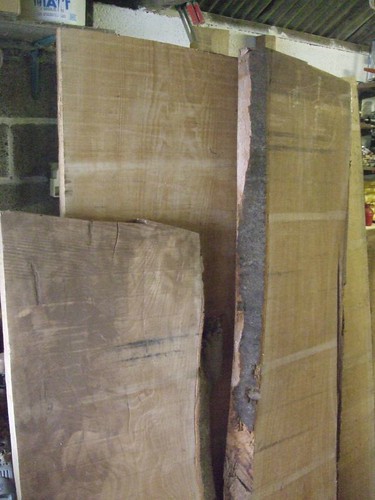
Actually, this is a photo of my second load. :shock: Believe it or not, I bought enough of enough of both timbers to overload my car. Earlier this year, I pushed my car's suspension to the limits with a load of 3in. beech for my workbench. Miraculously, it just keeps on going but, I decided it would be sensible to get the wood for this dining table in two trips.

Back to my old ways, I spent almost double what I had anticipated! :shock: I usually blame the wastage factor involved with waney-edged timbers but, as this is a regular occurrence, could it actually be me? :? Three cubic feet of oak for one table top (1000mm x 760mm) - I'm not saying any more!! [-(

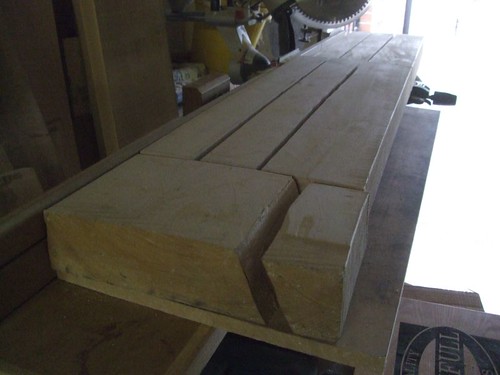
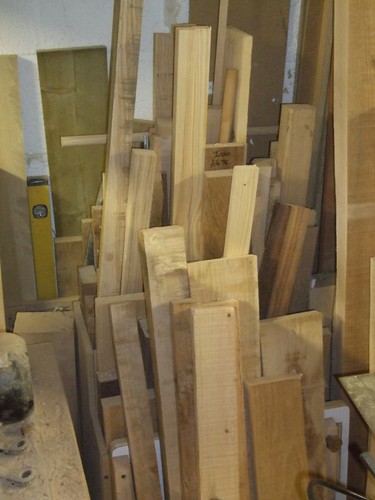
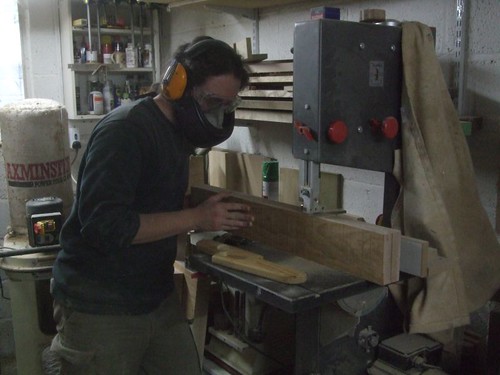
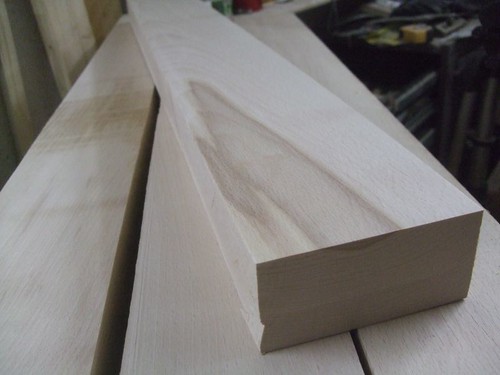
Some of these 2in. thick boards were phenomenally wide - I ripped the bark from one edge, cut the other parallel and still had 21in.-worth of usable timber!! 8)

3945487180_c47ecde073.jpg


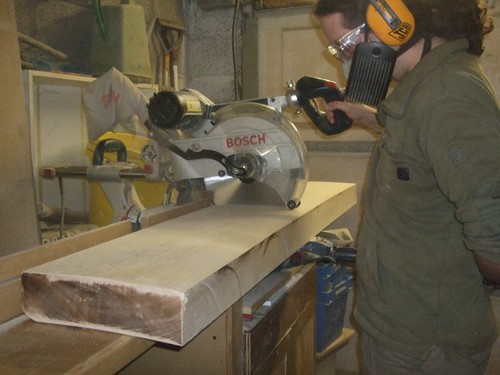
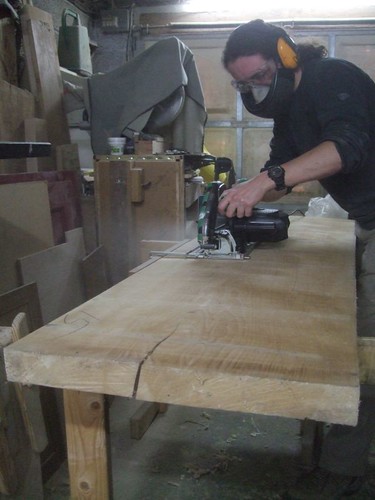
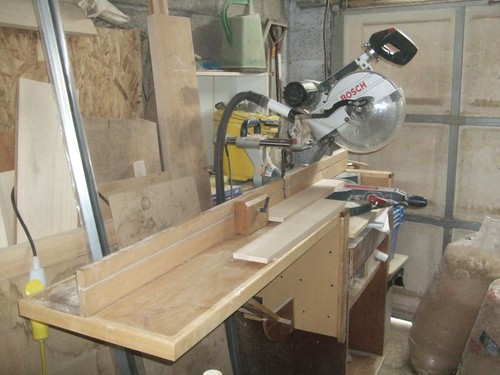
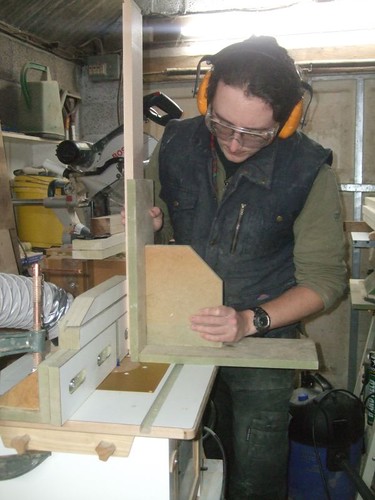
I'm still hanging on to this Makita saw, despite owning a larger Hitachi. I find this one more convenient for sheet materials (at least until I can afford a plunge saw! :D). It did struggle a bit but, I'd put that down to the 40t blade. Previously, I was set on a 32mm thick top. After studying my SketchUp drawing, I've now decided on 38mm finished thickness. It is a shame no-one stocks 1¾in. sawn timber (they do 2½in. - and who the heck buys that, anyway?! :roll: :))

3944704161_83e22e7728.jpg


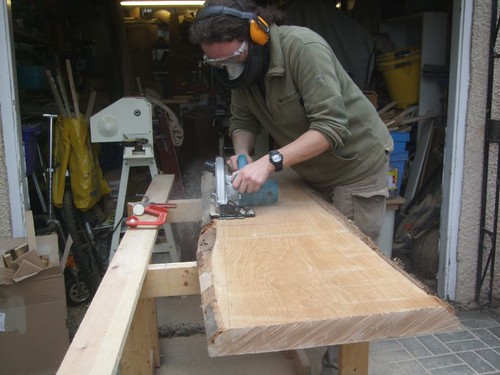
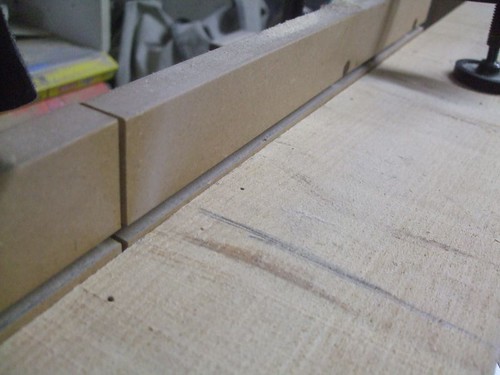
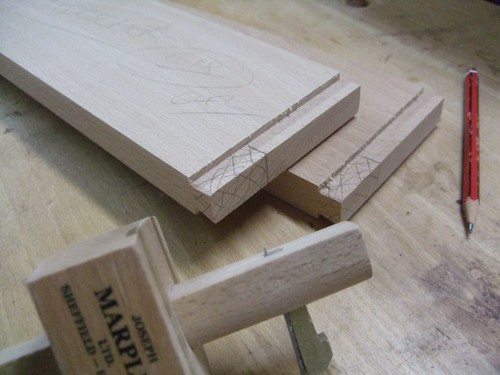
My approach to working waney-edged wood this time around is a little different... Normally, I'd remove the bark from both edges. This time, I intend to straight only one edge [yes, I'm aware of what I wrote earlier!! :wink:]. Once it's had some time to settle in the 'shop (a week or so), I'll reference off this edge to get my components out over-sized before sticking them indoors for a bit.

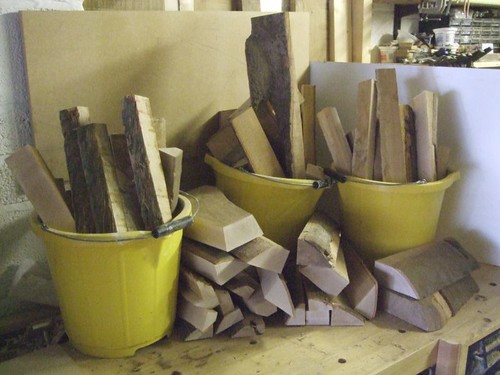
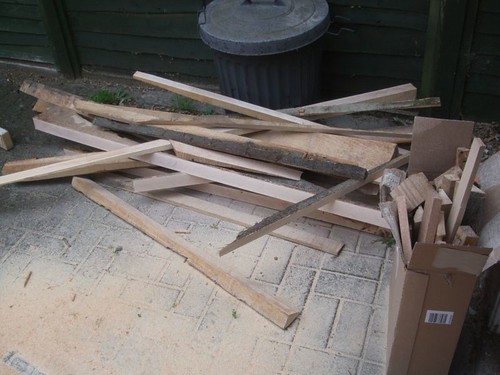
Speaking of bark and wastage, this is what I'll be throwing away initially. I'll normally give this away to someone else as firewood - I do wonder whether anyone would actually pay for a 'good quality hardwood' though...? :-k :wink:

3944703763_f0d704c4aa.jpg


On to the design, at last...

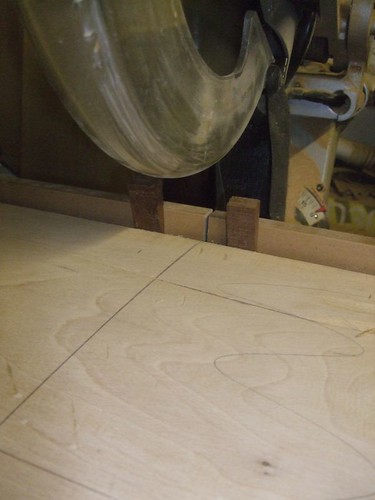
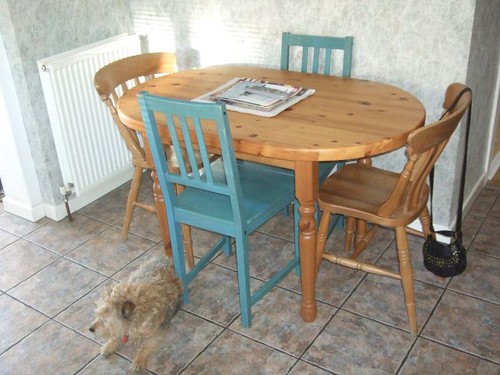
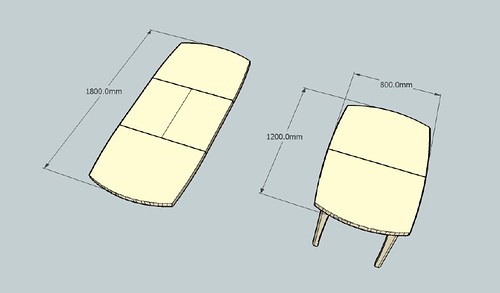
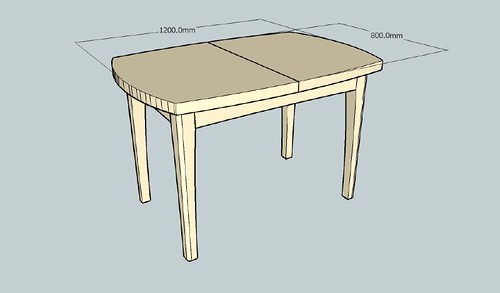
My brief calls for a table roughly the same size as our existing pine piece, which will initially seat four people, extending to seat six on occasion. Mum did talk about an eight-seater at one point but I showed her (using the power of Google SketchUp!) how that isn't really feesable in our small kitchen. I'm aware that each seater (and seat, inside the frame) needs at least 500mm of arm room for comfort. So, as you can probably see in these images; I'm not far off but, there's still a little bit of playing around with dimensions to be done.

3945532296_8293699005.jpg


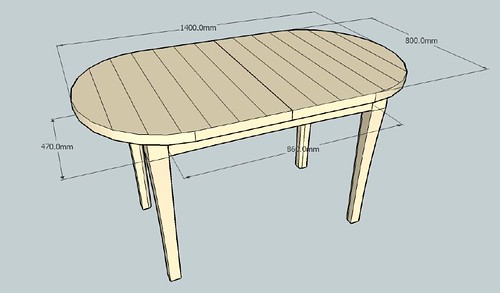
It's a bit 'touch-and-go', in the sense that I don't want the outer corners of the legs to be too close to to perimeter of the table top, for aesthetics, more-so than anything else.

3944749637_1548a42a59.jpg


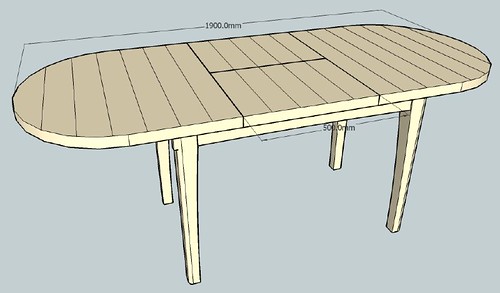
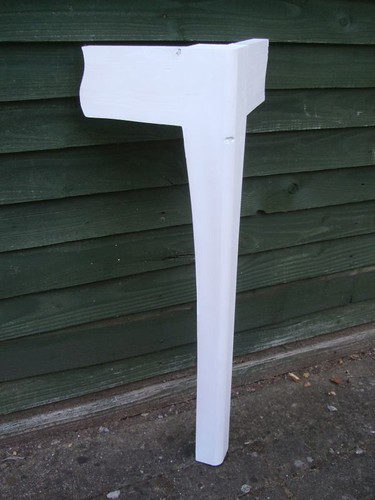
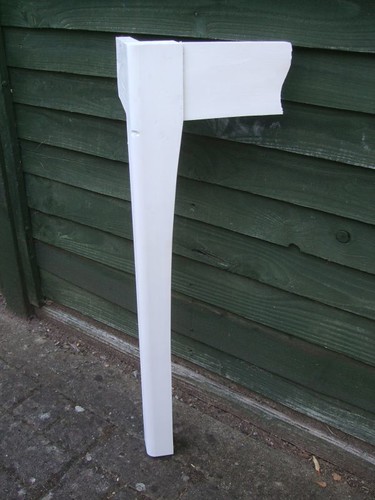
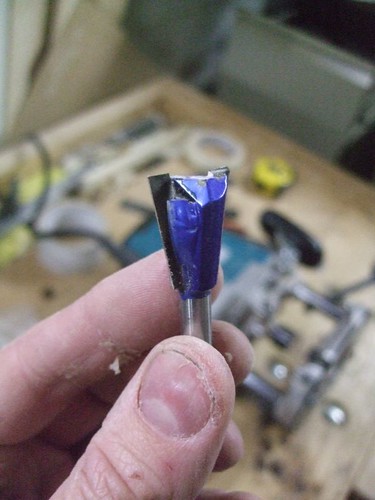
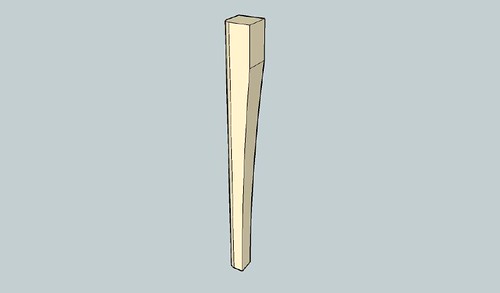
In order to help such matters (I hope!), in my current leg design (see below), I will add a considerate radius to the outer arris, which I feel compliments the curve of the top (...speaking of which, that curve isn't yet concrete). I bought some 3x3in. pine a few weeks ago and will make a couple of mock-up legs soon.

3945532564_e529a8cdda.jpg


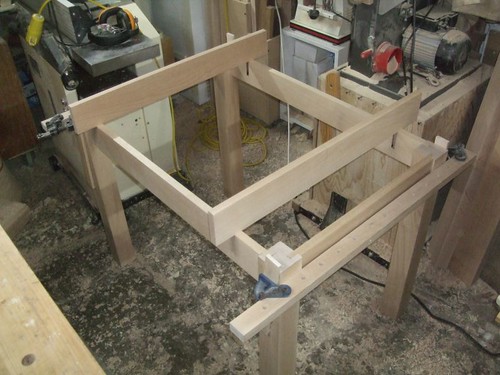
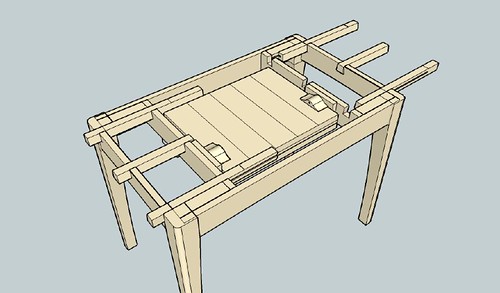
Regardless of whether or not I actually finish, I would like to have this underframe construction finished by the end of October. After which, the top should be fairly straight forward. I'm fully aware that beech isn't the most stable of timbers, which is why I'll be adding a central runner to this construction, which should help to keep the top flat.

3944749715_162d4cf0f8.jpg


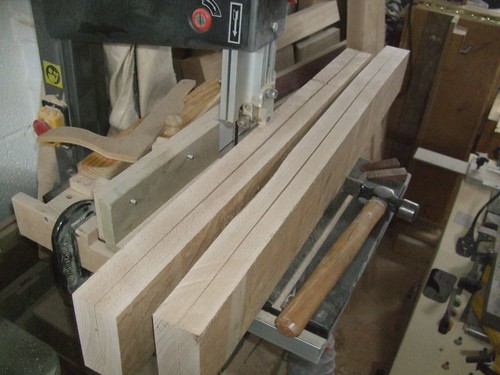
Thinking back to the sawn timber, which currently rests at approximately 54mm thick, that's an awful lot of waste to achieve a 38mm thickness. I don't fancy mountains of wood shavings and several trips to the Recycling Centre so, I may have to cut and store nineteen beech veneers, 100mm wide! No, I don't like to waste wood, which is partly why I often end up taking home the boards in a stack which several other people have already turned over...! :roll: :D

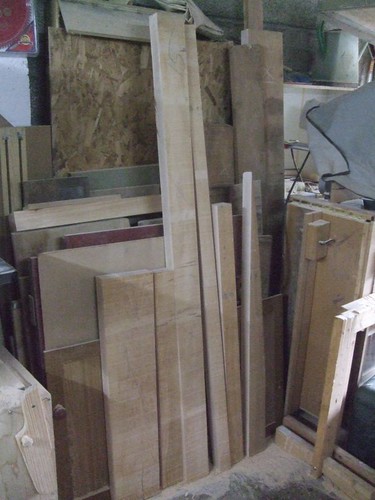
There's still a little more ripping to be done tomorrow, as the heavens halted proceedings for today. :x I've hand some 3in. beech on stand-by since my 'bench build during the summer. This length was the only one not to have split severely. Damien's [Ironballs] thread appears to have sprung his competition entry in to life. While I appreciate that I have minimal progress to show so far, I'm hoping this entry will have a similar effect on my project. :wink:

See you in twenty-four hours! :)
 
Olly you know how to make a man feel better, talk about pushing a deadline to the limit. I feel like I've made massive amounts of progress!

Let's see what you can knock out in 24 hours then
 
Cheers, Damien! :D

Today, I was hoping to have completed my first mock-up but, as I still had a tonne of wood to cut up from yesterday, I couldn't get beyond feeding the pine through my thicknesser. That'll be my first job at the weekend though. I'd like to share with you my approach to getting four legs from this great lump of beech that's been sitting in my workshop for a few months now...

3947715141_934a81a4df.jpg


Note the 'other-hand-behind-my-back' technique. :D Don't worry, I have clamped the other end to stop it falling off the saw. This monstrous mass of beech was only just large enough for the cross-cutting capacities of my saw.

Neither edge was dead-straight (or convex, for that matter :roll:) and I didn't fancy digging out my power planer or risking injury by trying to feed this over the planer on my own. :? So, I placed one wedge either side of the blade to prevent the pieces from being 'pulled in' and binding as the saw completes the cut. Let me tell you from past experience that it makes a terrifying 'BANG!' if you don't take such precautions - and that was 1in. cherry! :shock: :oops:

3947715041_85c7f40169.jpg


Wedges are always handy to have around the 'shop. If you don't have any yet, honestly, grab some scrap and cut at least half a dozen, next time you're out in the workshop. :) Despite four months of living in my 'shop, there was still a good amount of stress within this board (I'm not even sure it's right to call this a 'board'! :D) and I admit to stalling the bandsaw blade twice... :oops: Still, it's much safer than using a table saw as there's no risk of kickback; you can let the timber sit there, with the blade running, as you drive the wedge(s) in.

3948497398_79fbb15c76.jpg


This is how it worked out in the end, taking four legs from a 2m long length. You can see I've still got enough spare for two more legs, should the unthinkable happen. :wink: I had to waste 400mm off the end as this was split quite severely (it 'fell apart' as I the saw broke through).

3948497664_78479f0c17.jpg


Although I've forgotten to take a photo' here, all the frame components are now stacked up indoors, ready to sit for a couple of weeks. Even the 1in. boards feel damper than the oak I bought. I may cut a piece off and take it in to college to check the moisture content, nearer the time. For now, I'm having to work within a space that'll certainly compete with wizer's workshop for timber content!! :D

3948497320_cae3f89e4a.jpg


Most of that is waiting to be downsized in to boards for the top at a later date. Somewhere in behind this lot is my offcuts storage bin, based on a design by Ralph Laughton.

3948497926_f367b4a142.jpg


This winter, if it's too cold to make furniture then I may have to start getting serious about 'round spinning things'.... :shock:

3947715469_eefd163cd9.jpg


Yes, this is getting ridiculous now! :oops: :wink: Even my dog, who seems to love the taste of oak shavings, is getting sick of the sight of all that beech! (Of course, none of these photos show you what I've got stashed away indoors!! :roll:)

3947715363_9882abc26b.jpg


All waney-edged offcuts have been through the bandsaw [I think the correct term now may be 'Robbed'? :D] and I'm left with some reasonable lumps which I am going to try and sell locally. Normally, I'd give this stuff away but these 2in. chumps should burn much better than the 1in. boards I most commonly work with. 8)

3948497242_ac4b446214.jpg


So far, I seem to have documented an awful lot about, well, almost nothing really! I apologise to those who are awaiting full progress to begin although, I anticipate that you will be waiting a few more weeks yet. :( This weekend then (college tomorrow and Friday), I'll get a mock-up done and we'll see how things move on from there (this has made me realise I'll need to purchase a new trimming cutter from Wealden though! :roll:) :)
 
Don't worry Olly, I enjoy a good prevarication as much as the next man, half the fun of this is being stood in the garage with a cuppa with a thousand yard stare pondering things.

At least you've got started now so you should have some machined components ready for jointing soon.

With regards to your offcuts for the fire, that equates to about a dustbin worth which my local place will charge you 6 quid for. If it were me I'd try and exchange for beer, but you don't drink beer
 
Yesterday, I finished spraying my first mock-up leg design a lovely white colour. Mainly to disguise to knotty, pine grain so we can focus on the shape. This first shot shows the rail (biscuit-jointed, for ease!) finishing flush with the outer face.

3965230311_51c5f9a926.jpg


In this next shot, you can see the rail is set back about 6mm from the outer face. What you cannot tell from these mock-ups is that my rails will have a very slight curve to their lower edge (provided I stick with this curved leg idea, anyway).

3965230135_ff1c990cbe.jpg


It is quite like a cabriole leg except, this has been (and will only be) shaped on the two inner faces. I spent some time looking at it before I glued the rails on and I don't think it would work with the curves reversed (ie. on the outer faces).

I would appreciate some feedback from other members of the forum on this (excluding the Judges, of course! :wink:). The curve starts about halfway up, here. On my next one, I may start it lower (either one-third or one-quarter up from the bottom) to retain some of the thickness lower down. I do not think that round over on the outermost arris should be increased at all. I could also reduce the rail width from 100mm down to 90mm. They may not need to be so wide, if the legs are going to be shaped.

For those interested, this is the old pine table my design will (eventually!) be replacing and you can also see the corner space I am partially restricted to. I think it measures 1200mm x 800mm and it does not extend.

3965230075_d26178df56.jpg


...Yeah, my dog's a bit of a photo' wh**e at the minute; sneaking in to the background of everything I do right now! (No, actually, that's foreground, isn't it - and she usually hates being photographed!!) :D

One other reason we decided on beech [not only because it's "a light wood", to quote my mother] is because we were given two of these chairs not long ago. I think they came from a charity shop or jumble sale, or something. Yep, you guessed it; just the two for now... Though, now armed with a woodturning lathe, I'm guessing someone :whistle: will be asked to make two more at a later date...! :roll: :)

3965230235_a8ae134e67.jpg
 
I think the leg looks good Olly, the curve has an elegance to it whilst still remaining sturdy, will go well with a curved rail too
 
Yes, I really should alter the title of this thread, shouldn't I... :shock: You don't need me to tell you now that I won't be anywhere near finished by midnight! :oops:

As promised though, I will keep this thread going and will keep you all informed of progress! :)

Today, having dragged the chest of drawers in to the house to clear some space for wood-machining (and to keep it clean!), I set about reducing the large quantity of 2in. thick beech which has slowly taken over my workshop in the last month or so... :? Out came the Hitachi circular saw and I made a start on the biggest b****r of all, which alone gave me six of the required nineteen lengths of 900mm x 110x50mm sawn. 8)

4060516205_8f5078e011.jpg


(Don't worry, I aim to have a new workshop vacuum in my possesion fairly soon!! :oops:)

Much to my surprise, there was minimal tension in all of this beech. A couple of the 6ft lengths 'pinched' right at the very end of the cut (and, I mean, very end!). It was enough to almost stall the saw. Driving a small wedge in to the kerf was enough to complete the cut! :)

Fear arose in my mind some time later when I noticed these bore holes :shock: - there are three in this photo and you can probably just make out the last one.

4060515707_9712f340ae.jpg


This is actually something I noticed on the 21in. I showed you earlier. What was very strange is that these were near the centre of the board, in the heartwood... :? I've written off woodworm because they generally attack sapwood in greater numbers... I guess it's some kind of beetle? Even so, they must be bloody tough to get in to the heart like this! :shock: Any thoughts, anyone?

For peace of mind, I've put this length to one side and cut out a replacement. I couldn't find one bore hole on any of the other lengths, even after skimming them through the thicknesser.

Now, all the 2in. boards I've machined today will be for the top. Another good reason getting this done now is because I need to replace a couple of lengths I'd previously roughed out for the side rails, because of the sapwood content. To be honest, it was something I noticed weeks ago but, with two other jobs to finish first, I couldn't be bothered to do anything about it. :roll:

4061258520_d8b8e41fea.jpg


I barely bought enough 1in. boards to begin with so, I had to deep-rip a couple of 2in. lengths to get what I now required. There was a bit of tension along the way but, they didn't split dramatically at the end of the cut, which is a problem I've experienced previously with 3in. beech.

4060515887_5b7598dd7a.jpg


(You should just be able to make out the 'hollow' in the middle, while the ends are just touching.)

Each board was averaging 55mm/56mm thick. Previously, I was looking for a 38mm finish but, seeing as these have been sawn so generously over sized (as they often are), I'll be looking for 45mm/1¾in.

4060516299_b9866d478e.jpg


I'll try to leave them like this in the workshop for a few days, while the weather's kind, just in case the worst does happen [splits, cracks, checks!!]. At least this way, I shouldn't have to lug them all outside again and there's a reduced risk of them being 'cooked' by the central heating (bloody mothers, eh! They don't know what real cold is!! :D)

Before you go, I noticed this on one of the boards (it was evident while the board was still sawn)...

4060515977_f8743c1446.jpg


Anyone know what it is? Is it some kind of staining? I've not seen this in beech before and it's the only board I have like it. You can see how shallow it is. Chances are that, by the time I've finished preparing it in a few weeks, it will have disappeared anyway! :D But still, I'm interested to find out. :)

Half a days work with power tools and a lot of sweeping up later and I still have a considerable amount of beech left over... :roll:

4060515809_d1d8b24370.jpg


:D

Hopefully, I'll be making a proper start on this table a fortnight from now (once those freshly sawn rails have had some time to settle). In the mean time, I'll try to get some general bits and pieces around the workshop sorted and may even make some progress on a couple of small items for an exhibition next year... :wink:
 
So many photos, so many words and, yet, I still haven't started this... :oops:

Maybe the week after next. Slight issues in getting the mortiser set up properly have delayed things a little and I'm likely to be busy doing other things, running people around next week. :(

While I should be focusing on my approach to constructing the frame right now, I have to admit, I haven't been happy with the appearance of the top or the overall length of the piece. Suddenly, yesterday, I was hit by a glimpse of inspiration and came up with the following idea:

4091188964_0d3b115472.jpg


Actually, one of Alan Peters' pieces has a similar looking top to it (with sharper corners, I think?). It is probably from reading his book a few weeks ago that my brain has now decided that image is of some relevance today. :roll:

4090421765_a9d72d0039.jpg


I may widen the top slightly but, I quite like it. It is different to what's already there, which is very important to me (though, I still haven't cleared this with mother... :?). Plus, it should offer a little more support and comfort at the corners. I've also reduced the length to absolute minimum seating requirements, which would better suit the limited space we have (see previous post above). My SketchUp drawing alsotells me that the mechanism should still work okay. 8)

I can't think of how would round-over the edges just yet but, I do feel it is crucial on a top of this thickness for comfort (and, also, because of all the other curves elsewhere). As I'll no longer require all nineteen of those lengths I cut earlier, I could machine up a spare piece for trial and error (I was thinking of a large radius on top, small on the bottom...).

I'm open to all comments on this so far. :)
 
Hi Olly,
Don't want to comment on the actual design, as your mother is obviously having an input ( call it learning by experience :roll: !!), but I do enjoy reading your account, and hope you continue to show us all how the project is progressing.

Malc :D
 
I played with all sorts of shapes like that before I settled on a simple square edge :)

Hope mum doesn't have to move this table as that thick top is going to make it a heavy table. Mine has 25mm top and leaves but is still pretty weighty.

Watching with interest....
 
Seeing how the weather's being kind at the minute (temperature-wise!) and I'd like to get this job finished in time for Christmas, I made a start on this table in the workshop today.

...Actually, make it half-of-today - I spent most of the morning dithering about on SketchUp, trying to decide (last-minute!) whether or not I've actually got enough room for the mechanism to work since altering the shape of the top... We might find out in a couple of weeks! :wink:

From my "wood store" (bedroom!!), I dug out all the components for the frame that I had previously roughed out. You may recall that I decided to cut two new side rails because of sapwood in the old ones and, that the replacements had to be deep-ripped from 2in. beech... Well, when I got my tape measure out, I realised I had foolishly cut these to 900mm long - the frame is going to be 1m long, which means I'd only have tenons approximately 30mm long!! :x So, I was back to using what I had prepared previously. :oops:

First stop was the planer/thicknesser. This next shot shows my current method of keeping the blasted hose clear of timber exiting my thicknesser - a length of yellow pine balanced on top of my bobbin sander while wedged between the blocks of my wall... Well, it works! :D

4110083794_88b0fb2e69.jpg


If only I could say the same for the dust extraction - as Mark (TrimTheKing) said in another thread, it really is s***e on this machine! This lot was left to clean up once I'd finished preparing the legs, rails, stretchers and runners. :x

4109320677_3e821f1916.jpg


My new vacuum extractor received a good workout today and cooperated reasonably well with my bandsaw and sliding mitre saw. One thing I don't like about the Nilfisk is that the motor switches off as soon as you switch off your tool or machine. With other models (including the RSDE2-A I owned previously), they'll run on for an extra ten-seconds to clear any straggling particles. A little disappointment but, overall, I'm still very happy with this purchase. :)

After several months of using power tools [not machinery!] without dust extraction, this is what my Trend AirAce was looking like, inside! :shock: (Yep, long overdue a filter swap...)

4109320795_c1ce6e44fd.jpg


For the very first time, my new~old mortiser got a proper workout. It still needs a little tweaking to get the vertical headstock travel working smoothly but, I cannot fault the performance. I can't believe I put up with my old Fox machine for so long! 8)

4110084110_45bacdd0a5.jpg


And, to finish off for to-half-day, cleaning up the mortises by hand. Actually, where I was worried about not being able to fine-adjust the back fence on my mortiser, it's not actually that difficult. If I fit a wide face to the screw-clamp then and lightly nip up the securing bolts, I can use the thread to fine adjust in one direction.

4110083906_a939819a5b.jpg


I've chopped these mortises with a ½in. Japanese chisel. I would've normally gone for 3/8in. in this situation (22mm rails) but, I gave that cheap one away with the Fox machine it came with. I also wanted to keep a good 12mm of timber on the outer face of each leg, for strength so, it looks like I'll be cutting bare-faced tenons on the rails, which should also save me a bit of time on the router table. :wink:

So, tomorrow...

I've got these tenons to cut on my router table and then I've got to do a dry-assembly of the frame before I can look at adding the two stretchers with sliding dovetails... If I can manage all that then, I also need to order a new trimming cutter from Wealden so that I can (hopefully) get some shaping done on Wednesday/the weekend.

I'm really gutted I couldn't get this started in time for the competition but, at the same time, it's a relief not to have that kind of pressure hanging over me. :)
 
Another late start today. :roll: At least, this time, I was able to get out there before lunch time! Started with the bare-faced tenons, which didn't take all that long on the router table using Steve Maskery's jig (you know what it is; you don't need to see another photo! :wink:). I really must look at a why to utilise my 50mm Wealden Tenon Cutter for this, as it's currently too 'short' for use with an 18mm thick jig...

I'd like to have a little moan about my mitre saw station, if that's okay... While I'm fairly pleased with how it turned out (only built it last year!), having to lift these great tables up and down is a real pain in my small workshop and I'm considering alternate solutions, seeing as I'm stuck with a mitre saw for the time being (until I can afford a table saw). While studying the last issue of British Woodworking closely, I noticed Steve adds a long fence but then uses only a roller stand for support... I was about to sell my two but, I think this setup would work very well for me, for the time being.

4112757081_c7951f91ab.jpg


Haunches were cut and widths trimmed on the bandsaw. Following that, I put a 45° mitre on each end using my disc sander. You can probably see that beech burns quite easily though, I am a little aggressive with these things... :roll:

4112757155_730575ccc9.jpg


I was thinking about doing an interlocking tenon but, wasn't sure how that would or would not work with a haunched tenon. Actually, I'm now thinking of draw-boring these tenons, as they're only bare-faced and I have plenty of beech dowelling left over from my 'bench build over the summer.

Here, are the completed tenons:

4113525712_f45a0e505f.jpg


Next, my thoughts turned to the sliding dovetail housings which would connect the stretchers to the long side rails. Before I set my router up though, I decided to sand the inner faces to 120g, so I didn't risk exposing the joint later. If it was anything other than beech, I'd have quite happily used a hand plane!! :D

Fortunately, I have a dead-handy set of matched dovetail and straight cutters from Dakotaland (Rutlands :wink:). They've been in my 'shop for a few years so, it was about time I got them dirty!

4113525644_c8f04702b4.jpg


On eBay, recently, I've been hunting for a DW621 router with a ¼in. collet but, people keep out-bidding me by £2! :x That would've been dead-handy, here. I could've kept each router set up with a different cutter and cut the grooves without having to rest the jig (...just a scrap of 12mm MDF).

4112756515_e5bb9a55f8.jpg


...If that didn't make a lot of sense, I should explain; in order to save my dovetail cutter, I 'hogged' most of the waste out of each groove first with a straight cutter. This next photo should tell you all you need to know.

4113525788_a4d48157f0.jpg


A good workout for this little cutter. Shame about the paint work! :)

4112756831_2985979832.jpg


Now, there are two things wrong in this next photo... You can see the gaping hole where I over cut the depth on my haunch... Can you spot the other one?...

4112756903_429c03df30.jpg


This was at the beginning of my first dry-run and I only noticed this looking at the photo just now...

Okay! I've put the wrong rail in the wrong mortise! Look at the tenon shoulder - it should be closer to the outside of the leg! :oops: Don't worry though, it is only the image that is wrong. I know that all my rails and tenons are correct. 8)

Here's the frame going together before any shaping. This gave me an opportunity to take the shoulder lengths for the stretcher rails. I know, they do look very close to the ends of the frame and you may think this allows little room for the runners. Well, I decided to widen the top anyway with the redesign, which has given me an extra 50mm underneath (that equates to about 32mm either side of the central leaf in its resting position, between the runners).

4112756983_070cb4d9c3.jpg


Looks like another half-day for tomorrow and I probably won't get any shaping done until the weekend, now. :( These stretchers should be pretty straight-forward and I'd like to get the notches done as well (for the runners, which will be 'dovetailed' in cross-section!).

Do I cut the grooves first or bevel the edges on the runners? :)
 
Have you every tried hand-planing beech yourself?! :D

No, seriously... It is hard work. Certainly not as easy as planing oak or one of many other hardwoods. Plus, I haven't used my planes properly for a few weeks and all the blades either need sharpening or (in some cases) regrinding - I just couldn't be bothered at the time and wanted to get the job done! :roll: I don't like regrinding either so, I try to wait until I have a batch of irons ready to go!

Saying that, I sold my bench grinder a while back and I still haven't bought a replacement - not sure how I would manage that either... :? :wink:
 
OPJ":2an9z3e8 said:
Have you every tried hand-planing beech yourself?! :D

Yep, am doing on my current project. Not just finishing it, but dimensioning it from sawn :) The planes do have to be sharp though, and it is slow going. I think you could describe my pace of work as 'meditative' rather than 'speedy'.
 
Another brilliant build thats a pleasure to read olly. Thanks for putting it all up again.
 
bodgermatic":1zl85i69 said:
Yep, am doing on my current project. Not just finishing it, but dimensioning it from sawn :) The planes do have to be sharp though, and it is slow going. I think you could describe my pace of work as 'meditative' rather than 'speedy'.

In which case, I take my hat off to you!! :shock: It would be good too, if you could upload some photos to the forum, as work progresses... :wink:

Thanks, Chems. Today's update to follow shortly, once I've sorted out my photos...
 
Sliding dovetails - what's all the fuss about?! 8)

Okay so, it took me an age to get the fence set just right for the perfect fitting joint but, after that, it was a breeze! I actually made this jig about a year ago for a different job I've actually yet to finish... :oops: No need to clamp the timber in place and the back fence means I can attach a false fence in future without breakout. :wink:

4114814069_8102c003ba.jpg


I now suspect my thicknesser is also producing boards which are very slightly tapered along their length... I ran each face of these boards against the router fence twice to make sure I got an accurate cut. Yet, on both stretchers, the joint fits snugly at one end and a little bit loose at the other! :roll: :duno:

I then trimmed the waste off by hand.

4114813907_00666c5050.jpg


My next task was to look at cutting the dovetail-shaped notches in each rail for the dovetail-shaped runners. Before I go any further, you can probably look at the next photo and see that I'm heading towards trouble...

4115584200_8b4659cde0.jpg


These were also chopped out by hand. I think the fact that I over cut one of my lines here shows that... :oops:

4115584350_aa03fc25fc.jpg


...The inevitable happened when I started hammering ["malleting", actually! :D] away with my chisels. Months ago, when I first started planning this, I had anticipated this and decided at the time that I would not cut the haunches and would leave the tenons almost "American"... Somehow, I completely forgot about this until this morning! :x

4115584442_0f63e0d8ea.jpg


What I'll do now is to cut all these bits off and plug the haunches. I think this makes my case for draw-boring these joints even stronger!! :)

As darkness, my bandsaw was screeching away to the tune of dovetail-shaped runners. The 6tpi blade I fit for shaping all these components (my next job!) didn't enjoy the ride but, I did leave enough on to plane them back by hand for a 'perfect' fit! :)

4115584040_2b5d0e4e4d.jpg


So, that's most of the under frame done, now. I'll start shaping over the weekend after I've made some final decisions although, I really don't know how much time I'll get on this next week... :? There are also pivot blocks and things to consider, which can all be added later. Actually, it's probably best that I size up the top before I do any of that, just in case my finished thickness differs from the current specification.

Not forgetting the daunting thought of all that sanding! :( I'm currently thinking of trying Osmo's Worktop Oil for the top. I do have some Polyx oil left over from last year, which will probably get used on the frame. It's best to use up oil finishes ASAP as they don't last forever in the tin. Don't think I've got enough to do the top so, it looks like I'll have to place an order with Rutlands :?, unless anyone can suggest an alternative supplier? (The temptation to add a WorkSharp 3000 to that basket will be immense! :p)
 
Looking good Ollie.

Just slip the worksharp in. They are the business. You may as well get a Domino whilst you at it...
 
Thanks, Mattty. :)

I may have found a buyer for a load of stuff I'm selling on eBay. If that goes for the right price then, it would almost pay for two WorkSharp grinders! 8)

Don't mention the Domino!! :shock: With one of those, I could have totally avoid this mess with the haunches! :roll: Sadly, they're way out of my budget right now. Maybe in a couple of years, if I can get my head straight and get a business off the ground... There's no doubt in mind that I would greatly reap the benefits in owning one.
 
Back
Top