Extending 'Flip-Top' Dining Table - Finished!!

UKworkshop.co.uk

Help Support UKworkshop.co.uk:

This site may earn a commission from merchant affiliate links, including eBay, Amazon, and others.
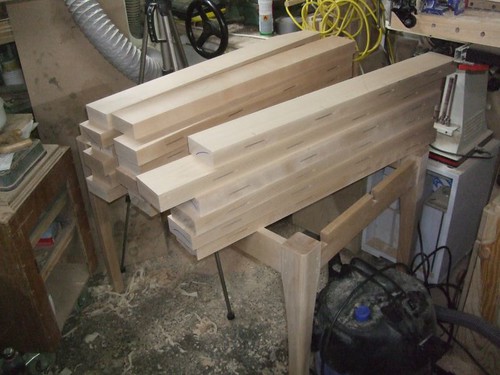
This weekend, I haven't spent much time out in the workshop at all although, I have made some progress on the shaping of the legs and rails.

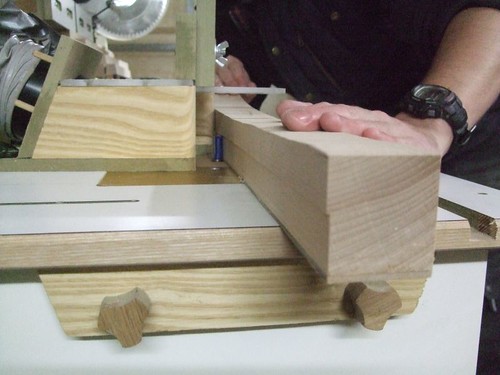
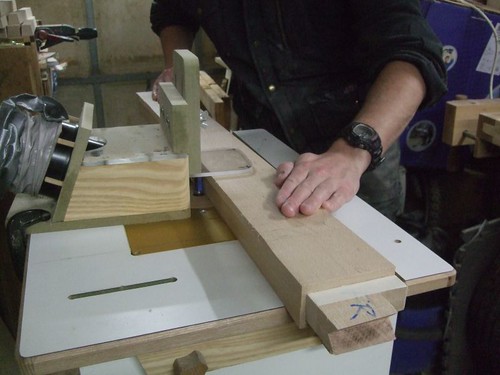
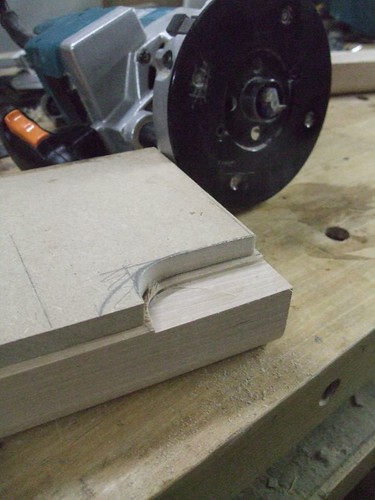
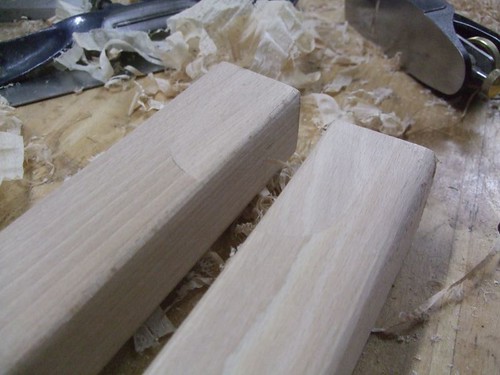
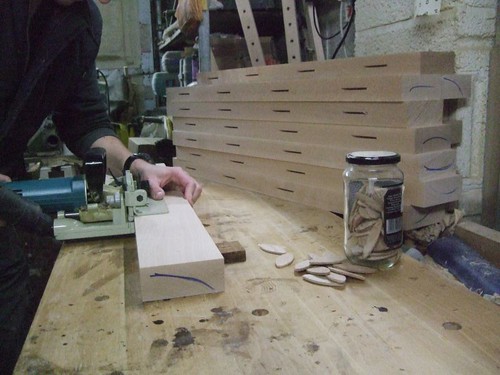
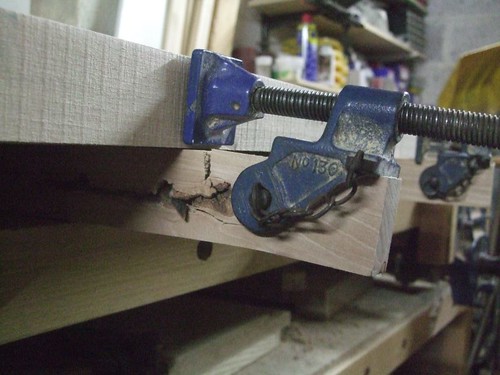
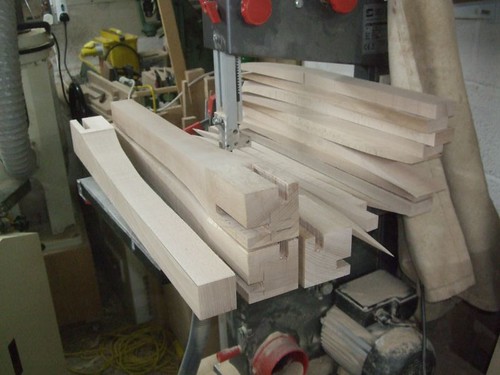
After marking out with my template, I started cutting the legs on the bandsaw. You have to approach these as if you are cutting a cabriole leg. Once the first cut is done, you need to re-attach the offcuts so the piece is fully supported while you cut.

4125480272_cb435a61be.jpg


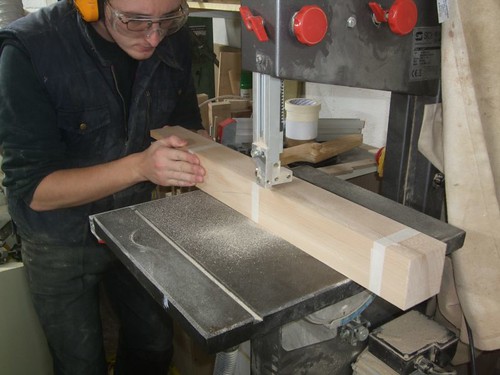
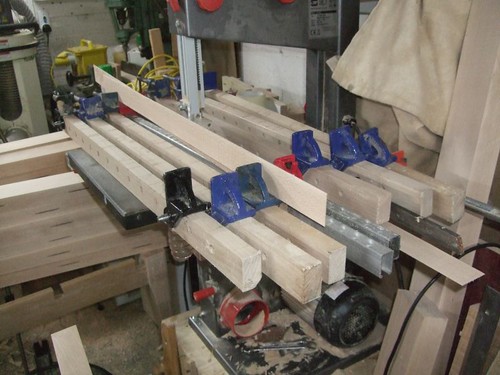
Even after purchasing a new vacuum extractor recently, I could see the dust raining out of the left-hand side of my saw as I cut! You can see where the mounds of it have built up, just below the bottom door. This was never an issue with the type of extraction I was using; it's in the design of this type of saw, where there's no room to get a hose under the table to extractor at source so, it ends up going round with the blade. Must look up Boz's solution again... :wink:

4124711615_e6302ab707.jpg


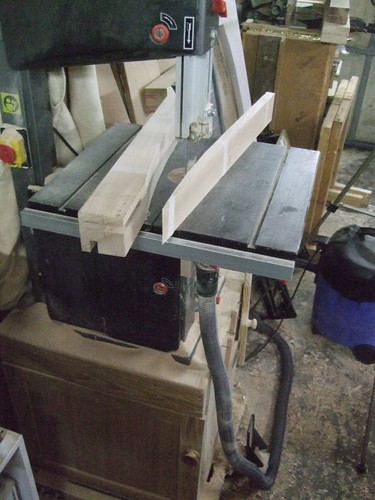
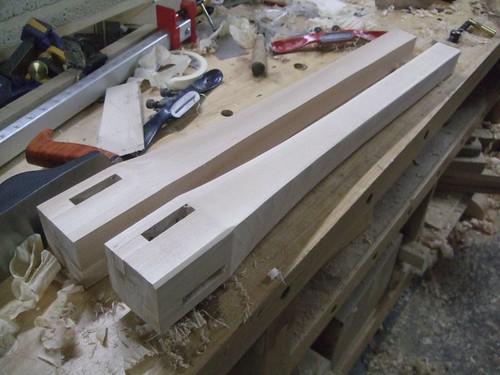
There's quite a lot of waste involved here, which either means I bin the lot or, add to growing collections of "usable" offcuts... Well, I can still get decent lengths of 400 x 50 x 21 (sawn) from this lot so, on the pile they go! :roll: :D

4125480636_fce9221b13.jpg


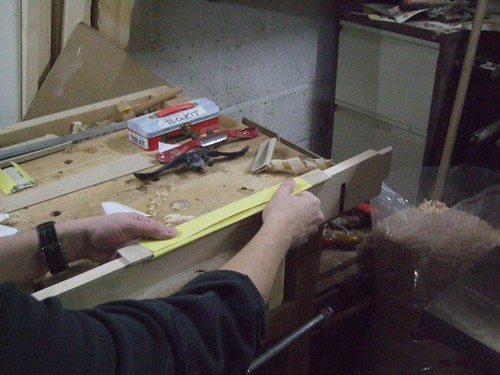
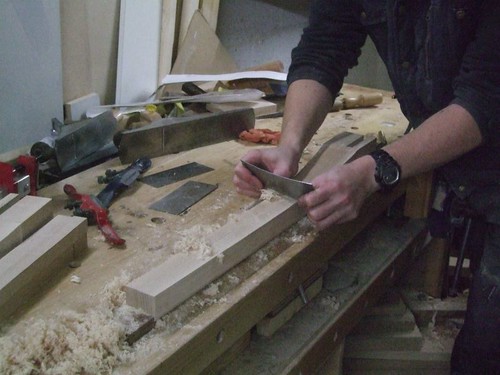
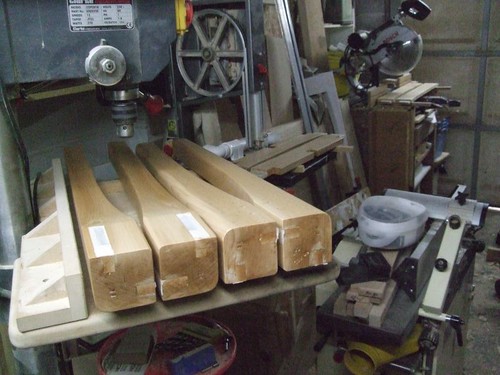
After all that sawing, I dragged my bobbin sander out before I looked at my spokeshaves. That 3/8"x6tpi blade I was using is on its last legs and, although I don't claim to be a 'master' at the bandsaw, the cuts were going all over the place. That's why I'm using this sander. Not to finish to the line as it requires a great amount of skill to get a consistent curve with these things! But, to remove the bulk of the waste for 'shaving later.

4124711729_0034facbd5.jpg


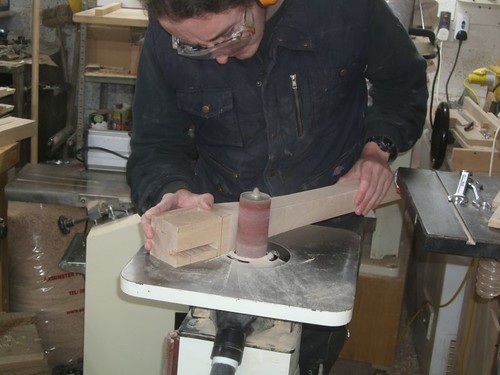
The sleeves that came fitted with these bobbins must be at least 120g as I find they're too fine for bulk material removal. I must invest in some coarse abrasives! Still, I spent a good twenty-minutes on this with the vacuum going and it didn't even get hot. 8)

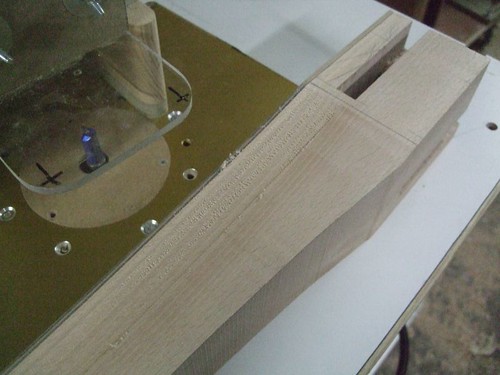
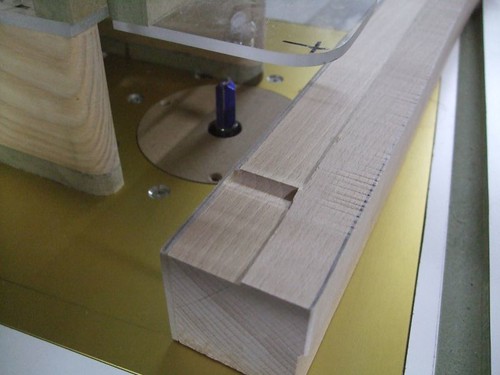
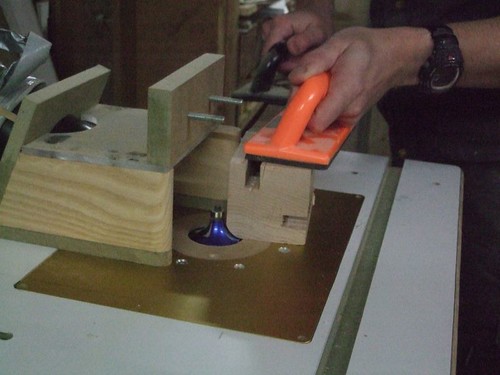
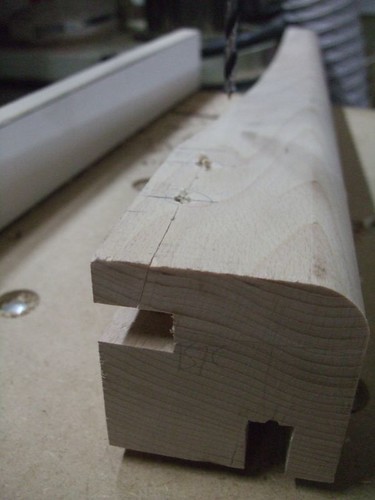
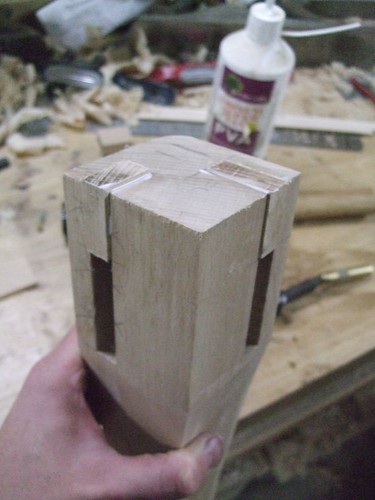
Now, I've got to decided on my next move... The plan is to clean up one of each rail, stick the other one to it (with double-sided tape) and use that as a 'template' for a router cutter. This won't work on the legs because my longest trimming cutter is about 25mm so, I'd still have plenty to clean up by hand.

I might have to give Ray Iles a call in the morning and see where he's at with this thicker spokeshave blades I enquired about a month ago... The current blade in my old A151 'shaves will cut it but, it's difficult trying to avoid chatter.

Whatever happens, I'm sure I'll figure something out! :wink: Trouble is, I won't have much time on this in the coming week. :(
 
Progress is looking good olly.

About the template routing of the legs. Could you do what you are saying, get most of the depth with your top bearing guided router then switch to a bottom bearing guided flush router, flip the leg over and have the bearing travel on the previously routed surface. I imagine it will be a lot quicker and better finish than having to smooth them in by hand?
 
Good work Olly, more ideas for me on the bandsaw :)

Ref the dust extraction, it's now 4 months since I added the custom feed to mine, and I've only once opened the bandsaw door to vacuum out the interior. Very little there, just some small piles of dust in the corners :). I don't use it as much as you, but I think if you can get some sort of extraction around the blade above the guides it will help you significantly. But it will take a bit of thought and perhaps a visit to the plumbing shelves in a DIY Shed to work out how best to do it for your particular bandsaw :twisted:

Boz
 
Chems, while that will work with the top bearing-guided cutter, if I then flip the leg over, it will be resting on the curved face. :? So, I will still have a bit of bobbin sanding and 'shaving to do afterwards. That's what I will do today, though. I did look at buying a longer cutter but, for £30, I can't justify it right now.

Boz, when I get a chance (probably when after I finish this build), I will look doing something very similar to your solution. My current set up doesn't help a lot and I still find piles of dust built up inside the cabinet as well. :x Enclosing the blade (as DC did) seems to be the way to go. If only these smaller saws had more clearance below the table...
 
Good job Olly - it's looking great.

I had a similar problem with my Axminster bandsaw, and I came up with a slightly more Heath Robinson solution than boz.

The access under the table is really limited, so I took some flexible 32mm hoover hose, cut a v into the end, then bolted it to the underside of the throat plate. It's not perfect, but it's quick and easy and I reckon it's cut down the dust by at least 50%.

One of these days when I sort out my HVLP, I'll add collection above the blade too. HTH.


Cheers
-Tom
 
Feeling a bit better today than I have been of late, I set the router table up with a bearing-guided cutter to trim most of the waste away from these legs.

4128985520_723615eace.jpg


As you can see, it does leave approximately half of the leg thickness (at the narrow end) still to be planed away.

On each leg, I had one cut going with the grain, another going against (that's why I did so much work on the bobbin sander; to leave as little material on as possible). This minimal amount of tearout was unavoidable though.

4128215707_a329d002bb.jpg


In fact, it got much worse than that, when I let the leg 'tip' as I was running it against the bearing...

4128985736_edbe0220a9.jpg


Not only did this pipper the penultimate leg but, it also left a permanent 'scar' on my template - meaning I forgot about it and let the cutter dig in again on the second cut of the last leg! :x

At this point, I'd appreciate some advice on how to fix this.... Router was the first thought I had but then, this is on the curved face of the leg. Another thought was the biscuit-jointer, to create a recess and fill it in after... Getting a good grain match is going to be very important, though.

My two old spokeshaves didn't perform quite as badly as I had feared, once the blades had been sharpened. Still, I took a tip from The Wood Whisperer himself to even things out - wrapping a sheet of abrasive around a flexible bit of scrap (in this case, 4mm MDF).

4128984674_e0e601a0b8.jpg


Once I had one of each rail shaped, I taped each one to its pair and ran them against the same bearing-guided cutter. Again, the cutter wasn't quite long enough to do this in one pass.

4128984796_b39e4ee12b.jpg


Before storing the router table away, I fitted it with a 5/8in. roundover bit to finish off the outer corners (arrises) of each leg.

4128985004_4b3fc381c0.jpg


Then, it was back to the 'bench to start cleaning them up properly. I sharpened my scrapers up and found they cut the beech with greater ease than my round-bottomed spokeshave.

4128985090_de9f3e26c8.jpg


I've also decided to drill the legs with a 6mm bit for a pair of draw-boring dowels to be fitted later.

4128215457_5d668e5eb2.jpg


Unfrotunately, one the legs had begun to split here, as you can see. I did manage to squeeze some five-minute PVA in to the crack before filling the haunches I needn't have bothered cutting - it'll be fine. :)

4128985404_7d84407ca4.jpg


Another thing I should point out is that I've had to trim about 5mm off the width of each stretcher, now that I've curved the outer rails. This was something I foresaw at the design stage. But, when I came to prepare my timber last week, I had to take a couple of boards down to 95mm from 100mm and so, I've also lost 5mm... This will probably mean I have to reduce the intended finished thickness of my top from 45mm. But, it shouldn't be more than a couple of millimetres.

4128214945_efd8c8b52d.jpg


So, yes, if you've got any ideas as to how I can 'repair' those legs then, please, leave a message!
 
Good timing. I need to do some "curved sanding" today and was wondering how to do it. The MDF trick is ideal. Thankyou :D

Boz
 
After lunch, I made a start on the 'repairs' to the two legs I routed a gouge out of yesterday. Each gouge was only about 2mm deep. I was hoping I'd be able to use my biscuit jointer but, the blade wouldn't protrude far enough to cover the 25mm cutter's mark. So, instead, I made a dead-simple MDF template for my router to follow with a guide bush.

4131783116_cbce938491.jpg


After lots of shaping by hand, I had two bits of scrap cut to a reasonable fit. With the first pair I made, I tried disc sanding them but, that removed too much material too quickly and, I had to cut another pair!

4131019671_d7b50e1f3f.jpg


Unfortunately, the next two I cut didn't match the grain quite as well as the first pair; despite coming from the same scrap piece, which was previously sawn from the 70mm leg when I began shaping. :roll:

4131019467_be3325bd58.jpg


Oh, well. No-one will ever notice it and, with a bit of sawdust and plenty of oil (maybe even some wax, if necessary), those gaps will disappear in no time! :wink:

The rest of this afternoon was spent shaping and tidying up all four faces. It's not easy to photograph at this point but, I've now removed the sharp corners from the other three arrises and have replaced them with a graduated or tapered round-over; something that starts thicker at the bottom of the leg (approx. 6mm radius), thinning almost to a point near the top.

4131019749_6d7e90a4af.jpg


With a little more sanding on these legs and the rails, they should all be ready for their first coat of oil, some time tomorrow.

I'm going to go ahead and use up some of my left over Osmo Polyx oil. I should also mention that I've also ordered some worktop oil for the top from Smith & Roger. Yes, another Rutlands order evaded (sorry, Mattty, no Work Sharp 3000 just yet :()! In case you missed the advert in the last issue of British Woodworking, they're giving away a free tin of wax with every online order this month - apparently, I was the first to mention it! :shock:

I was a bit shocked when I saw the £6.50 delivery charge at the checkout but, it is free when you spend over £60. They appear to stock a good range of finishes and their prices look competitive (against Axminster and co.) if you're looking to buy in bulk (I'm thinking I might try them next time I need to spray some lacquer or similar).
 
Looking good mate, i like the nifty little repair idea, I'll try and remember that one.
 
Brilliant repair Olly, I read your thread yesterday and the only thing I could think of to make it right was start again and I knew you didn't want to hear that!

Looking good again, will be another brilliant piece!
 
Not much of an update for today as I've had to halt production while I wait for this oil to dry (if mum wasn't hope today, I'd have finished this in the kitchen!! :twisted:). :(

I've gone with Osmo Polyx (matt finish) and will do a quick test of the worktop oil to compare, once that arrives. As you can see, finishing takes up a huge amount of space in my workshop. Osmo say eight-to-ten hours... The temperature today seemed to drop suddenly at 3pm - I could see it taking even longer to dry.

4134158080_bf974bb47e.jpg


Over the course of the weekend, I'll get the main frame glued up in time to start working on the top on Monday - there's an awful lot of wood to prepare and I think my neighbours would appreciate a little quiet before I start! :oops:

I may attach the stretchers later, once I've got the top thicknessed. Without it, I don't think I could accurately position the pivot pins in to the stretchers.
 
I've only ever used the Fiddes Hard Wax Oil (Axminster do it) - that has "4-6" hours for recoat. I regularly do two coats and buff it afterwards in a day, even in a colder workshop. Just a thought when you run out of PolyX :)

Boz
 
This morning, I finished assembling the frame... At least, for now - I will be adding stretcher rails and pivot blocks later, once I've sorted it all out. The heater was left in place to 'radiate' some heat and help the glue to cure properly in this cold weather (it was a bit big to drag indoors). After a couple of hours, I was pleased to see it had dried clear. 8)

4144156875_a8ecf24348.jpg


Next time I do any draw-boring, I certainly won't be using 6mm dowels - these ones didn't take much of a beating before they snapped. :? Normally, you'd be able to remove the cramps in this situation. But, as only half of my dowels went all the way in, I decided to play it safe. As they were only 30mm long (identical to the depth of the holes I drilled), I've also have to drill them out a little bit and insert even shorter dowels, so they finish flush with the surface... Why didn't I just use 8mm?! :roll:

4144156741_d7f563830e.jpg


I am pleased with how much the Polyx Oil has not darkened this beech. You can probably just see how this is notably lighter than my workbench, which was finished with Danish oil (the legs from this table were cut from the same stock). My order from Smith & Roger came on Thursday or Friday and, after doing a quick test, their worktop oil doesn't seem to darken beech any more so than Osmo's hardwax oil. :)

I'm not going to get much time on this tomorrow but, I hope to start working my planer/thicknesser with all that beech for the top on Tuesday. The finished thickness will definitely be closer to 38mm now, which is going to require a lot of work, considering the sawn boards are currently about 52! :? I'd forgotten to allow the pivot blocks and, anyway, I think it will looking better in proportion with the frame - which I quite like the look of, I must say! :)
 
For various reasons, I've barely been able to get any work done on this table in the last week. Today though, I was able to get all the timber prepared for the top and finished the day with the two main leaves glued up in the cramps.

Things haven't quite been going my way, lately. It started at the weekend, when I fiddling with my planer thicknesser and the emergency stop button fell off! :roll:

4166328483_b19f22ab67.jpg


I was actually trying to shim the thicknessing bed so that it is level with the cutter block. Actually, all I've done is put it out by 0.5mm the other way!! :oops:

Back on the workbench, I was trying to reassemble my Veritas Wonder Dog with a new circlip to replace the one that went AWOL some time ago. I almost had it in place when, suddenly, I slipped and everything flew off the bench! It took me about ten-minutes of digging through shavings all around the bench before I realised where the head was hiding...

4166327835_f1313b6137.jpg


:oops:

Back to the table and with my thicknesser still cutting slightly out of square, I left an extra 1mm on the width and 're-jointed' each board on the planer afterwards. As I don't have a lot of joy hand-planing 42mm thick beech, I used the trick of 'pushing down hard over the cutter block' to create a slight hollow on each length. Then, it was time to cut some biscuits. I'm still impressed with the low-working noise of my new vacuum. It was the biscuit jointer making all the noise today! :wink:

4167087944_b5377914ed.jpg


Before the final assembly, I got all my sash cramps set up on the bandsaw table...

4167088280_67bcc66425.jpg


...With all the board stacked on top of the table frame. At least this shows how the frame is built to last! ...It needs to be, considering the weight of all these boards, even with the cramps of!! :wink:

4167088186_abe4347278.jpg


Hardest part was actually dragging them indoors, a little while ago. I know the cramps add some weight but, bloody hell!! :shock: I ran out of glue (and sash cramps!) or else I would have done the central leaf as well.

4167087688_ede2b702af.jpg


I'm still hoping to get this done in time for Christmas, which only leaves me with a couple of weeks... :? At least the temperatures seems to be holding up outside. I ordered some soss hinges from Isaac Lord last Monday but they didn't arrive with the rest of my order on Friday! :x I'll have to photograph this again but I was disappointed to find some of the boards had split or cracked quite badly in the time they spent indoors. Some of it I'll be able to cut out, others can go on the underside as they're not that deep. I'm sure I cut this wood up too quickly (again!) so, I doubt I'll be using locally-grown beech again in a hurry!! :D
 
Yesterday afternoon, I finished gluing up the last of the three leaves. I was right to drag each assembly indoors for the glue to cure overnight. This first photo shows the left over cascamite, after twenty-four in a winter workshop! :?

4171624097_49cf081d3b.jpg


Looking at it this morning though, it has at last gone rock-hard.

As I was tightening the sash cramps on that last leaf, there was a huge BANG! as I was doing up the last cramp...

4172379078_efa3d37ba7.jpg


:shock:

I kind of new this might happen one day so, fortunately, I had a spare one ready to go! 8)

In other good news, I found a Bristol-based buyer for my bags of wood shavings. After a thirty-minute drive in the dark and the rain [barely a single street light for twenty-five minutes - if the government are serious about losing more of these then, heck, I'll lead a protest against that!!! :x], I came home with £15 in my pocket (£5 per bag), which would just about cover the cost of ten new bags from Axminster including postage - plus, I still have six bags left, in addition to the one I filled up earlier today! :wink:

This morning, I got the stretchers in place after applying a belated second coat of Polyx oil last night. Normally, you should need sash cramps in this situation [sliding dovetail housings] but, err, something wasn't quite right... :? (No that it would ever matter!)

4171624263_13e2a1ecc5.jpg


I really should have left this part until later in the day. Not only did I need to get back on my 'bench but, as I was trying to use my planer and then router table, I kept getting poked in the back of the head! :roll: I've started working on the other bits and pieces that'll allow the central leaf to pivot and also stop the outer leaves from tipping over under load. Below, you can see how I intend to do the latter with a 6mm strip of beech, attached to a couple of spacer blocks fixed inside the side rails near the legs.

4172379238_7702a381ae.jpg


Bad news - I spoke to Isaac Lord today and I'm looking at a three-to-five week wait for the soss hinges I ordered nine-days ago. :( This definitely won't be finished in time for Christmas dinner, now then. I guess it could get it ready as a four-seater though... Question is, how easy would it then be to get it back to work on?! :D

----------

***EDIT*** - Please disregard some of the above!! I've just re-read the e-mail I received earlier and these hinges will be available again within three-to-five DAYS - not weeks!! :oops:

Apologies for that, it's not like they have to be shipped in from China, thankfully (I wouldn't pay this much for Chinese hinges! :?). Still, I'll be hard-pressed to get this job done in time.
 
"This lot was left to clean up once I'd finished preparing the legs, rails, stretchers and runners."


Olly I literally have no sympathy for you! Come to my workshop I literally have about 30-35 black bin bags full of shavings! Think I managed to find someone with some stables to take them off my hands.

Still can't find the morticer!
 
:D

George, if you're prepared to give them away then you could list them on Freecycle for free - I've found there are plenty of takers in the Bristol and North Somerset groups, hungry for a few bags of shavings! :wink:

What about those pigs you used to feed??? Have they had enough?! :D
 
As I understand it, hardwood shavings and sawdust are not generally acceptable for animals, due to health issues. I think they should only have softwood.

Ed
 
I think the pigs have been sent to market, dissapeared around July poor blighters.

Maybe I'll advertise them as various hardwoods for animal bedding....
 
EdSutton":2lgu64bw said:
As I understand it, hardwood shavings and sawdust are not generally acceptable for animals, due to health issues. I think they should only have softwood.

Ed

Hi Ed,

You've got me worried now! :?

I've been doing a bit of Googling and there are comments both for and against the use of wood shavings... It doesn't seem to matter whether they're hard or soft wood, some sites suggest that wood shavings in general are bad for small animals.

Well, I know that some people like oak shavings for smoking meat and others may take a bag for composting... Another person told me he was in to bushcraft and wanted to use it for fire-lighting. Guess I'll have to start advertising and passing this on more carefully... I've lost a few pets in my time and I'd hate to be responsible for the loss of those who are loved by others... :(
 
Back
Top