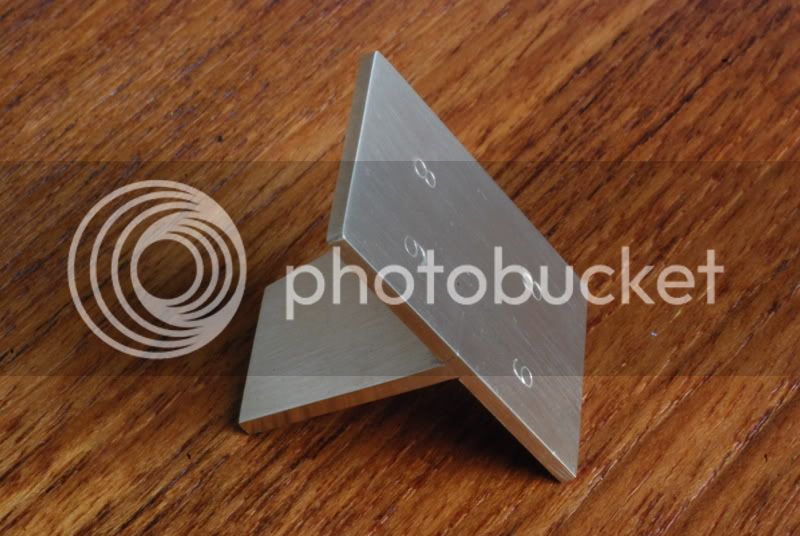
DT gauge, simple cheap and handy

UKworkshop.co.uk

Help Support UKworkshop.co.uk:

This site may earn a commission from merchant affiliate links, including eBay, Amazon, and others.

bugbear

Established Member
Joined
16 Jul 2004
Messages
13,074
Reaction score
11
Location
North Suffolk
Whilst reading George Ellis' book, I noticed he prints (p66) a dovetail marking gauge design. It
couldn't be simpler to make - it's just a sawn of tenoned rail, with the shoulders
cut to the angle desired.

The opposite faces give the two angles required, and the two sides of the tenon
mean you can always seat the reference face (the shoulder) nicely on the workpiece.

Hacing read the book, I realised that I've seen quite a few of these in old toolboxes,
in the "odd and ends" drawer (along with a few screws, bits of chalk etc...)
so I don't believe this to be just book learnin'.

BugBear
 
Benjamin Seaton's toolchest (dated 1797) also contains a small, wooden dovetail gauge, and it even has it's own storage slot with the wooden squares, so he clearly thought well of it.

A very simple little tool to make from a scrap of hardwood, which is perfectly acceptable because dovetails are usually marked out with a pencil, not a knife. (The knife should be used when transferring the sizes of cut tails to the pin board, or vice versa; but the first marking of tails is best done with a pencil.)

There are several proprietary gauges available, some rather nicely made in brass (Richard Kell's, for example). Joseph Marples make a couple of dovetail squares. None are outrageously expensive.
 
This is mine made from two bits of brass dovetailed together.


The sides on the top are at 90 deg to the blade so it can be used to square lines across the end of the wood.
It could do with the angled marking on the blade as well as the top.

Pete
 
IMHO that is by far the best type of DT marker.

One tool instead of two, as it does the square line and the slope.

We make ours from thin dense hardwoods. Vertical part glues into very shallow routed groove in the horizontal part. It is a nice exercise in preparing thin stuff, Planning and shooting.

Best wishes,
David Charlesworth
 
.

I recall that the late Jim Kingshott made a an almost identical marker using two pieces of perspex, which, he claimed, allowed him to see the mark from both sides.

.
 
The majority of the Dovetail markers made or sold are based on this traditional design, my only concern with them is that when marking out small DT's the second line in from the end can leave most of the template hanging off the end of the timber. The use of a sliding bevel does overcome this issue but only if you turn the tool upside down for half the joint, sharp end up and sharp end down and flip it left to right.
Cheers Peter
 
Peter Sefton":21p8hwd4 said:
....The use of a sliding bevel does overcome this issue but only if you turn the tool upside down for half the joint, sharp end up and sharp end down and flip it left to right.
Cheers Peter
You make it sound difficult! But in fact the sliding bevel makes it easy - you can turn it and/or use both ends as you say. And you only need one, for all angles.
I don't think anyone is seriously at risk from the sharp end. If so they shouldn't be doing woodwork as many things they will use will be a lot sharper!
 
It's perfectly true that you can mark out dovetails with a sliding bevel (I know you can - I've done it) but it's a large, cumbrous thing in relation to fine, small joints. It's a bit like cross-cutting 3/4" dowel stock to length with a 26" handsaw - there are better tools for the job.

For someone cutting dovetails once every Preston Guild, then fine - use the bevel. In that case, there's no real justification to buy or make a special tool. However, for someone wanting to make furniture or boxes more regularly, a special dovetail marking gauge is a worthwhile addition to the kit.

Peter Sefton notes the waekness of the 'traditional' sort of gauge in making the second mark in. Good point - I've had that trouble too. It can be overcome with careful holding of the gauge, but I've found a better solution is to use a gauge with the register piece longer than the dovetail piece, so that it sits more firmy on the stock timber. The Richard Kell gauge is so made. The downside is that you no longer have the straight-across marking facility on the register piece; you have to swap to a small square. Swings and roundabouts!
 
Cheshirechappie":1joks260 said:
It's perfectly true that you can mark out dovetails with a sliding bevel (I know you can - I've done it) but it's a large, cumbrous thing in relation to fine, small joints. It's a bit like cross-cutting 3/4" dowel stock to length with a 26" handsaw - there are better tools for the job.

For someone cutting dovetails once every Preston Guild, then fine - use the bevel. In that case, there's no real justification to buy or make a special tool. However, for someone wanting to make furniture or boxes more regularly, a special dovetail marking gauge is a worthwhile addition to the kit.

Peter Sefton notes the waekness of the 'traditional' sort of gauge in making the second mark in. Good point - I've had that trouble too. It can be overcome with careful holding of the gauge, but I've found a better solution is to use a gauge with the register piece longer than the dovetail piece, so that it sits more firmy on the stock timber. The Richard Kell gauge is so made. The downside is that you no longer have the straight-across marking facility on the register piece; you have to swap to a small square. Swings and roundabouts!

I believe that Ian Kirby marks his tail slopes (with a bevel gauge) well past the gauged line, until they meet actually. He marks thickness on the tail piece to leave it slightly proud so that these marks are easily cleaned up when planing to the pin piece end grain which marks the correct size of the object being made - a drawer for instance.
 
CStanford":zquzd0cu said:
I believe that Ian Kirby marks his tail slopes (with a bevel gauge) well past the gauged line, until they meet actually. He marks thickness on the tail piece to leave it slightly proud so that these marks are easily cleaned up when planing to the pin piece end grain which marks the correct size of the object being made - a drawer for instance.

Can you inform us why he does it that way? Does it give a quicker result, a result that is better in some way, or is just a personal whim?
 
Just had a go with a sliding bevel as for DT pin holes. I can't see what the problem is. Easy to mark both sides and from either end. Big and solid (compared to the set gauges shown), a long edge for accuracy and something to hold on to to keep it steady. Perfect, problem free, the obvious tool for the job. And I didn't stab myself in the eye!

If you freehand you don't need a square (across) or a bevel for the angles. Much easier all round. Just a saw, a piece of wood and a good eye. Two pieces most likely - drawers I've looked at seem to be sawn (pinholes) in pairs. Sawing a whole set in a "gang" is not as easy as it sounds.
Freehand seems to be the traditional way, judging by most of the pictures linked to. Obviously a lot faster, at the cost of little irregularities.

Checked Ellis and he says 10º for all of them (about 1/7), which is fine - if you feel you need a number, but not compulsory!
 
Big an solid? its an adjustable gauge if you drop it it will move, mine does the angle and square in one go, and doesn't move if you drop it.
The wobbles at the ends are a problem for me, bigger isn't necessary better in that respect.

I don't blame you sticking with a bevel gauge but I do find mine easer and quicker, I will make you one if you want to try it out.

Pete
 
Jacob - if using a sliding bevel works for you, that's great. Nobody is telling you that you can't do it that way. However, there are other ways, and it's perfectly legitimate for other people to point them out and discuss their relative merits. The imparial observer, or the beginner, can read all the posts and make their minds up based on everybody's experience and input.
 
Jacob":um3wwd3e said:
Checked Ellis and he says 10º for all of them (about 1/7), which is fine - if you feel you need a number, but not compulsory!

Indeed - to follow up the OP (that's me!) here's the picture.

dt.png


BugBear
 

Attachments

  • dt.png
    dt.png
    13.9 KB
Jacob":2bg3ktur said:
Checked Ellis and he says 10º for all of them (about 1/7), which is fine - if you feel you need a number, but not compulsory!

Point of pedantry - 10 degrees, (actually 9.46 degrees), is about 1 in 6 [-X :)

Regards Mick
 
Cheshirechappie":3v241zjw said:
CStanford":3v241zjw said:
I believe that Ian Kirby marks his tail slopes (with a bevel gauge) well past the gauged line, until they meet actually. He marks thickness on the tail piece to leave it slightly proud so that these marks are easily cleaned up when planing to the pin piece end grain which marks the correct size of the object being made - a drawer for instance.

Can you inform us why he does it that way? Does it give a quicker result, a result that is better in some way, or is just a personal whim?

Better visual imprint on the angle. I believe he marks the straight pin lines long as well but this has to be done with a very soft pencil for ease of cleanup.

If one gauges lightly, and one should, then it's easier to just go past the gauged line anyway rather than counting on the incised line to stop the pencil. Going fractionally over the gauged line can give one the wrong impression of where it is during sawing. Just go well past it.
 
CStanford":sr2jjy2o said:
Cheshirechappie":sr2jjy2o said:
CStanford":sr2jjy2o said:
I believe that Ian Kirby marks his tail slopes (with a bevel gauge) well past the gauged line, until they meet actually. He marks thickness on the tail piece to leave it slightly proud so that these marks are easily cleaned up when planing to the pin piece end grain which marks the correct size of the object being made - a drawer for instance.

Can you inform us why he does it that way? Does it give a quicker result, a result that is better in some way, or is just a personal whim?

Better visual imprint on the angle. I believe he marks the straight pin lines long as well but this has to be done with a very soft pencil for ease of cleanup.

If one gauges lightly, and one should, then it's easier to just go past the gauged line anyway rather than counting on the incised line to stop the pencil. Going fractionally over the gauged line can give one the wrong impression of where it is during sawing. Just go well past it.

Thanks for the reply!

I think most craftsmen stop their angle lines on the gaugeline, and manage to cut and fit their joints successfully. Mr Kirby is, of course, quite in order to use whatever methods he feels help him to cut and fit his joints!

Maybe it's a tip worth bearing in mind if you have trouble sighting exactly what the saw is doing.
 
It's useful to saw to a long line as you can use it to sight the saw, and it's traditional (and very useful) to cut just past the gauge line, so that you don't have to clean out the corners. So if you are working to a line that's two good reasons for extending it.

So am I the only person to do them freehand? Not that I'm doing any currently but I certainly have in the past.
 
Back
Top