Files and Filing

UKworkshop.co.uk

Help Support UKworkshop.co.uk:

This site may earn a commission from merchant affiliate links, including eBay, Amazon, and others.

AES

Established Member
Joined
18 Feb 2011
Messages
5,762
Reaction score
1,069
Location
Switzerland, near Basel
Part One

A while back Robbo 3, esteemed member of this fine congregation, PM'd me asking me to write something on files & filing. He'd noticed that I'd pontificated on this subject on the Forum before.

I was lucky enough to serve a "proper" engineering apprenticeship which started early 1961 (IMO "proper" means a good mix of practical - "workshops" - and theoretical - "schools" work), and like many others serving apprenticeships at the time, the initial practical part included quite a lot of basic bench work such as precision filing and hack sawing to quite fine limits (+/_ 0.001 in old money - i.e. a thou). This is/was called "fitting" in old terminology.

I've noticed that several other members here clearly also have good knowledge of the subject, but Robbo felt that some basics would be useful to members who perhaps have not had the "benefits" of such an apprenticeship (I wish I had had more appreciation of the in-depth treatment of these matters at the time - I just wanted to "get on with it" and start work with real aeroplanes - foolish boy that I was/am)! So I agreed to have a bash at writing up some basics which I hope members will find useful.

I also hope the following won't bore (or disagree too much with!) info that those already in the know have learnt in their own various past lives. And although it's long - very long actually - I've tried to make this a useful, practical guide for those whose main interest is woodworking but who need to do a bit of metal bashing now and then.

In the main I'll be dealing here with the common or garden "standard" metal work files and only talk about specials as the need arises.

Although they're as common as most other hand tools (more so than many?), files should be treated with respect, because they're really quite clever tools, and, in skilled hands, very capable tools too.

They're made of specially heat-treated high carbon steel (either full-cycle heat-treated, or case-hardened), and are therefore pretty hard (by most standards they're very hard). They have to be hard to allow them to happily cut just about any other metal of just about any other type or grade they're likely to come across.

But with this hardness comes a disadvantage - being hard means they're also quite brittle, which means it's quite easy to accidentally chip a cutting edge (a "tooth") - especially if allowing one file to bang against another.

Files are cutting tools, but unlike most other cutting tools, they have many cutting edges ("teeth"), as opposed to a chisel's or a plane's single cutting edge, or a router cutter's perhaps 4 cutting edges (max). But despite the many teeth, to work properly, all of the file's cutting edges need to be "all present and correct". To make it worse, being so hard, once damaged/blunted, the teeth are, for all practical purposes, impossible to re-sharpen.

So just as you wouldn't chuck a nicely sharpened chisel or a router cutter into your toolbox any old how, neither should your chuck files around - as above, be especially careful not to let files bang against each other.

These days files aren't exactly cheap (good ones aren't anyway), so I'll give a couple of ideas about safe storage further into this piece.

But all this means that if you value your tools at all, files should not be used to open paint tins, stir the contents thereof, nor for any other "gash jobs" that may come to mind - not even with a "rubbish file" from car boot sales and the like. And certainly not " 'cos it's only a file"!

So what are files for really?

Simply, files allow you to re-size, clean up, and/or re-shape pieces of metal of just about any type. And yes, I include all types of "normal" steel (including mild, stainless, spring, and silver steels); bronze; brass; copper; aluminium of all grades; nickel silver; cast and wrought iron; and even lead and solder, right on up to fancy stuff like titanium - not to mention many non-metals such as plastics of just about all types, bone, and, would you believe, wood too!

What's more, files allow you to remove material accurately, and to within fine limits - once you've acquired the necessary skill of hand!

I'll look at what acquiring that skill really means further on, but for now, jobs that might crop up in the shop and for which a file is the tool (unless you have metalworking machine tools such as lathe, mill, etc) can include:

:arrow: Removing points of screws & pins showing through visible surfaces of the work (wrong length chosen/correct size not in stock at the time!)

:arrow: Maintaining screw drivers (single slot type mainly, but a little re-work is also possible with Pozidrive & Phillips screwdrivers)

:arrow: Sharpening spade/flat bits; auger bits; Forstner bits; lip & spur bits; etc

:arrow: Sharpening various types of saw

:arrow: Removal of moulding "flash" from items with handles, etc, moulded either in plastic or die cast in metal

:arrow: General de-burring

:arrow: Making a router mounting plate (for a router table/stand)

:arrow: "Making" an adaptor to allow modern bits such as Torx to be fitted to old-fashioned tools like Yankee-type screwdrivers

:arrow: Unless there's a lot of "grinding" to do (for which I use a small circular stone in a Dremel tool with a special jig,) I also use a file for touching up the blades on garden tools such as a (rotary) lawn mower blade, shears, secateurs, etc. This is quick and easy, and is especially good for removing the burr/wire edge from the back of such blades

:arrow: General refurbishment, repair, and upgrade of tools and machinery

So files are pretty flexible tools in terms of what they can do and there are many other tasks we could add to that list.

Later on I'll look at some of the above tasks in detail, but first let's have a look at basic metalworking file types:

According to Wikipedia there's no internationally-agreed standard for the naming and classifying of files, but there are some terms which seem to be generally accepted in "general engineering English". But caution please, there are differences between US and UK usage, as well as differing usages and names within different trades on both sides of the pond. The following is what I learnt, and seems to line up pretty well with what I've heard others talking about. But as I've marked below, there are differences, particularly between US and UK terminology when defining file cuts/coarseness:

:arrow: LENGTH: Measured from the "toe" (opposite end to the handle) to the start of the handle (or where the handle is to be affixed - i.e. not including the handle itself, nor the softer, non-cutting and usually roughly triangular end called the "tang"). It seems that even in "mainland Europe", this measurement is in inches. Typically available off the shelf lengths are from 4 inches up to about 12 inches, in 2 inch steps, though I think there are some files available up to about 14, 16, or even 18 inches, and a few 3 inch files can be found too. Personally I find that some 4 and 6 inch files, plus some 8 and 10 inch files cover just about all I need for "standard" files. I have one 12 inch file, but then the work I do isn't normally all that big.

:arrow: "SHAPE" (CROSS-SECTION): The main shapes are flat, round, half-round, triangular, knife-edge, and square. These main shapes may also vary according to "sub-shape", meaning that for example a file can be parallel in both plan and in side views; or parallel in plan view but tapered in side view; or tapered in both plan and side views. And the taper can end either in a blunt-ish end or in a pretty sharp point.

Typical aspect ratios (length to width ratio) are around 10:1 for flat and half round files (i.e. a "standard" 10 inches long flat or half round file will be about 1 inch wide), with round, square, triangular files being about 20:1. Some "less standard" flat files have a much narrower length/width profile and these are called "pillar files". These are handy for getting into confined areas and I find having a couple of these useful but by no means essential.

In addition, some (but by no means all) flat files have a "belly" on one side, with one face being absolutely flat but the opposite face having a marked thickening in the centre of the cutting face (see sketch below, which I've deliberately exaggerated to show this feature). BTW, at the end of this piece I've given a few references which I found very useful. However, Reference 3, while giving generally excellent descriptions, does call the general body of the file a "belly", but that doesn't seem to refer to what I've shown in the sketch. I can't really say what is "right" or "wrong", but I was definitely taught what I've drawn below:
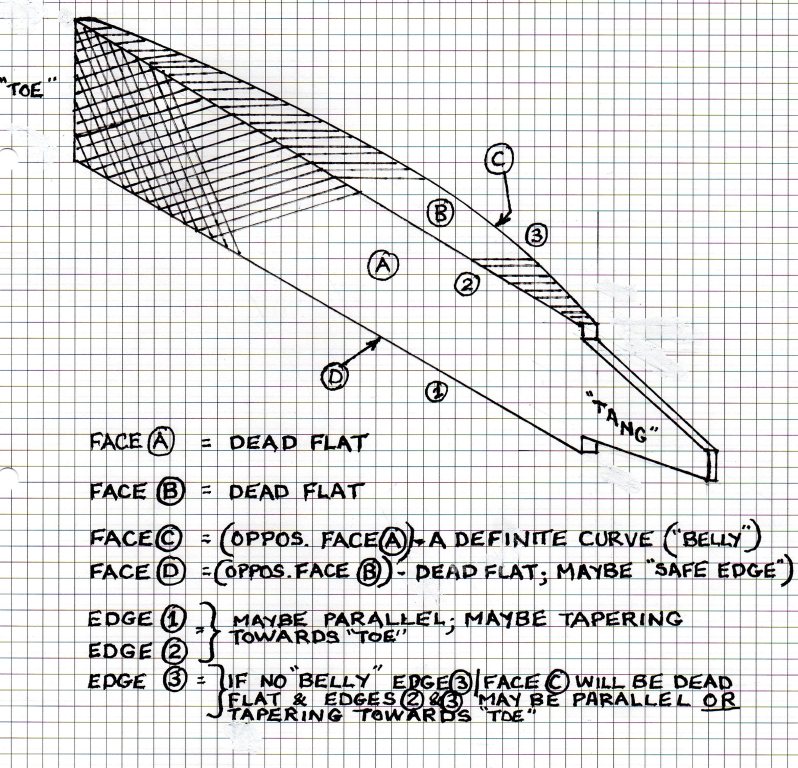
FF1 Belly-C.jpg


I find this bellied type of file very helpful for fast metal clearing, but from comments I've seen here and elsewhere, it seems bellies are now not so common on off the shelf "standard" flat files as they used to be.

:arrow: "CUT": This is where most confusion seems to arise.
It all starts simply enough, running thus (from coarsest to smoothest); mill or rough (mainly USA?); coarse (mainly UK?); middle cut (mainly USA?); turnip (both UK & USA); second cut (both UK & USA); smooth (both UK & USA); Xand dead smooth (both UK & USA). Not all of these cuts are freely available off the shelf, but this is not so important as in practice I think 3 cuts (say a mill, or a coarse, or a turnip; then a second cut; and finally a smooth or dead smooth) will suffice for 99% of jobs. In fact I refer to my own files in my own "in-house terminology" as just coarse, medium, and smooth.

But as we'll see later, the coarseness of the cut can anyway be temporarily modified for specific purposes, and when we get to needle files we'll see different coarseness classifications.

The basic thing remember though is all these terms refer to the number of teeth per inch set out along the cutting face/s, and you'll soon get used to selecting the "right" cut to do a particular job efficiently, simply choosing by one of your files by eye, and by the cutting feeling you get when first starting the job.

I thought the picture below, which I copied from Wikipedia, was pretty good. If only all files were marked like that, it would make life much easier!

FF2 Wiki-Files Flat-Smooth-2ndCut-turnip.jpg


So far so good, but now it gets more confusing (and we're still only talking about "general metal work files" and not yet about specials)!

Most files have one set of teeth cut at an angle of about 25 to 30 degrees across a face, each row of teeth being parallel to the previous row, but with a second or double cut of parallel teeth superimposed on the first cut at a different angle (usually about 55 degrees), and usually somewhat shallower than the first set of teeth. This creates the common diamond pattern. Such files are called "cross-cut" or "double-cut" files (not "second cut" files, please note)! The purpose of that cross cut is to provide chip breakers. This increases efficiency and reduces the effort needed to remove the maximum material with each stroke of the file by ensuring that chips and burrs are cleared away from the teeth as quickly as possible.

OTOH, files with only one set of teeth cut into them are called "single-cut" files - "eezy-peezy rules OK"!

But do note, not all of the second ("cross-cut") teeth of some manufacturer's files are straight line tooth cuts at all - some are cut in a curved formation, doing away with the more common diamond pattern and creating a sort of "lazy S" pattern instead.

FF3 Single-Wavy-Double Cuts-C.jpg


The next potential confusion arises from the fact that while, for example, a coarse grade file is considered by just about everyone to be pretty coarse (just as you'd expect). But for example, a 6 inch file classified as a coarse cut file will be a lot finer than, say, a 12 inch coarse cut file. This is because the manufacturer makes the depth and spacing of the rows of teeth of whatever cut being made proportional to the length of the file. Obvious really, because it's generally reckoned that you'll use big/long files on big work pieces, and little/short files on small jobs!

FF4 turnip Cut-C.JPG


I hope the pictures make all these points a bit clearer.

Not all files have teeth cut into all faces. Some files come with one or even two faces without any teeth. These are called "safe edges" and make it easier to file one area of a job without an adjacent face of the file accidentally filing into an area of the job that you do not want to touch. BTW, one good way to judge the quality of a file is by its safe edges/s (if any) - cheaper files tend to leave the edges of the teeth "hanging over" onto the adjoining safe edge (see exaggerated sketch below), while better quality files have the safe edge/s ground off completely smooth after tooth cutting, giving truly safe edge/s. For special use you can of course grind your own full or partial safe edge/s by use of the off hand bench grinder, and you can touch up poorly-made files to improve safe edges in the same way.

FF5 Safe Edge-C.jpg


Finally in the matter of cuts, half round and round files are made with a series of slightly overlapping flat cuts. Cheaper files have less of these cuts than those from the better manufacturers, so clearly the cheaper files do not follow the ideal circular or semi-circular profiles as well as the more expensive files. And cheaper half round files have "blunt-ish" sides (where the curved upper segment meets the flat under part). More expensive files which have nice sharp edges with teeth all the way down the curves, terminating in a sharp edge each side.

FF6 Round-Half Round-C.jpg


:arrow: And now, HANDLES: Some "standard" metal work files can be bought with handles permanently attached to the file (wooden or moulded plastic). Others come without handles, leaving the buyer to choose his own.

In the latter case, we're back to the above-mentioned "tang" again. In relation to the rest of the file, the tang is deliberately left pretty soft, and generally speaking, manufacturers are not all that careful about the exact shaping of the roughly triangular tang - some are pretty blunt, others quite sharp. But if a file does have a clearly defined tang (rather than a "forged-in" metal handle as in the case of needle files for example, which we'll talk about later) then for your own safety you must always use a handle of some type - even for only just a quick couple of cleaning up strokes! Please, please, never use a file with just a bare tang pointing toward the under part of your hand/wrist, especially not if you've got the job mounted in the chuck of a drill or lathe!

And yes, I did quite recently see a very well-respected regular YouTube contributor talking about making a marking gauge. He was filing a small steel washer mounted in his pillar drill to make a circular "knife". He had the bare tang of the file pointing directly at the lower part of his wrist. IMO that's nothing short of being really stupid, and you don't need much imagination to guess just how much serious injury his hand and wrist would have suffered if that file had slipped or jammed - there's a major artery buried in somewhere in your wrist!

FF7 Handles-C.jpg


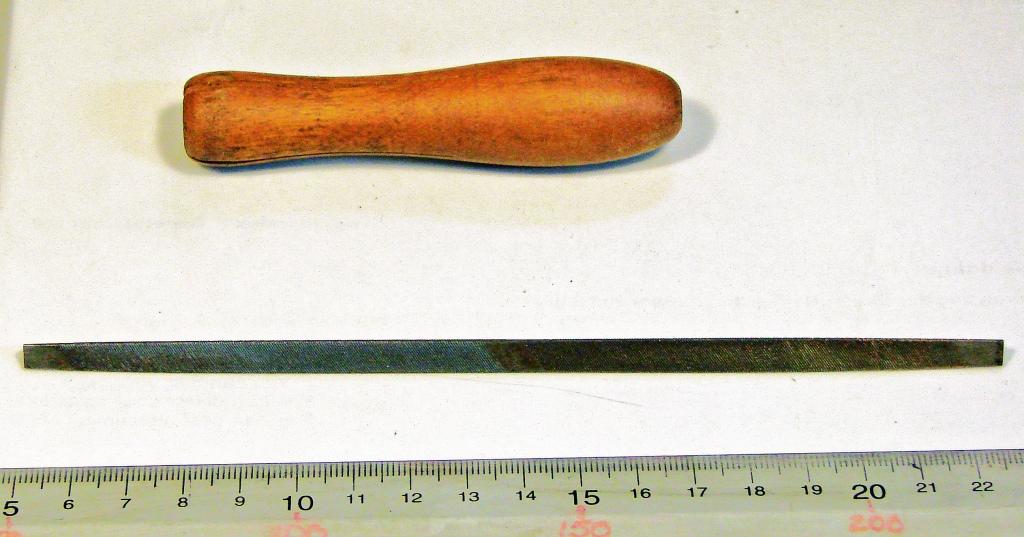
The picture shows several, both wood and plastic, including 3 wooden handles for Swiss & Needle files at the lower Left.

All types are freely available, both in wood and plastic, in many sizes and shapes, and in just about any tool shop. They're pretty cheap too - and much cheaper than surgery!

Decent wooden handles have a metal ferrule at the end with a quite small hole to allow the tapered tang to be driven into the handle. Personally I prefer the shape and the feel of wooden handles, but that's just a matter of personal choice, and I've got several plastic handles which I also use quite a lot.

The "approved" method for fitting and removing file handles (wooden and plastic) is as shown in the pictures. To fit, first use hand force only to push the handle onto the tang. Then grasp the body of file in one hand and strike the handle once (only) onto the bench (or in my case, onto the anvil section of the vice). This will produce a perfectly adequate fit.

FF8 Fitting Handle-C.jpg


To remove a handle, lay the file flat on the bench with the end of the handle overhanging the edge of the bench (or in my case, overhanging edge of anvil section of vice). Then, while grasping the file by the main body, but with the ferrule end of the handle some distance away from the edge of the bench/anvil, then pull the file smartly from L to R (I'm assuming right handed workers here - sorry lefties).

FF9 Removing Handle-C.jpg


My own practice is to fit a handle as I select a particular file for a job, but when the job is finished I remove the handle and put both file and handle back in the drawer. Apart from anything else it's easier to store files safely without fixed handles.

Incidentally, the above fitting/removal methods shown are "approved" because A), it's the way I was taught; B), it works first time every time; C) it definitely won't damage either yourself or the tool!

But if you wish you can leave your handles permanently fitted. It's entirely up to you.

BTW, when fitting a new handle to a file for the first time, the method I was taught was to heat up the tang - NOT red hot but "pretty hot" (rather less for a new plastic handle I guess!) - and then just tap the handle into place by grasping the body of the file and simply striking the handle onto the bench, like the fitting method shown above. The heat apparently burns into the handle body and makes a strong permanent bond with the wood (and plastic)? I understand this is usually enough to do the job permanently.

As said, apart from files which came with pre-fitted handles, my own practice is to remove the handles after use, so sorry, I have little idea on what else works well if you want to permanently fit your own file handles.

Part 2 continues:
 

Attachments

  • FF1 Belly-C.jpg
    FF1 Belly-C.jpg
    197.5 KB · Views: 4,892
  • FF2 Wiki-Files Flat-Smooth-2ndCut-turnip.jpg
    FF2 Wiki-Files Flat-Smooth-2ndCut-turnip.jpg
    110.8 KB · Views: 4,889
  • FF3 Single-Wavy-Double Cuts-C.jpg
    FF3 Single-Wavy-Double Cuts-C.jpg
    63.1 KB · Views: 4,884
  • FF4 turnip Cut-C.JPG
    FF4 turnip Cut-C.JPG
    64.6 KB · Views: 4,890
  • FF5 Safe Edge-C.jpg
    FF5 Safe Edge-C.jpg
    80.7 KB · Views: 4,885
  • FF6 Round-Half Round-C.jpg
    FF6 Round-Half Round-C.jpg
    96.4 KB · Views: 4,885
  • FF8 Fitting Handle-C.jpg
    FF8 Fitting Handle-C.jpg
    82 KB · Views: 4,885
  • FF7 Handles-C.jpg
    FF7 Handles-C.jpg
    47.3 KB · Views: 4,887
  • FF9 Removing Handle-C.jpg
    FF9 Removing Handle-C.jpg
    64.8 KB · Views: 4,887
Thankyou AES. Brilliant. (Please sticky this Mods.)
You have helped me many times but one thing that struck me was belly side files. I've noticed it to the point where I have marked it on my vallorbes with a sharpie 'side 1' and 'side 2' but I never knew it was deliberate. I always thought it was production issue, a fault. Turns out it's supposed to be there. :shock:
Thanks for producing part one of the best definitive guide on files I have ever seen Aes. (hammer) Much appreciated mate. Really.
Best regards
Chris
 
Thanks Bm 101. There's plenty more to come, AND it's all finished, BUT, clutz that I am, I'm having LOADS of problem with the Forum full editor!!!

But I'm going to finish it tonight (even if I do have to stay up until Gawd knows when - I've already "lost" Pt 2)!!!

Glad you liked it though.

Later ..........

AES
 
Part 2:

A final point about using the tang for a "one-off special" use. In the above list about filing jobs, I mentioned removing the points of screws, pins, etc, that are showing through above the outer surface of an item you've just made. For my own use I have one (only!) 6 inch smooth cut flat file where I've bent the last half inch or so of the tang up at about 90 degrees to the cutting face. I find this makes a "handle" big enough to allow me to rub the face of the file over the face of the job to flatten off any offending screw or pin points. As no great pressure or push-pull force is needed, gripping said "handle" between finger and thumb of one hand while gently pressing the file down onto the on to the face of the job against the offending point with the other hand is perfectly safe, and if done carefully does not damage the surface of the job at all (as I've found can happen with even a fine grade sanding belt or disc).

FF10 My Modified File for Points.JPG


Now to some "specials" which you're likely to find useful (listed in no particular order):

:arrow: Aluminium Files: If you're going to be working a fair bit with ali and similar soft stuff, it may be worth thinking about buying one of the special files designed for that work. It will be somewhat coarser and with a better set of chip breakers than a "normal" cross cut file. The one shown in the picture below is from Baiter (a Swiss manufacturer - see short list of known manufacturers at the end), but there are others available. As you'll see in the picture, the chip breaker cross cuts take a form a bit like an expanded "lazy S", similar to the "Oberg Cut" (Sweden) also shown below. The picture also shows a single cut file for comparison.

The trick with ali, even more so than with other soft metals, is to clear the chips as efficiently and quickly as possible, which I've found the special ali file does quite well. The main problem with ali is that as well as being pretty soft, the chips "curl around" and stick to the teeth, quickly clogging the file. Even more than when working with any other material, regular clearing of chips throughout the job is important (there's a bit about clearing and cleaning further on).

FF11 Baiter Ali-C.jpg


FF12 Oberg Cut-C.jpg


The Oberg Cut file shown on the right in the picture above is also pretty efficient at removing material quickly, and without too much clogging too - it works at least as well as the single cut file shown on the L of the picture, even though the LH file looks quite a bit coarser. Note that generally speaking, single cut files are reckoned to produce a smoother finish.

:arrow: Rasps: I'm not going to say much about rasps here, as from time to time I've seen on the Hand Tools section here that there are a lot of members who know a lot more about them than I do. I think a member of this Forum even produces his own?

But if you're new to using rasps in "real wood", note that due to their distinct, individually cut teeth, their main use is for shaping, allowing quick removal of large amounts of material. This means unless the work is supported with a sacrificial piece behind it, the typical rasp is so coarse that you're likely to experience splintering on the rear side of the job. That's one reason why I often use a coarse metal working file rather than a rasp on my own efforts at producing joints. Hopefully, only small amounts need to be removed, which often saves splintering on the back of the job. But don't tell anyone else please, I'm sure this practice is not approved by either "proper" wood workers or "proper" metal workers! (Like how I use my little metalworking mini lathe for wood turning sometimes - I'm sure that's frowned on by the purists too)!

Although aimed primarily at wood, rasps are also useful when working GRP and similar "plastics". And there's also a widely-promoted DIY tool from the 1970s called Surform (are these still available in UK now)? This tool is very useful on such materials. However, from my background in aeromodelling (that's mainly balsa, plus some spruce and thin ply, plus GRP sometimes), I did find a very interesting set of Swiss file-sized rasps which I've found useful from time to time, and not only in modelling.

FF13 Small Rasps Set-C.jpg


:arrow: Warding Files:

Warding files are generally about 6 inches long (sometimes longer; maybe available as specials in shorter lengths), are parallel in thickness, tapered in width, usually with a pretty sharp pointed toe, and in comparison to "standard" files, they're very thin. Their original use was for locksmiths (the levers and spaces between them in locks are called "wards" apparently). They're ideal for small-size flat work and for forming slots, and the larger sizes are normally available as one-offs rather than in sets. Most sets seem to come with fitted handles. I'm not sure how their cuts are classed officially, but mine are what I'd call "medium", with a simple single cut pattern. Mine do not have any safe edges but for one particular job I did modify one of the set by grinding a safe edge half way down one side without problems.

FF14 Typical Warding File Set-C.jpg
)

:arrow: Swiss Files & Needle Files:

Needle files are used on jobs which are either/or small in size, and/or where a particularly fine finish is needed. They're not great at removing large amounts of material quickly. They're often sold in sets with the same shapes, as listed above (flat, half-round, round, triangular, knife, etc). Needle files are normally straight double cut pattern, and have a similar range of cuts to the "normal" files listed above, but usually without the two coarsest and the one finest cuts listed above. They may have machined-in knurled handles, or have tangs and no handles, or come with permanently fitted wooden or plastic handles. Typically they're about 6 inches long with a very slim aspect ratio (roughly 30:1).

Swiss files are "the same but different"!!! First off, although there is at least one manufacturer based in Switzerland (Vallorbe), Swiss files do not have to have been made in Switzerland to be Swiss files! The main difference is the coarseness grading. There are seven grades (00 to No. 6 - 00 is the coarsest and 6 the finest). They're generally used for detailed work by jewellers', clock and watch makers, model makers, and tool and die makers. They're generally between 3″ and 6″ long. They're single cut pattern and are particularly useful for fine work because although they're based on the same shapes as the needle files and the "general metal working" files listed above, Swiss file manufacturers generally offer a useful range of other "specially-modified" shapes including shapes like double-oval, half knife/half flat, etc.

Again, please don't tell anyone, but when cutting lettering and very fine shapes in wood with my scroll saw I find a quick clean up with a needle file after cutting is a good and quick solution to a sometimes "hairy" problem!

And I understand that for the sharpening of fine-toothed saws such as Tenon saws, a triangular needle file is very useful too.

FF15 Needle n Swiss Files-C.jpg


:arrow: Saw Sharpening Files:

These are specialist files which are surely worth a place in the average wood shop. Usually single cut type (for a smoother finish) they're triangular, with a double end and no handle, although mine does have a somewhat modified wooden handle designed to slip over the end which is not being used at the time. Note that my own, shown below, is Xactually of a slightly finer cut at one end than the other. I am most certainly not an expert on the sharpening of saws, but I understand that the most important aspect is to ensure that A) all the teeth on the saw end up with the same form and, B) of the same depth. Note also the point above about the use of a triangular Swiss file for sharpening fine-tooth saws.

FF16 Saw File-C.jpg


:arrow: Rifflers:

These little files are a bit strange. Double-ended (no handle), triangular at one end and half round at the other, with both ends formed into gentle curves, and normally single cut. By no means an essential for the average shop, they are not good for removing large amounts of material but are a useful addition to the armoury for doing one-off jobs such as smoothing out hard and soft solder fillets (e.g. model aircraft fuel tanks and control horns & bell cranks!), projections on castings, and anywhere else where the "blending" of flat into curved surfaces may be needed.

FF17 Riffler-C.jpg
:

:arrow: Abrafiles:

Another "odd one", I think Abrafile is/was originally a trade/brand name? They come (came?) in two types, the round file types, as shown here, and the "wire type", which are much longer and more flexible, usually for mounting in a hacksaw frame. Somewhat harder than the average rasp, these are by no means essential in the average shop, but useful to have if cleaning out a circle or a large curve. This particular set was designed to fit into the "Heavy Duty" craft knife type of handle.

FF18 Round Abrafiles-C1.jpg


:arrow: Diamond Files:

Apart from knowing that they are available in several grades, I have little knowledge of these, and apart from a couple as shown below, I have none. If anyone wants to add more info to this section it will be more than welcome.

The one shown is one of two I bought, quite cheaply. It's marked "Mini Diamond Stone, Coarse" (the other is marked "Fine"). Although marked "Coarse" it is, in reality, very fine indeed, and as the name suggests, I don't consider it (or its "Fine" drawer mate) a file at all really. But I do find them both useful for gentle honing of the tip of the cutting edge of HSS lathe tools, flat wood boring bits, etc. And though I haven't tried myself, maybe it would be good for pre-honing chisels and plane irons (perhaps for removal of the wire edge at the back of the 25/30 degree edge)?

There are also several other specialist types of files, including the Dreadnought (single cut, curved teeth) and the Millenicut (single cut, straight teeth) which are mainly used for very fast "non-precision" material removal/shaping of non-metallics or very soft metals. I have neither type myself and have very little experience of them.

FF19 Diamond File-C.jpg


Part 3 continues
 

Attachments

  • FF10 My Modified File for Points.JPG
    FF10 My Modified File for Points.JPG
    22.3 KB · Views: 4,668
  • FF11 Baiter Ali-C.jpg
    FF11 Baiter Ali-C.jpg
    79.7 KB · Views: 4,668
  • FF12 Oberg Cut-C.jpg
    FF12 Oberg Cut-C.jpg
    86.2 KB · Views: 4,671
  • FF13 Small Rasps Set-C.jpg
    FF13 Small Rasps Set-C.jpg
    64.3 KB · Views: 4,668
  • FF14 Typical Warding File Set-C.jpg
    FF14 Typical Warding File Set-C.jpg
    26.8 KB · Views: 4,665
  • FF15 Needle n Swiss Files-C.jpg
    FF15 Needle n Swiss Files-C.jpg
    50.1 KB · Views: 4,667
  • FF16 Saw File-C.jpg
    FF16 Saw File-C.jpg
    66.4 KB · Views: 4,667
  • FF17 Riffler-C.jpg
    FF17 Riffler-C.jpg
    48 KB · Views: 4,667
  • FF18 Round Abrafiles-C1.jpg
    FF18 Round Abrafiles-C1.jpg
    34.9 KB · Views: 4,668
  • FF19 Diamond File-C.jpg
    FF19 Diamond File-C.jpg
    49.7 KB · Views: 4,663
Part 3:

:arrow: "So what do I buy?"

After all that, and assuming someone is just starting out with next to nothing, or perhaps simply wants to add to an existing file collection, what is a practical minimum kit? My own recommendation for a more-or-less minimum kit would be for the following:

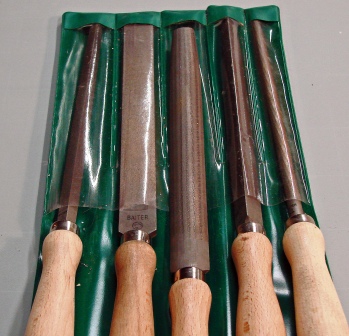
A single set of 8 or 10 inch medium files such as the set shown below; plus a single set of either warding, needle, or Swiss files; plus a couple of 6 inch pillar files; plus whatever specials the above list would suggest you may need based on the work you do. As a basic starter kit, the 5 files kit shown below cost about 20 quid in a sale at the local tool shop. That was about 10 years ago, and such sets are probably a bit more expensive now. I'm anyway not up to date with UK prices, sorry.

FF20 Typical Set - Note the half round segment cuts-C.jpg


:arrow: And: ....

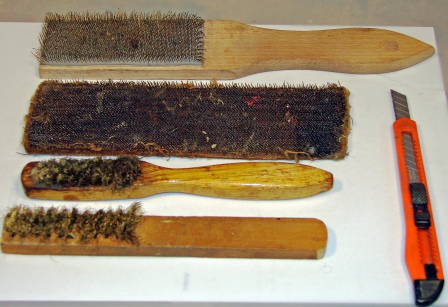
To the above purchase/s, you should add at least one "scratch card" (or "scratch brush" in some places), because files need regular "clearing" (rather than cleaning - that comes after use). As already said, as soon as the file starts to clog, it will not only become less efficient at clearing material, it is also very likely to make unsightly scratches on the surface you're trying to finish. My own bunch of file "clearers and cleaners" is shown, and consists not only of a scratch card mounted on a wooden handle (I bought it like that) but also a bare scratch card where you can see the very short and stiff wire bristles which are woven into a tough cloth backing. (Thinks - I really must get around to mounting that onto a piece of wood). You'll also see a couple of rather worn-out wire brushes with somewhat longer and softer (brass wire) bristles. I think these are originally sold as suede shoes cleaning brushes (any colour, not just blue)! But I find them very useful for clearing the finer files such as Swiss, needle, and warding files.

As already noted, filing aluminium can be a bit of a pain, mainly because the chips are so "sticky". You'll probably soon find that even if you use a special ali file, the scratch card won't clear everything, leaving little silver blobs stuck fast in some teeth. And if filing hard and soft solder that gets even worse. That's the reason for the little snap-off blade knife in the picture - just running the point of that, or of a fine-pointed nail, along the affected teeth row/s works wonders and I find it quite a therapeutic task at the end of a session too.

FF21 Scratch Card etc-C.jpg


Clearing and cleaning is pretty easy. With the handle still installed - please! - rest the toe of the file against a convenient vertical surface (I use my vice, as you can see where all the paint is worn away!) and brush sharply from side to side.

FF22 File Clearing-C.jpg


BTW, if you're into the resurrection of old tools, provided the teeth themselves aren't damaged, badly rusted and otherwise clogged files can be brought back to life with any of the well-known de-rusting methods. Personally I prefer the electrolytic method and have had good success with several old files inherited from my Dad.

I've heard from time to time that scratch cards can damage files. Personally I don't see how that can possibly happen - the file must be much harder than the wire, surely? Except perhaps with diamond files? I don't know much about those.

It's also sometimes said that files used for softer materials such as copper, ali, solder, etc, should be kept for just those materials and not used on steel, etc. As I don't think any of us here are earning a living with files every day, I don't think that's necessary. Personally, apart from buying a special ali file as discussed above, I don't bother with any segregation, and have no problems provided my files are all cleared regularly throughout any filing job, and thoroughly cleaned at the end of the job.

:arrow: Storage:

Now just some brief ideas on storing files that didn't come in a box, carton, wallet, or packet. When I was lucky enough to score a metal tool cabinet from a retiree, I lined the bottom of the drawer with thin plastic packing material. Mostly the flat files are then laid edge-on into the drawers (without their handles), each being separated by a piece of thick foam plastic simply laid in place vertically. Those files with more awkward shapes, such as the rounds, half-rounds and triangulars, are each individually "wrapped" in thick hard bubble wrap packing plastic, each being individually made into a "pocket" and fixed with staples and hot melt glue, reinforced where necessary with gaffer tape. See the first picture below.

FF23 Storage1-C.jpg


For the smaller files which didn't come in plastic wallets, etc, I've made something similar using some rather odd packing material. The stuff looks rather like a much thicker version of those throw-away "J Cloth" cleaning rags, and as you can see below, the material is a rather "natty" pink colour! Still, it's easy to mark the outside with felt tip pen. These "wallets" are again made up with hot glue and staples.

None of the above storage devices are at all elegant, but the important job of stopping the teeth of adjacent files rubbing together is satisfied and they should all last my life time. If I was a tradesman regularly going on site with files I'd want something rather more rugged and substantial though. Perhaps on the lines of a leather or heavy cloth chisel tool roll?

FF24 Storage2-C.JPG


:arrow: Filing Techniques:

Now we come to the "clever" bit. Actually, as I already suggested, this is a skill of hand which takes practice to acquire. A bit like riding a bike perhaps, where when you first start you think "I'll never get this", but then, all of a sudden, it just clicks. And I've found that once it has clicked, you never loose the knack - again like riding a bike perhaps, and provided you practice, it's really not all that hard.

I have a long-standing medical problem which means I sit to do a lot of things, including machining on my little lathe, scrolling, and even most of my band sawing. And for really small jobs I have a little vice with lockable angular settings mounted on a low bench, so I sit for that work too.

But as soon as a job gets to "a hand full" size and more, I haven't found a substitute for standing at my big vice mounted firmly on the bench. I was also taught that for height, the top of the vice jaws should be at elbow height when you stand against the vice with your hand folded up touching your chest. That works fine for me, and once you get the hang of it, most filing jobs don't take very long. So this standing is mostly not a big problem for me.

The stance is very important, and again I was taught to stand slightly off to the Right of the vice centre line, with my Left foot about one normal pace ahead of my Right and slightly offset to the Left. Again, that works for me, but whatever you try yourself, do remember that if you're after any degree of accuracy, flatness and straightness when filing, the stability of your stance will definitely affect your results.

In all of this, please remember that I'm right-handed. I guess left-handers must reverse everything?

Having fitted a handle to the chosen file, grasp the handle firmly in the Right hand, thumb uppermost, and with the other four fingers curving around under the handle. The Left hand grasps the toe of the file, thumb uppermost, and with as many of the remaining fingers that fit the file curved around underneath. See the picture.

FF25 Filing 1 FWD-C1.jpg


Files cut on the forward stoke, and within practical limits, you should use as much of the full length of the file as possible for every forward stoke - about 90% is the aiming point. Each stroke should be slow and sure, not rushed, as is so often seen on YouTube (even on some of the not-speeded up sequences)! The idea is not to win a race, but to apply a firm, steady downwards and forwards pressure along the length of the file, and if the file is clean and not blunt, you should feel and hear a steady cutting action.

At the end of the forward stoke, the cutting action must be disengaged from the work. In the picture below I've exaggerated this, trying to show the file lifted well clear of the job. In fact this exaggerated lifting is not necessary - it's actually not desirable, as light contact with the job should be maintained on the return stroke. You'll soon get into a slow, steady rhythm where the downwards pressure on the file is relaxed as the file comes to the end of the forward stroke and then starts drawing back to the starting position - with almost no downwards pressure applied. This "light pressure disengagement" of the file from the job is very important as it's this action which allows the chips to be cleared ready for the teeth to start the next forward stroke without being clogged up.

Note that in both pictures above and below I've shown the file at roughly mid stroke. In fact the start position ("Filing 1") should be with your toe end fingers only just in front of the back face of the job; and the end position ("Filing 2") should be with your fingers at the handle end almost touching the front face of the job and/or vice.

Note also that it is perfectly OK to make a few strokes with the file angled to the Left (seen from above, as shown); followed by a further few strokes with the file angled to the Right; then perhaps followed by a few strokes at 90 degrees across the work.

If the surface to be filed is particularly rough and uneven, it's also quite OK to move to the RH end of the job and file Xalong the length until the biggest hills and valleys are reduced. But once that's achieved, it's back to filing across the job, as shown - until we come to the "last knockings" that is, which I'll look at in a moment.

The biggest problem with all this across the job filing is that inevitably, as the strokes proceed forwards and backwards, the handle and toe ends will not automatically stay perfectly horizontal to the surface of the job. Instead a natural up and down rocking motion soon develops, and this of course produces a curved rather than a flat surface. It's a natural habit that has to be guarded against and needs concentration to prevent when you first start out filing. The trick is to concentrate on maintaining an equal downwards pressure on both the handle and the toe ends throughout each complete forwards stroke. But like so many other things, it's "just" a matter of practice, and as above, you'll suddenly find it will click, so that you do it automatically, producing a nice smooth and flat surface without unwanted curves.

As filing proceeds you should stop and clear the file with the scratch card every so often. As experience develops you'll soon get to feel and hear when the file stops cutting effectively.

FF26 Filing 2 BCK-C.jpg


Assuming that we're not only trying to produce a smooth and flat filed surface but also trying to file to a line or to hit a specific dimension, it's good practice to regularly remove the job from the vice and check it with straight edge and tri-square for both flatness and squareness against the light. This also presents the ideal opportunity to quickly clear the file with a couple of strokes of the scratch card. And when replacing the job in the vice, make sure that it's set horizontal (don't be afraid to use a small spirit level) and also check that it's not standing too high above the vice jaws. This is especially important when filing thin material as unwanted vibrations and chatter will definitely affect the accuracy and smoothness of the finished job.

All the above took a long time to write (as well as a long time to read I'm sure)! But in fact it really is "only" a matter of practice, and the above steps actually proceed pretty quickly - but while still maintaining a steady, not "trying to win a race" pace. The most efficient way really is to take it nice and steady.

There are some references at the end of this piece, and for those who have never filed properly before, or who are having trouble with the above descriptions, I'd strongly recommend visiting reference 1. This has an excellent series of animated sketches which show the whole process very clearly.

FF27 Filing 3 Drw-C.jpg


By now, we're probably coming very close to the line or required dimension, but perhaps we also see a few scratches. As mentioned above, a single cut file will generally cut a smoother surface, but without changing files to a smoother cut, we can temporarily reduce the coarseness of the existing file. Do this by rubbing quite a thick coating of ordinary blackboard chalk, or even light oil (yes, really!) all along the file cutting face. This will produce a very nice smooth and shiny surface on the job. And when trying to hit the line or a specific dimension, as we get to within "a gnats what's-it" of size, try the process of draw filing as shown above.

The technique is quite simple. Lay the file across the job at 90 degrees and grasp the file with both thumbs just behind the rear edge of the file, the fingers being wrapped around the body of the file at each side of the job. Then slowly draw the file from Left (front of the job) to Right (rear), making sure to keep the file exactly horizontal, and remembering to relax the downwards pressure on the job during the return stroke (which is now a forwards stroke note)! This technique, coupled with chalk or oil on the cutting surface, will not only polish out any scratches but will also produce a very fine, almost machine-like surface, and with the bonus of bringing the job to spot-on dimension. Personally I find the results of this very satisfying - it's a clear mark of the skill of hand that you've painstakingly developed all on your own.

:arrow: Filing specific materials:

Stainless steel (and Titanium, if you have any!) is pretty tough and dense. If they're not to wear out quickly, the files used must be of good quality. Use at least a second cut coarseness. Take the filing stokes at bit slower than normal, and use a bit less downwards pressure than you would use on, say, Mild Steel.

Aluminium is, as already discussed, soft and clogs the file quickly - even the special ali file shown above. Generally, ali seems to respond best to strokes made across the job but angled Left to Right only. I've no idea why! Care is also required when setting up in the vice, and often some scrap wood cheeks will be useful, especially on thinner stock as it's very important to prevent the job vibrating and chattering. Ali generally responds well to draw filing for the best finish to final size, but special care must also be taken to remove the wire-edge bur from back surface of the job.

Brass and Bronze are both softer than Mild Steel but generally harder than ali. Depending on the exact alloy, both can be harder than you expect, especially some bronzes. I find the Oberg cut (the "lazy S" double cut shown above) to be very good for this, but that same file is not so good for draw filing. I change to a smooth cut file for the last knockings if accuracy is important. Use a medium downwards pressure (less that for MS, more than for ali). If you're not very careful, accidental grooves will soon appear, and as brass particularly is often used for on-show items, great care is Xneeded if you're not to ruin the job at the last minute (DAMHIKT please)!

Lead and most Solders are not only poisonous (so be careful!), but are also very soft. If shaping is required, the single cut riffler file shown above can be useful, and round and half-round files too, but whatever you use, very frequent clearing during the filing is essential (not to mention "knife" cleaning the file afterwards)! Use very gentle downwards pressure and use the scratch card at least every couple of strokes.

Wrought and Cast Iron are, contrary to popular belief, normally "eezy peezy" in that they're normally much softer than you'd expect. A smoother cut (less coarse) file normally works well, and a lot of cast iron often has graphite components included which makes for a lovely smooth finish and a nice smooth filing action. About the only thing to be especially careful of is mounting in the vice - some cast iron components can be relatively fragile if presented with uneven loads, especially oddly shaped castings.

Spring Steel is often even harder than stainless, but a good job can still be done with care. Just because it's almost impossible to drill holes in spring steel doesn't mean a new hook end can't be filed up into a clock spring (for example) - and without messing about with heat treatment. Use a good sharp file, ideally single cut and not too coarse - 2nd cut grade perhaps. Most spring steel springs are pretty thin so the best approach is to very carefully load the job into the vice with it fully supported to prevent vibration and chatter. A couple of pieces of thin sacrificial ply in front of and behind the whole work piece, covering it completely works well I find.

Plastics covers a wide range of materials with differing properties, and these range from pretty hard to very soft. I know there is at least one member of this Forum who has professional plastics knowledge – much more than my own, so perhaps he, and anyone else, would like to add comments here?

Hard plastics require files with deeply-cut, very sharp teeth. I've found the above-mentioned Surform and Abrafiles to be useful sometimes, but frankly, if the finished job is to be on view, my results are not usually all that satisfactory. That's because my finished surface, instead of being smooth and shiny as originally moulded, often ends up marked with fine, rather dirty-looking scratches. Frankly, for simply removing excess moulding flash, I prefer a sharp knife rather than a file, and I only rough-file stuff to achieve a particular fit or for shaping fillers, etc.

:arrow: I almost forgot!

Clearing the wire edge/bur from the finished job is important, both for good looks and for safety - these edges can be quite sharp. My own method is to remove the job from the vice, hold the job in the palm of my Left hand, then use a dead smooth file to draw the file slowly and lightly backwards and forwards across the burred edge with the file lying almost flat on the face. In the case of ali or brass which shouldn't have any file marks on visible faces, make sure to keep the edge of the file off the visible face, and finish off by drawing a fine sharp knife lightly backwards over the edge, again with the blade almost but not quite completely flat on the face.

:arrow: Filing "machines":

I believe that in the past, machines to hold special machine files were common. These were originally hand-powered, then later motorised. Apart from in pictures I've never even seen one, and have no experience of them at all.

But these days, Black & Decker sell a machine called a "Power File" (probably other manufacturers do too). This is a bit like the compressed air or electrically-powered elongated thin abrasive belts seen in car body repair shops - the B&D machine looks similar, with a range of different width abrasive belts tensioned with a spring arrangement and driven by an electric motor. I have one of these actually, which I bought for a specific job (blending GRP and plywood into compounded concave curves). It was quite good for that job (it saved a lot of laborious hand work), but just for interest, I've tried it on metal too.

Clearly it's aimed at the DIY market, and personally I found that just like any other abrasive belt, it would remove metal OK. But I couldn't work out how to hold the tool well enough to produce any degree of accurate work. So I think "Power File" is a daft name because I don't believe that anyone will be able to produce filed work with any accuracy, and it was even difficult to get a surface straight and flat and square. So if you're thinking of saving yourself a bit of sweat, I'd suggest you instead save the money and try out the techniques above. Less than half the cost of my B&D tool would buy a lot of decent files!

:arrow: Filing a job in a drill or drill press, or in a lathe chuck:

Use basically the same procedure as above, and especially here, always use a handle please. Depending on the amount to be removed, chose a single cut file, coarse cut if there's a lot to take off, smoother if not so much. A file with a safety edge is helpful, especially if you're truing a diameter up to/along to a shoulder. File against the rotation of the work piece, use light downwards/sideways pressure, and make forwards and backwards strokes, reducing the downwards/sideways pressure on the back stroke, all as described above. Chose the lowest rpm possible on the horizontally-mounted drill, in the lathe, or in the drill press, and remember that the chuck bearings on both drills and drill presses are not really designed to accept much downwards/sideways force - i.e. use lighter pressure on the forward stroke of the file than you'd normally use when filing in the vice. This last point does not of course apply to filing in the lathe.

Even with the lowest possible rpm selected, the chances are that the effect of the rotation of the work piece, plus your forward file strokes, will result in file clogging much quicker than normal - i.e. use the scratch card more often than usual. If you're trying to hit a specific diameter and also achieve a decent finish, pay particular attention to keeping the file teeth clear. You may well find the above tip re using chalk or oil for the last few strokes helpful in getting a decent finish on the required diameter.

:arrow: Starting a hacksaw cut:

At school (which was the only formal wood work teaching I've had), I was taught that when cutting timber it's important to start the cut by placing the thumb just to the waste side of the chosen mark, then draw the saw backwards a few times (I'm assuming a conventional wood saw here, not a Japanese saw or any other which cuts on the back stroke). That makes a small vee in the job and ensures that the saw doesn't bounce out of the proper position as you start the real, forward stroke sawing. I hope that's the right procedure for wood!

But I've seen many beginners attempting exactly the same procedure when starting to cut a piece of metal to size with a hacksaw. Unfortunately, this is usually doomed to failure as the hacksaw will usually bounce around all over the place across the top surface of the job. Not at all what we want for the start of a cut which is supposed to be in the right place!

The procedure that will work every time, without fail, is to use a small smooth triangular or half-round file to make a vee similar to that when cutting wood. It's much easier to keep a file in the correct position for a couple of strokes. But do make sure to keep the flat surface of the file as close to the mark as you dare (!!), and also, keep the flat surface of the file as vertical as you possibly can, leaving the half-round or the other two sides of the triangle to cut into the waste metal. See diagram.

FF28 Start Cut-C.jpg


Part 3 (or is it 4? I've lost count) continues:
 

Attachments

  • FF20 Typical Set - Note the half round segment cuts-C.jpg
    FF20 Typical Set - Note the half round segment cuts-C.jpg
    60.6 KB · Views: 4,656
  • FF21 Scratch Card etc-C.jpg
    FF21 Scratch Card etc-C.jpg
    70.6 KB · Views: 4,649
  • FF22 File Clearing-C.jpg
    FF22 File Clearing-C.jpg
    55.4 KB · Views: 4,653
  • FF23 Storage1-C.jpg
    FF23 Storage1-C.jpg
    89.7 KB · Views: 4,652
  • FF24 Storage2-C.JPG
    FF24 Storage2-C.JPG
    73.5 KB · Views: 4,651
  • FF25 Filing 1 FWD-C1.jpg
    FF25 Filing 1 FWD-C1.jpg
    67.3 KB · Views: 4,653
  • FF26 Filing 2 BCK-C.jpg
    FF26 Filing 2 BCK-C.jpg
    94.2 KB · Views: 4,650
  • FF27 Filing 3 Drw-C.jpg
    FF27 Filing 3 Drw-C.jpg
    82.8 KB · Views: 4,648
  • FF28 Start Cut-C.jpg
    FF28 Start Cut-C.jpg
    158.5 KB · Views: 4,653
Part 4:

:arrow: A quick filing job:

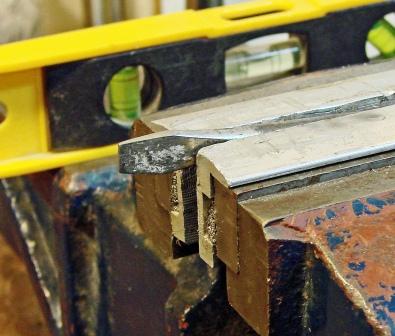
Back at the start of this piece I gave a long list of jobs that I think are best done with the file. One of those was the upkeep of screwdriver blades. This may seem surprising as I believe many prefer to use the off-hand bench grinder. Personally I find the use of a file not only quicker but also much more accurate, and there is no risk of burning the temper of the blade, which can happen very quickly on the grinder.

To work well in the slotted screw head, the screwdriver blade must fit the slot snugly of course. That means it must be parallel in width, correctly tapering in either one or two directions, and the blade end has to be exactly perpendicular to the shaft of the tool. As said, I find it much easier to set those angles up carefully in the vice, using a spirit level if necessary - certainly easier than "blindly stabbing" the blade against the grinding wheel without much chance of getting the angles exactly right. I hope the first three pictures below make this clear.

FF29 Retouch Screwdriver 1-C.jpg


FF30 Retouch Screwdriver 2-C.jpg


FF31 Retouch Screwdriver 3-C.jpg


If done often it really only does take just a couple of strokes from a smooth single cut file on each of the angles. And don't forget than even though slotted screws are less common these days, they are still to be find in a lot of electrical and electronic goods, where often, the smaller slotted-type screwdrivers have two parallel sides, rather than the tapered sides shown in picture "Retouch 3" above.

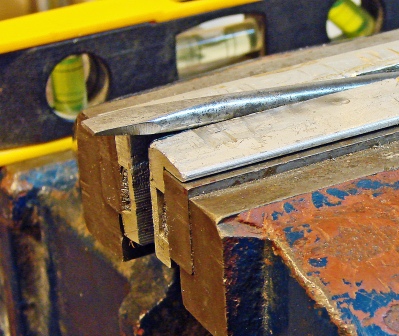
Although not so effective, if you have a particular favourite Pozidrive or Phillips screwdriver (rather than a throw-away removable bit), then if you catch it early enough, some limited cleaning up of burs is possible with a file. Set the tool dead-on vertically in the vice as shown below and use a smooth triangular file:

FF32 Retouch Pozi-C.jpg


:arrow: Another quick filing job:

I maybe a bit weird ("maybe" he says??), but I have an unproven theory that the longer a screwdriver is, the higher is the torque that can be finely (i.e. with feeling) applied to screws. As a sufferer with back and shoulder and arm problems, I of course often use a power screwdriver, and this has the advantage of accepting any bit type. But I do like the "fine final torque feeling" I get when giving the last quarter turn or less by hand. With the longer and larger diameter screws, this means a Yankee-type screwdriver for me. But as far as I know, Stanley and the other Yankee manufacturers only produce either flat slotted or Pozidrive bits for these screwdrivers.

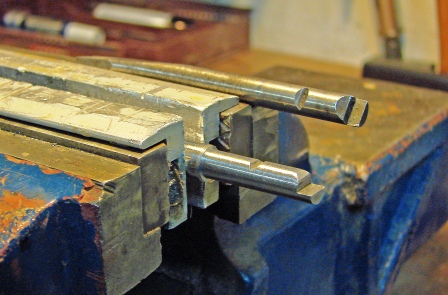
So this led me to the mod shown below which is A) not my original idea; B) quick and easy to do; and C) enables any bit type to be used in my Yankee screwdriver. (OK, agreed, perhaps it's not so quick if you don't have a lathe)!

The idea is to "butcher" a magnetic bit holder from an interchangeable bits set. In my case, the bit holder had a hex-drive shaft which I simply cut off flush with a hacksaw (if it had been a decent quality bit holder, I guess I would've had to use a cut-off disc in an angle grinder). This was then mounted in the lathe and carefully turned down to the same diameter as the shaft of a proper Yankee bit. The only job then was to copy the little vee positioning slot in the correct place along the now reduced diameter shaft, followed by copying the "angled/flat" driving dog on the end of the bit. By careful set up in the vice, these last two features were easily cut with a medium single cut file. I hope the picture makes this plain. As said, probably not a quick job without a lathe (that turned-down diameter needs to be spot on) but with time and patience, do-able I think. And the little "vee positioner" plus angled drive dog were simply a matter of some gentle filing practice, exactly copying the same features from an existing Yankee bit. I hope the picture makes all clear.

FF33 Yankee Bits Adaptor-C.jpg


BTW, when we're talking about "spot-on" dimensions, such as in the above example, just because metal workers generally work to tighter tolerances than wood workers, this doesn't mean that you will automatically need perhaps quite expensive precision measuring equipment such as micrometer/s or vernier calliper/s when you're simply copying something else. A simple calliper (the non-vernier type), or a good, lockable pair of spring-bow outside callipers will do just fine. It's only necessary to set your calliper up as a comparator - i.e. set it and lock it so that it's a tight-sliding fit over the diameter or the flat on the item you're copying. The actual dimension in real numbers doesn't matter. When you simply file (or turn) the item until the job is just also a tight-sliding fit over the pre-set calliper, then you're there! This does however need a certain amount of "hand feeling" on your part as you mustn't force the calliper over the item you're making ( obviously!), nor must you keep filing or turning until the item you're making is too small and becomes a "sloppy fit". But for those who don't have precision measuring equipment (although digital vernier-callipers are often quite cheap these days, and easily capable of measuring to +/- 0.001 inches - or 0.01 mm), if you don't want to pay for such gear this shouldn't stop you trying a bit of precision copying work when required.

:arrow: Manufacturers:

Here's a list of manufacturers of known high-quality files. The list is most probably out of date as far as UK is concerned, and it's undoubtedly incomplete, so as noted before, anyone who wants to add info will be most welcome.

Accu (Switzerland - general metalworking files?);

Baiter (Switzerland - general metal working files, plus "special-cut" files for aluminium);

CEKA (Germany? - mainly smaller warding files, needle files, and Swiss files I think);

Henry Disston (UK? USA? - no longer makes files?);

Grobet (Austria? Germany? - mainly Swiss & needle files?);

J.A. Neil, "Eclipse" brand (UK - no longer makes files?);

Nicholson (UK? USA? - all types?. BTW, I thought this is/was a British company, but while Googling for this post, it seems that Nicholson now belongs to an American tools group?);

Sandvik, also a group I thin? Sweden - maybe also/only under the group brand names of "Bahco" or "Oberg" - makes all types of files);

Simmonds (USA - all types); Vallorbe (Switzerland - only Swiss & needle files I think, but also scroll saw blades for both metal and wood under the brand name "Pegas").

:arrow: References:

For anyone who (still?) has an appetite for more info, the following will be useful. Also, for those who have any doubts about their own filing technique, the animated cartoons to be found at reference 1 are highly recommended.

1. http://www.technologystudent.com/equip1/hfile1.htm

2. https://en.wikipedia.org/wiki/File_(tool)

3. https://www.kmstools.com/blog/hand-file-identification

Well folks, when I agreed to do this piece, I had no idea it would turn out so long, but although I've gone back over the text several times, I've found it hard to cut much out if it's also to be a true "beginner's guide".

But I do hope it's not boring and hope it will actually help those with little confidence in their filing ability. Just have a go and improve your present capabilities. You'll be pleasantly surprised I think.

As you see, there's actually much more to files and filing that you may have realised. But although they're used less in a production environment these days (how many tools and machines have you found where de-burring wasn't done?), they're still used by professionals in pattern, tool, and die making, not to mention in watches and clocks, and by model makers. Even expensive files are a lot cheaper than most other tools, and used correctly, they can produce excellent results.

I should add that in my view, there are very few "truly rights" and "truly wrongs" in this life. So I've simply repeated exactly what I was taught all those years ago, and added the little tips and tricks I've developed since. But if you know a better way to produce good, accurate results, then off you go, and the best of luck to you.

It occurs to me that hack sawing is closely related to filing, and it's also a subject which perhaps not too many people without an apprenticeship background have much knowledge of (in fact, some of the tradesmen who visit us at home frankly horrify me with their lack of hack saw technique and over-use of their own energy)! Such a piece would be much shorter than this, but I'll only write it up if there are enough requests. It's up to all of you members.

It also occurs to me that I could write more, especially about some of the jobs made possible with files, such as making a router mounting plate. I need to make one for myself anyway, so I could slow that job down and turn it into a WIP post. But I'll only do a WIP if there's enough requests (not just one or two), so if wanted, please say so. And if you do ask for it, don't expect it "next week" either!

But for now I expect everyone's had more than enough of me - and of files!

AES
 

Attachments

  • FF29 Retouch Screwdriver 1-C.jpg
    FF29 Retouch Screwdriver 1-C.jpg
    55.6 KB · Views: 4,635
  • FF30 Retouch Screwdriver 2-C.jpg
    FF30 Retouch Screwdriver 2-C.jpg
    83.9 KB · Views: 4,638
  • FF31 Retouch Screwdriver 3-C.jpg
    FF31 Retouch Screwdriver 3-C.jpg
    25.6 KB · Views: 4,638
  • FF32 Retouch Pozi-C.jpg
    FF32 Retouch Pozi-C.jpg
    81.3 KB · Views: 4,640
  • FF33 Yankee Bits Adaptor-C.jpg
    FF33 Yankee Bits Adaptor-C.jpg
    72.8 KB · Views: 4,639
Great post!
I work with files pretty much everyday and I learned a lot from reading this.
 
I well remember my apprenticeship days in the classroom, when we had to make scale drawings of every tool we used so that we could understand them better. 18" stillsons were my favourite.
A very exhaustive (exhausting?) work, You have my respect for staying focused for that long. But I can save you a bit of work because Axminster sell an adaptor for yankee screwdrivers to take any hex bits.
http://www.axminster.co.uk/hex-adaptor- ... s-ax927317
 
That's a really useful survey of the essentials. Many thanks for taking the time to write it.
 
@ Peter Maddex: There's a brief mention of Dreadnaught files in there - at the end of the description of different "specials" I seem to remember.

@ sunnybob: Ah, "Anthony Alouicius Hancock", NOW yer talking mate! Thanks for the info about the Axi Yankee adapter - I've made mine.

AES

Edit for a P.S. Thanks to whoever joined the 4 parts together (was it CHJ?). I didn't understand how you did that (I AM dense, I know) but thanks anyway.

And thanks for the thanks everyone. It's Robbo 3 you should "blame" really - he asked me to do it.
 
AES, On the basis that the apprenticeships from our day were 4 -5 yrs long as a minimum, and you have covered the first couple of months or so I can see this being a long series.

Who's going to set up the practical workshop side of things for the next 4 years so that there is a "Full Technical Certificate" at the end.

I've got a copy of this for ref. if needed from 1956, for the first year:- :lol: :twisted:
scan0020-1024.jpg
scan0021-1024.jpg
 

Attachments

  • scan0020-1024.jpg
    scan0020-1024.jpg
    43.9 KB · Views: 4,473
  • scan0021-1024.jpg
    scan0021-1024.jpg
    120 KB · Views: 4,475
CHJ, my apprenticeship was in the RAF as an engines and airframes fitter. It only lasted 3 years, so things moved at quite a pace and don't forget that unlike "civvies" we had all that marching and square-bashing and saluting to learn too! And there were often quite long discussions amongst us all about "How come the civvies need 4 or 5 years, whereas we only need 3?" But we worked 5 and a half-day weeks, and anyone falling behind was soon pushed into the own-time "extra studies" group.

But re the practical, as I remember, it was for 4 half-days per week for I THINK, 2 months or so. During that time we learnt all the stuff described, and about the next month or so practical was spent doing basic welding (gas and stick electrode), turning, copper-smithing, soldering, etc. So about 3 months total on "basics".

As I hinted in my piece, at the time I never appreciated what a good basic grounding it all was, though in fact, I NEVER made anything to be fitted on to an actual aircraft during my actual service (of course not).

The other differences between us and civvies was there was no day-release to go to the local college, our "schools" was on the same site, with own (generally excellent) teaching staff. And apart from the odd special books from the on-site Library (e.g. Kermode on Aerodynamics) all the books were actually AM-produced - "APs" (Air Publications) if you remember that term.

But as also discussed on the General Chat section about "How do we get kids .......", what I didn't realise at the time was that both the practical and the theory were very much specifically aero-oriented, and above all else, aimed to produce a mind-set of "Now how do I solve this?".

It was only afterwards that I realised how good it was. I don't think the RAF has any more apprentices these days.

Drift a bit, sorry.

AES

P.S. I'm NOT writing the whole book (unless you cross my palm with LOTS of gold & silver that is!!! :D
 
AES":2a12fe15 said:
CHJ, my apprenticeship was in the RAF as an engines and airframes fitter. It only lasted 3 years, so things moved at quite a pace and don't forget that unlike "civvies" we had all that marching and square-bashing and saluting to learn too! And there were often quite long discussions amongst us all about "How come the civvies need 4 or 5 years, whereas we only need 3?" But we worked 5 and a half-day weeks, and anyone falling behind was soon pushed into the own-time "extra studies" group.

Ministry sponsored civilian apprenticeship was, First two years full time in training workshops with a ratio of 6-7 to one with apprentice master taking machining skills up to the level of being able to manufacture something like a micrometre from scratch with lecture rooms in same buildings for associated coarse work.
Second two years were allocated to a one-to one apprentice master in a research support manufacturing workshop with associated time in associated lecture facilities taking skill levels up to manufacturing such things a prototype rocket guidance servo systems, prototype magnetrons, plating/ metal deposition forming, metal casting including lost wax parts, making prototype metrology lab standard test equipment covering all processes involved, cryogenic testing and application tooling made from cupronickel etc. time to finish was based on academic limits aimed at and achieved and if like me you desired to move from manufacture engineering into aircraft instrument, electrical and radio radar fields extra time was spent going through servicing bays, second and first line servicing and research installation fitting etc. so there was a slow filtering along the way starting with City & Guilds Final for Mechanical, ONC/HNC- for Electronic students tackled similar in their fields with crossover between trades dependant on abilities and leanings and on to Degree-Doctorate- etc. if you were bright enough.

Much exposure to Industry such as steel making- car production- bearing manufacture, atomic research at places like Harwell etc. all very much aimed at making you look for alternate methods and improved standards.

So things were not a so cut and dried as these days with private industry driven systems, with no real profit motive in the system you were guided and pushed along to the max of your abilities. Mind you there were those that left the system every six months or so if they did not make the grade.

Did mean many of us ended up as Jack of all trades as 20-21 yr. olds just armed with an ability to know where to look for a possible solution when confronted with the real world and a few 'specialists' eventually coming out of the end becoming masters of a subject.

So much has changed with the advent of electronic computers it becomes very difficult to maintain the small but to my mind essential core of finite hand skilled folks that still have a real niche place to keep things running smoothly in a world reluctant to support their learning curve in deference to profits.
 
I've never had *any* workshop training of any kind, and I lap up this kind of wisdom with gusto. Is this going to be saved and stickied somewhere safe so that people like me can easily find it and go back to it from time to time? It really is far too much to be easily digested at one sitting. I did think of printing it out, but it's 32 pages!
Martin.
 
Thanks for taking the extensive time to do this,very interesting and informative,I served a mechanical engineering apprenticeship with the N.C.B.back in the sixties but changes in career made me forget a lot that I was taught including the use of files.Your tutorial not only refreshed my memory about the use of files but also reminded me of the good times spent during my apprenticeship.Many thanks once again,Kevin.
 
Well done my friend, brilliant write up =D>
Takes me back to my days at the training school. I pick up a file these days and hear "flat and square!! file it properly boy, flat and square!!" :lol:
 
Thanks a lot for this tutorial!

I file quite a bit whan repairing machinery so most of what you told is known to me yet I am happy that you took your time to tell it so others so they don't need to make as many misstakes as I did while learning.
The main problem to me is that most of the file types you refered to are no longer available.

Theese days there as far as I know only two decent file makers in the world.
-Pferd in Germany
-Sandvik nowadays in Portugal

The rest have closed down or became marketing names stamped on cheaply made files that cannot cut mild steel or cast iron for more than a few minutes before they are worn out.

For several years I have been searching high and low for bellied flat files to no avail. I get by using the flat side of certain half round Sandvik files that may still occasionally be bellied. When I find bellied ones I buy a bunch.
The importers say bellied half round files aren't made anymore so if that's true I must soon invent a way to cut and harden my own bellied flat files or find a way to bend factory made parallel sided flat files.
 
Back
Top