advice on repairing an infill smoother

UKworkshop.co.uk

Help Support UKworkshop.co.uk:

This site may earn a commission from merchant affiliate links, including eBay, Amazon, and others.

baldpate

Established Member
Joined
30 Jan 2011
Messages
271
Reaction score
10
Location
London
Hi folks,

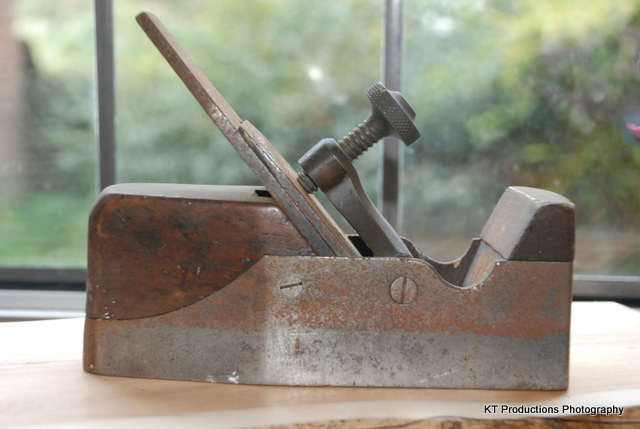
a few months ago I acquired a small infill smoother on ebay; the auction didn't go too high because there was damage to the metalwork at the heel, which you can see in the picture below. The same picture, in the background, shows the removed rear infilll; you should be able to make out the embedded remnant of the screw which I presume was the means that the infill was secured into the case - there are no infill-securing screws or dowels through the side walls. I imagine the damage was caused by some rather too enthusiastic tapping to adjust the iron.
damage_to_heel.jpg

When I first got it the infill seemed secure enough, but in a recent disassembly it came free. There were traces of some sort of glue on the infill base. The fit is pretty good and the plane is still very usable, but the infill now moves back a fraction of a mm when the blade is clamped with the lever cap.

So I'd like some advice on how to fix it. Please note - my metal-working skills are elementary, and certainly not up to repairing the damage to the heel. My first thought was simply to epoxy in the infill, but then I thought that woodscrews through the side-walls (one each side?) would do the trick. Or maybe both.

So, what would you do?

Thanks

Chris
 

Attachments

  • damage_to_heel.jpg
    damage_to_heel.jpg
    155.4 KB · Views: 1,045
I have a few of these and all except my Scottish infill are held in place with 3 screws/rivets. 2 at the side and one at the back. Guess some glue is also involved.

My Scottish infill has a similar low back end and that just has the 2 screws on the sides. Jimi's also shown on the thread below has 4 (2 each side) side screws and nothing at the back.

scottish-infill-smoothing-plane-help-advice-needed-t69147.html

Any chance of a side shot ?

So my guess is glue and side screws are the solution. Hopefully Jimi will be along shortly to better advise on repair and type of glue to use.

Edit:

This thread shows planes that are more like yours and all with side screws

infill-coffin-smoother-wedge-repair-replace-wip-t78676.html
 
Hi Chris...

At work at the moment but can you put the infill back in and take another rear shot straight on.

When I get home sometime after midnight I'll have a gander on a larger screen and come up with some ideas.

Cheers mate

Jimi
 
+1 side screws and glue
They will need to be countersunk, rivets won't work in this case as I reckon when your perning you may cause further damage to casting.
Make sure the screws are slotted and not modern ones. Old infills don't like modern screws ;)
Some more photos would be nice.

Hope this helps
TT
 
Thanks for replies so far. Here are a couple more shots.
side_view.jpg

rear_view.jpg


Hope these make it clearer.
 

Attachments

  • side_view.jpg
    side_view.jpg
    192 KB · Views: 927
  • rear_view.jpg
    rear_view.jpg
    140.6 KB · Views: 927
Another old slater style infill. Shame about the damage but it's in good nick apart from that. Ilia it where mine I'd as mentioned above countersink two slotted screws into the tapered back that will sort your problem out and for piece of mind use an adhesive to bind it all together :) sorted.

Try and match the new screws to the one already in it so it look original!
Let us know how you get on.
TT
 
Exactly what I would do but be sure to start with a centre punch...drilling cast steel is a tad difficult and use new bits. Start smallish and expand the hole to fit the chosen old slotted wood screws.

I don't think you will need glue as well if you do two fastenings on each side and it allows you to remove the infill at a later stage should you wish to.

Countersink of course.

The important bit is to line up the infill so the bed lines up with the bed of the sole so that the iron sits flat. Do this with the holes drilled in the sides and carefully mark where the screws will go into the infill. Remove the infill and drill pilot holes so that it makes it easier for you to insert the screws and the bed will remain in the correct alignment.

Then I would make an infill piece for the "hole" in the rear out of mahogany and stain this to match the wood of the infill so it becomes virtually invisible. You might want to clean up the edges of the broken edge a bit so it looks the part with a half round file.

Glue the new bit in place with some Titebond original and it will stay there forever if you get a clean joint first.

If you need any part of the above or Toby's comment clarified let us know.

In the meantime...as a template...here is one I have:

DSC_0184.jpg


...the rear would originally have looked like this:

DSC_0269.JPG


Two screws hold the infill just to the rear of the lever cap...and one on the heel which you can just see under all the dents.

Clearly a previous owner of yours had been a little "enthusiastic" with a hammer (probably!) and not realised that the castings are very fragile to impact damage....unlike mild steel of the dovetail ones. Hence a chunk has fallen out around the weak point surrounding the original screw hole.

These pictures don't help with the resolution above but they do serve to give you a clue as to how it would have looked originally.

Hope this helps.

Good luck

Jimi
 
Thanks for your input everybody. Screws in the side is obviously the way to go. I think I'll put off glueing until I see the results of just using screws.
 
Just thinking aloud, but would it be feasible/desirable to try and replace the missing bit of metal with metal? Tidy up the shape of the hole, find a bit of cast iron roughly the right size and then do a lot of filing :( . Once you've got a fit, either epoxy the piece in, or silver solder or even braze if you have the kit? Might need to use one of those coolbag thingies that plumbers/bodyshops use to stop heat transfer to the front infill, but it could be a nice end result?
 
Hi baldpate, I know from reading many forums here in the U.S. a lot of people use a product called jb weld, I have never used this or any similar product, so I'm not sure it would work on such a small area, I hope someone can help you out it is a nice looking plane. Jamey
 

Latest posts

Back
Top