Post a photo of the last thing you made

UKworkshop.co.uk

Help Support UKworkshop.co.uk:

This site may earn a commission from merchant affiliate links, including eBay, Amazon, and others.
Just before Christmas, my Mum was using an old shoe box to store the nic nacs she uses regularly. Lets just say the shoe box had seen better days.

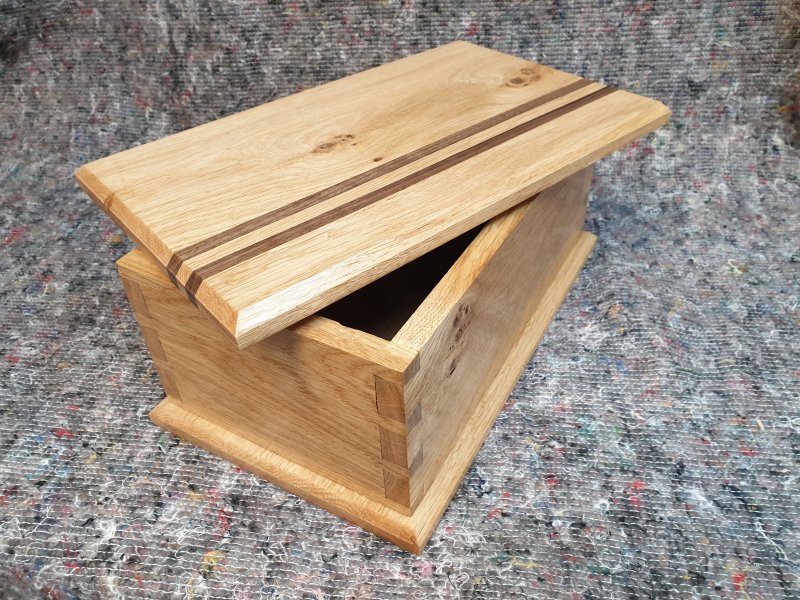
So she asked for a simple box, of similar dimensions. Now the box lives at the side of, but just under a small chair, so a hinged lid was out of the question. I'd not done any DT's for a while so put this together as much for practice as anything. It's European Pippy Oak, with ABW strips. Finish is Osmo PolyX Clear Gloss.

170355632.jpg
 
I discovered the world of Kumiko on YouTube last year and was intrigued enough to have a go at a simple pattern to use in a side lamp. My inspiration came primarily from videos by Des King, Mike Farrington and Johnny Tromboukis.
KumikoLamp-01.jpg
KumikoLamp-02.jpg

KumikoLamp-03.jpg


The lamp frame is Oak with a coat of Osmo and the Kumiko panels are a friction fit. The panels, which are left unfinished, comprise Lime for the gridwork, Bubinga for the diagonals and Walnut for the in-fill. Now that it's completed I realise that, in a lamp at least, it's much more about the silhouette than the colours of the wood and I'll probably just stick to Lime for the next one.
 
Ahhhh, you spotted my dilemma, Mike.
I didn't think the lamp frame construction through thoroughly at the time I pulled the P/T out to prepare the materials (I was too concentrated on the Kumiko pieces).

I'd prepared the Oak to 16mm square, the dimensions coming from what was usable from a board reclaimed timber I had lying around. The concept I was aiming for should have had larger dimension uprights as you have guessed. Given this is a trial piece and shouldn't receive much handling in normal use, I opted to compromise and go for a very weak joint and keep the protrusion feature (can't think of the appropriate technical term at the moment).
KumikoLamp-JointDetails.JPG

The horizontal 'squares' of the frame are made with half-lap joints with an additional 4mm trench cut to allow for a push fit of the upright pieces - this element of the joint being entirely dependent on glue.

I chose the make vertical pieces the push fit joints as gravity would be a help in minimising stresses on the joint. Time will tell if I can get away with it but I wouldn't use this joint again!
 
AndyT":3mc60gyh said:
Power tools or hand tools?
I mostly use power tools, Andy. To make the Kumiko strips I prepared a board to 12mm thickness and, using my bandsaw, cut a strip off both edges of the board and then went back to the planer to clean up each edge of the board before repeating. Finally, I cleaned up the sawn edge of the resulting strips in the thicknesser using an 18mm mdf board to allow thicknessing to 4mm for the Kumiok gridwork and 3mm for the in-fill strips.

I bought a 4mm FTG blade from Cutting Solutions recently and use that with a couple of cross-cut sleds on the table saw to cut all the half-lap joints (I'm particularly pleased with how well the FTG blade cuts).

Finally, I used my disc sander to do the majority of the Kumiko shaping using jigs to create the 22.5⁰, 45⁰ and 67.5⁰ angles needed.
 
pulleyt":1dvze7n6 said:
Ahhhh, you spotted my dilemma, Mike.
I didn't think the lamp frame construction through.......

It's a lamp. So long as the switch is detached from the lamp then it should never really need handling. It'll be fine. However, don't attempt to scale that up to a piece of furniture!!
 
MikeG.":a2yrxo7k said:
Could you show or describe the joints where the three frame pieces meet at the corners?
I did one similar a few years back...Dominos are your friend Mike :lol: - Rob
 
MikeG.":297grnfm said:
However, don't attempt to scale that up to a piece of furniture!!
Indeed. If I'd had thicker stock to hand I wouldn't have used it for this. Definitely a one-off solution :D
 
Not really a furniture worker but footstool made to match existing suite.
Cheers Andy
Now edited with pictures of completed footstool.
 

Attachments

  • rsz_img_20200129_121834.jpg
    rsz_img_20200129_121834.jpg
    630.1 KB · Views: 421
  • rsz_img_20200129_121854.jpg
    rsz_img_20200129_121854.jpg
    758.8 KB · Views: 418
  • rsz_img_20200129_121657.jpg
    rsz_img_20200129_121657.jpg
    715.7 KB · Views: 417
  • rsz_img_20200129_121727.jpg
    rsz_img_20200129_121727.jpg
    762.9 KB · Views: 416
  • rsz_img_20200129_121908.jpg
    rsz_img_20200129_121908.jpg
    761.3 KB · Views: 414
  • IMG_20200307_182542.jpg
    IMG_20200307_182542.jpg
    1.1 MB · Views: 30
  • IMG_20200308_104246_663.JPG
    IMG_20200308_104246_663.JPG
    635.8 KB · Views: 30
  • IMG_20200307_182403.jpg
    IMG_20200307_182403.jpg
    1.2 MB · Views: 30
Modified the Kreg fence I bought on here to fit my Startrite 352. Had to drill a few extra holes and fit a new tape but chuffed with the outcome.

Fence is attached two points to the right of the table slot and one to the left on 20mm spacers. Hope I can slide the blade out without removing the fence just by releasing the left side fixing. Should be ok with any blade <3/4”.

Fitz.
442229C1-5F6F-4DF8-AAC8-C6F9AF77B93A.jpeg

B9C83C87-0928-426E-91DD-402CEEDD8DEB.jpeg
 

Attachments

  • 442229C1-5F6F-4DF8-AAC8-C6F9AF77B93A.jpeg
    442229C1-5F6F-4DF8-AAC8-C6F9AF77B93A.jpeg
    344.4 KB · Views: 383
  • B9C83C87-0928-426E-91DD-402CEEDD8DEB.jpeg
    B9C83C87-0928-426E-91DD-402CEEDD8DEB.jpeg
    288.2 KB · Views: 383
Mahogany and Kevazingo jewellery box ...

C1D26ABF-055B-438B-A15D-A7DBD3100824.jpeg
8B2DB252-E590-4432-87E0-9E7C7D41E91B.jpeg
 

Attachments

  • 8B2DB252-E590-4432-87E0-9E7C7D41E91B.jpeg
    8B2DB252-E590-4432-87E0-9E7C7D41E91B.jpeg
    120.6 KB · Views: 378
  • C1D26ABF-055B-438B-A15D-A7DBD3100824.jpeg
    C1D26ABF-055B-438B-A15D-A7DBD3100824.jpeg
    126.6 KB · Views: 378
My woodworking is like a Billy Connolly sketch, it’s very circular and involves lots of tangents, but finally comes back to the start and everything resolves.

I started this desk before the shelves I recently finished, but I put it in my boy’s room rough finished to see how it worked. Two weeks later it had so many books on it I had to build the shelves. Finally back to finish it!

A simple desk made from two boards recycled from an old Victorian wardrobe, perhaps mahogany? Two rails float of the bottom to stiffen across the depth, width wise it’s stiff enough, I considered stopped sliding dovetails but decided they were beyond my ability. Hairpin legs off eBay for £35.

Desk is asymmetrical to account for the space it needs to fit in where it overhangs a radiator. I was worried about the heat making things move but after two months sitting there in the rough it was fine.

I stupidly edge jointed the boards with the grain running the opposite direction on the two boards. This combined with the wood having a real tendency to tear-out made planing the top flat a long process. Sharp irons and fine shavings were the only way forwards. Top is finished with Polyvine, which I’m going to leave to cure a few weeks before I try to finish dead smooth.

A97D0900-4A47-4FD1-924F-7130C4771E49.jpeg


7A079708-4CC8-46CA-B385-FD7189F04BAF.jpeg


16D2F0EB-F9EA-4934-AB31-C51521DB2768.jpeg


A97D0900-4A47-4FD1-924F-7130C4771E49.jpeg


Fitz.
 

Attachments

  • A97D0900-4A47-4FD1-924F-7130C4771E49.jpeg
    A97D0900-4A47-4FD1-924F-7130C4771E49.jpeg
    213.1 KB · Views: 316
  • 7A079708-4CC8-46CA-B385-FD7189F04BAF.jpeg
    7A079708-4CC8-46CA-B385-FD7189F04BAF.jpeg
    1.7 MB · Views: 318
  • 16D2F0EB-F9EA-4934-AB31-C51521DB2768.jpeg
    16D2F0EB-F9EA-4934-AB31-C51521DB2768.jpeg
    384 KB · Views: 316
  • 1FFB9B1A-EB49-4C13-99C2-7A2F69818961.jpeg
    1FFB9B1A-EB49-4C13-99C2-7A2F69818961.jpeg
    285.6 KB · Views: 240
Back
Top