The UKW Infill Project

UKworkshop.co.uk

Help Support UKworkshop.co.uk:

This site may earn a commission from merchant affiliate links, including eBay, Amazon, and others.
Cheers Andy...but remember...this is my first attempt at one of these so I would hope the balls ups are more help than anything else mate! :mrgreen:

Just looking at the R.Welch of Richard's one above...methinks he was being extremely modest in his woodie infill abilities too! Eh Richard! 8)

I did a bit of research on the bevelling and came to the conclusion I actually like Norris' solution...don't bevel the cupid's bow bit at all...a point that Karl copies in his beautiful A1....

A1_17a_pa.jpg


Picture from the Holtey Plane website...

The rear is just as Karl does it too so shall we just go with shamelessly copying Thomas and Karl? Seems a cheek not to! 8)

Jim
 
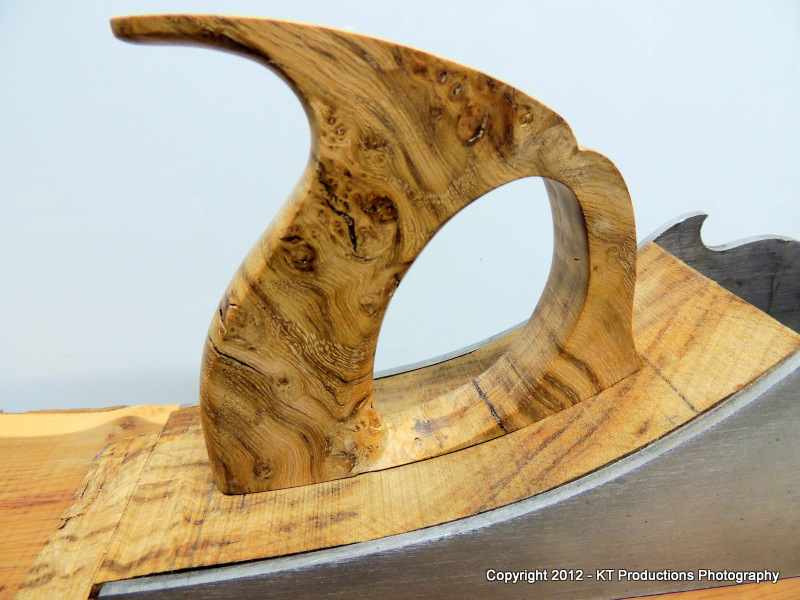
I tinkered with the handle tonight.....

DSCN1119.JPG


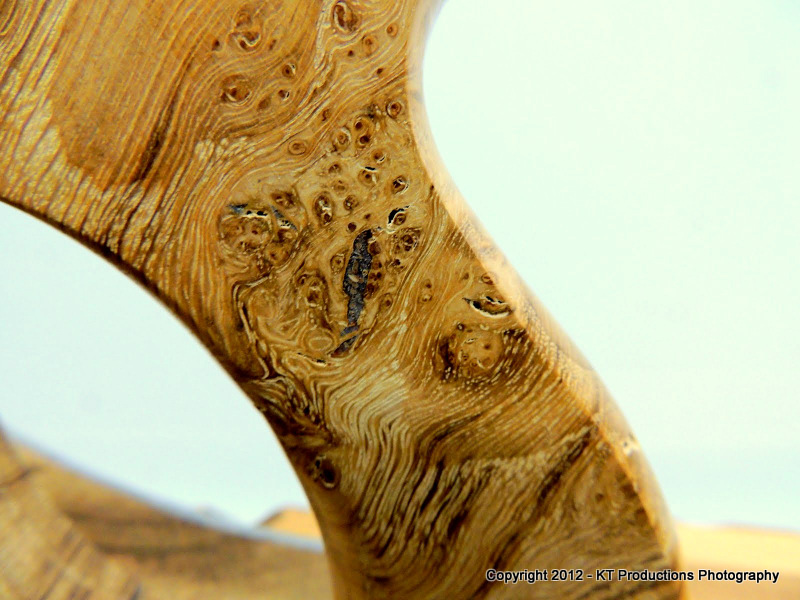
The grain and burr in the handle stock has exceeded my expectations...

DSCN1124.JPG


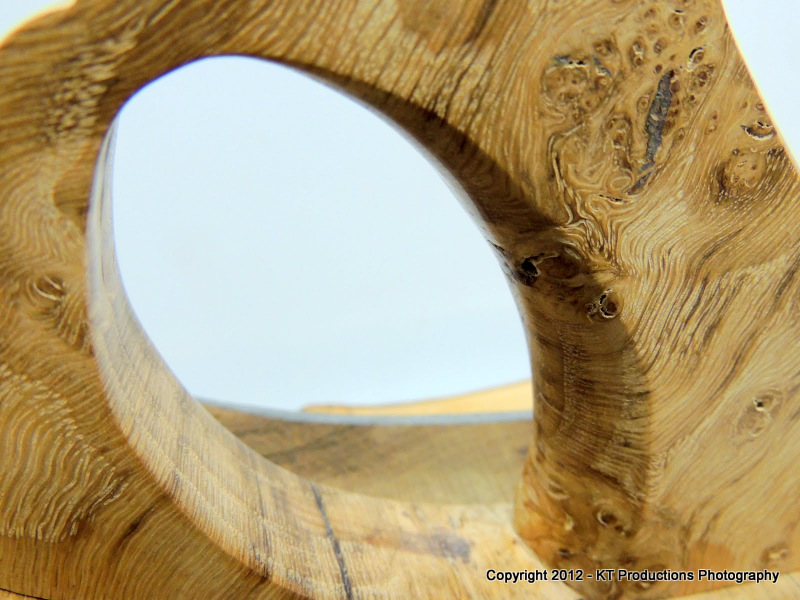
My little Universe in miniature as I have said many times before about burrs.

DSCN1125.JPG


Richard T and Richard A....I've gone with a more classical Norris handle with the transition at the bottom right.

I like this powerful back to the handle and the delicate...almost feminine front with the little upturn and splay to the bottom.

I was getting a bit worried Richard as the step did not follow the base in places...then a HUGE "DOH!!! (homer) (homer) " hit me...

It's not been smoothed out yet has it! :oops:

That's the next job!.....and your views on bevels gratefully received!

Jim
 
Richard T":3p7kapko said:
Not quite sure what you mean there Jim ... What Doh! ? Looks good to me ... ????

See where the black line is on the bottom of the handle...from there left about one inch...the tenon step has a gap to the tail infill.

But if you look...that part is lower at the edge than either side of that where the handle does fit flush.

So if I remove the rises to the metal in those areas the whole handle will drop left and right bringing the middle into line!

Jim
 
Well you can take the steel down too - the shape is very flexible. It's a blank canvas. With the infill in without the handle it can be shaped in situ (draw filed) steel and all. Then the tenon shoulders/tenon re adjusted.

I suppose this wouldn't happen with a straight - through, handle size mortise but it's a trade-off. Very daunting doing a straight - through with the curve on the back of the handle to consider.
 
It looks beautiful, both the wood and the profile on the handle. Beautiful.

Do you still intend to modify the shape of the handle before finishing it? I think the side profile is brilliant, but at least I prefer a rounder, or even a fully oval cross-section for the handle. A handle just fills the hand much better that way and gives freedom to change your grip on the handle.

I know Norris used handles which were flat on the sides and just rounded over on the corners, but I think that had much more to do with the manufacturing methods and much less with ergonomichs or aesthetics.

Don't get me wrong, it is amazing as it is. Perhaps I tend to round my designs too much, but it's because I'm afraid that all corners will dig in to my hands when using the plane for a longer time. Those edges look brilliant, but they also look like they could start feeling a bit uncomfy after half a day of planing.

Pekka
 
Ah....no sorry..I think you misunderstand.....

There isn't actually a problem. The sides are perfect curves from which I took the line for the curve on the wood.....making sure I marked the two cross points for each end of the handle.

I cut the step tenon and then noticed the couple of thou gap in the middle. But if you look...when I cut the infill on the bandsaw...I went off line slightly and it is proud at the front and back..

I need to sand and finish the infill to the sides first...then the tenon will fit perfectly in line.

I'll be doing the finishing later so will show you....

Cheers

Jim
 
Good, good, good good good.

That's what comes of trying to read and understand after falling asleep in front of the fire and looking at the forum at 3.43am en-route to beddy byes.
 
Hi Pekka

Thank you for your kind words...having seen your work I understand what you mean. Strangely, the flats are not at all comfortable. The front of the handle is almost a perfect right angle...just a little slope away and I tested the rear and the hand itself follow the small amount of flat...so it should be comfortable enough.

I have seen quite a few Norris handles and they do stay within a style profile but there are a huge number of subtle deviations from the example Richard A posted a few pages back...

025-3.jpg


The leading portion tends to be flat all over...with a minute curve on the inside...barely noticeable. Some follow on from the bed as a ramp for the rear portion of the iron and adjuster...

na1.jpg


...some leave a space and curve in that lovely way and don't have the adjuster.

The rear of the handle sometimes just follows the oval of the insert...

na13.jpg


...though these tend to be smaller panel planes.

You may very well be correct with your idea that the production would be easier to leave the flats...but I prefer this to the completely rounded handles commonly found on smoothers.

Cheers

Jim
 
Richard T":ds6tak6j said:
Good, good, good good good.

That's what comes of trying to read and understand after falling asleep in front of the fire and looking at the forum at 3.43am en-route to beddy byes.

I've been like that recently Richard...can't seem to sleep at all lately. But it is very conducive to research!! 8)

Cheers

Jim
 
Hi Jim,

I think we talk about slightly different thing. What I meant was only the part of the handle that you grip: on the first two examples there that part is oval in cross-section: you are holding a round handle, not just a square bit with corners cut off with a router as on the last picture. I understood that you are talking about the whole handle and all it's parts?

I think for the other parts (at the front ofg the D curve in front of actual handle) sharp, nicely defined corners, arrises, facets... they are lovely. I loved Swagman's saws in the other thread just for the nicely defined lines, they give a sort of sharpness in the design that i can't ever get to mine as my style leans on surfaces that just flow into each other. But with heavy work the corners just chafe your palm.

It's just an ergonomic thing: If you have a corner somewhere in those areas of the handle that you grip thre will also be some "grips" (positions for your hand) that may not feel comfortable. You can always avoid them by handling the plane differntly, but a smooth handle just doesn't have that kind of restrictions. So if you think of the different shapes you get to larger and larger angles between the different surfaces untill you reach an oval shape. Rounded has 90° angle between the faces, rounded ends about 110, barrel 130 and oval with no angles at all.

Pekka
 

Attachments

  • cross-sections.jpg
    cross-sections.jpg
    17.9 KB · Views: 1,752
Hi Pekka

I do understand what you mean...the rear of this handle is in fact a lot more rounded than it looks from the side.

With the highly figured grain and polish it is hard to see well...I will photograph it from the back so I can show you.

All of the Victorian infill jointers I have studied are like this...apart from maybe a few owner-made ones.

I totally agree with you regarding the ergonomics but I like the style of the flatter sides. If it turns out uncomfortable then I can easily redo it. What I can't do is add more on if I make it oval and don't like it.

I agree with you about swagman's sharp transitions...they look lovely. Once I get the final profile correct...I will run the sides against a flat surface to do the same.

At the moment I am fine tuning the bed in preparation for temporarily fixing the rear infill so that it will stay rock solid while I finish the surface profile.

Richard (T)....one quick question....I take it we can agree a 25 degree primary bevel for the iron or do you think a higher bevel will be better? I know there is a bit of a discussion on the Holtey blog where he grinds at 25 degrees and others then modify this higher. I think I would prefer to stick to the standard and then work on a secondary bevel if needed or ....I have enough thick steel to go for a second iron of a higher angle.

I am going to concentrate mostly on metalwork today...the iron, cap iron and lever cap.

Cheers

Jim
 
That's really helpful BB! Wonderful stuff.

I have just held up the handle to this and the inner of the rear is between cyan and black and the outer (rear) is a tad more acute than the cyan

So if you look at it this way...you see that the profile is more rounded than it appears.

It also helped me to see that one side is slightly more rounded than the other on mine which I hadn't noticed until now but I can now correct this.

Cheers mate

Jim
 
I reckon it's a try plane - so iron bevel just as it would be for a smoother I should think.

It's BD, and it has a decent frog block for support so it's far from crucial.
 
Richard T":3nbqdsm5 said:
I reckon it's a try plane - so iron bevel just as it would be for a smoother I should think.

It's BD, and it has a decent frog block for support so it's far from crucial.

Silly me...of course it's bevel down.....! It's was a bit of a long day yesterday with all sorts of things going on. I wasn't thinking! So I will just grind it at 25 degrees then....I'll be cutting it on the mill anyway.

I need to temporarily fix the rear infill now to stop it from moving...I'll just use some temporary screws.

Do you reckon steel screws countersinked to protrude to the bottom of the slot and then grind down would be best or steel or brass rods?

For the lever cap screws I was going for a cheese head screw counterbored but I don't think even with this monster there is enough thickness in the sides so I would appreciate your opinion on this too.

Cheers

Jim
 
Hi, Jim

Brass screws in the infill filed down would get my vote. Its what holds my infills in, and some epoxy :lol:
DSC_0039-1.jpg


Countersunk screws for the cap iron.

Pete
 
Racers":28xb2ke0 said:
Hi, Jim

Brass screws in the infill filed down would get my vote. Its what holds my infills in, and some epoxy :lol:
.......

.......

Countersunk screws for the cap iron.

Pete

I think I tend to agree with you there Pete.

Jim
 
What I did for my cap iron was to drill and tap M6 threads to the cap iron. There was about 5 mm of free 6mm hole and 10 mm of thread. There were 6 mm holes in the sides of the plane. I just inserted the cap iron to its place, screwed on two partially threaded screws so that there was only the unthreaded part and bolt heads protruding from both sides of the plane. I then marked the surface of the plane side and orientation of the lever cap to the screw. Removed the bolts, cut them to length, filed a slot for a screwdriver to the end of the screwand voilá, I had removable pivot points for the cap iron and even the screw slots were aligned to the same direction as the cap iron itself.

It's not as pretty as a smooth side with fixed pivots, but I prefer to be able to remove the cap iron as the whole thing is a proto and I may have to modify it later on.

Pekka
 
Pekka Huhta":xhvoacjc said:
What I did for my cap iron was to drill and tap M6 threads to the cap iron. There was about 5 mm of free 6mm hole and 10 mm of thread. There were 6 mm holes in the sides of the plane. I just inserted the cap iron to its place, screwed on two partially threaded screws so that there was only the unthreaded part and bolt heads protruding from both sides of the plane. I then marked the surface of the plane side and orientation of the lever cap to the screw. Removed the bolts, cut them to length, filed a slot for a screwdriver to the end of the screwand voilá, I had removable pivot points for the cap iron and even the screw slots were aligned to the same direction as the cap iron itself.

It's not as pretty as a smooth side with fixed pivots, but I prefer to be able to remove the cap iron as the whole thing is a proto and I may have to modify it later on.

Pekka

This is also a good approach....

I have a while to ponder this so if we can discuss the merits/disadvantages of all methods on here before I proceed then I'm sure we will get the best solution.

I have an idea of doing something a bit more modern...removable if possible. I want to stay away from a complete through solution as this is going to be a solid lump of brass.

My thoughts were to put tapped steel inserts in either side of the lever cap and then have some form of modern designer fastening to screw into these inserts through the sides.

I may be over- thinking this a tad! :mrgreen:

Jimi
 
Back
Top