You are using an out of date browser. It may not display this or other websites correctly.
You should upgrade or use an alternative browser.
You should upgrade or use an alternative browser.
The UKW Infill Project
- Thread starter jimi43
- Start date


Help Support UKworkshop.co.uk:
This site may earn a commission from merchant affiliate
links, including eBay, Amazon, and others.
Richard T
Established Member
Re the pinning of the infill I would recommend screws of some sort for now and until you've had a bit of practise with riveting. It's the easiest thing in the world to either cut them too long or too short ( and once you've started the heads there's no easy way back) or peining them up too tight ...
Maybe nice, countersunk screws would look good with the slots intact until you decide otherwise; at least that way you can change them.
Maybe nice, countersunk screws would look good with the slots intact until you decide otherwise; at least that way you can change them.
Pekka Huhta
Established Member
A few images from my approach.
As a temporary solution I used just any screws that were on my desk. That wasn't pretty, but whatever method you use, threads are the most versatile, and believe me, you do want to remove the cap iron quite a few times before the plane is ready.

Then there is just a second picture about the marking out of the screws and third one showing the final result. As you can notice, the pin is a bit loose on the hole. That's because the laser cut hole was a bit too big and a 6 mm screw does not fill it completely. But it does it's job, for a prototype.


I would say that if you want temporary, use any screw you have as long as you don't have to modify the plane (drill larger holes or countersinks on the sides etc). Also, the "stud approach" doesn't involve modifying the plane, but you can't get back once you countersink the sides.
Pekka
As a temporary solution I used just any screws that were on my desk. That wasn't pretty, but whatever method you use, threads are the most versatile, and believe me, you do want to remove the cap iron quite a few times before the plane is ready.
Then there is just a second picture about the marking out of the screws and third one showing the final result. As you can notice, the pin is a bit loose on the hole. That's because the laser cut hole was a bit too big and a 6 mm screw does not fill it completely. But it does it's job, for a prototype.
I would say that if you want temporary, use any screw you have as long as you don't have to modify the plane (drill larger holes or countersinks on the sides etc). Also, the "stud approach" doesn't involve modifying the plane, but you can't get back once you countersink the sides.
Pekka
Attachments
jimi43
Established Member
Some 18 months ago this thread went strangely quiet. I had been distracted by a rather protracted observatory build in my garden which went on a tad longer than expected and is now all but finished.
The recent sad news about Richard brought me back to earth with a huge thump and I vowed to finish this plane so I can remember that truly remarkable guy until I meet him again, where no doubt he will want to discuss the finished build.
I was a bit unsure about continuing to post on the original thread but having spoken with Emma...she wants me to so I will...I just hope I can do it justice.
So...last time we discussed Richard's panel body infill...I hadn't moved on beyond the rear infill...so let's pick it up from there.

I decided to start on the bun yesterday...I have marked out the lever cap ready for milling and hand shaping:
....but I want to come back to that as I have other ideas in the pipeline to test involving older technology...wedges and bridges! :shock:
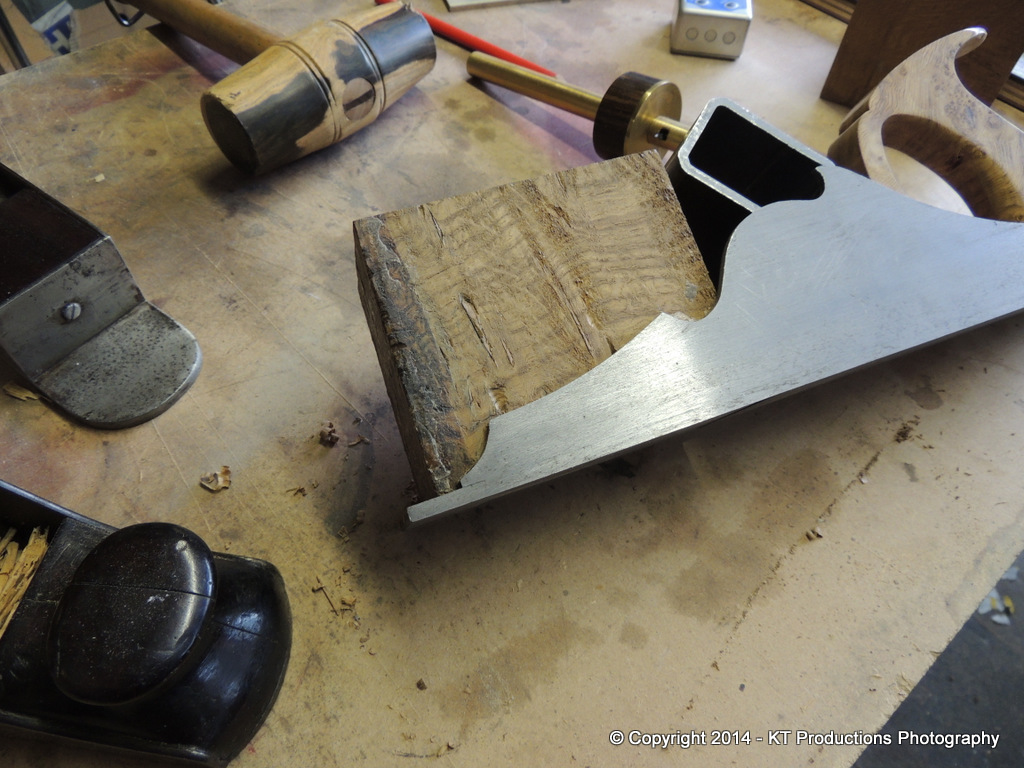
Ok...after clearing a few tons of junk and shavings from a mothballed workshop...and tidying the bench...I set about making the bun.
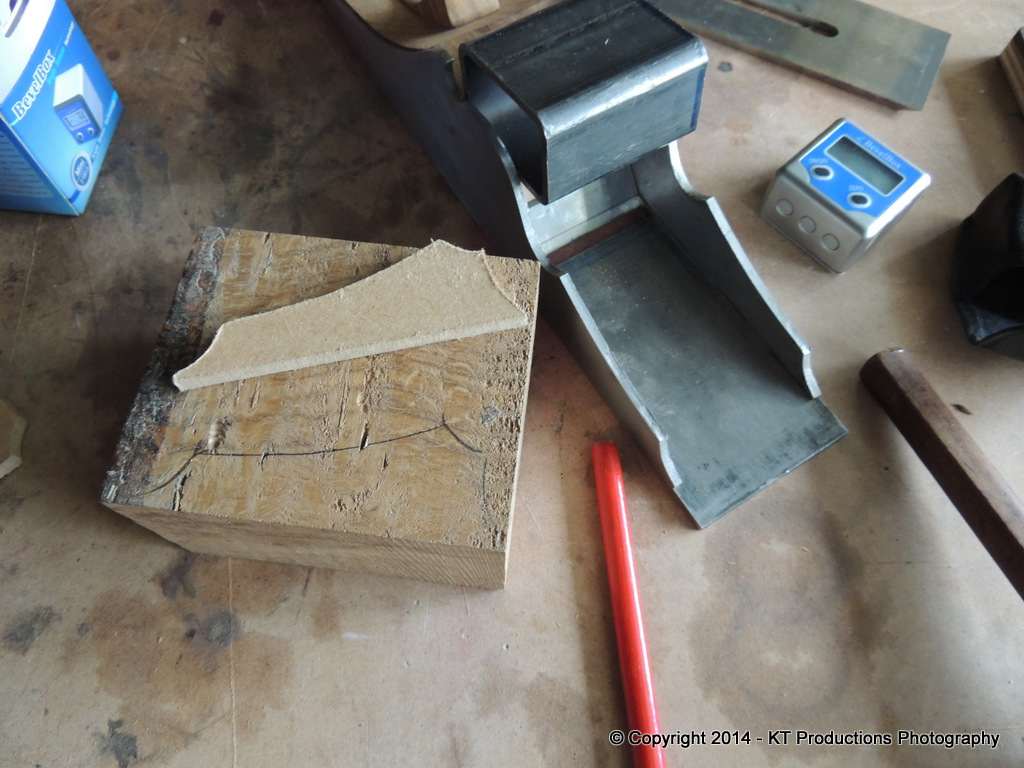
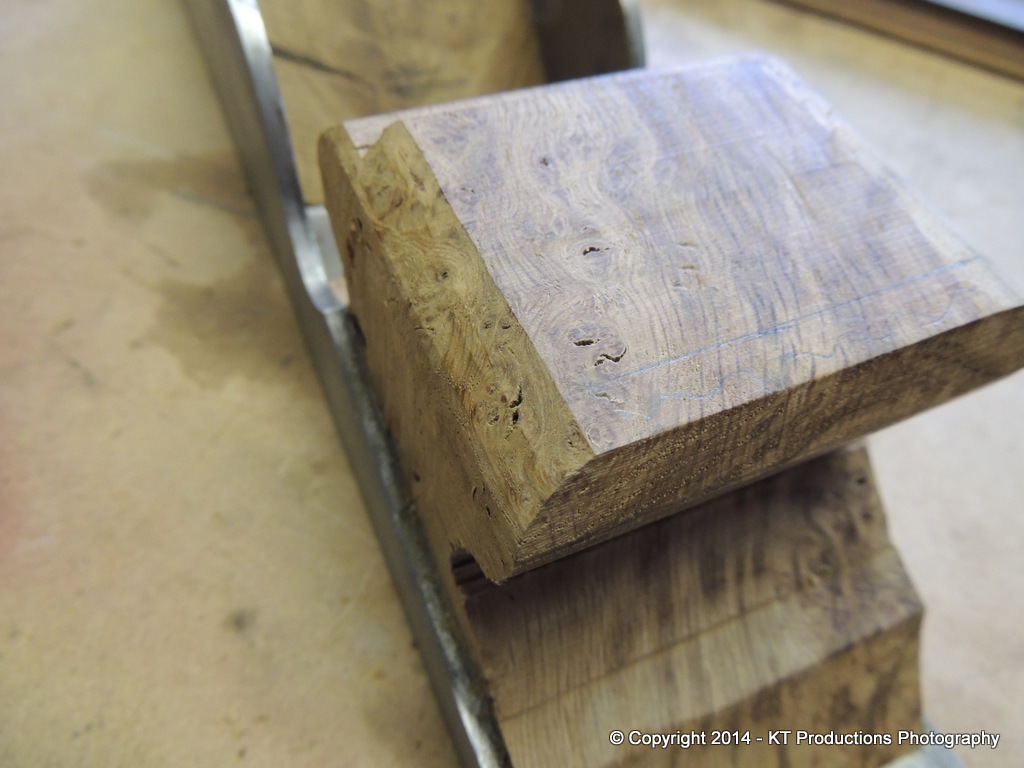
Making a quick template of the side gave me something to play with when selecting the stock...being burr it has many sides to choose from to get the best out of the figured grain and I had two blocks left over to choose from.
I roughly marked the thickness of the block so that it would be a tight, oversized fit into the front cavity...then shaved bevels all round to give me sight levels to plane to...( a fabulous tip picked up on UKW!)
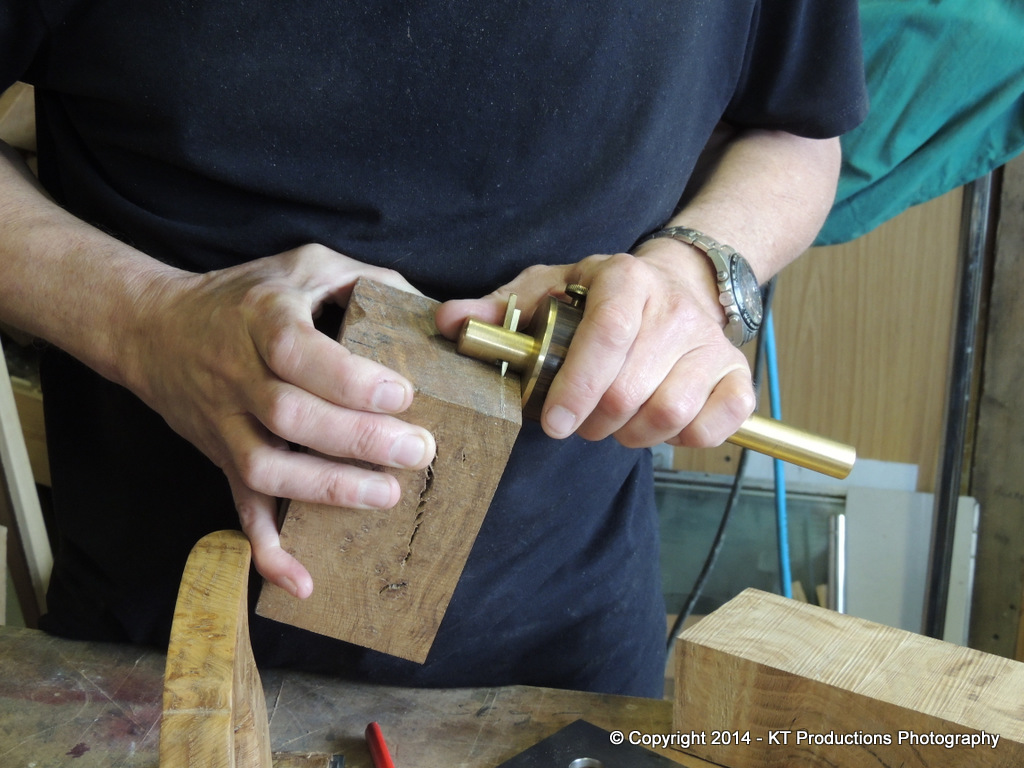
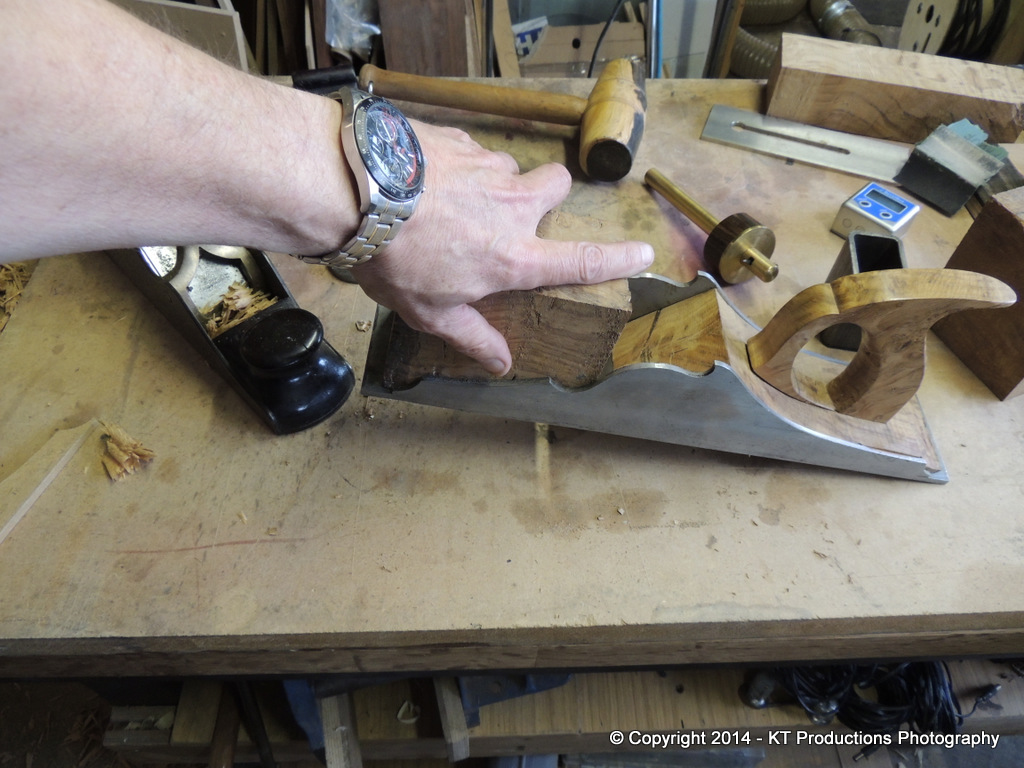
I think it was Konrad Sauer who said once in his fine blog..."I am always thankful that I have infills to make infills!"....and he's darn right. This old panel plane with a Quangsheng (yes QUANGSHENG) iron...made light work of the thicknessing.
Of course...you have to check about a thousand times that you don't over-cook it but I eventually got to that magical thickness that just fits (with the aid of a sledge hammer :mrgreen: ).
Finally!!
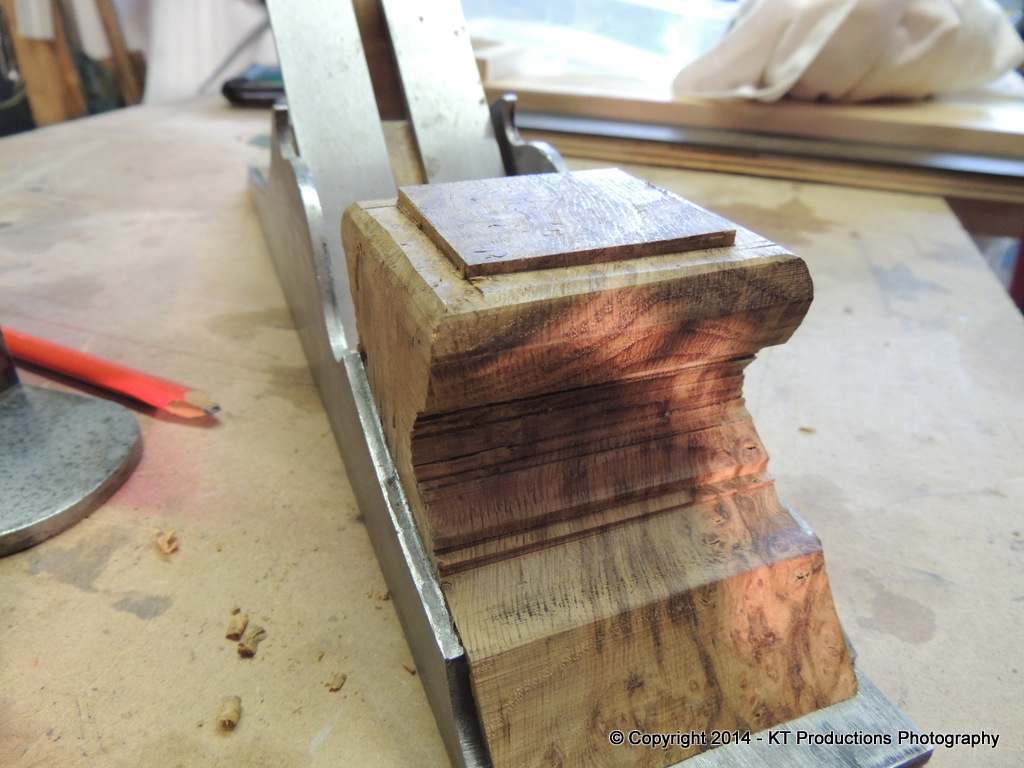
And another Konrad tip for making sure it's a good fit...lift it up without the aid of glue, screws, rivets or nails...at the front....
...and at the same time lift it from the handle end.....
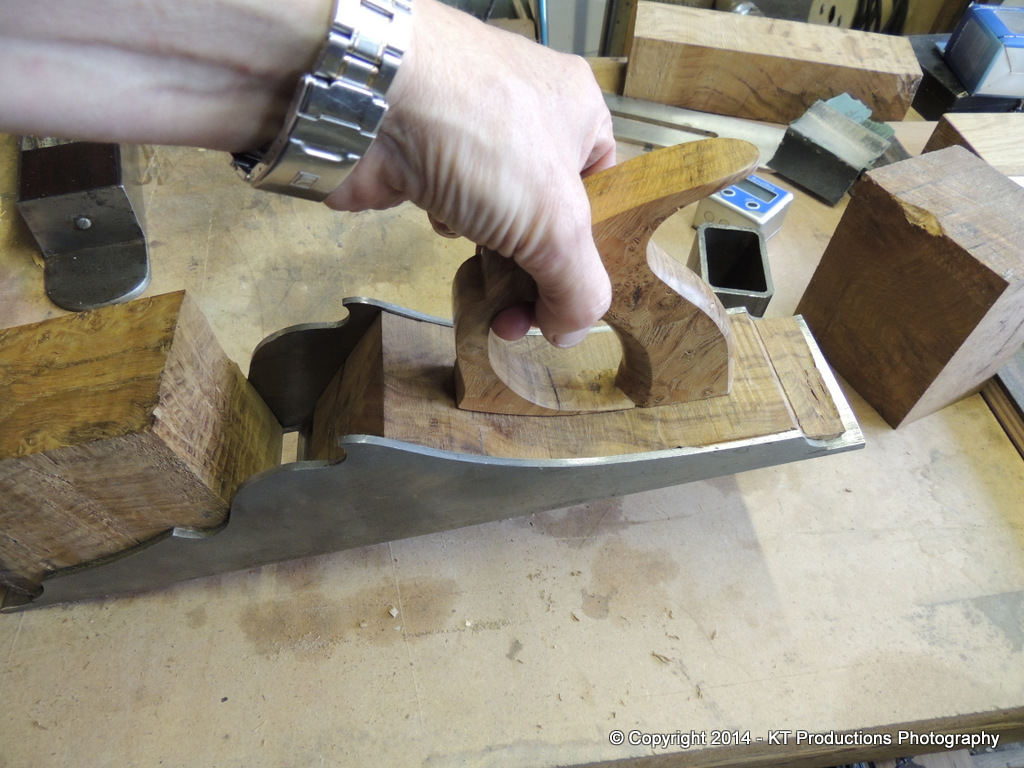
Et VOILA!
And if there is any camera shake on those two pictures it's totally down to me quaking in my boots!!! :mrgreen:
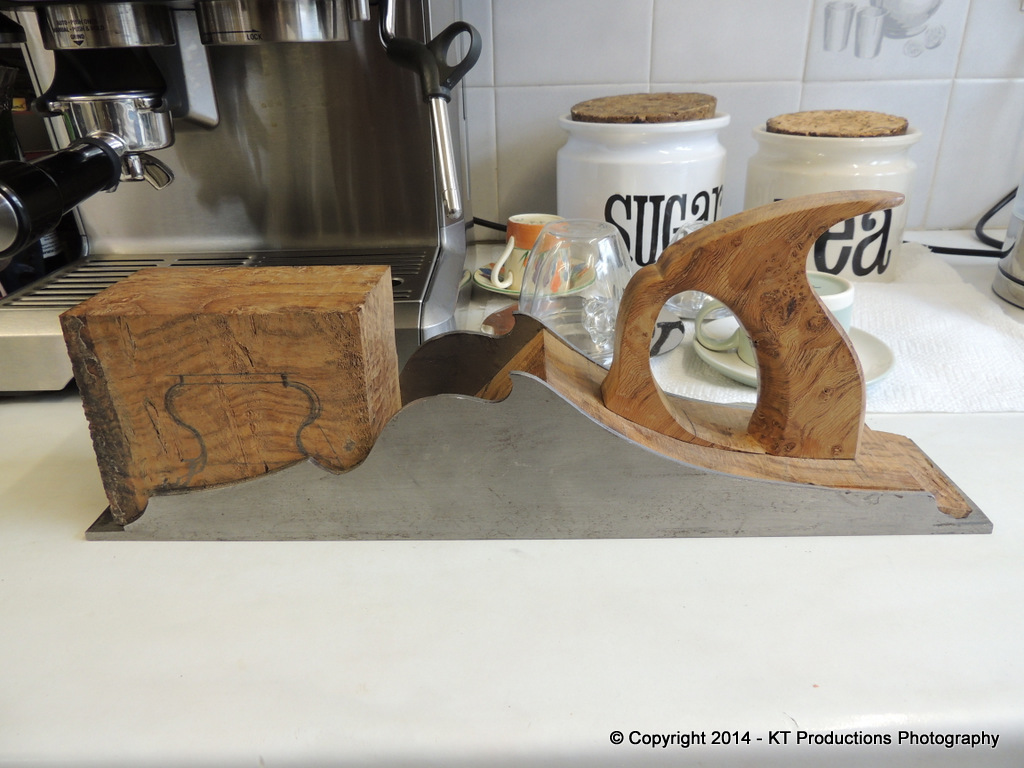
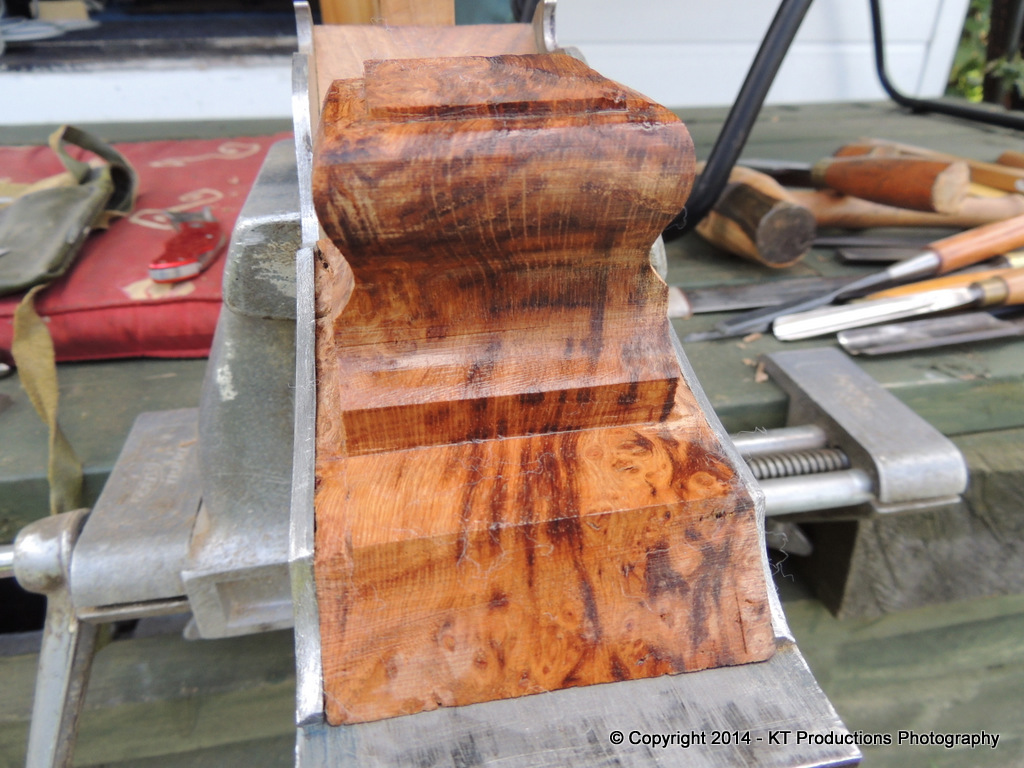
There is some serious grain at work on this block of wood....
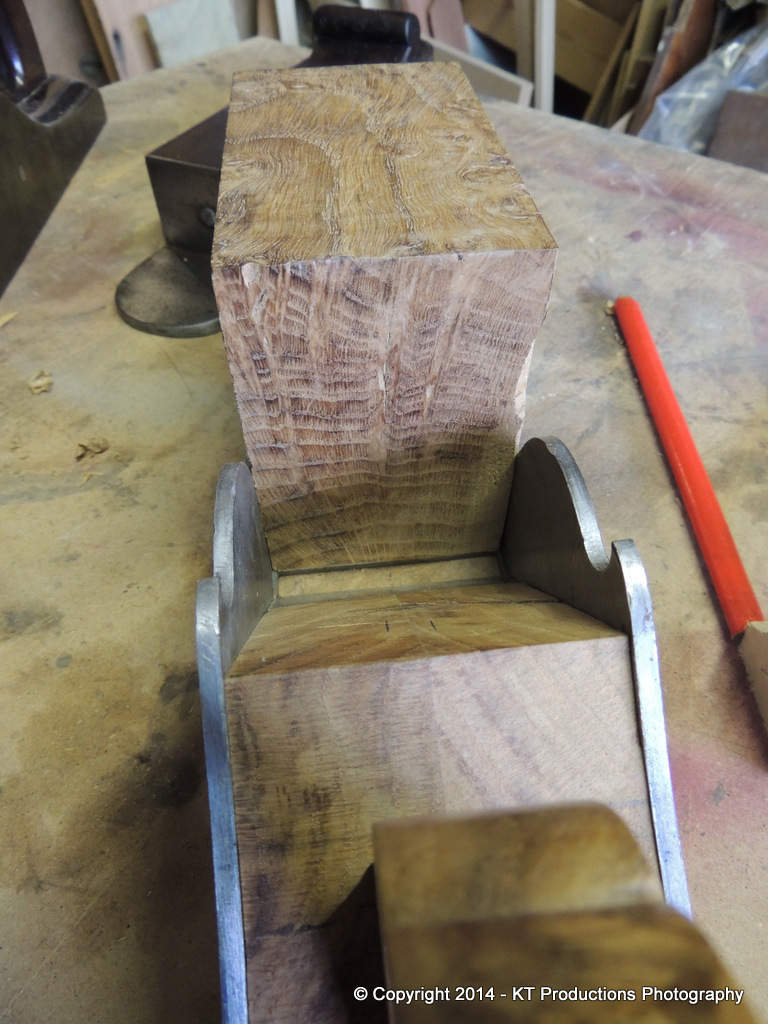
...I can't wait to get it out into the open! 8)
Now..... Da Vinci I am not so excuse the rough sketch.....
Note the need for a caffeine fix at this stage!
......before I hit the bandsaw.
Some of you may recall my affection for the little Burgess Powerline bandsaw I picked up once for a tenner. And I do now have the utmost confidence in this surprising machine......
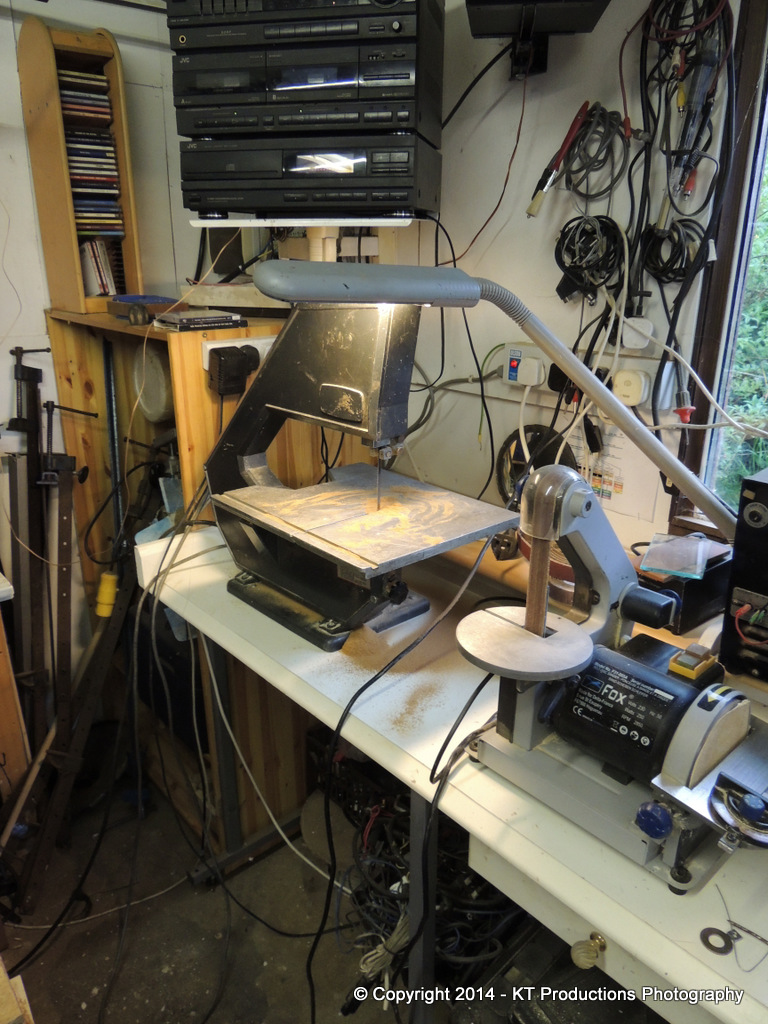
..... but this is limit time...nearly three inches of burr oak....guides to the stops...just fits under the arm....
This little baby never ever ceases to amaze me!! :shock: Of course...the TUFF SAW/ blades are the real gems here! (wonderful stuff again, Ian! =D> )
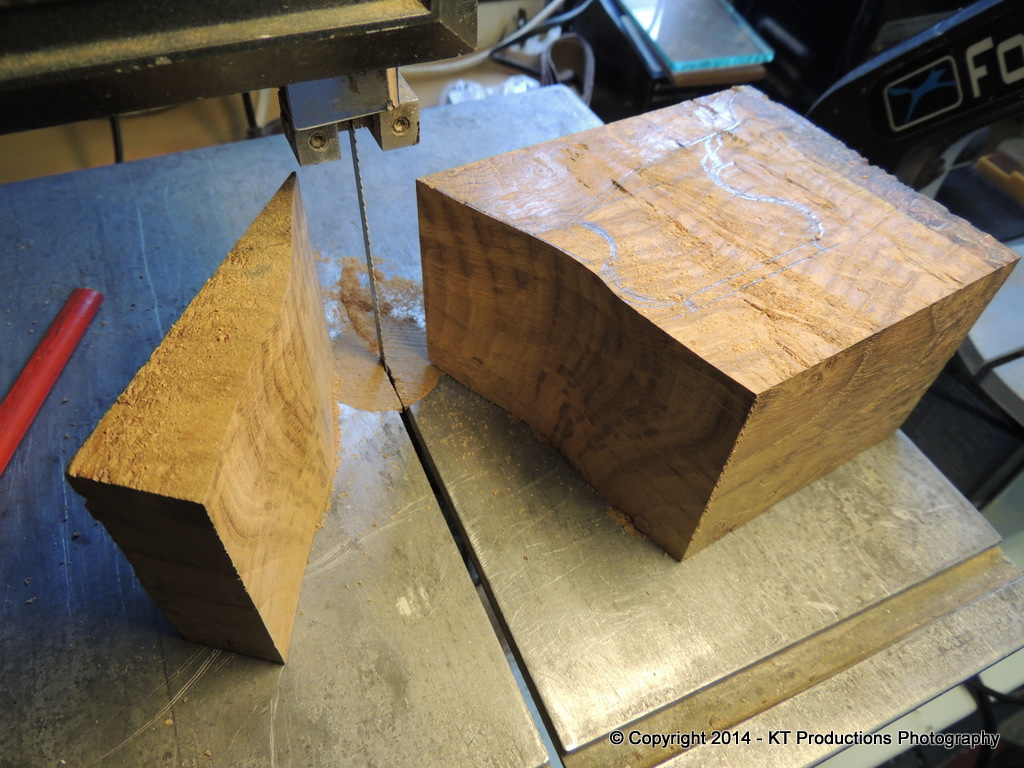
So...a short time later and a few wiggles...
..a rough bun shape was formed.
I'd say we have some nice figuring beginning to emerge there...
Well...that's it for now...it was a bit late when I finished.....

In the next part I will cut the sides to width and tidy up the contours using the other great trick from Bill Carter...the squared end scraper chisel!
Cheers all...and Emma especially.
It's good to start work on Richard's panel infill again...I only wish it were under happier circumstances.
Jimi.
The recent sad news about Richard brought me back to earth with a huge thump and I vowed to finish this plane so I can remember that truly remarkable guy until I meet him again, where no doubt he will want to discuss the finished build.
I was a bit unsure about continuing to post on the original thread but having spoken with Emma...she wants me to so I will...I just hope I can do it justice.
So...last time we discussed Richard's panel body infill...I hadn't moved on beyond the rear infill...so let's pick it up from there.
I decided to start on the bun yesterday...I have marked out the lever cap ready for milling and hand shaping:
....but I want to come back to that as I have other ideas in the pipeline to test involving older technology...wedges and bridges! :shock:
Ok...after clearing a few tons of junk and shavings from a mothballed workshop...and tidying the bench...I set about making the bun.
Making a quick template of the side gave me something to play with when selecting the stock...being burr it has many sides to choose from to get the best out of the figured grain and I had two blocks left over to choose from.
I roughly marked the thickness of the block so that it would be a tight, oversized fit into the front cavity...then shaved bevels all round to give me sight levels to plane to...( a fabulous tip picked up on UKW!)
I think it was Konrad Sauer who said once in his fine blog..."I am always thankful that I have infills to make infills!"....and he's darn right. This old panel plane with a Quangsheng (yes QUANGSHENG) iron...made light work of the thicknessing.
Of course...you have to check about a thousand times that you don't over-cook it but I eventually got to that magical thickness that just fits (with the aid of a sledge hammer :mrgreen: ).
Finally!!
And another Konrad tip for making sure it's a good fit...lift it up without the aid of glue, screws, rivets or nails...at the front....
...and at the same time lift it from the handle end.....
Et VOILA!
And if there is any camera shake on those two pictures it's totally down to me quaking in my boots!!! :mrgreen:
There is some serious grain at work on this block of wood....
...I can't wait to get it out into the open! 8)
Now..... Da Vinci I am not so excuse the rough sketch.....
Note the need for a caffeine fix at this stage!
......before I hit the bandsaw.
Some of you may recall my affection for the little Burgess Powerline bandsaw I picked up once for a tenner. And I do now have the utmost confidence in this surprising machine......
..... but this is limit time...nearly three inches of burr oak....guides to the stops...just fits under the arm....
This little baby never ever ceases to amaze me!! :shock: Of course...the TUFF SAW/ blades are the real gems here! (wonderful stuff again, Ian! =D> )
So...a short time later and a few wiggles...
..a rough bun shape was formed.
I'd say we have some nice figuring beginning to emerge there...
Well...that's it for now...it was a bit late when I finished.....
In the next part I will cut the sides to width and tidy up the contours using the other great trick from Bill Carter...the squared end scraper chisel!
Cheers all...and Emma especially.
It's good to start work on Richard's panel infill again...I only wish it were under happier circumstances.
Jimi.
tobytools
Established Member
Truly beautiful work Jimi,
This will be a fine piece one finished, I love the idea of using a wedge and inserting a bridge, a beautiful brass bridge with a Cupid's bow, same with the chunky scroll wedge.
I follow this thread with hunger for more.
This plane is the combined efforts of two great craftsmen and it really shows.
Keep it comming mate
Cheers
TT
Jimi, I'm really pleased you're finishing this wonderful piece of work. I'm sure you will think over and over again "I'll just talk to Richard about this bit" just as the rest of us will read a post on here and think "I wonder what Richard will say about that" before we remember the dreadful truth.
Cracking work Jimi, that's going to be a beauty.
First time I've seen this and I enjoyed it very much, I will be looking out for the updates.
It seems to me that Richard had quite an impact on some here and with this in mind ( and I will make no other suggestions with regards to your build ) I will say this one thing -- memorial inscription ?
Tell me to bu**** off if you like.
jimi43
Established Member
Cheers Toby...thanks for your feedback yesterday.
Hi Prof! All day I thought "what would Richard do/say" during the whole process. It is both sad but uplifting. I am sure he would want me to finish it and I think I will put an inscription on it too following your most excellent suggestion, nOlegs.....it seems the right thing to do.
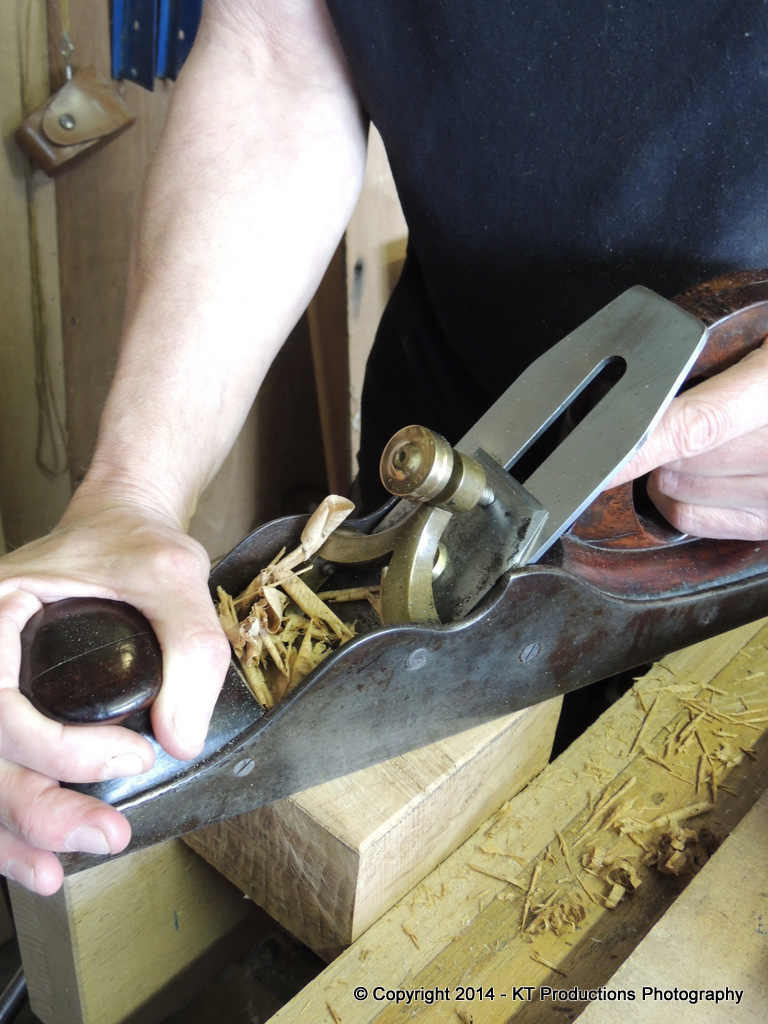
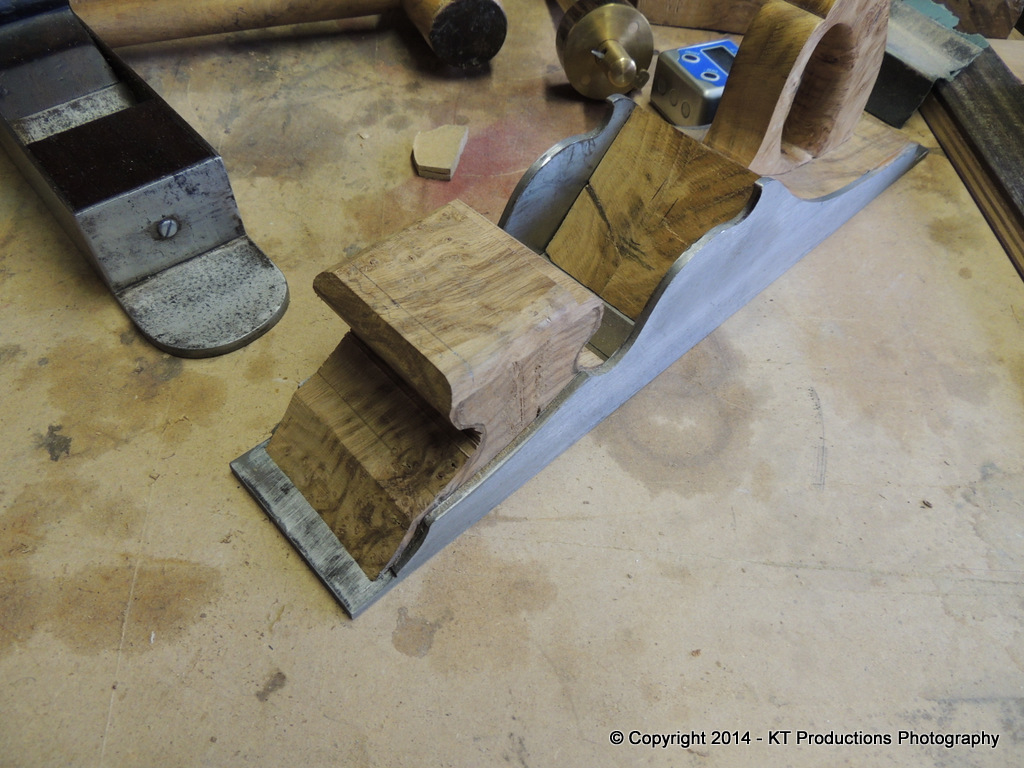
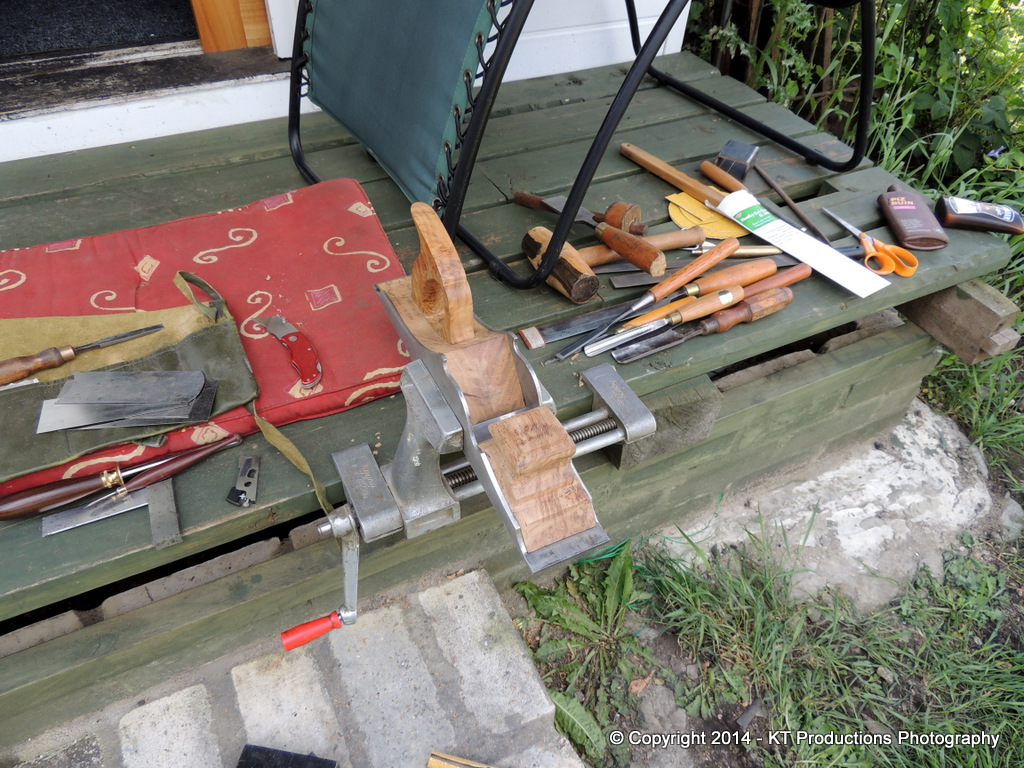
I cut the side cheeks to the bun this afternoon and I thought I would bring out the best cutlery for the job....
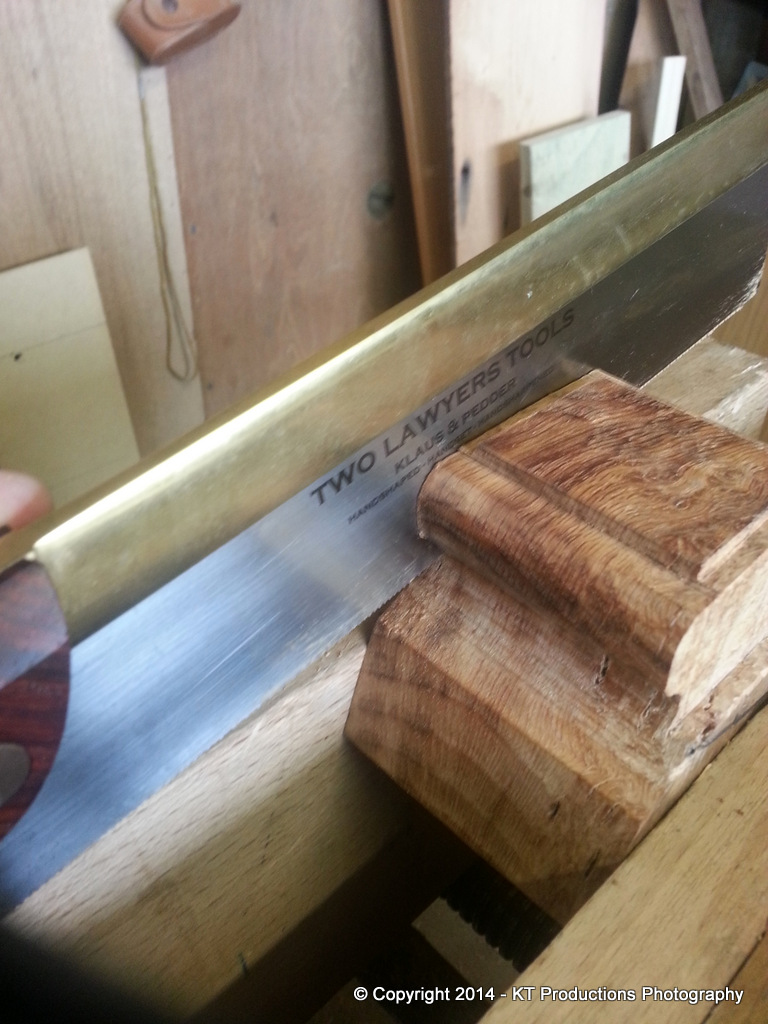
I finally get to use the fine saw from my dear buddies from across the Channel...I wanted to wait for a suitably important job!
I stopped there...rough edges and all....
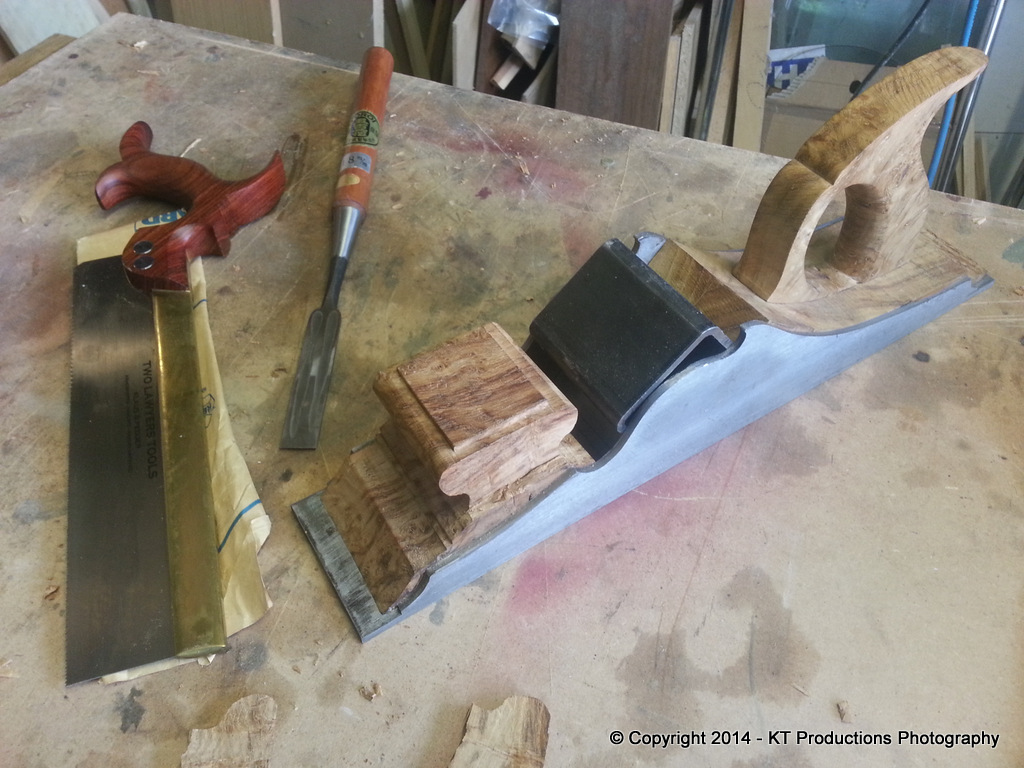
...as I now want to pull the infills and do the bevels on the steel so that I can match up the ledge to the bevel properly using chisels and such like.
On the basis that ALFIE is now in charge of "cleaning up" after me...a quick whiz of air denoted this had started....
....as he quickly whisked away the offcuts....
...and ATE them!
Anybody would think I didn't feed the mutt!!! :mrgreen:
More later
Jimi AND ALFIE!
Hi Prof! All day I thought "what would Richard do/say" during the whole process. It is both sad but uplifting. I am sure he would want me to finish it and I think I will put an inscription on it too following your most excellent suggestion, nOlegs.....it seems the right thing to do.
I cut the side cheeks to the bun this afternoon and I thought I would bring out the best cutlery for the job....
I finally get to use the fine saw from my dear buddies from across the Channel...I wanted to wait for a suitably important job!
I stopped there...rough edges and all....
...as I now want to pull the infills and do the bevels on the steel so that I can match up the ledge to the bevel properly using chisels and such like.
On the basis that ALFIE is now in charge of "cleaning up" after me...a quick whiz of air denoted this had started....
....as he quickly whisked away the offcuts....
...and ATE them!
Anybody would think I didn't feed the mutt!!! :mrgreen:
More later
Jimi AND ALFIE!
Lovely work, Jim.
Your dog's antics reminded me of a friend of mine who has been making a hugely complex project involving very complex glue-ups. He used the old trick of making angled glue blocks which he glued to the work with animal glue with a sheet of newspaper between block and work. After glue-up these can be kncked off with a sideways blow with a hammer and the work cleaned up. He had about thirty blocks of various shapes and sizes and decided they would make good woodburner fodder, put them in the woodbasket in the lounge and went out for the evening. On returning he found them all over the floor, every one have been licked perfectly clean of glue and newspaper by his ex-guide dog retriever. Yummy, lollipops for dogs.
Jim
rafezetter
Troll Hunter
I didn't know about this thread until todays' post, but I've just read read it from start to finish - and been riveted the whole time.
The only thing I could possibly add is even though Richard T, may not have seen the final product, I'm sure he knew the care and devotion to craftsmanship you have shown Jimi43 and had every confidence you would produce something amazing.
The burr and figuring in that oak is beautiful.
Out of interest the thread name of UKW infill project suggests the finished plane had a specific destination in mind, what was the original end result going to be for the project? Auction, gift? Or was Jimi43 the intended?
I think if a gift, then maybe a gift to Emma with said inscription would be fitting? Possibly some sort of display box for it made by another member as part of the tribute?
Or Maybe Emma would like to choose what happens to it?
condeesteso
Established Member
Pleased to see this build re-activated. I was there when the body was handed over and it was definitely for Jim. I'm pretty sure Richard wanted it finished (I could have added 'in a timely fashion') and used. I'm sure you will do it justice. Can I have a go when it's done
Given the all-over grain of the burr I expect the 2L d/t saw worked rather well?
Given the all-over grain of the burr I expect the 2L d/t saw worked rather well?
Jim
You are working this beautifully. I think a very fitting tribute would be to finish it to the best of your ability, and I know you will, and then use it.
I have a Stanley No.4 plane bought for me by my father as a birthday present about 30 years ago and every time I pick it up I think of him and it's nowhere near as special looking as yours or crafted with such care but to me it's priceless.
So in tribute, finish it, photograph it and use it. I think both Richard and MrsT would be proud of the collaboration and the finished result.
Mick
Mrs T
Established Member
Oh yes, it's definitely Jimi's plane. Richard wanted him to have it to play with (observatory allowing). As for me, I have a whole host of orphaned planes to mind right now, and it's just lovely seeing Jimi's work go on. I know Richard's work (and knowing him, he would downplay his part in the finished plane) has gone to a good home.
Love to all, Emma xx
PS. Edited to say, that oak is incredible.
Love to all, Emma xx
PS. Edited to say, that oak is incredible.
jimi43
Established Member
Thank you guys and particularly Emma for your responses and perhaps a little further history is warranted from back then.
Clearly Richard's ability working with metal was what he was comfortable with...he'd cut his teeth in the forge and was confident working with "the black stuff!".
In the "village" he would have been the smithy and a darn good one too! His holdfasts were a testament not only to his skills with metal but also his tenacity to "get it right". Such an apparently simple "hook" device is not quite as simple as it seems to work as it is intended. Richard knew this and sought the advice and beta testing of members of the forum and tweaked that basic, but important tool until he had it perfect.
Such was Richard's attention to detail.
He also knew I tinkered in metal and particularly the hardening of steel and we often conversed here via PM as I picked his brain. But he knew I was far more comfortable with the wood side of the toolmaker's art. It was entirely his surprise that started this collaboration. In his mind...he could make the shell with his honed hands and wanted to see what I would fill it with....knowing my love of exotic and weirdly figured woods.
This collaboration was the reason behind the title of the original thread.
In the intervening months....Richard set about filling his increasing collection of beautifully dovetailed steel shells and WE quickly discovered that he also excelled in that area and his initial worries about harmonising his woodwork with his metalwork were totally unfounded.
We have all seen his subsequent threads of this journey of discovery and the beautiful completed planes as a result. For not only was Richard an excellent all round toolmaker, but he was also supremely adept at documenting these journeys in terms that mere mortals may follow, and perhaps someday emulate.
Just trying to come close to this sort of perfection.....
....is a hard task.
I know I am keeping busy finishing one of his first gems...I will try to do it justice...if I come close I shall be happy.
Jim
gasman
Established Member
Lovely job Jimi - it is going to be beautiful and I am sure Richard would / will appreciate it
I'm all for a lever cap but I am sure will be lovely either way
Well done mate
Mark
I'm all for a lever cap but I am sure will be lovely either way
Well done mate
Mark
jimi43
Established Member
Roughed out the contours of the bun today...
There are a few voids but nothing drastic...a bit of coffee/epoxy mix will sort that out.
It was so nice out today I dragged the old Swiss Zylyss vise out and worked in the sunshine with ALFIE...
I stuck some alcohol on the wood to give me a rough idea of how the grain will look when finished and there's some very interesting figuring going on....
I also rough filed the front bevel on the steel in order to match the shelf on the bun to it....
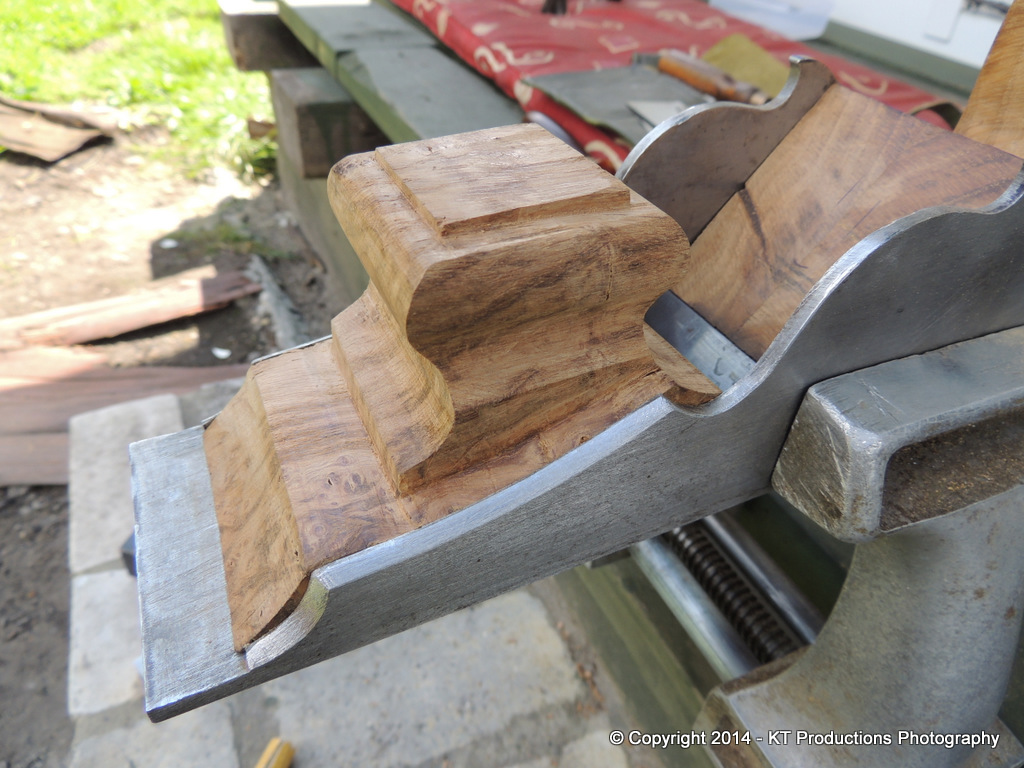
Scrapers are in order next I think!
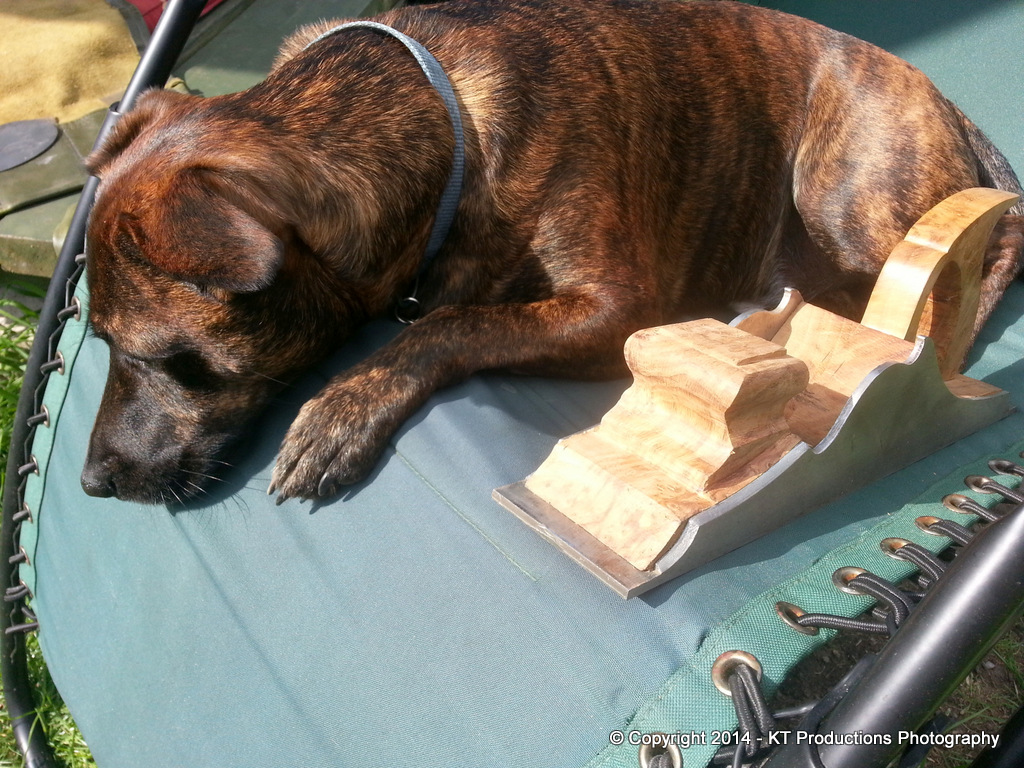
ALFIE wanted to help out all the time...
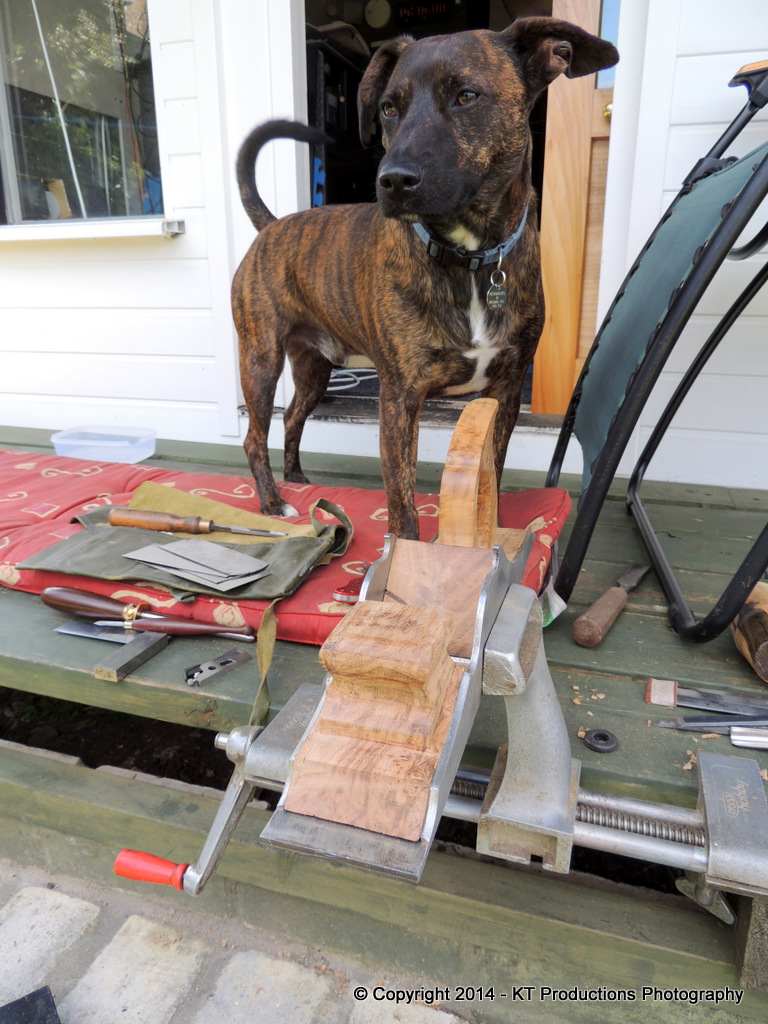
....but he got bored and decided he needed to lay down in the sun a bit!
I will be bringing the plane along to Richard Arnold's event on Sunday as there are a number of people who have expressed interest in seeing the progress so far.
As far as the choice of lever cap/wedge...I have started on the lever cap and will test fit that first and also make a quick wedge and see what that looks like.
Cheers
Jimi and ALFIE!
There are a few voids but nothing drastic...a bit of coffee/epoxy mix will sort that out.
It was so nice out today I dragged the old Swiss Zylyss vise out and worked in the sunshine with ALFIE...
I stuck some alcohol on the wood to give me a rough idea of how the grain will look when finished and there's some very interesting figuring going on....
I also rough filed the front bevel on the steel in order to match the shelf on the bun to it....
Scrapers are in order next I think!
ALFIE wanted to help out all the time...
....but he got bored and decided he needed to lay down in the sun a bit!
I will be bringing the plane along to Richard Arnold's event on Sunday as there are a number of people who have expressed interest in seeing the progress so far.
As far as the choice of lever cap/wedge...I have started on the lever cap and will test fit that first and also make a quick wedge and see what that looks like.
Cheers
Jimi and ALFIE!
richarnold
Established Member
Loving the detail on the front bun =D> Really looking forward to seeing this In the flesh. I hope lots of folks turn up to see it, but I still cant quite come to terms with the fact that Richard won't be there to see it
tobytools
Established Member
That's is comming along beautifully Jimi, thank you for taking the time to share this project with stunning photos and write ups.
Wish I could see it in the flesh
Keep it up mate,
Have you made a decision on whether to have a bridge or a lever cap?
Many thanks
TT
Wish I could see it in the flesh
Keep it up mate,
Have you made a decision on whether to have a bridge or a lever cap?
Many thanks
TT
Similar threads
- Replies
- 12
- Views
- 595
- Replies
- 8
- Views
- 986
- Replies
- 8
- Views
- 1K