The UKW Infill Project

UKworkshop.co.uk

Help Support UKworkshop.co.uk:

This site may earn a commission from merchant affiliate links, including eBay, Amazon, and others.
It was built in Imperial days and sold as a 14 ½" hence the measurements.

The steel thickness I measured as 4mm as I couldn't be bothered trying to read in 1/32" :)

The iron is marked Norris on the front and Sorby on the back - I'll measure the thickness tomorrow.

Rod
 
Cheers Rod....appreciated.

Following the sacking of the sound man responsible for the last "test shaving" video...I thought I would sit down and try to understand the video software....boy is that type of programme weird!

After about three days and quite a bit more head scratching...I suddenly had a :idea: moment...and this allowed me to produce a "slightly" more professional video...but more importantly...I worked out the slow motion bit...so...bearing in mind that I don't work for the BBC film production unit...I offer this little video bite...go easy on me guys....don't blink or you might miss the action shot!

AMAZING SHAVING

Thanks again to Douglas for providing the muscle power and the valuable wood!!

Jimi
 
Excellent Jimi - what software did you use?

Sorry I forgot about the iron thickness - the weather has been so nice :) - will try to remember today?

Rod
 
Harbo":1f2d3l2c said:
Excellent Jimi - what software did you use?

Sorry I forgot about the iron thickness - the weather has been so nice :) - will try to remember today?

Rod

Hi Rod

Serif MoviePlus X5....which is an old version they sell off cheap...£20 if I recall...to test to get you to buy the full new version. It's simple (good for me!)...once you have that "eureka" moment!

Now I know how it works....I can tart up the others!

Certainly shows that amazing "wow" moment when you slow it down....and as Douglas says....it still needs "work" to the iron! :shock:

More to come....

Jim
 
Another update....Ian at CHALCO STAMP AND DIE has confirmed receipt of the lever cap, the 5mm iron and the cap iron and has already started the engraving.

So there should be an update on that soon too.

In the meantime...taking note of the various comments about the selection of lever cap bolts I bought and coming to the conclusion that the one I made was rubbish...I spent the day in the workshop making another set.

I think I have it right this time...

20140929_220659.jpg


Flush...brass...slot...and countersunk....

20140929_221200.jpg


I tinkered with this for a while....I guess practice does make perfect as it was a lot easier this time...

Now all I have to do is make another one. The most expensive bolts on the planet eh!?

What think you oh fellow conspirators? :mrgreen:

Jimi
 
Looking sweet from my angle Jimi. Did you "clock" that slot or was that happy chance? Also watched the vid and enjoyed the shaving shot. Mind you the wife was coming back from the kitchen and just shook her head as I played it again. So asked her how much time she spent in Skyrim this week. She just about started to answer and then just kept walking.
 
Hi Mick!

Thanks mate! :mrgreen: :mrgreen:

I didn't even fancy a cigarette after I'd made it though so I must have kicked the habit! LOL!

After you said that...I looked back and thought to myself, after my chuffedness had had a night to dissipate....I thought..."what the hell am I posting pictures of soddin' brass bolts for!?"

I will have to get out more...but commercial screws just ain't what they used to be in my day! :mrgreen: :mrgreen:

......So asked her how much time she spent in Skyrim this week. She just about started to answer and then just kept walking.

Worrying my friend...very worrying! Not so much that I fear I might be cited in a divorce...but more that I have absolutely no idea what you are talking about.

I know it's been a while since you guys left European shores but WTF is a SKYRIM.....? It sounds like a very deviant satellite TV channel! :shock:

Jim
 
Skyrim is a very addictive video game that my beloved plays each morning for about 3 hrs, Richard T once described it as going on holidays in Switzerland but with dragons. I think it appealed to him because you could do forge work there on your own forge and anvil. On any sort of divorce front , fear not amigo , tis our quirkiness that binds us. If I were anyways near normal she would have nothing to do with me as we both see normality as the boring bit of life.
P.S. Just remembered a talk Richard and I had about this very plane! He mentioned that the design was very Skyrim and if you look closely at the pic on first page of this thread you can see it. The metalwork looks very like the head of a dragon , small horns on head , nostril bumps. imagine a dragons skull but just the upper half , lovely.
 
Jim
I would appreciate if you could give an "order of play". Do you turn down the stem and shape the countersink, or run the die up to a square edge, then turn the countersink?
It is not quite clear from the photo, but have you created a small "waist" just under the countersinking?
I have tended to do this to allow the die to finish with a clean thread, or are you screwcutting on the lathe?
I have today bought "Screwthreading on the Lathe" but am somewhat anxious!

Pity the simple elegance of your bolts will be mostly hidden.
Mike
 
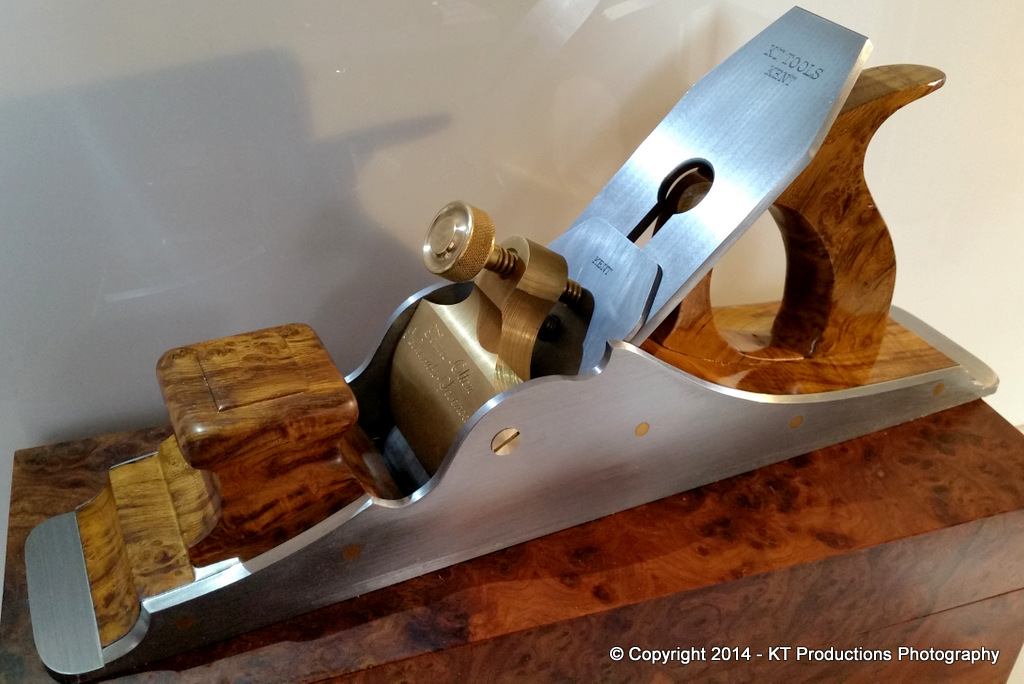
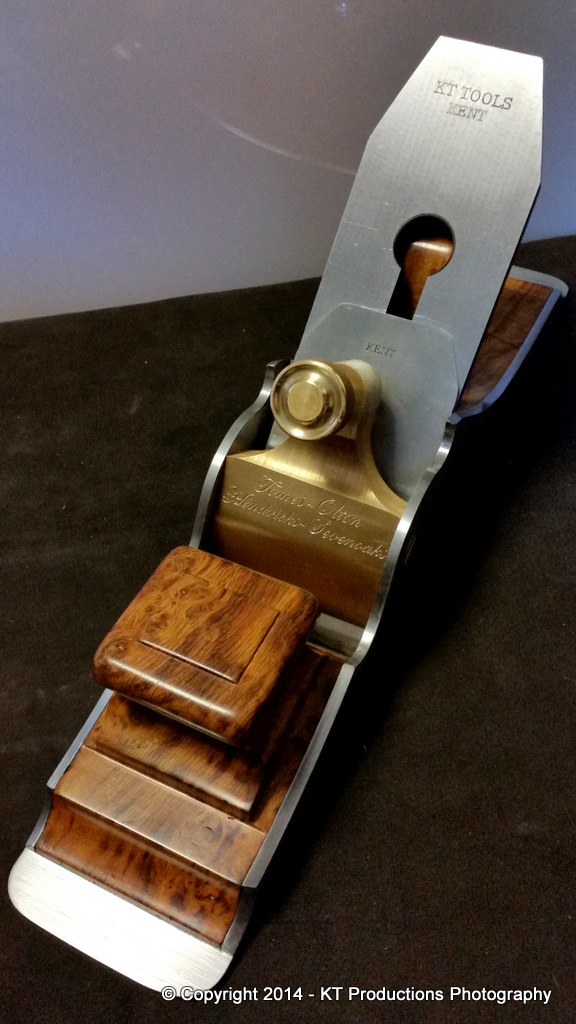
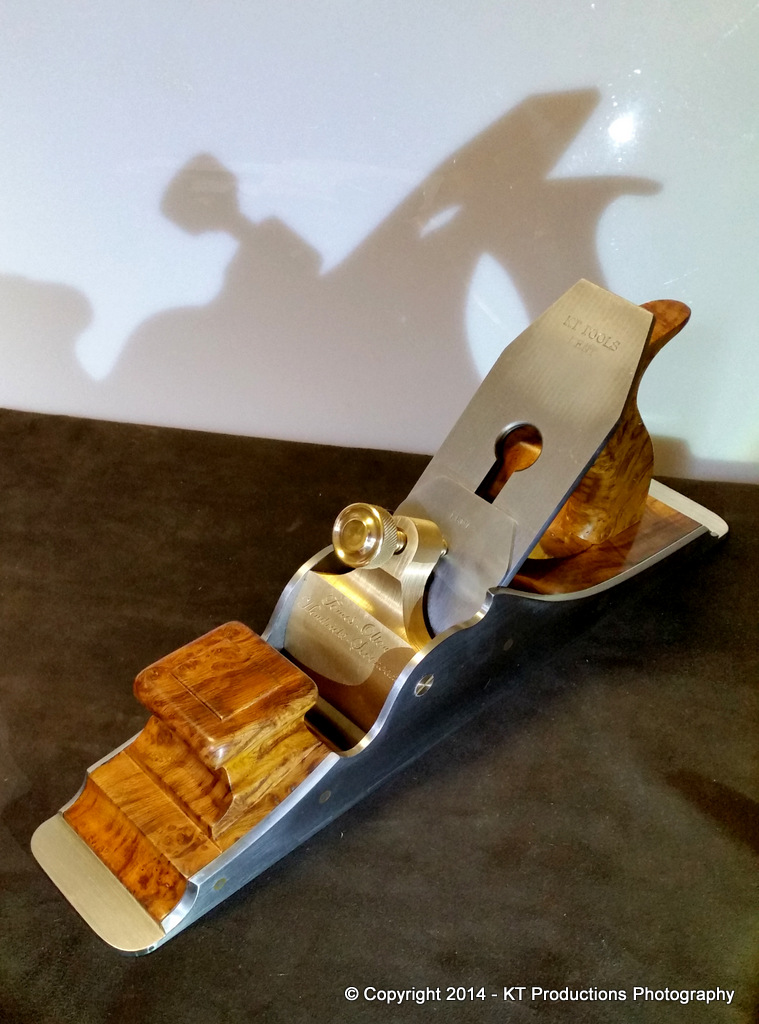
Mike 1 (Canada)....ah! Ok...I trust your description...though Richard did say he designed the side as the Great Wave Off Kanagawa so I followed that lead and bookmatched the rear so that it was like a shark fin running through the water after the wave...

2014-09-08%2015.16.32.jpg


By bookmatching...I could get the grain in the wood to flow out from either side like a wake.

But I'll go with the dragon idea too....it certainly bites like one! :wink:

Mike 2 (Bedrock)....

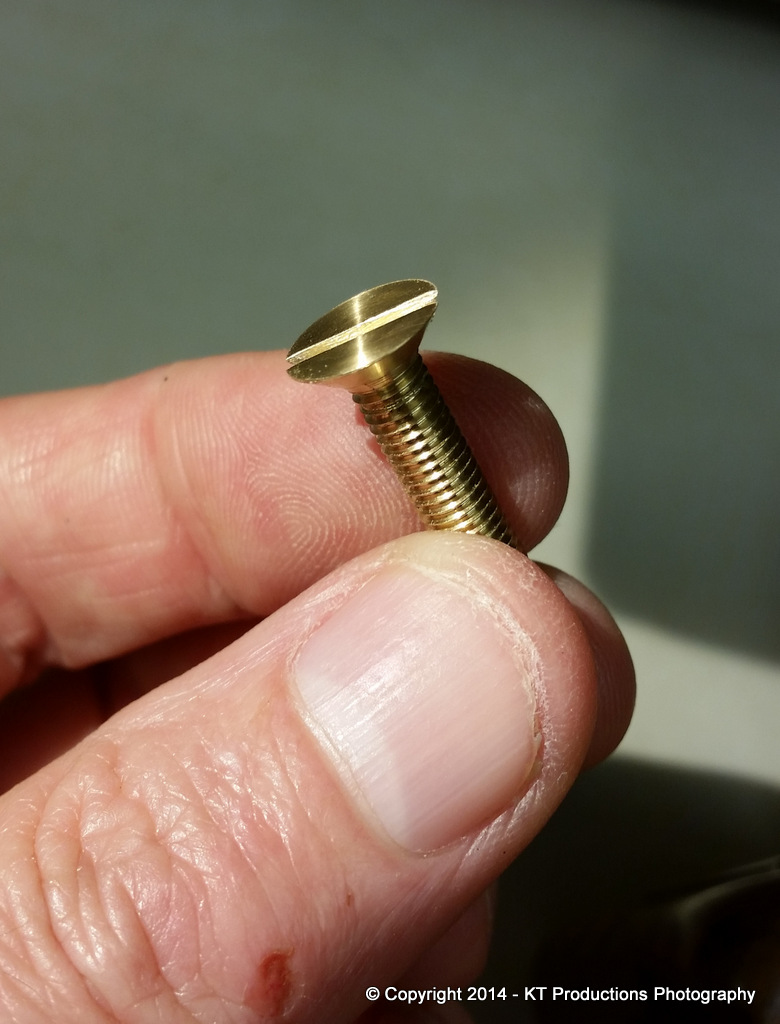
Funny you should say that because when I was doing the second bolt this afternoon I thought to myself...ok...it's only a bolt but I bet someone asks......etc! :mrgreen:

So...I took some pictures...at some of the stages anyway.

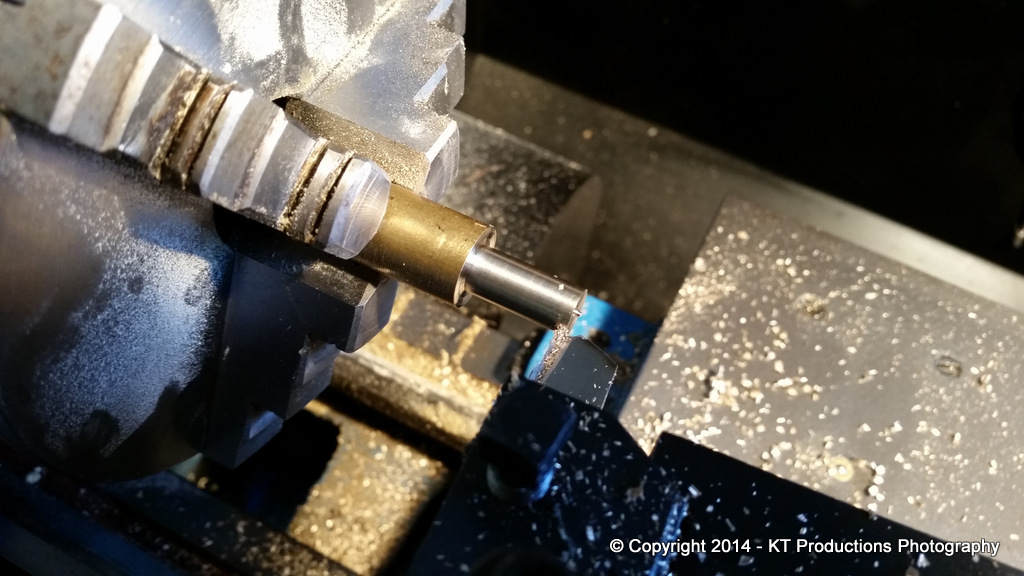
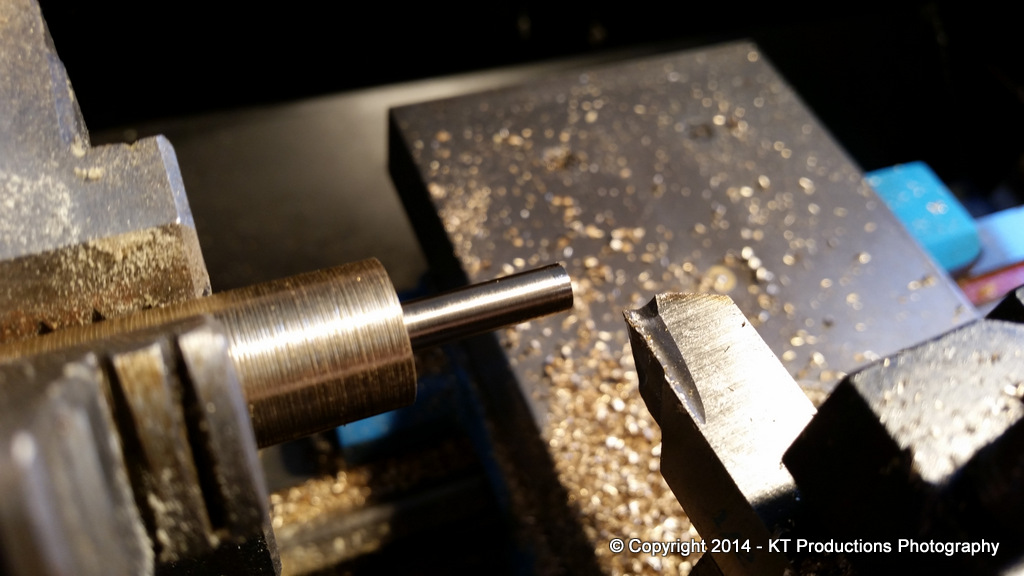
A round brass bar big enough to be slightly larger than the maximum size of the head was mounted in the chuck and then the diameter run down square...

20140930_151856.jpg


When I got near the right diameter for the OD diameter of M5 thread I did just the end to test the caliper diameter...

20140930_152309.jpg


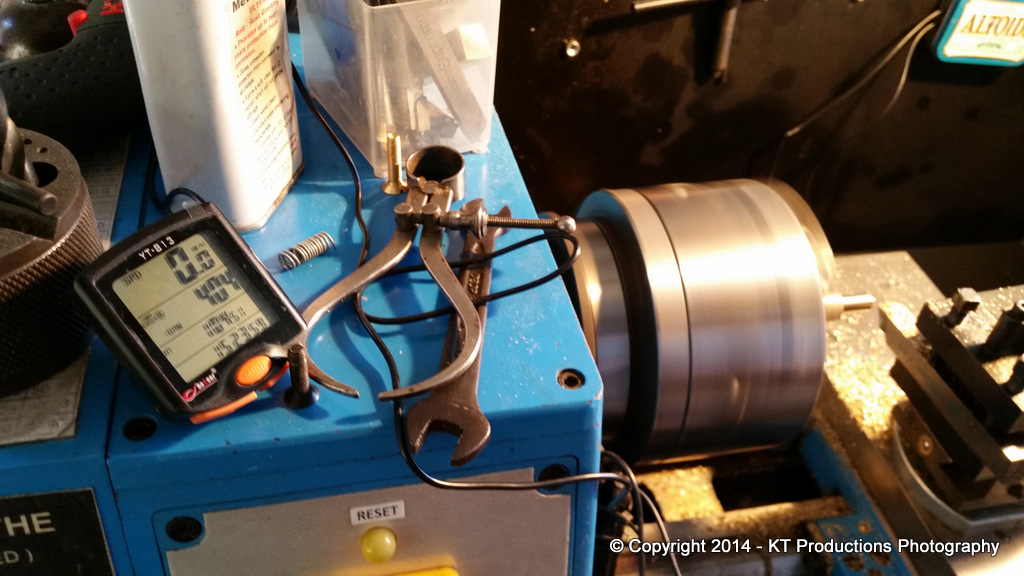
I don't have a tacho on my lathe so was going to buy one from Axminster but they are silly money and they're only Hall Effect switches and a meter so I bought one for a push bike for a fiver from China...

20140930_152431.jpg


....and the indicator matched my laser tacho exactly! I was very pleased! 8)

I then ran the diameter all the way back to the end of the screw part...

20140930_152805.jpg


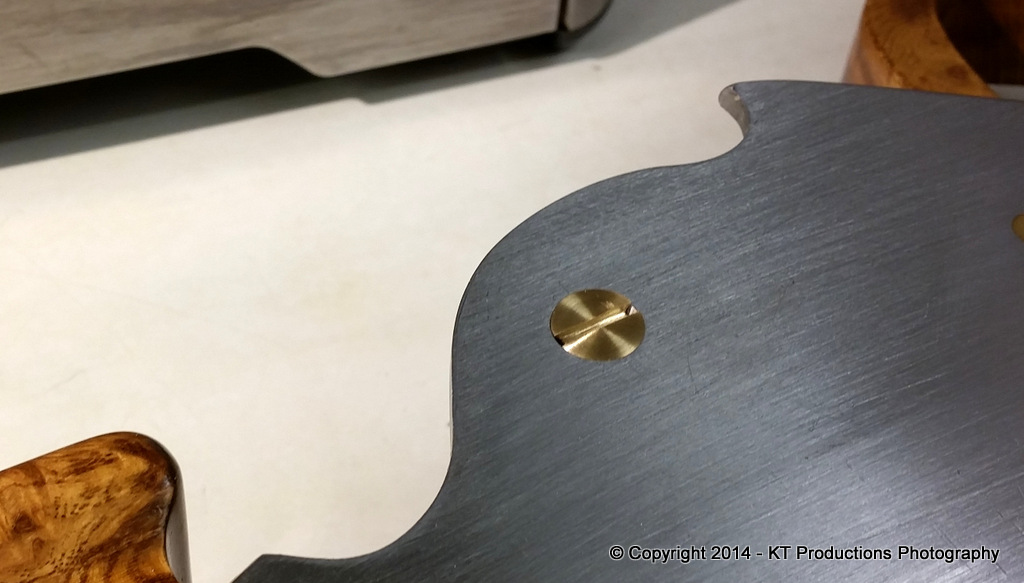
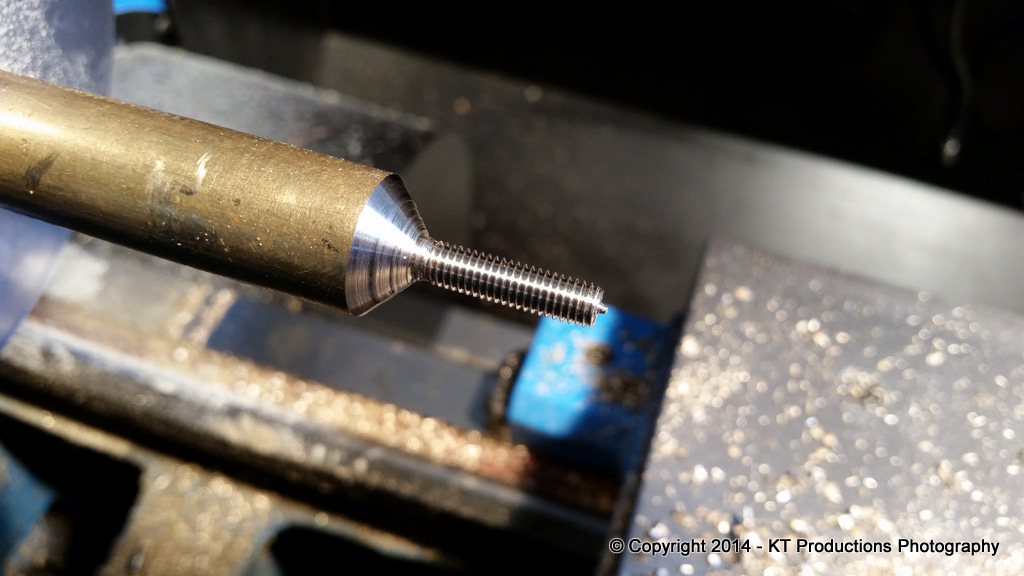
I then moved the cutter to give the correct angle for the countersink taper...and cut the thread with a hand die stock...

20140930_154921.jpg


Leaving a blank shoulder as you suggest.

The machine screw can then be cut off using a parting tool just proud of where the head will be to give me the opportunity to cut it down to the exact size by turning it around.

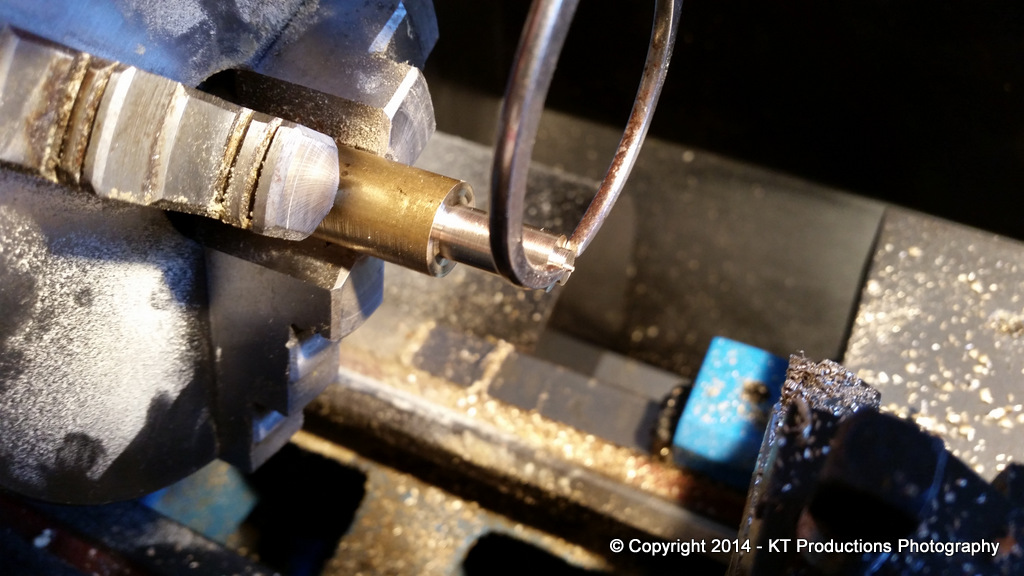
When mounting the thread I wound some wire around the threads and set it in the chuck so as not to damage the threads...as recommended by AndyT in his most excellent tip!

I then cut the slot by eyeballing the centre and using a junior hacksaw for a thin slot...finishing with a flat needle file and polishing on the lathe with abrasives.

I hope this helps...

Jimi
 
Jimi - I know there's lots of ways to crack a nut but a slitting saw on your mill would have been a safer option to cut the slot? :)

Rod
 
Harbo":1oztu4gx said:
Jimi - I know there's lots of ways to crack a nut but a slitting saw on your mill would have been a safer option to cut the slot? :)

Rod

You are most correct Rod...if I had one that is! :mrgreen:

I have become pretty adept at "eyeballing" things since the start of this project...I would never have dreamed of attempting a lot of things before then! :wink:

Jimi
 
Are we talking slitting saws - they only cost a few pounds for the little ones?
Though you do need an arbor too.

I was thinking more of not knackering your lovely handiwork - junior hacksaws are notorious for not making clean starts - unless you do the Paul Sellers trick?

Rod
 
Jimi
Thanks for the clear explanation and photos. I have used a tail stock holder for the die, and cut the bolt shank overlength, then machined the extra so that the die engages lightly. The purpose is to ensure that the die starts off square and that if I then finish the screwcutting off the lathe, nothing starts to diverge from true. Perhaps a little OTT but early experience with screwcutting taught me a lesson.
When you can acheive the finish of the slot to this standard, hand work is so much more satisfying, and quicker, if that matters.
Mike
 
Hi Mike

Yes..I have one of those...

20140620_195504.jpg


...but I find that if you hold an ordinary die stock holder square by eye and then rotate the chuck..you can start correctly...after that..it cuts automatically square.

Sometimes I can't be bothered to get all that kit out to cut one little thread....lazy I know! :oops:

Jimi
 
Another anxious period is now over for hopefully the last time..the wait for engraving and twice trusting Her Majesty's Royal Mail..phew!!

So...the long awaited time to show the final pictures for this thread....

I asked Ian at CHALCO STAMP AND DIE to engrave the lever cap in Copperplate script as I love that style and I felt that it suited the period in which this style of plane would have been made.

I wanted to brand my irons so I asked him to machine engrave them in the same font Norris used...seemed suitable.

I didn't even have to ask him to do it straight either! (sorry...couldn't resist that one! :roll: )

Anyway...enough typing...the skill of that guy speaks for itself!

20141007_141909.jpg


20141007_163914.jpg


20141007_144853-1.jpg


20141007_133812.jpg


20141007_144631.jpg


20141007_164737.jpg


I am absolutely thrilled with the results...and more so now that I know it's finished...although I may tinker a bit more...

But it means I can now go out and use it on a number of projects I have in mind...for my daughter...and other things in the pipeline.

I would like to take this opportunity to thank everyone involved in this project from start to finish...you know who you are and you are fantastic guys and girls. But most of all...I really have to thank Richard...

I still have his notes on other projects...so just maybe there will be a few more to come.

Thanks Richard....

Jimi
 
Wow. That's wonderful.
I'm feeling equal proportions of sadness that Richard can't join in with us in celebration of such a splendid piece of work, and pleasure that you have taken such care and skill to produce such a superb object.
Really one of a kind!
 

Latest posts

Back
Top