Trevanion
Greatest Of All Time
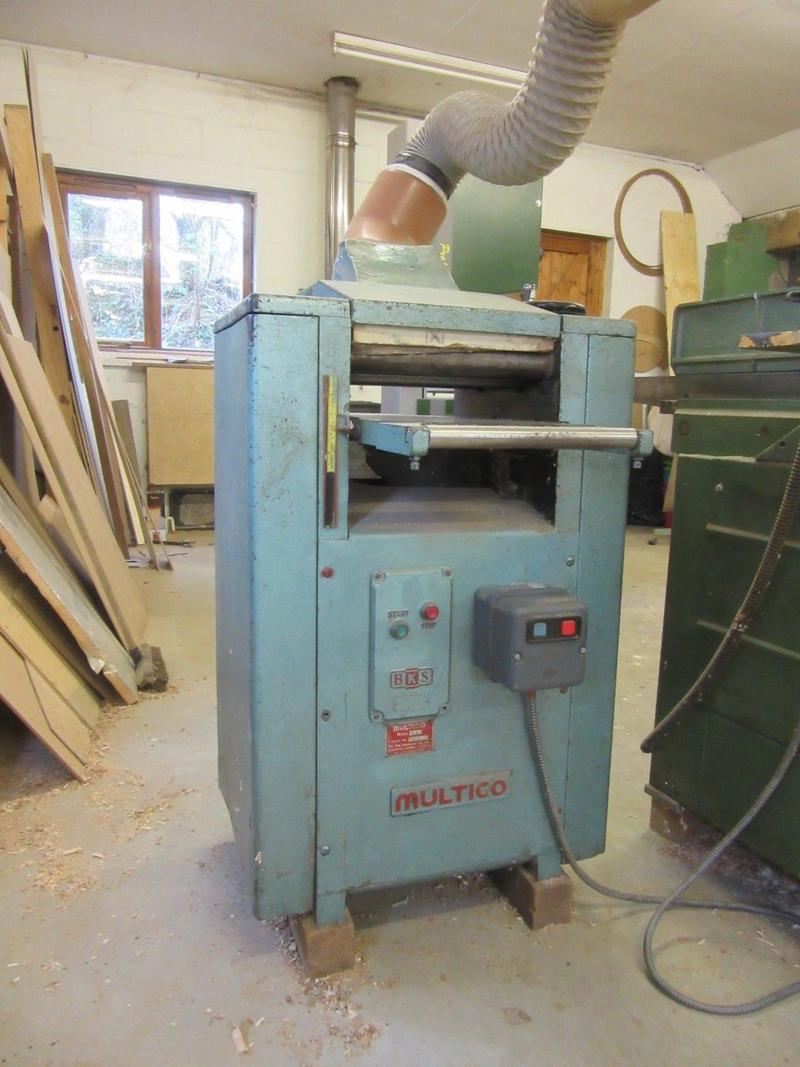
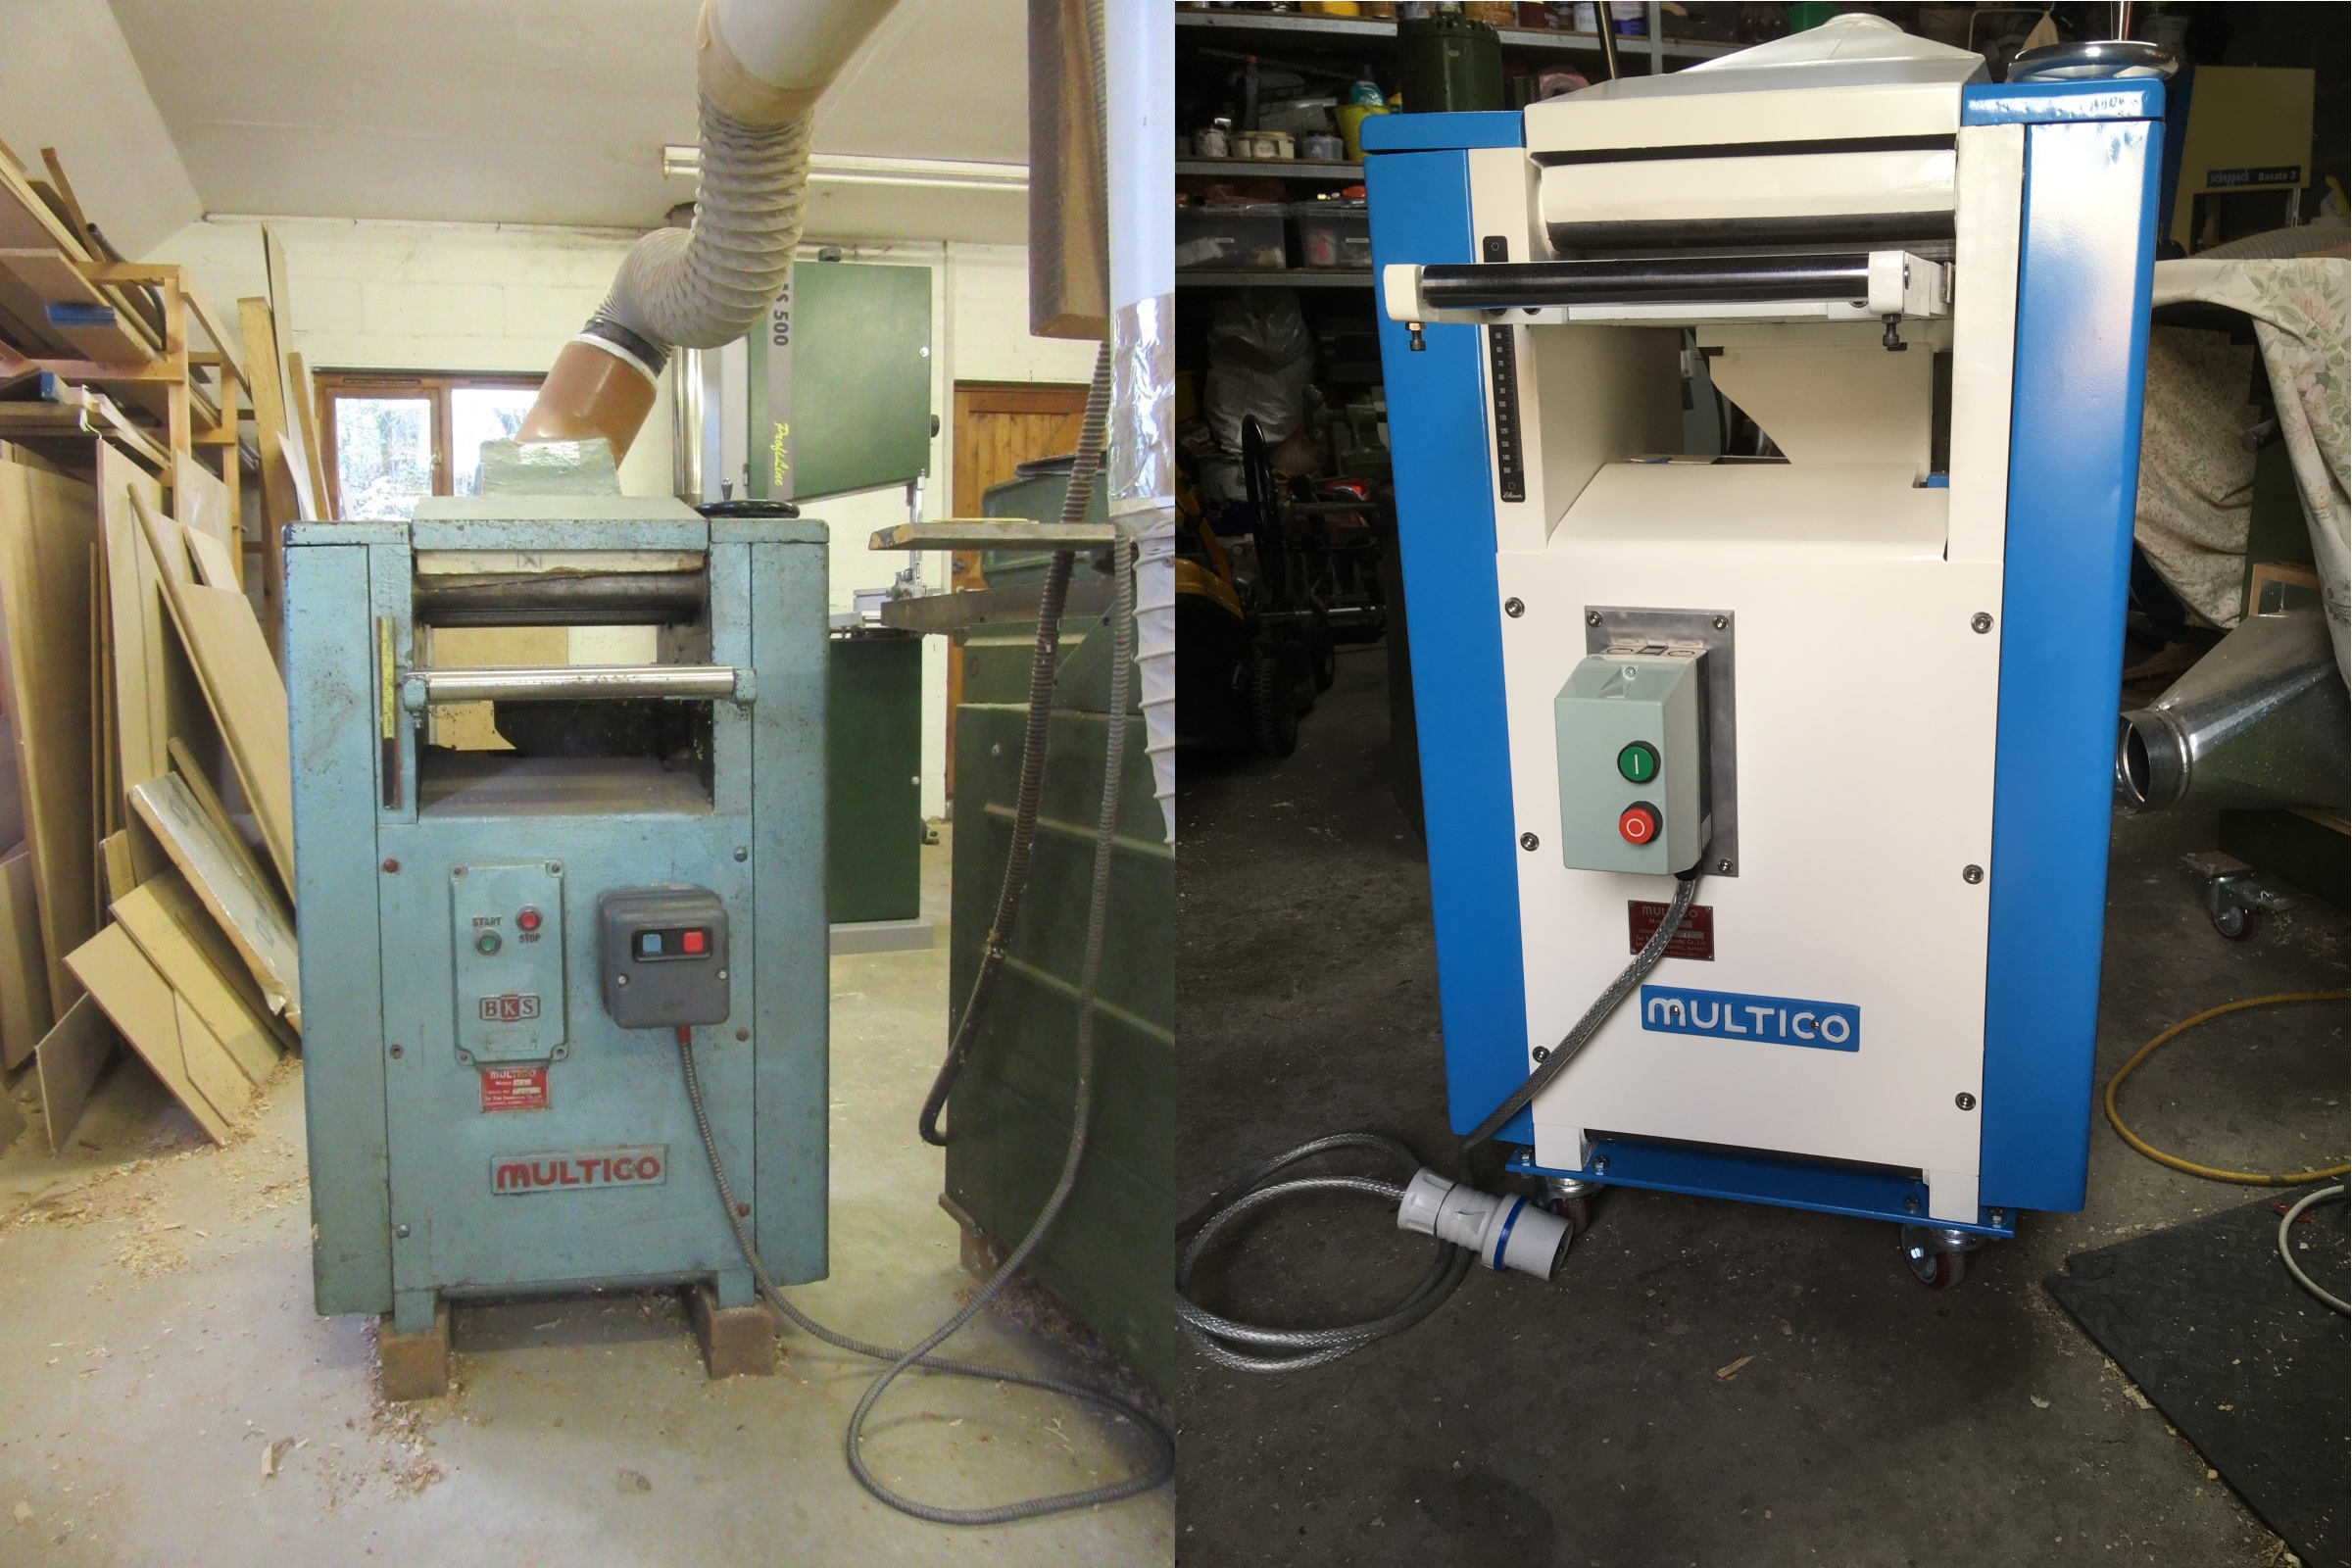
2nd of December 2018, Oh dear lord, what have I done... slapped down £450 on a 12" Multico TH thicknesser (£850 if you include the surface planer :wink
") . For a bit of context, machines are quite rare out here in the west as they either are sold immediately through word of mouth as everyone knows everyone or farmers hoard the gear in some shed somewhere until they keel over and then the auctioneers come in, sell the whole lot in a single big day and then they just end up with another farmer in some shed somewhere and the cycle continues until there are only fragments of rust left. So when I saw this reasonable pair of machines not too far away for what I thought was reasonable money within the first 5 minutes of them being listed, I pounced on them like you wouldn't believe and grabbed first dibs. When naive little me went to look at the machines I didn't really notice too much wrong with them on first glance aside from being a little old and your general wear and tear you get with machines, and pretty much parted with the cash with not too many questions asked. The owner was quite a renowned local cabinetmaker who made what were regarded back in his day as some of the best kitchens in Britain, so I've been told anyway, he never mentioned it and was very humble the whole time(More here about his worksmanship). Brought them both home and started having a good proper look through them.
. For a bit of context, machines are quite rare out here in the west as they either are sold immediately through word of mouth as everyone knows everyone or farmers hoard the gear in some shed somewhere until they keel over and then the auctioneers come in, sell the whole lot in a single big day and then they just end up with another farmer in some shed somewhere and the cycle continues until there are only fragments of rust left. So when I saw this reasonable pair of machines not too far away for what I thought was reasonable money within the first 5 minutes of them being listed, I pounced on them like you wouldn't believe and grabbed first dibs. When naive little me went to look at the machines I didn't really notice too much wrong with them on first glance aside from being a little old and your general wear and tear you get with machines, and pretty much parted with the cash with not too many questions asked. The owner was quite a renowned local cabinetmaker who made what were regarded back in his day as some of the best kitchens in Britain, so I've been told anyway, he never mentioned it and was very humble the whole time(More here about his worksmanship). Brought them both home and started having a good proper look through them.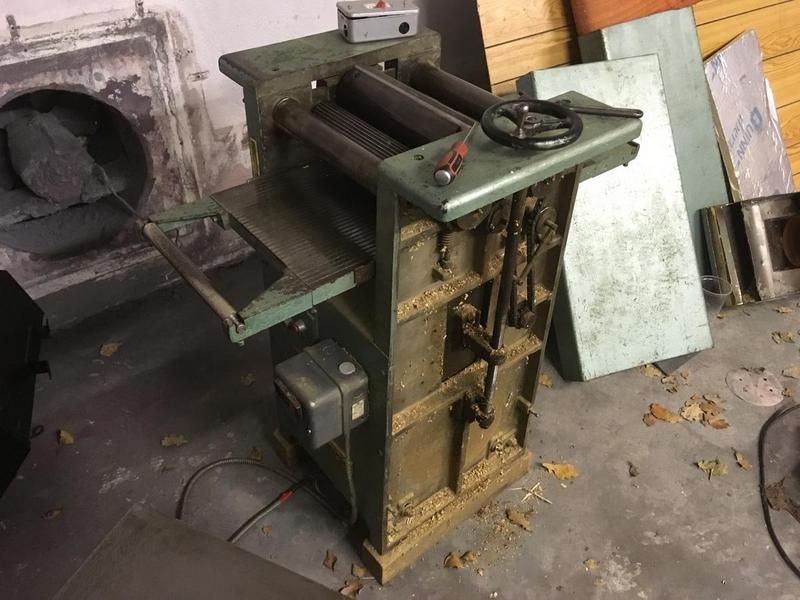
I'm quite familiar with the later model of the TH thicknesser, which is a welded box steel construction for the main sides but this one is a much older model and has cast iron sides, which explains why it was so whomping heavy to shift around. A couple of other things I noticed were that the older models didn't have any form of kickback protection whilst the newer ones did have a little box attached to the front with little grabbers in to prevent pieces from shooting back. This one also has a cast aluminium hand wheel for adjusting the thickness whilst the newer models had a plastic one. This machine also has a ridged cast iron table with the extenstion rollers and the newer model has a completely smooth, fly cut and ground table with no rollers. There are also a couple of other things I noticed but I will touch on these later
, Other than that they are almost identical in every way.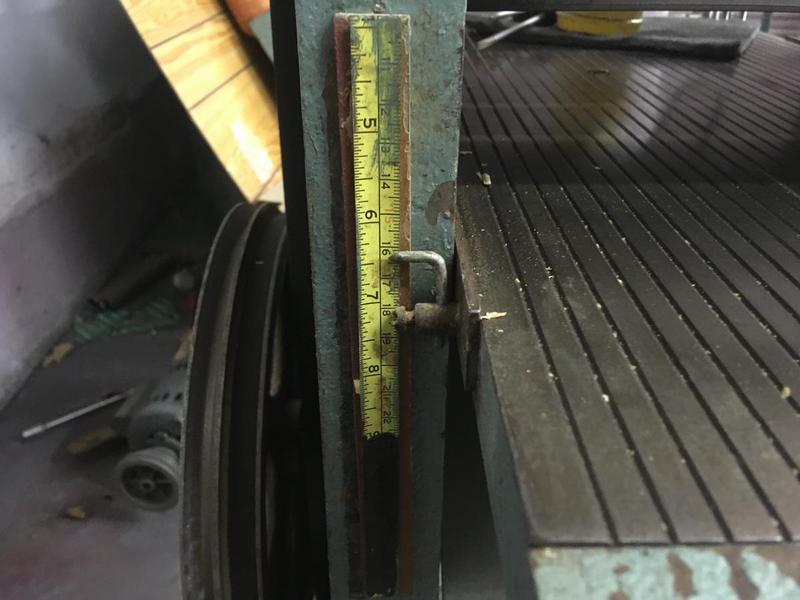
Something immediately obvious was that this scale was not original to the machine! :lol:. I assume since this machine is quite old the original scale was imperial only (No exact date but the manual references the 1976 Woodworking Regulations so it's at most that old.) I had also been looking at some examples online and they seemed to have imperial only scales which confirmed my assumption. Wanting things to be done good and proper, I put out a plea asking for help to find a scale suitable for the machine and I got a response from forum member SkinnyB (Who has also restored a Multico TH) saying he could make me one, Golden!
. I had him make me a 150mm one since I knew the machine I was used to was 150mm, but it wasn't until I had the lovely 150mm scale kindly made for me by Skinny in hand that I noticed something not quite right... This machine was actually 125mm at full depth #-o My cock-up, should've checked. Looking back at the photos of the old machines I saw I noticed they were all down to 5" and even the scale that was on my machine was blacked out below 125mm SkinnyB has kindly again agreed to make me another a 125mm but he hasn't got back to me yet about it. Fingers crossed :wink: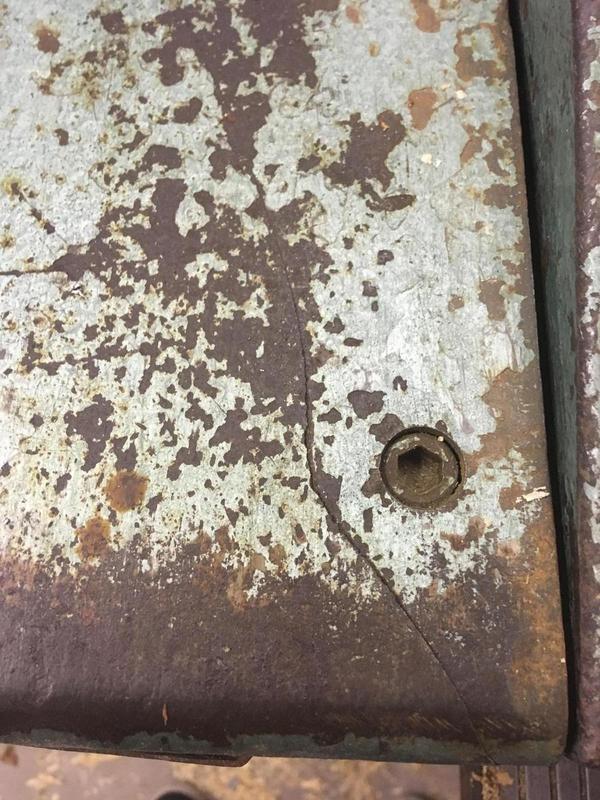
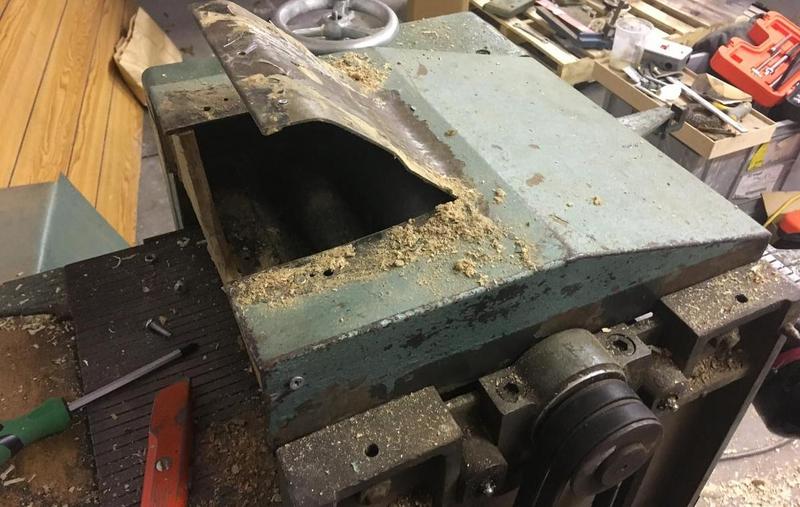
Something I hadn't noticed when I went to look at the machine was this nasty crack in the left side casting from what I can only assume was a piece of timber landing on it hard, or even the machine tipping over. I'll deal with this later as there's something else to look at first.
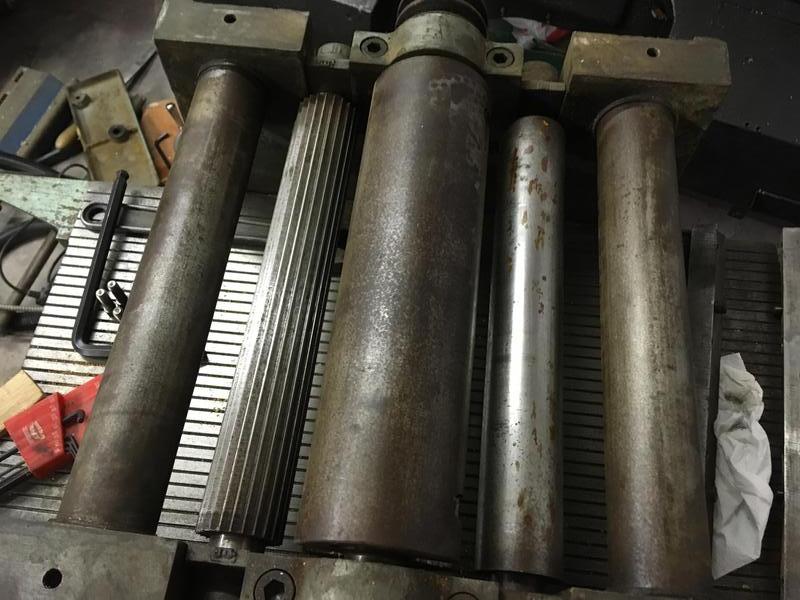
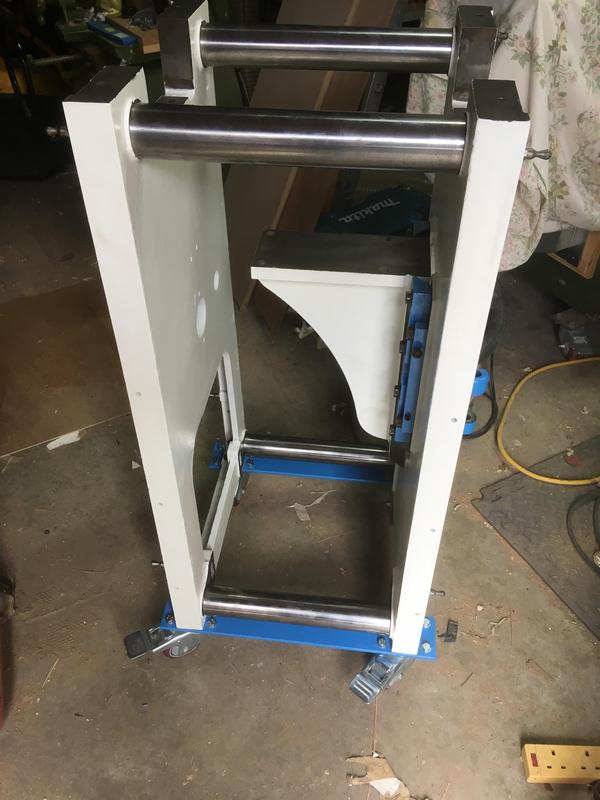
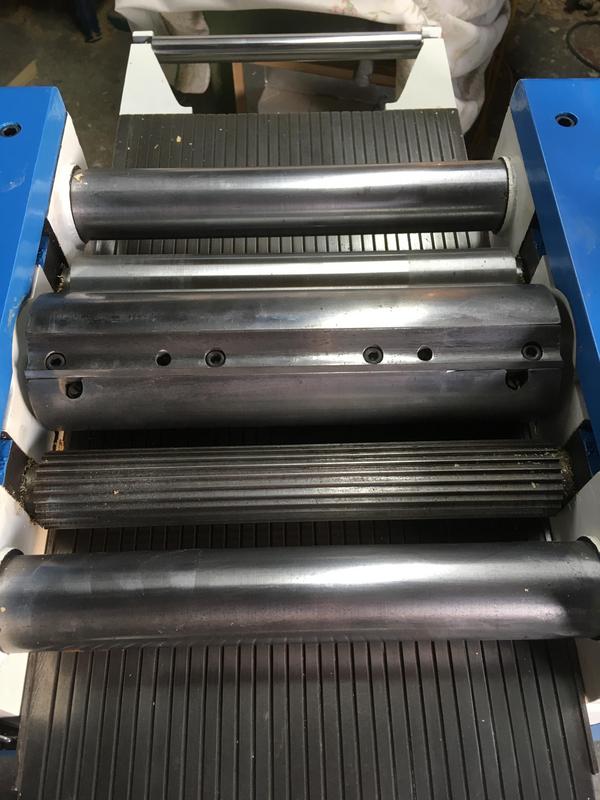
These rollers, columns and cutter block could do with a good clean and polish but I'll save that for later. It seemed there may have been an accident with this machine at some point as there were a couple of chunks out of the feed roller and a few dings in the cutter block which would suggest a cutter came loose. The cutterhead allen screws had seen better days as it looks like someone had been using a metric or torx sized key to take them out rather than a proper imperial one, I put some new ones on order.
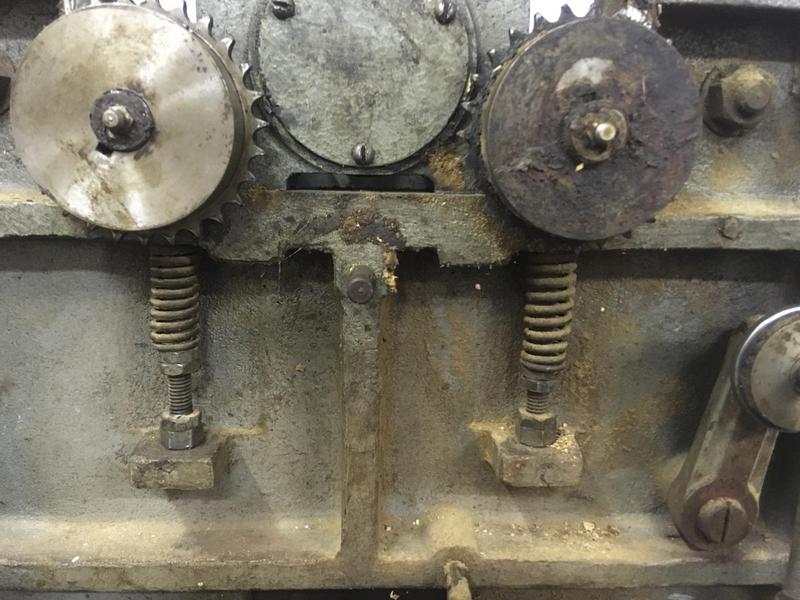
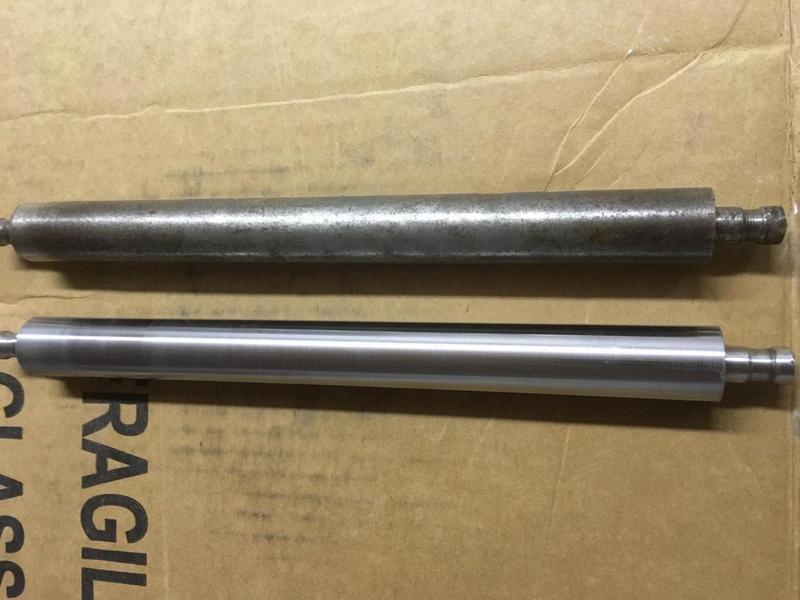
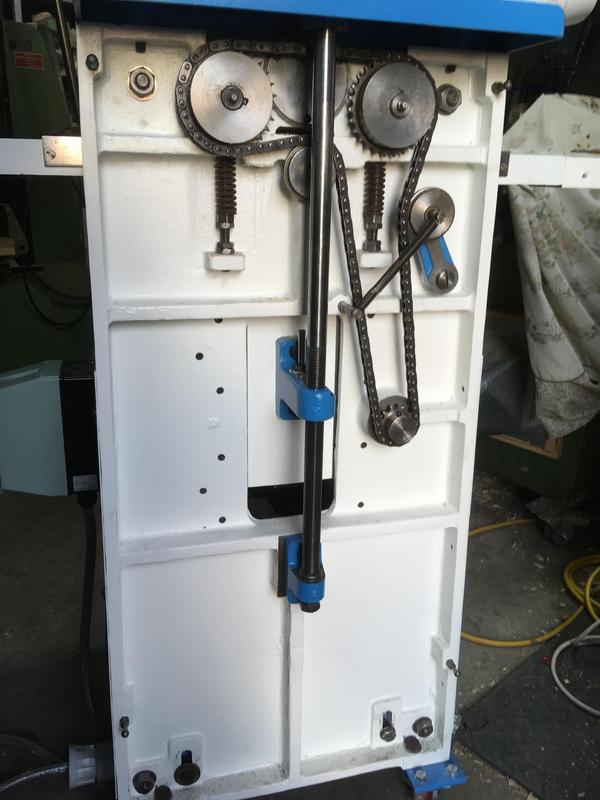
I took the chain off the power feed mechanism to soak it in some thinners to clean off the decades of baked-on grease and started cleaning up the sprockets which also had quite tough ancient grease welded to it. When I was cleaning the front roller I noticed that the right bearing side rattled quite a lot more than any of the other sides so I decided to strip it out and have a look at it just to see what the problem is...

:shock: No wonder it was rattling so much, It had worn almost 0.75mm all the way around! I'm pretty sure grease guns had been invented before this machine was made :lol: Absolutely bone dry. The rest of the feed rollers were a little worn but this one was extreme as I guess it's the first roller and gets the most pressure especially on the sprocket side from the chain resisting the lift. I decided to tackle this problem first as it seemed the most serious.
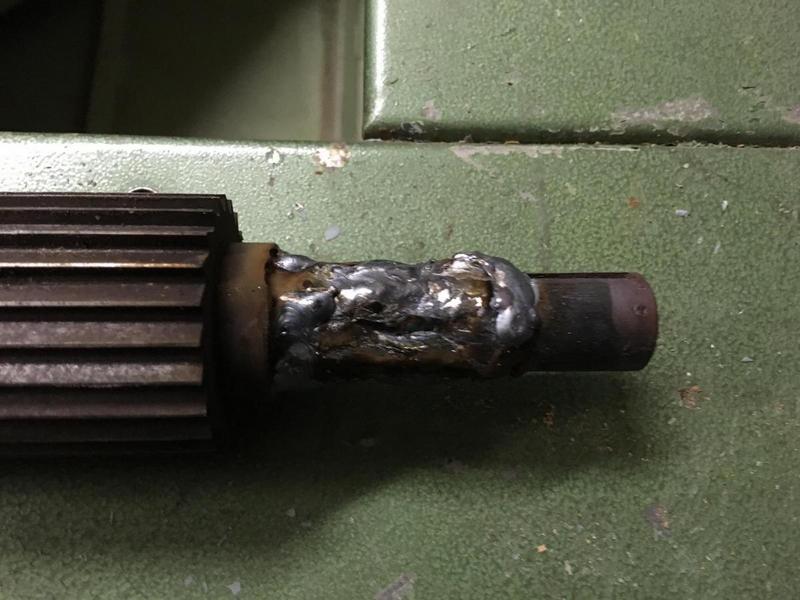
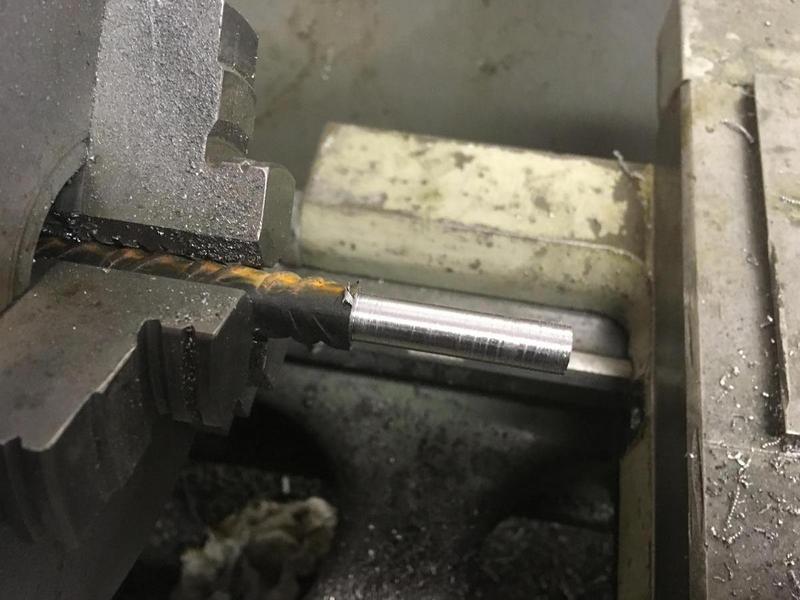
I attacked it with vile prejudice with the MIG gun until I was happy I had enough material to work with.
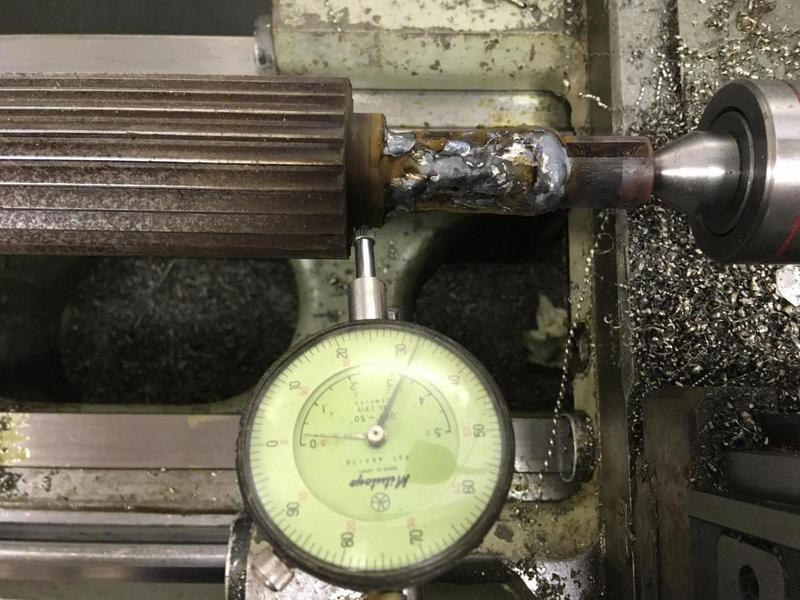
I chucked it up in the CVA lathe and checked it with a dial indicator to see if the welding had warped the shaft in a particular direction, which it had so I gave it a good few clumps with a sledge (Out of the lathe of course, what do you think I am? Some kind of uncultured neanderthal?
) until I was happy it was running spot on so I could machine it correctly.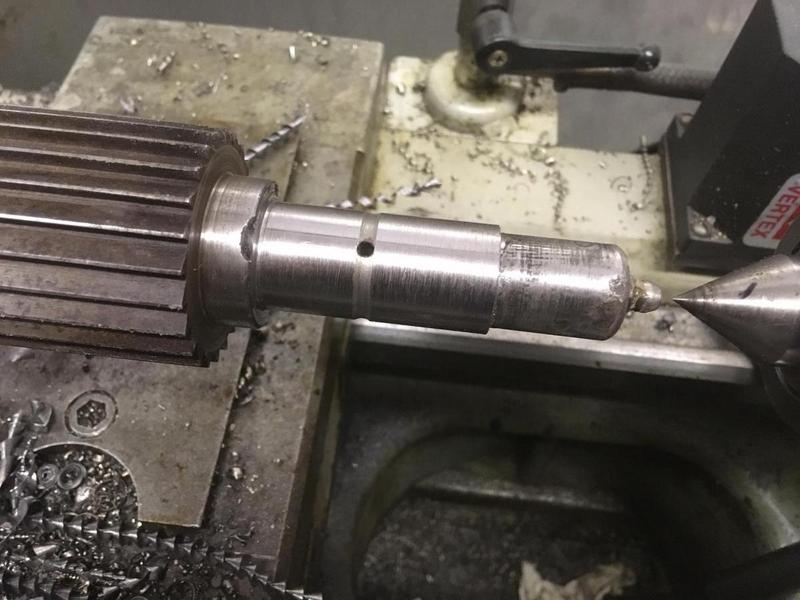
I turned the weld down until it was the same as the keyed portion of the shaft and tried it in the cast iron housing, which was still quite a loose fit so I decided I would press a sleeve on the shaft a couple of millimeters larger and bore out the housing to be the same. Please note the grease groove and hole which should be used! :lol:
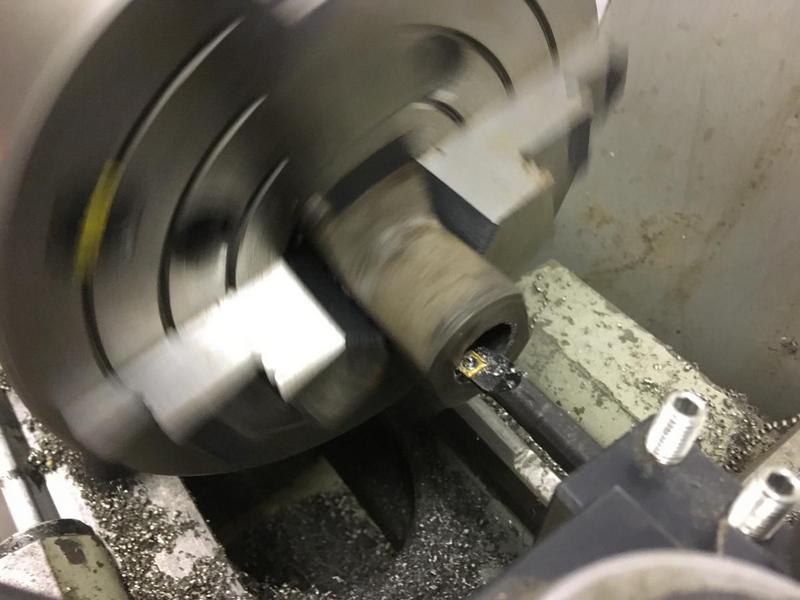
Boring the housing was tricky, it wasn't the easiest part to get a firm grip on in the 4 jaw chuck but I persevered and managed to get a larger hole. If I remember correctly the original diameter was 15mm and it's now 19mm.
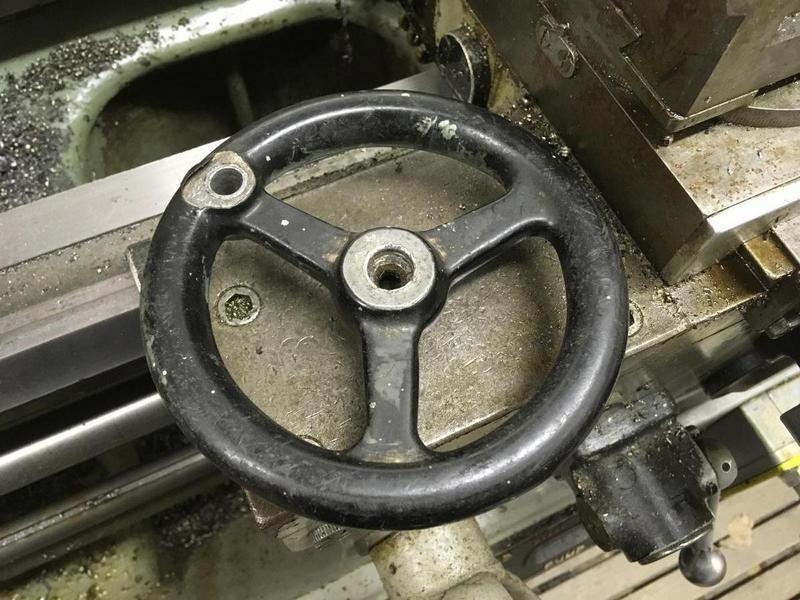
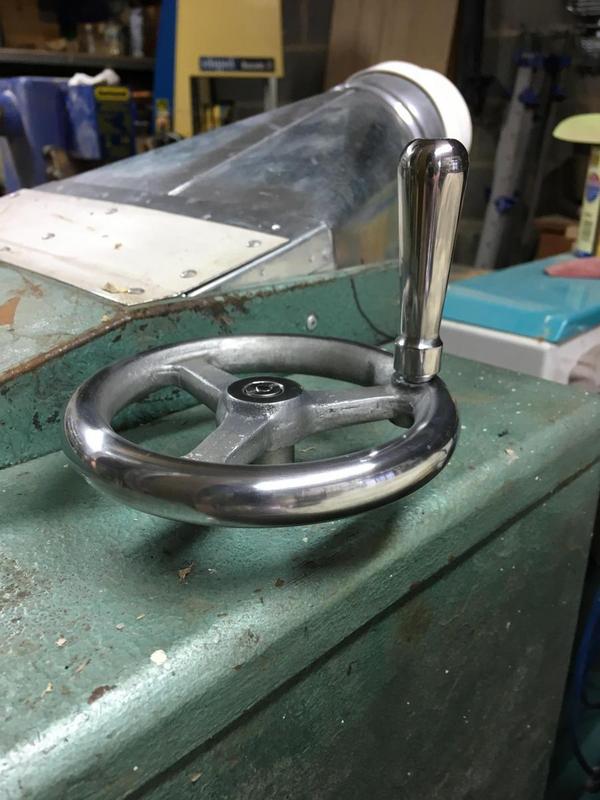
Moving onto this horrendous plastic coated cast aluminium handle. Even looking back at the photo just makes me feel queazy, Just look at it!
First priority was to rip off the nasty coating which was easier said than done, little git did not want to come off at all! Stanley knives struggled to cut it, screwdrivers had a hard time prying it off, devil material!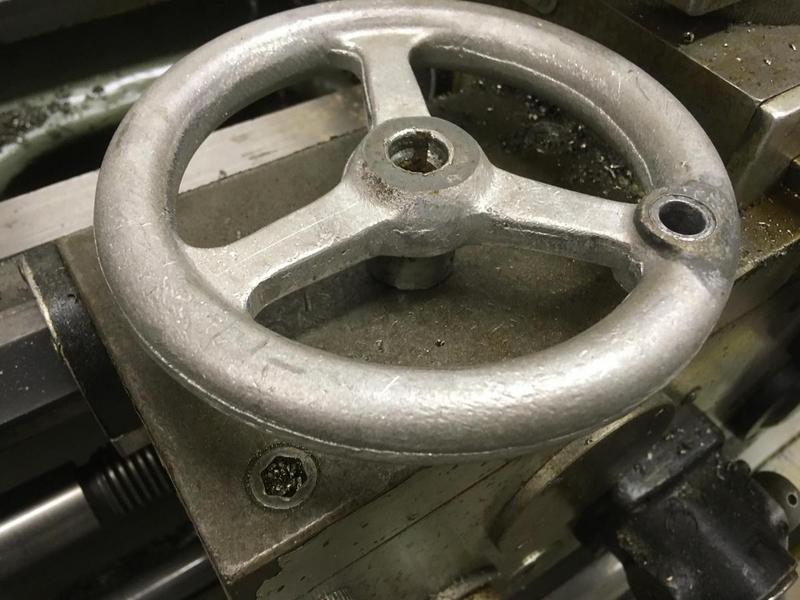
Once the glorified bin bag was removed from the handle I was a little disappointed to see it was just rough cast but I was really just being optimistic of it being lovely and polished Wadkin quality straight out of the packet. Not so
.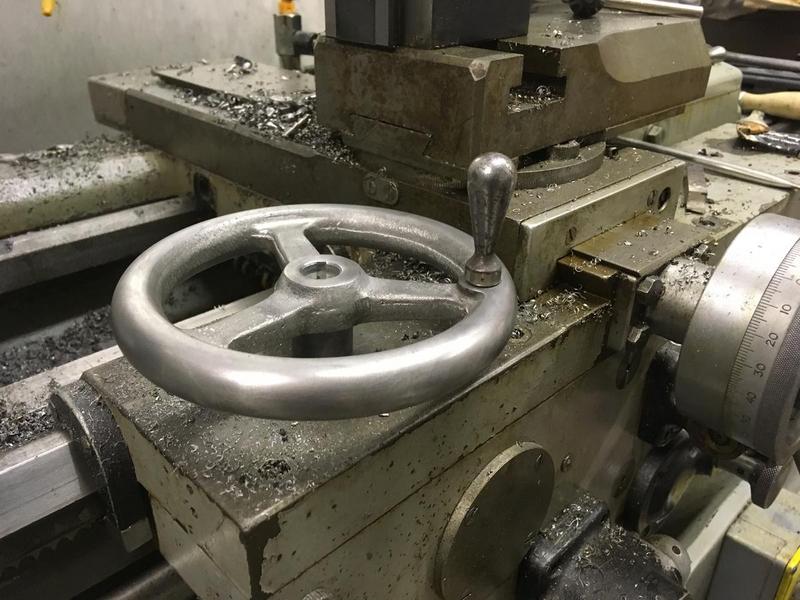
Mounted the wheel in the spinny-go-fast / time machine and cut the outer rim of it to some form of half circle and sanded it. Once out of the machine I noticed how pants the little knob handle was, it was a bit undersized and it wasn't the smoothest thing to use on account of the sheer amount of wear in the hole for it. To be honest, I didn't realise this wasn't fixed in place until I got the machine home, it was pure luck it didn't end up in a ditch somewhere with the bouncy trailer!
Now, you'll have to excuse me as I swear I took photos of me turning the new handle and the bearing axle which is threaded into the handle. You'll have to use your imagination to see me turning some stainless steel leftover from my Soviet Death-Ray manufacturing days into a nice little handle, keep the thought of the handle you've imagined in your head and compare it to the real deal later
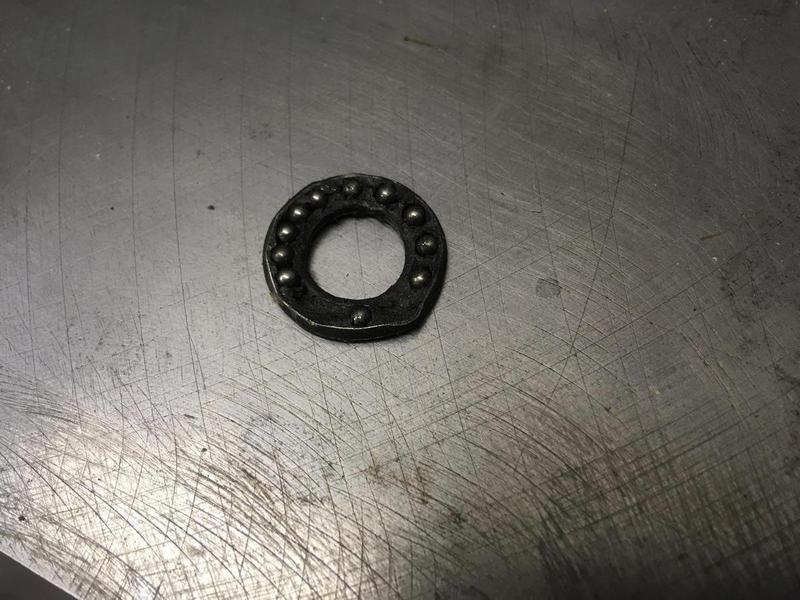
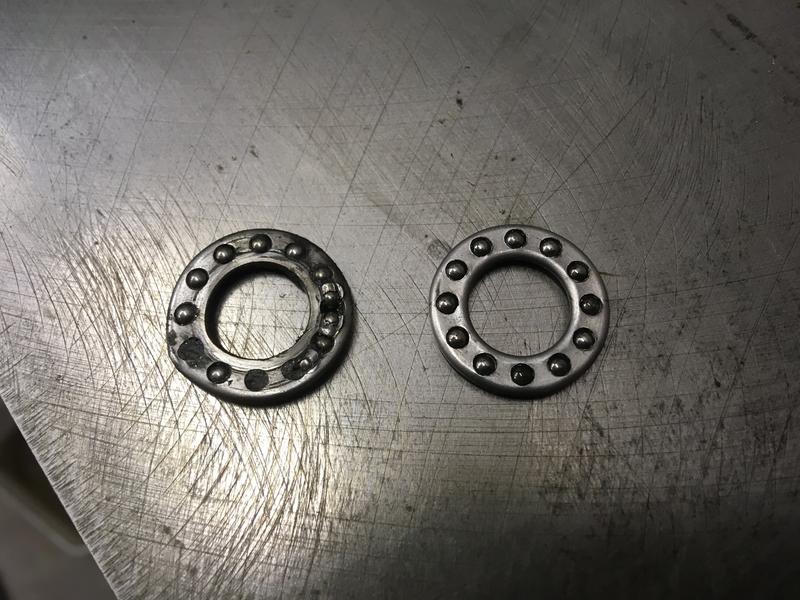
While the handle was off I took the threaded rod out which controls the height of the thicknessing table when the handle is cranked and I was greeted with this lovely little number. I thought the height adjustment was a little stiff and all it would need was a little WD-40 :shock: HOW DO YOU EVEN DO THAT TO A THRUST BEARING IN A LOW LOAD ENVIRONMENT!? So I popped one of them on order while I was at it.
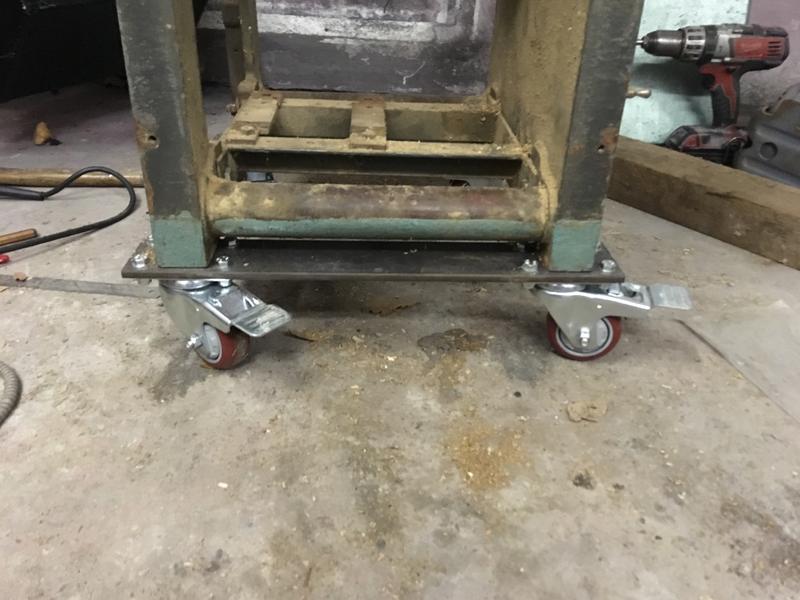
While the machine was mostly stripped down I put on some locking castors on the base of the machine which were attached to two pieces of 8mm steel to increase the area to bolt the wheels to, then one single bolt through to the steel plates and the feet of the machine. Rutlands Polyurethane 75mm locking castors, they're pretty good but they've recently gone up in price from £20 to £25 for the 4.
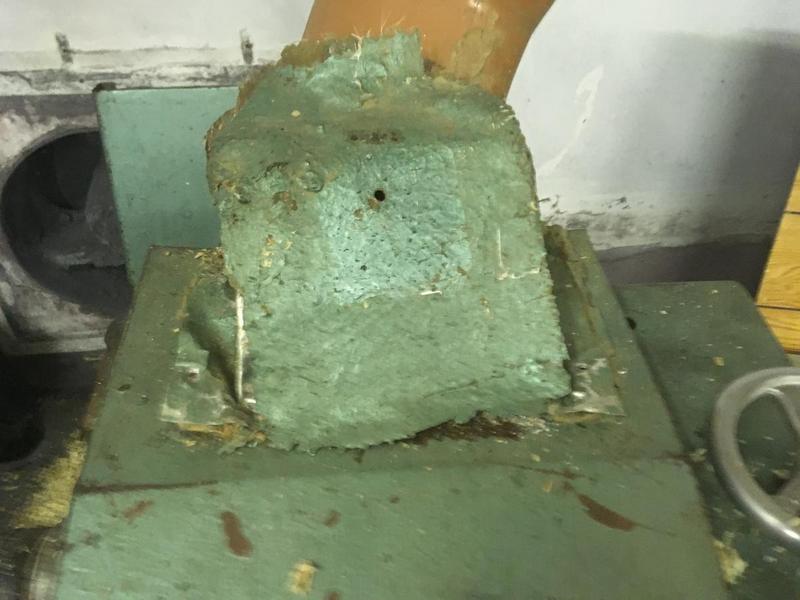
Moving onto the dust chute, to be frank... I've seen prettier pigs. The dust extraction would be pretty inefficient since there's a hard 90 degree right out the back end using a bit of 150mm osma pipe, which then used a plastic plant pot with the bottom cut off to reduce it to 125mm I kid you not! :lol:. The bend didn't matter too much on a big extractor but if you want to run it from a little 1HP machine you need to think smart, and shop smart. First job was to take off the fibre glass and tin foil construction that lay before me.
With all the junk off I can asses the next step, which was to order a 100mm x 300mm rectangle to 125mm round piece of ducting to cut into this hood. On order it went.
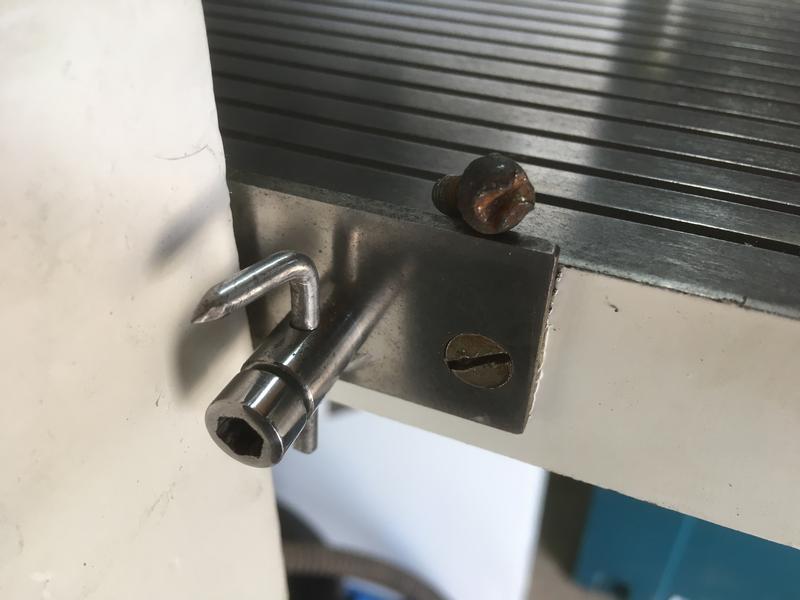
With the new duct on order, I moved onto another step in my cunning plan. I needed two new pins for the side panels to lock into since two had been snapped off at some point. Turned down a piece of rebar to the nominal diameter (fancy terms!) and threaded one end M6 to accept a nut and to thread it into the casting. I then turned the shape of them.
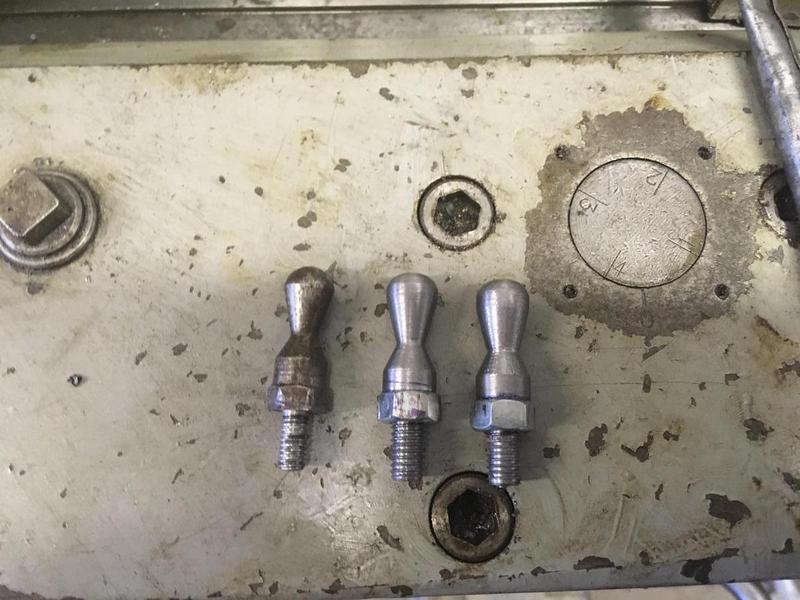
Not perfect copies of the original but they'll do. The nut is locktited in place for the spanner to have a purchase on tightening it into the castings.
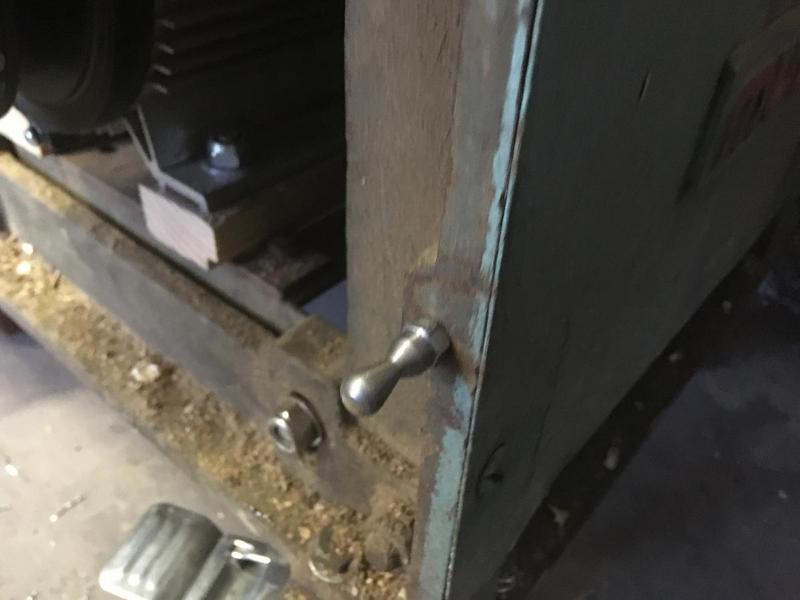
Casting drilled and threaded to accept the M6 thread and pins inserted.

Now for the part that had terrified me, brazing this casting solid. I drilled a hole at the end of the crack to stop it from cracking more when I heated it up, and then a ground a hefty V groove along the crack to fill in with the braze. Pulling out the ol' Oxy-Acetelyne bottles from the Death-Ray days I managed to squeeze enough gas out to heat up the part a bit and braze it. Kind of terrifying when you heat it up and the crack starts opening up and you hear "PING", still don't know what that was. :? Now, my brazing isn't the prettiest even after filing it back, but filler and paint will make you the brazier you ain't.
Decided to polish up some parts, here's a before and after of the bed rollers.
POW, you weren't expecting that now were you
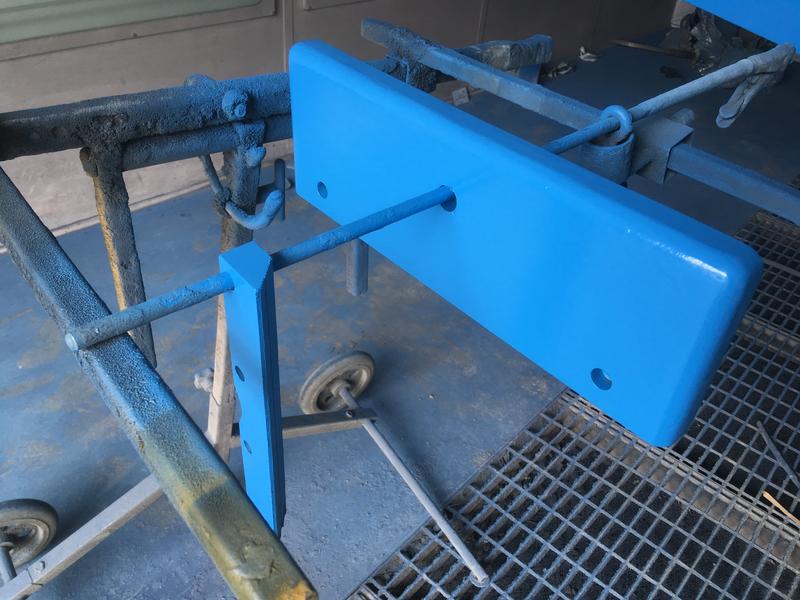
. You can even see me in the handle :lol:. Handle looks a little overkill here but it looks better later, it turns silky smooth and is far less fiddly than the old one. I also had to drill out the old double nut weird system of holding the handle onto the shaft which was quite unsecure anyway so I put a new M6 stud in the end and made a new slotted top nut that I can tighten down with a 20P ground down to suit the grooves You can also see my dust hood in this photo, not finished but its cut in and riveted. Sadly no photos of the process, but it works a treat and throws shavings out the back without an extractor attached.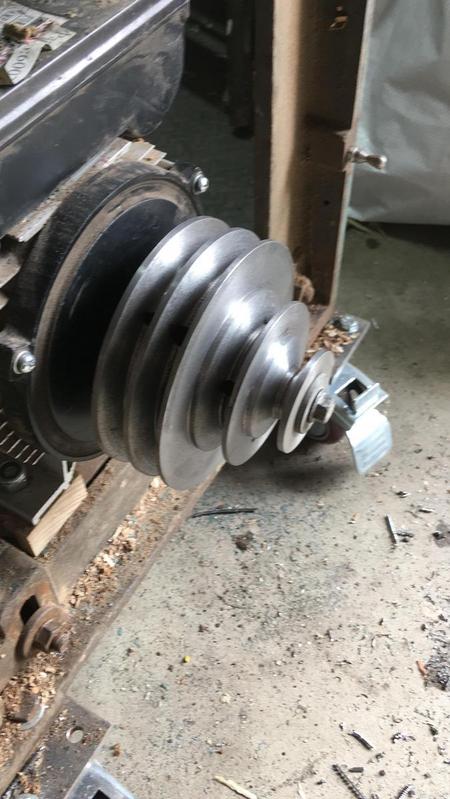
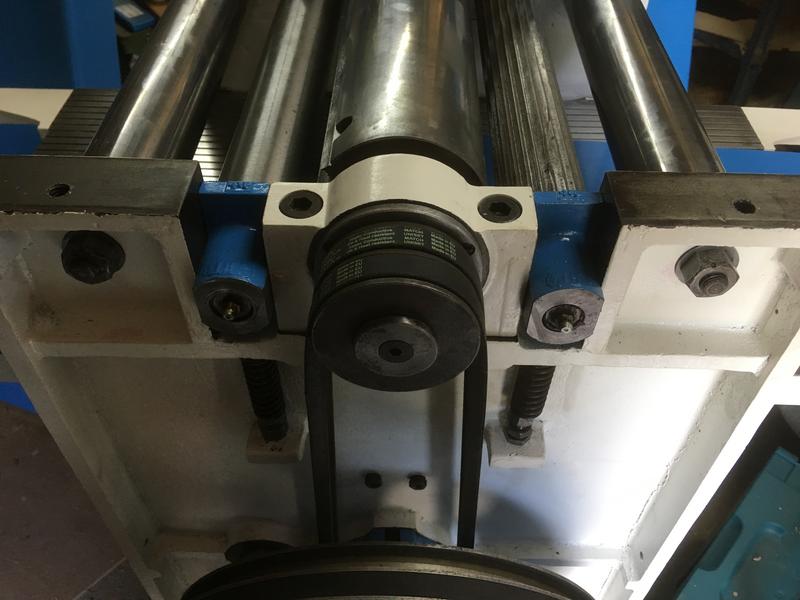
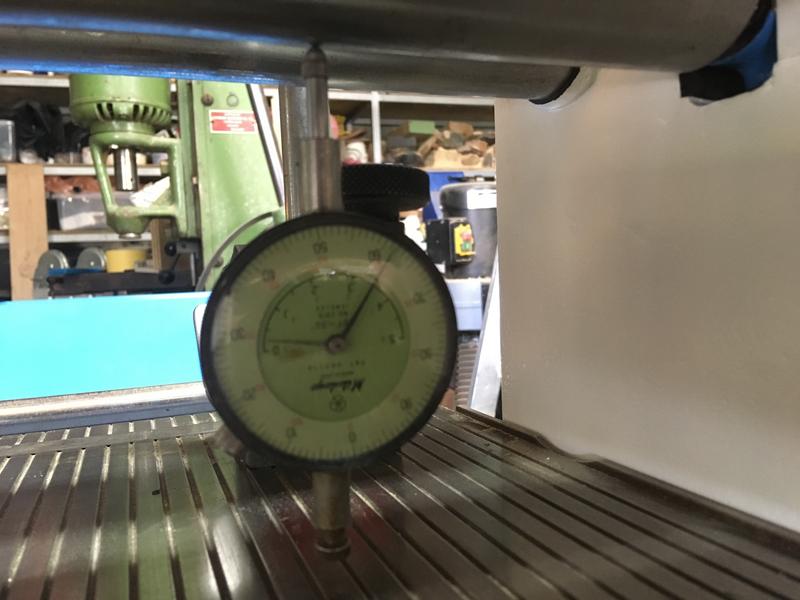
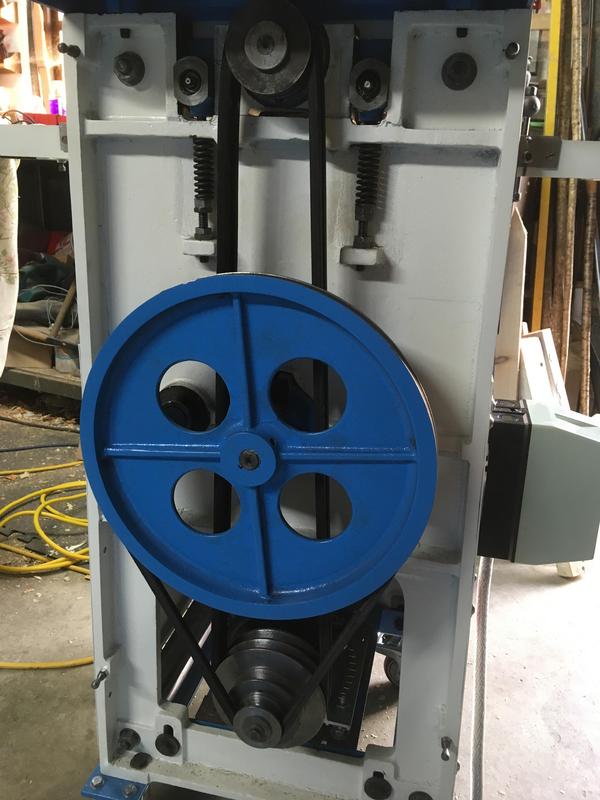
Whilst the machine was gutted out I took the opportunity to skim the pulley on the CVA as there was a little noticeable wobble which I belived was causing a little vibration, I turned down an arbour for the pulley to mount onto so I could get the skimming done absolutely perfectly concentric with the bore. Measuring the pulley with the dial indicator showed that some faces were quite true and some were way off but I skimmed the whole pulley just to be on the safe side, no harm in it. The pulley is actually a two piece construction and the end small V-groove is actually a piece of steel held in place with a grub screw, this is the lower speed for the power feed. I assume this V-groove was never actually used as I tested the belt on this pulley groove the steel component eventually worked it's way loose and shot out from under the machine and acted like a spinning top on the floor
. To prevent this from happening again, I extended the keyway in the bore into this steel component and put a longer key in to stop it turning, I also drilled the end of the motor shaft and threaded for an M8 bolt to go in the end, which locks the pulley component in place rock solid! 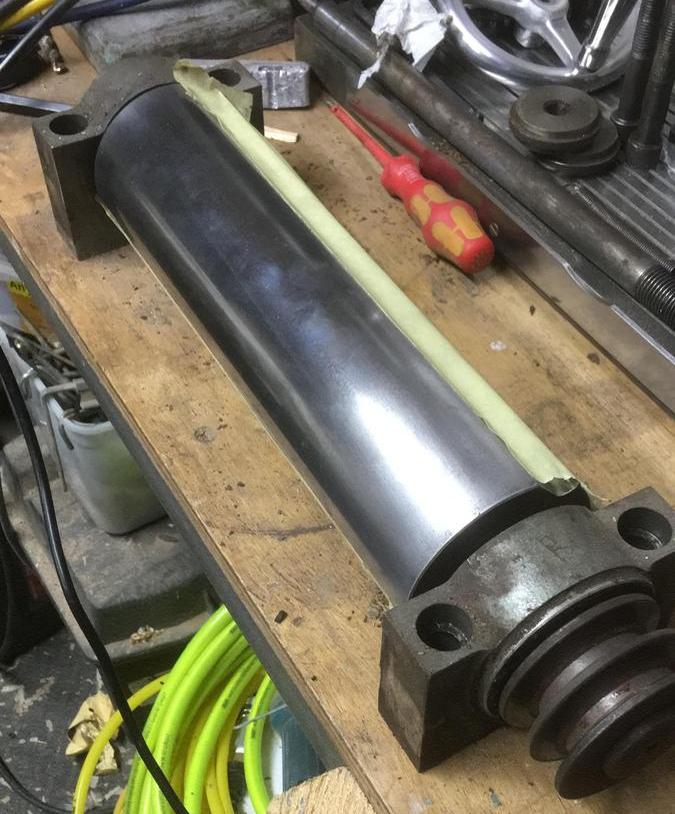
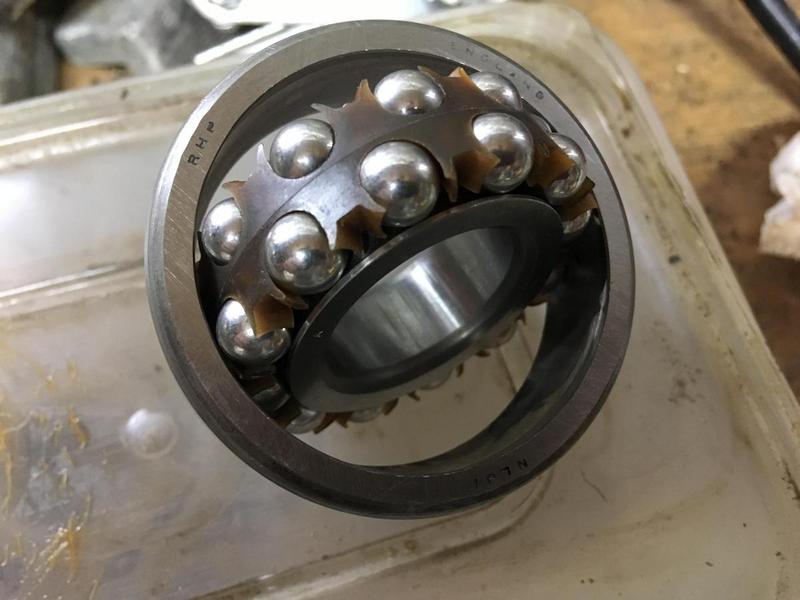
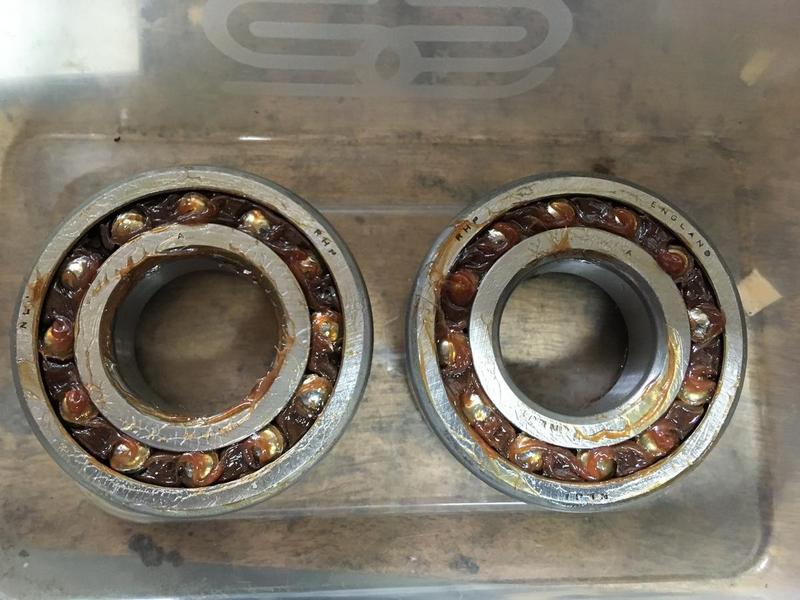
I pulled out the cutter block which is held in place by the two bearing housings screwed into the machine with four 1/2" BSW screws. To paint these blocks nice and tidy I decided to pull the blocks and bearings off the cutter block which was a bit of a pain to get the three-legged puller on a rectangular object, anyone got a four-legged puller handy? :roll: I managed to get the blocks off and the bearings pulled out of them quite easy. These bearings were quite unusual and I've never come across anything like them, the inner cage can be spun around whichever way you want and align themselves with momentum. Upon looking up the "NLJ1" bearing code I found out they were called "Self aligning ball bearings" Duh! :lol: The bearings themselves looked to be in pretty good nick and there wasn't really any discernable noise when the machine was running that would make me think they were worn, so I decided that they were staying as well as finding out to replace them with SKF equivalent bearings would cost me £50 EACH :shock: so they can definitely stay! They may not even be that old as there seemed to be signs somebody had taken the bearings out before because there was L and R marks scratched into the top of the bearing housings. Gave the bearings a good clean out and replaced the grease with Shell Gadus S2 V100 3 which is the new name Shell Alvania grease, which Wadkin used to recommend for their machines. Good enough for Wadkin, good enough for my little Multico!

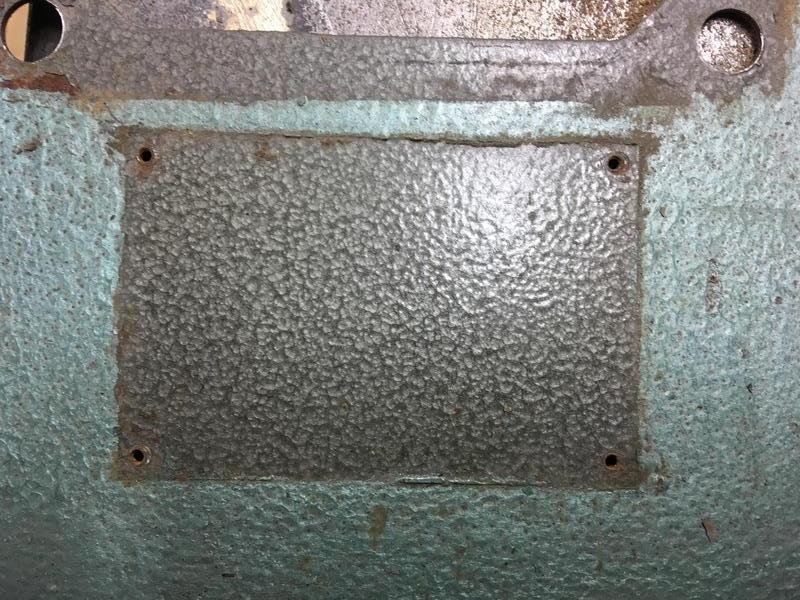
I decided to give the Multico Model and Serial badge a clean as it had seen better days, whoever painted it before obviously was quite liberal with the puke green hammerite and managed to splash it on the badge so I went at it lightly with a wad of 0000 wire wool and some turps to try and break down the dirt and paint. after scrubbing off the dirt I gave the badge a rub with some Autosol polish and it came up a treat, couldn't get the deeper scratches out without damaging the piece I think. Interestingly under the bade was the original paint which was kind of a nice military-eske dark green. Sprayed Hammerite looks 100x better than the brushed stuff, even though you'd think there wouldn't be much difference due to the hammer tone but it's much finer and has a far better look.

And so began the paint scraping with an old 1" marples chisel. Most of the paint came off very easily with the chisel on the flat panels and I just rubbed down the castings well and degreased the lot. Of course, the panels had a bit more attention to get rid of the rust and leftover paint residue. I asked here for suggestions on paint colour as I wasn't quite sure what would work and I had some interesting suggestions, from Oil Rubbed Bronze, Claas Green, Graffiti, Clear lacquer over the rust for a rat rod effect, Gold Leafing it, and even Neon Pink... I love this forum :lol:
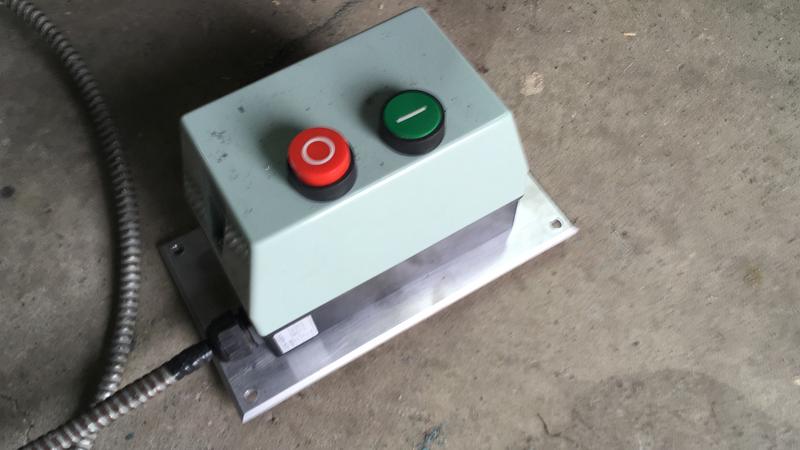
I bought a new starter switch and even got a fancy aluminium plate to cover the hole which the old BKS starter used to cover. The machine was originally a 3-phase machine but had been converted at some point with an Axminster single-phase motor and an old MEM box screwed to the front panel, unfortunately, the original BKS innards were missing whilst the plate was still there. If anyone wants an old BKS faceplate let me know
I also put a new braided steel flex on the starter rather than the metal sheething wrapped flex that was already on it, looks neater on the finished product.
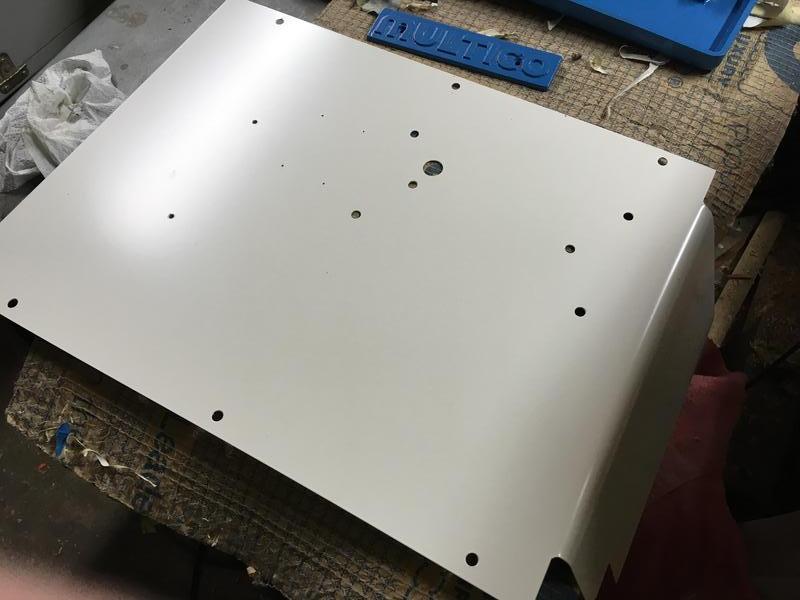
While trying to fill the holes in the original front panel by threading in rod and peining it over (I avoided welding it because I didn't want to warp the panel!) I ended up warping the panel beyond repair
I decided I didn't want a wonky panel so I bought a piece of sheet steel and cut and bent a new one. Don't have any photos of the bending or hole drilling so you'll have to imagine me putting the sheet in a Record 53 vice with two timber choks to bend it evenly which worked great! Then marked out and drilled all the holes with a christmas tree cutter. Very happy with the result and the lesson even though it cost me a little.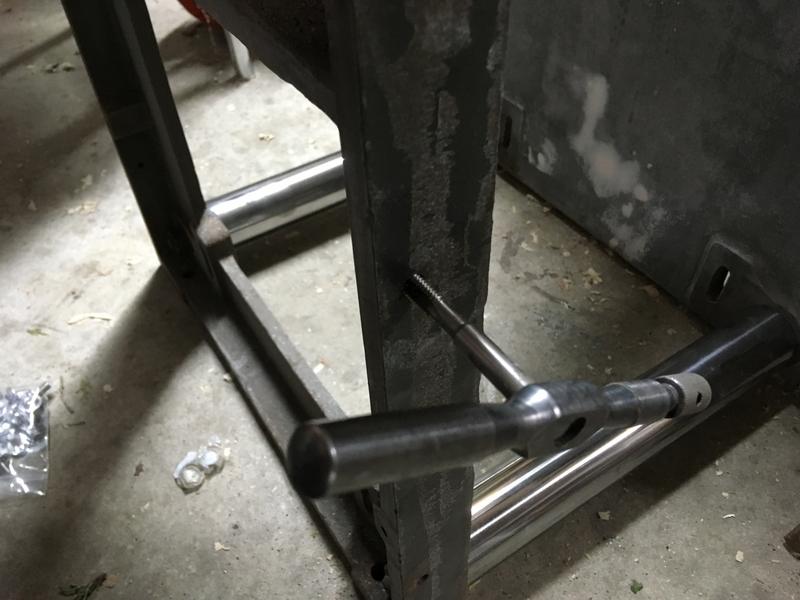
I drilled and tapped the panel attachment holes in the casting to M8 since there were a few original screws missing and BSF truss screws are expensive! I decided on some nice M8 flanged Allen head screws to modernise it a bit rather than copy the original slotted truss screws.
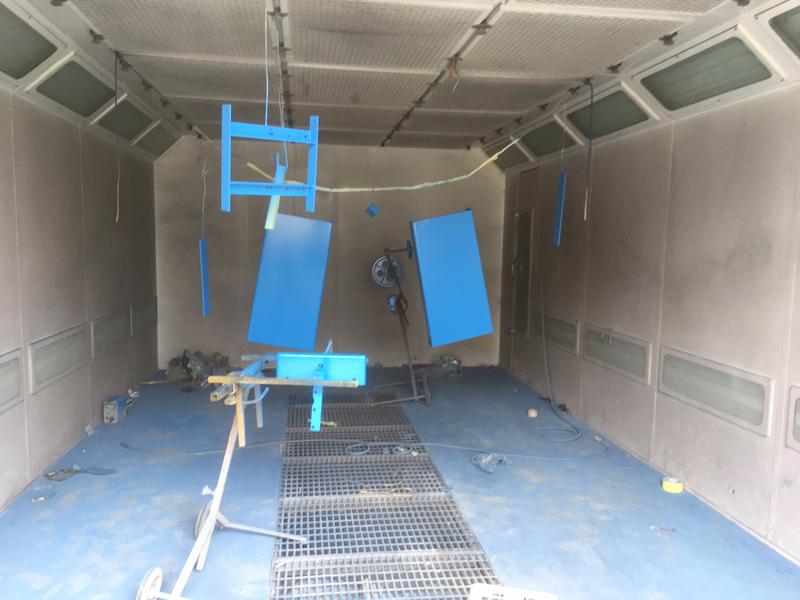
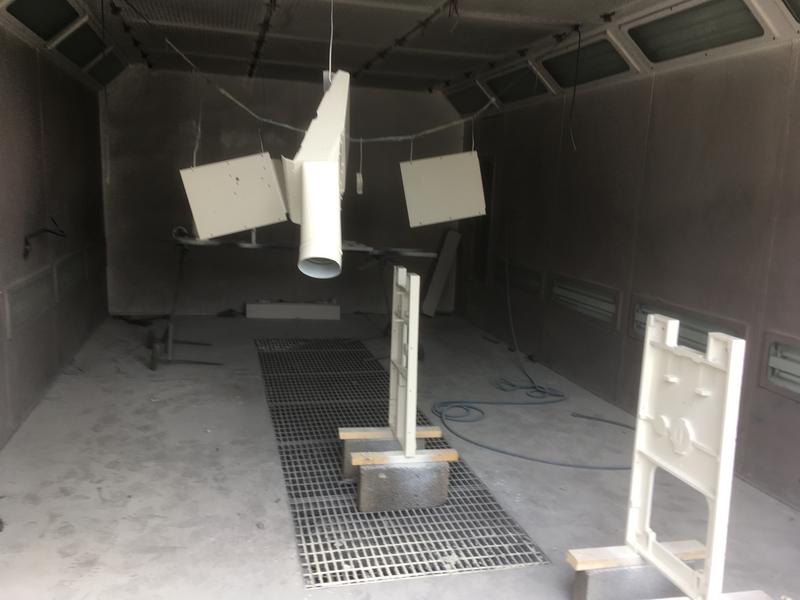
All parts masked up ready for paint! finally getting to the end of this thing. I decided on using Selemix Direct 2 pack as we actually had some RAL 5012 "Light Blue" kicking around from some plastic window painting. The off white was some mix of bright white and some random yellow, It's closer to RAL 9001 "Cream" than anything else.
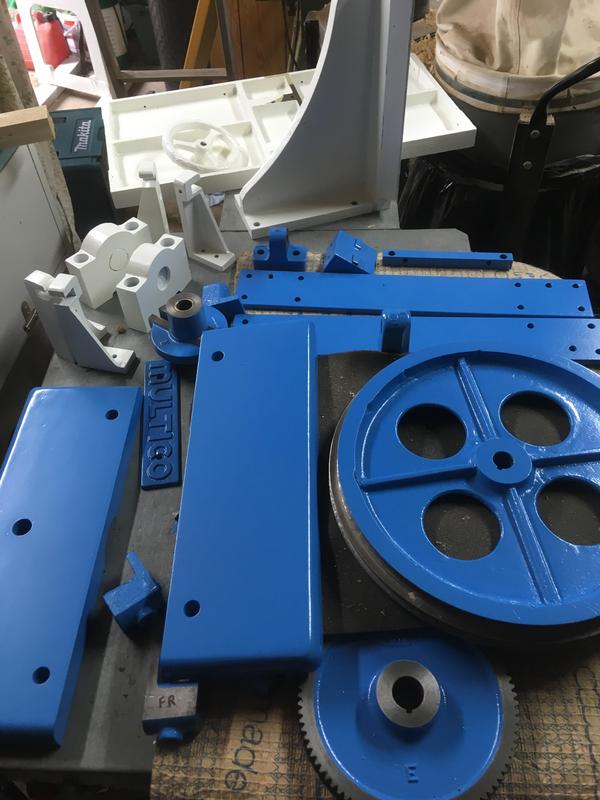
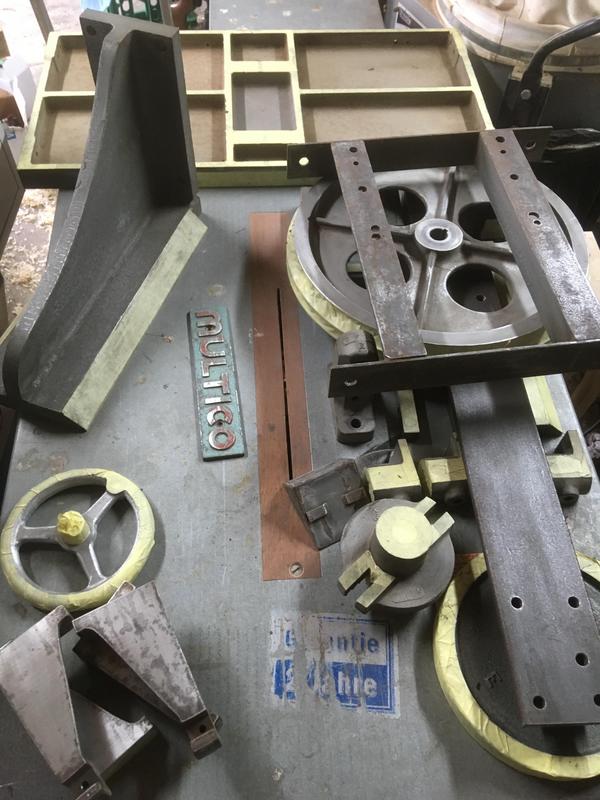
Now to put the jig-saw back together
Most of these parts you won't even see in regular usage which is a shame but it was worth doing the job properly in my opinion.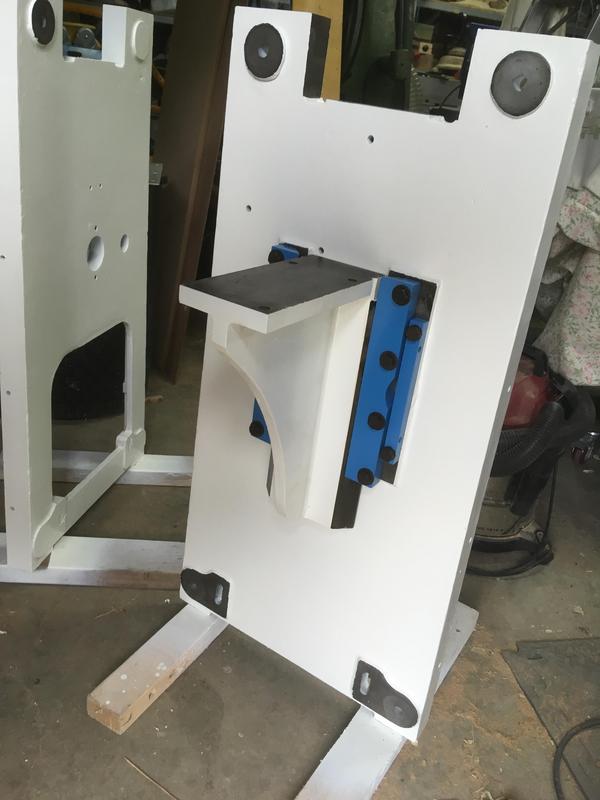
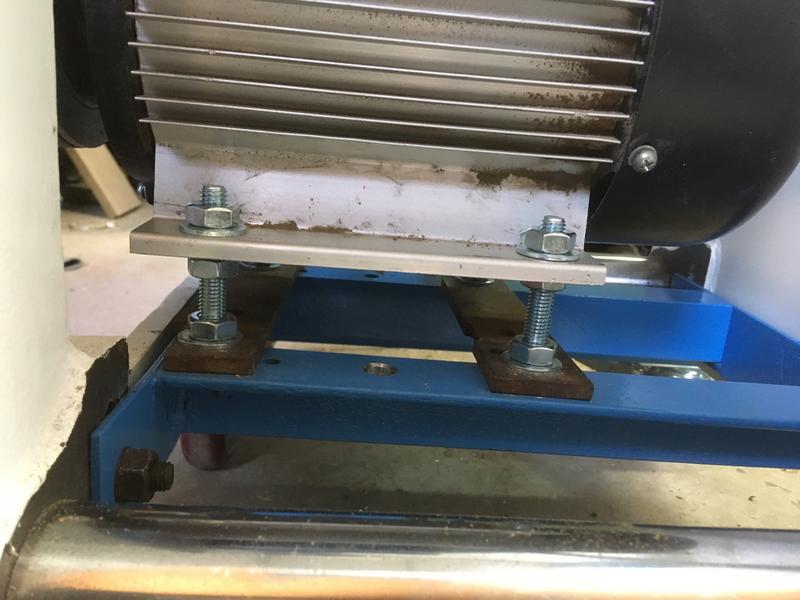
I prefer this way of mounting motors, far more adjustable than just on the baseplate and in my opinion more secure.
I got an exact same size thrust bearing to replace the original knackered one, but it wasn't cheap and in hindsight I should've bought a needle roller thrust bearing as these tend to be cheaper and better.
The original thicknesser scale pin screw had seen better days and was beyond repairing. I tried to get the 3/16" BSW thread screw but they were almost impossible to source, so in the end I drilled and tapped for an M6 cap screw which I turned down and polished to blend it in rather than have the blackening left on the screw.
Here's the new panel I made with all the holes drilled.
It was at this point when I was reassembling the machine I began having motor problems which Myfordman of this parish kindly guided me in the right direction to get the motor back up and running properly. I had somehow blown the start capacitor #-o
Setting the power feed rollers up was a bit of a pig of a job to get done, reassembling the spring and housing assemblies was the worst part. Once back together I set both about 1mm lower than the cutter block blades using the dial indicator to get the rollers perfectly parallel with the bed.

Finishing touches on the Multico Badge with some Plastikote White Enamel, bit of a pain to apply due to my lack of finesse and jittery hands even in my 20s
I'd be a terrible brain surgeon.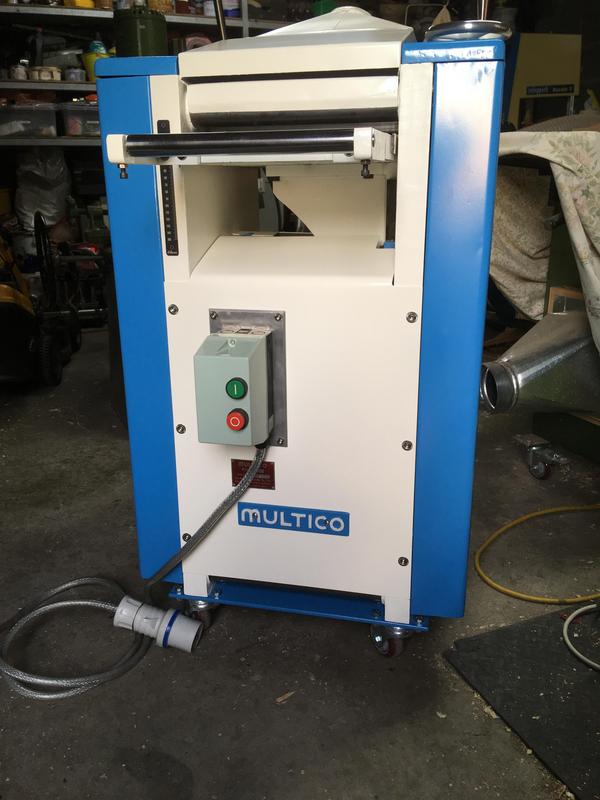
Finally, I'm finished!
It's only taken me 9 months and a fortune in bits! :lol: 
I've temporarily (hopefully
) stuck on the thicknesser scale with a bit of double sided tape ready to be taken off for when I eventually get the 125mm scale.
Very happy with the new handle, leagues better than the old one and looks far nicer in my opinion than the bin bag shrink wrap.
You'd have a very hard time telling that there was a crack and rubbish brazing in the piece anymore!
Price Summary:
Multico TH: £450
Paint: Roughly £100
New piece of ducting: £45
New starter switch: £33
New piece of sheet metal for front panel: £15
Castors and steel plates: £30
New Scale: £8
Motor Capacitor: £10
Aluminium plate for starter(which was redundant in the end but stuck it on the machine anyway): £7.33
Thrust Bearing: £8.50
New Belts: £19.76
New cutter head screws: £2.48
New bed extension screws: £1.99
New front and rear panel screws: £5.12
New top castings fixing screws: £2.30
Total parts and materials cost: £738.48
All in all, While I did spend a lot of time fixing up the machine and did spend quite a lot of money on it, I enjoyed working on it quite a lot. I learned a lot from all the little bits I've had to do on it. The main benefit is I now have a machine that is absolutely 100% perfect, If all goes well it should last me 60 years :lol:
Hopefully you enjoyed reading this to the end and perhaps you learned something from my fumbling along