Table based on Andrew Lawton's - F&C 127 May 2007

UKworkshop.co.uk

Help Support UKworkshop.co.uk:

This site may earn a commission from merchant affiliate links, including eBay, Amazon, and others.

Good Surname or what ?

Established Member
Joined
11 Mar 2005
Messages
403
Reaction score
0
Location
Reading, Berks
While the wood is settling for my current projects I thought I should start thinking about the design for the next one. I don't have a hope of coming-up with an "original" design. The best I can hope for is to take a design I like and add something. Even then I struggle....

I have knocked up this sketchup model of a hall table based on the design by Andrew Lawton - published in F&C 127 in May 2007

Please feel free to download the model and comment on ways I might "improve" and add to this.
 
Good start Phil. Here are some suggestions based on what I saw in your model.

Back legs: flip along green direction
Front to back parts except drawer side: Flip the ones to the right of center along red direction.
Add a drawer bottom.
Soften ends of curves on front and back.
Rescale the Cherry material. It's too large.
Apply your textures to the faces inside the components instead of to the component "wrappers" so that you can control the grain orientation.
Correct the orientation of the grain on the horizontal members.

If you wanted, you could add the joinery.

Keep up the good work.

Dave
 
Dave R":3tko7sri said:
Good start Phil. Here are some suggestions based on what I saw in your model.

Back legs: flip along green direction
Front to back parts except drawer side: Flip the ones to the right of center along red direction.
Add a drawer bottom.
Soften ends of curves on front and back.
Rescale the Cherry material. It's too large.
Apply your textures to the faces inside the components instead of to the component "wrappers" so that you can control the grain orientation.
Correct the orientation of the grain on the horizontal members.

Keep up the good work.

Dave

Cheers Dave. Thanks for the advice - I'd forgotten how to do some of this stuff.

Flip Back Legs - done by setting a top view, placing a guide point mid way between the tops of legs and selecting both back legs. Then rotating 180 degrees and then moving both legs by the leg thickness to eliminate offset created by rotation.

Flip other components using scale -1 technique.

Then remade 3 legs using scale technique -1 to ensure their faces are aligned correctly

Added drawer bottom and slips

Not sure what "Soften ends of curves on front and back." means

Will now have a play with textures.

Anyone have any comments on aesthetics?
 
Phil, If I understand what you wrote, the stuff about rotating the back legs is moot? Rotate and Flip are not the same thing.

Scale -1 works for flipping (mirroring) and so does right clicking on the component and choose Flip...

Softening the edges: open the component for editing. Get the Eraser tool. Hold Ctrl (Option on Mac) while clicking on the lines with the tool. Just soften the edges where the curves transition to the flats.

Aesthetically, I like it although I would like a taper on the legs better.
 
Dave,

I remembered after reading your last post that rotate and scale -1 gave different results. But I had never spotted the Flip option. I assume this gives same results as specific cases of scale -1.

I spotted the "soften option" when opening the front and back components for editting. I just clicked on the lines where the flats met the curves and they disappeared. Is that the same as the effect you spoke of?

I can now see how to scale and rotate the texture for individual faces. Thanks.

Do you have any textures you can share? I will work in ABW and sycamore/maple.

cheers
Phil
 
Flip and Scale, -1 give the same results but I think Flip is easier. You don't need to be able to get at the appropriate scale handle to do it. I have also assigned keyboard shortcuts to the Flip commands so that's even easier.

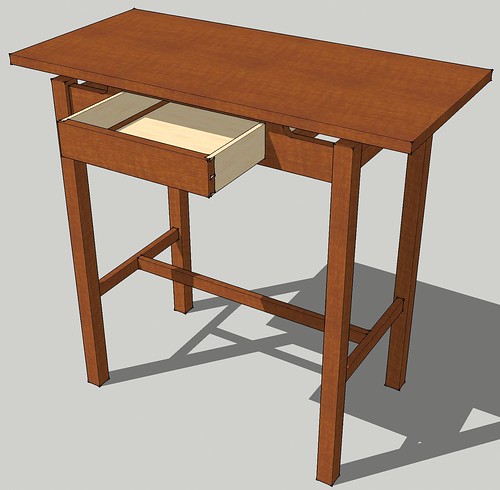
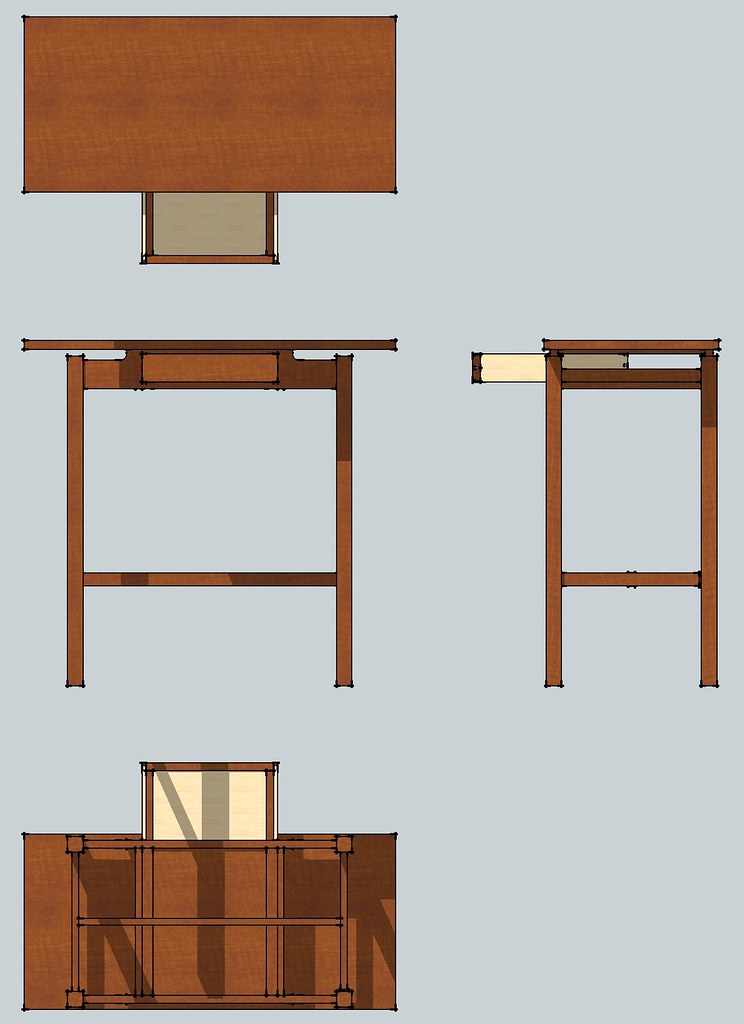
Keep in mind for something like the legs on your table, you draw, say, the front left, copy it over to the right hand position with Move/Copy. Flip the right hand leg along its red direction and then select both legs, copy them to the rear position and, while both copies are selected, flip them along the green direction.

To get a better idea of what's really happening, draw a diagonal line across the top of the leg to serve as a witness mark. If you draw that line between the two inside faces of the leg, when you get done copying and flipping, the witness marks should form a diamond.

Have you seen the video I did here? You might find it helpful. This one might be helpful as well.

As far as materials, I don't think I have anything real good but I'll take a look when I get time. One of the best sources I've found for woodgrain materials is Herzog Veneers. If you click on the thumbnail for the species you're interested in, it'll take you to some samples. Click on one of them and you'll get long images of the planks. Sometimes you'll get images of more than one plank from the same log. There's a nice scale on the side to aid in scaling the images. You'll need to do some cropping and perhaps some straightening of the images before you can use them in SketchUp. Bring them in at their proper size--within a few inches or so. Then after you apply the material to the faces in your model, you have the option to use various parts of image. Between that and choices between several planks of the same species, you should be able to do a nice job of applying materials so that you don't get repetition of recognizable features in the wood.

For more on applying materials, take a look at this. I think I blew out my vuvuzela with that last one. :)

My partner on the Design. Click. Build. blog recently showed the way he handles materials. He says it works for him but for me, it isn't an efficient way to work and it eliminates a lot of the controls I have in applying and editing materials to make them look somewhat believable. His method involves making both horizontal and vertical versions of the material to compensate for applying them to the component rather than the faces of the component. Having essentially duplicates of the images for the materials increases the file size, too. But, his method is certainly an alternative.
 
I hope you don't mind but I had a little play with your table. I didn't change any of the dimensions of the shape of parts. I did add joinery-most of which you can't see- and changed the materials and the way they were applied.

4747475186_643af02382.jpg


4747485130_e5a074417d_b.jpg


I would still be inclined to taper the legs or maybe put a chamfer on the outside corners.
 
Feel free Dave. I uploaded the file so people can download it and play.

I just watched the 2 short videos and will try to emulate your efficiency. I also tried walnut veneer. It takes some time but the effect is good.

I agree that the legs need something. Bed calls so I'll think about it tomorrow.

Again many thanks for your help.
 
Back
Top