Just a quick one. When you've finished with the vinegar you might want to neutralise it with some water and bicarb of soda. I've found personally at least it seems to stop flash rusting that I got a few times with vinegar even after washing and drying thouroughly. Might be my reasoning is off but based on the fact it's not recurred since using it with tools kept in the same conditions and you probably already have some in a cupboard....why not? From my (very) limited experience leaving metal for too long in vinegar can blacken it. Unimportant other than aesthetically. Depends on what you're after but worth bearing in mind perhaps.
You are using an out of date browser. It may not display this or other websites correctly.
You should upgrade or use an alternative browser.
You should upgrade or use an alternative browser.
Stanley Bailey No 4: To far gone?
- Thread starter timbo614
- Start date


Help Support UKworkshop.co.uk:
This site may earn a commission from merchant affiliate
links, including eBay, Amazon, and others.
timbo614
Established Member
Update. turning ito a WIP (I've learned that one).
Well finished work, took it all out of it's bath again. More impovement but maybe as good it's going to get?
Had another go at getting it apart.. and... the cut adjustment knob turns! Wow! And I got it all the way off.
An hour and more later i had also managed to remove the top frog bolts with many fine words and much grunting and some less than gentle persuasion. The back bolt just undid easily. Not the last one that holds the bracket to the body though gave up on that for now.
So getting the frog off revealed a lot more gunk, rust and grubbiness so I've put it and the body back in the vinegar. One last chance it may let me get the final bolt out and hopefully removes the newly revealed rust.
On the age of this plane; it not old by 1860 standards but I don't think it's very new either for a few reasons: 1) It's black japanned 2) it has "STANLEY" embossed on the Lateral lever 3) it has a cast "forked lever" to connect the depth adjustment. So according to that it is pre 1962. But it definitely does not have Rosewood grips.
Some pictures in a mo.
Carl P
Established Member
Glad to hear things are moving on well - looking forward to the pictures.
ed65 -
Carl P wrote:
...diluted vinegar with some acetic crystals for good measure...
Why dilute the vinegar and then add acetic crystals Carl, isn't that one step back and one forward?
It is indeed! The reason for the crystals was simply because I'd diluted the vinegar a lot to be able to submerge the vice, I happened to have them so thought I'd put them in to speed things up a bit. I used to use the crystals a lot but was never really sure of how much water to add and anyone on the internet talking about them seemed oddly evasive on the exact proportions. There also seemed to be a myth that it only attacked the rust not the metal - I managed to debunk this myth quite comprehensively a couple of years ago by not realising that there was a single moulding plane iron left in the murky liquid, a month later it was somewhat less than useable. It has joined the side of a box I made ages ago where I managed to mark out the dovetails upside down on one side and only realised once they were cut, displayed to remind me 'not to be so bloody stupid!', although at the time the language may have been more colourful.
Cheerio,
Carl
timbo614
Established Member
[Pictures in mo.] At that point I realised it was 9PM and I had not eaten ... Now have to work, so pictures tonight.
Yes, the acetic acid gets used up in the reaction.timbo614":x5tvlya3 said:I'm assuming there is a limit to the chemical reaction, so refreshed it.
Add salt, it helps your vinegar go further and work faster. In the great tradition of TV cookery shows, here's one I made earlier:
This took less than 24 hours and I've used the solution four or five times previously, with just one top up of fresh vinegar last week. As I mention above this included a couple of scrubs to remove anything made loose by the soaking, it would be a little slower (not by too much) if just left alone to work.
Neutralising traces of acid is a good idea IMO. Rinsing, even very extensive rinsing, may not be enough and could leave the part permanently more prone to rust.Bm101":2ced2m0b said:Just a quick one. When you've finished with the vinegar you might want to neutralise it with some water and bicarb of soda.
Washing in soap can also do it since bars of soaps are usually highly alkaline. Some are slightly greasy too which doesn't hurt.
A familiar pattern, the "Oh uh I just use a handful in a bucket of water." kind of thing. What you want to know ideally is what amount of crystals in a given volume of water approximately equals table vinegar so you have a starting point to make something stronger or weaker as you prefer.Carl P":eeajagxn said:I used to use the crystals a lot but was never really sure of how much water to add and anyone on the internet talking about them seemed oddly evasive on the exact proportions.
A chemistry forum I think should be able to help you with that if you want to find out.
God, I'd love to know who thought that since you can see etching beginning to happen PDQ :shock: This is the same with most other acids too. Reputedly phosphoric acid doesn't do this and if this is right tannic acid might work similarly, since they react with iron to form a stable compound that resists further chemical action.Carl P":eeajagxn said:There also seemed to be a myth that it only attacked the rust not the metal
beech1948
Established Member
Freeing up rusted parts requires something more suitable than WD40....the WD stands for Water displacement....its not a penetrating oil or fluid at all. WD40 would be a waste of time and effort.
Best solution is acetone ( try nail varnish remover) and brake fluid mixed 50/50.....soak for a few days.
Next bast way to remove rust when plane is in bits is either vinegar ( I'm not keen on this) or electrolysis. For electrolysis look on Youtube as there are many videos of the process. Its cheap, very effective and can be quite fast as well as simple.
timbo614
Established Member

timbo614
Established Member

timbo614
Established Member
timbo614
Established Member

timbo614
Established Member
On the bright side I a have rust removal lab and have put the rest of the parts into the neutralising bicarb bath I gave them a scrub and washdown too using the handy lab water supply.I'm leaving them there for an hour. But it is also obvious that I may have overdone it the vinegat bit, there are definite signs of overall etching of the surfaces turning them a grey colour and slighly well, err, very finely and evenly pitted? Can't think of better word. I was warned! 
Attachments

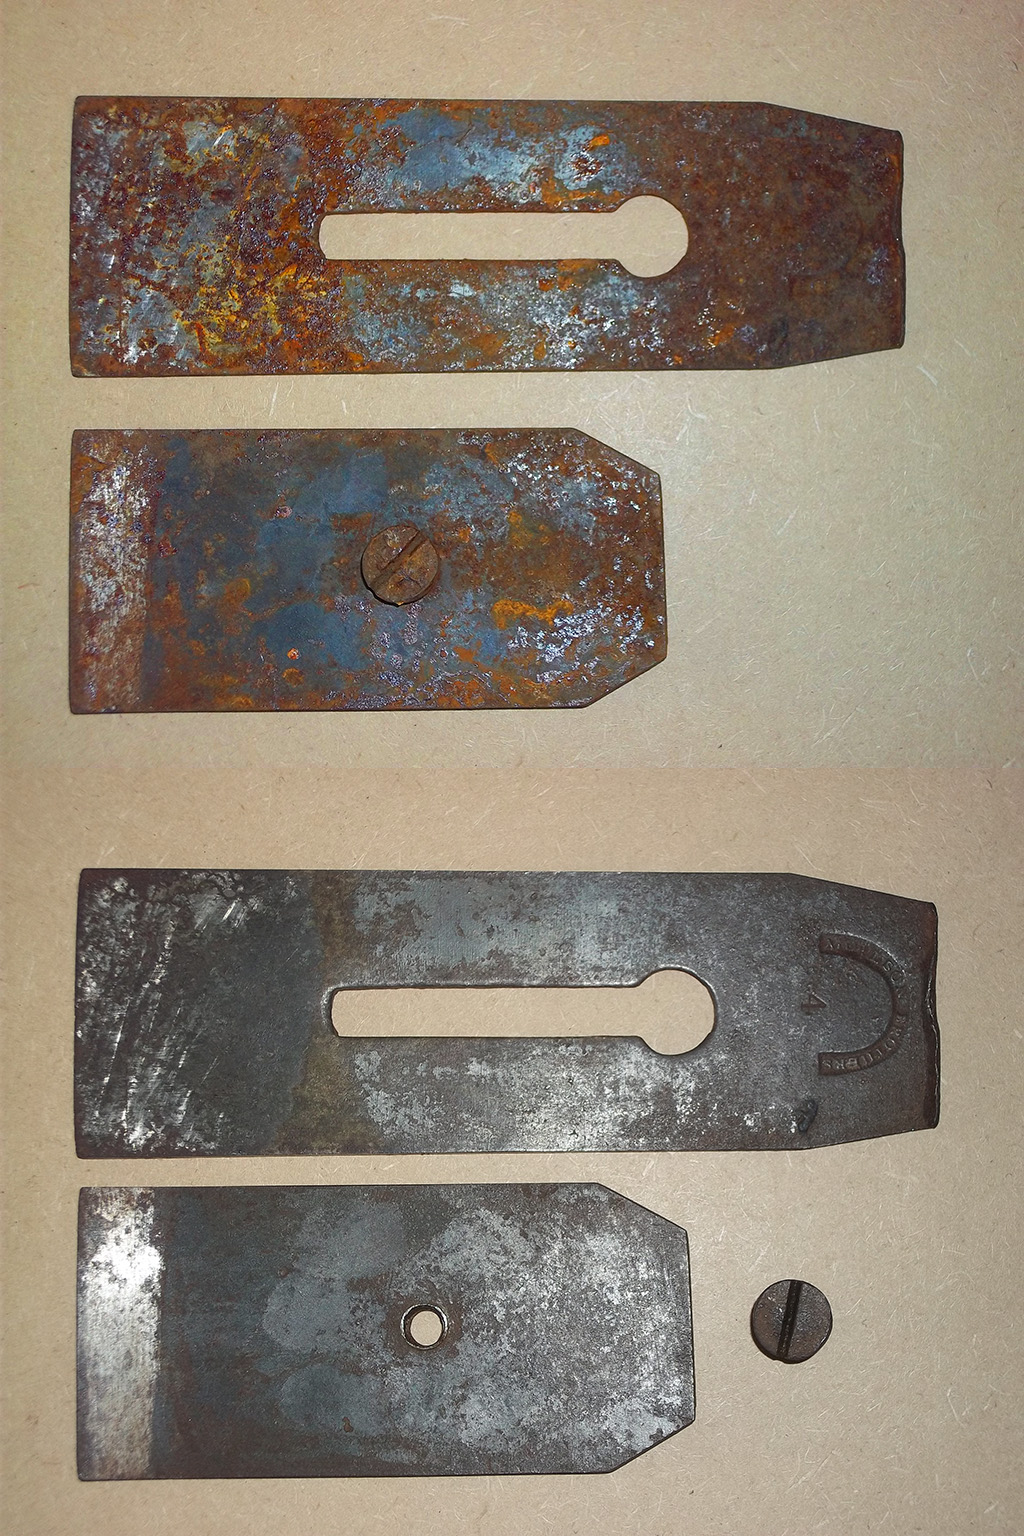
Yeah that's had it, I'll dispose of it properly if you want to post it to metimbo614":3sdv7jnv said:Unfortunately although separated it does not help the state the blade which I think has really had it.
No seriously, the iron should be fine. Presumably that remaining rust is where the cap iron sat? You'll often find that between them if you had to soak them together because the remover couldn't get at the rust properly in the small gap. If you don't want to soak the whole iron any more change to scouring/sanding or a wire wheel. You'll be back in business in no time.
You could have a bit of fine etching but a lot of the texture is sure to be from the rust eating away at the steel, as here on the top of the iron on my no. 4.timbo614":3sdv7jnv said:But it is also obvious that I may have overdone it the vinegat bit, there are definite signs of overall etching of the surfaces turning them a grey colour and slighly well, err, very finely and evenly pitted? Can't think of better word. I was warned!
I think it's very hard to guess at what surface you'll find underneath from looking at steel in its rusty condition. Sometimes you're pleasantly surprised and other times it's worse than you expected (and occasionally it's bad only in little patches, for no apparent reason).
timbo614
Established Member


timbo614
Established Member
So, Some progress on metal work. Incidentally that is not the orginal blade and backing iron. Those are from the record. But after I removed a lot of crud and rust it turns out that the blade is not Record it is a Stanley So I feel entitled to use it. I have got the original blade to the best I can. I put an experimental edge on it and it sharpens fine but will leave fine ridges because of the pitting. I will keep it use it for rough work, then switch to the newer blade for proper smoothing.
A couple of questions on finishes:
What do I paint the inner body with? I was thinking of Hammerite or something like Humbrol enamel?
Secondly I have done some prep and sanding on the handles, what do I finish them with to bring out the colour? I dabbed a bit of white spirit on the out of sight base of the handle and the colour will be very similar to the handle in the ED65's fnished plane.
At the moment the whole thing is covered in grease to stop the raw metal surfacea re-rusting. So I feel a can of degreaser is going to be added to the shopping list as well, but so far I have only spent 1.20 on vinegar and used some sanding sheets. So I can push the boat out on finishes.
So I feel entitled to use it. I have got the original blade to the best I can. I put an experimental edge on it and it sharpens fine but will leave fine ridges because of the pitting. I will keep it use it for rough work, then switch to the newer blade for proper smoothing.A couple of questions on finishes:
What do I paint the inner body with? I was thinking of Hammerite or something like Humbrol enamel?
Secondly I have done some prep and sanding on the handles, what do I finish them with to bring out the colour? I dabbed a bit of white spirit on the out of sight base of the handle and the colour will be very similar to the handle in the ED65's fnished plane.
At the moment the whole thing is covered in grease to stop the raw metal surfacea re-rusting. So I feel a can of degreaser is going to be added to the shopping list as well, but so far I have only spent 1.20 on vinegar and used some sanding sheets. So I can push the boat out on finishes.
Deffo. Flick between your first photos and these recent ones and you'll get that same "Wow, I did this!" reaction that makes restoring tools so much fun.timbo614":1443yn00 said:What fo you think? Going in the right direction?
You can use any black paint that meets your standards. Some people obsess over getting a near-perfect match to period japanning in finish, thickness, colour and toughness (usually on pre-WWI planes to be fair) while for others if it's black and tough enough that it doesn't chip easily they're fine with it. If it's cheap and easy to order that doesn't hurt eithertimbo614":1443yn00 said:A couple of questions on finishes:
What do I paint the inner body with? I was thinking of Hammerite or something like Humbrol enamel?
If you go with any sort of enamel after it has dried if you bake the body casting in a cool oven (about 40-50°C) for an hour or two the paint will often be made tougher than if just left to dry at room temperature.
You might also want to prime first. Not everyone does but if you do I can recommend Hycote's primers, have had good results from them for years and they don't break the bank. For the paint if you're looking for something in a spraycan I think Hycote also do a satin black, I haven't used it myself but I have used their gloss black and I found it good.
Well after staining the pale sapwood black I oiled mine lightly then used Rustin's French Polish, about six coats IIRC starting with brushing and ending with padding it on with a rubber.timbo614":1443yn00 said:Secondly I have done some prep and sanding on the handles, what do I finish them with to bring out the colour? I dabbed a bit of white spirit on the out of sight base of the handle and the colour will be very similar to the handle in the ED65's fnished plane.
You'll get much the same appearance if you varnish using an oil-based poly, and it will be tougher.
Common white spirit can be used to degrease quite effectively. The main ingredient in most commercial degreasers is basically the same solvent, just named differently.timbo614":1443yn00 said:At the moment the whole thing is covered in grease to stop the raw metal surfacea re-rusting. So I feel a can of degreaser is going to be added to the shopping list as well, but so far I have only spent 1.20 on vinegar and used some sanding sheets. So I can push the boat out on finishes.
Follow by wiping with acetone or meths if you want to get the surface super clean and dry.
timbo614
Established Member
ED65 - Thanks for the long reply. It's appreciated.
My joy is fixing things I love fixing broken stuff and putting it back in use. I even have the Tee shirt to prove it, bought by my Grandson it says "IF Granddad can't fix it - NO ONE CAN!"
So I'm looking at Hycote primer & satin black - there goes nearly the price of a car boot half-done plane! But Primer and matt black are always usefull.
[edit] For the handles:[/edit]
I have some osmo Polyx-oil 3032 Satin-matt. I like this product, it goes on easily and most times only needs one coat, will that do the job? After all I'm only going to use this plane myself, not display it in a show.
I did have quite a smile going after I took the pictures and looked at themWow, I did this!
My joy is fixing things I love fixing broken stuff and putting it back in use. I even have the Tee shirt to prove it, bought by my Grandson it says "IF Granddad can't fix it - NO ONE CAN!" So I'm looking at Hycote primer & satin black - there goes nearly the price of a car boot half-done plane! But Primer and matt black are always usefull.
[edit] For the handles:[/edit]
I have some osmo Polyx-oil 3032 Satin-matt. I like this product, it goes on easily and most times only needs one coat, will that do the job? After all I'm only going to use this plane myself, not display it in a show
.You should be well pleased with that Timbo I'd think. =D> I prefer the feel of a wax rather than a varnish on handles and slop a few coats of bison black wax on. Not sure it really matters as long as you're happy with it.
You might be interested in this if you haven't seen it. I stole several tips from here. The wooden polishing dowel one is great as is the the tip for sanding down using a drill. Whether you want to polish up the plane to these standards is a personal choice of course. Careful you don't get carried away now! :wink: http://www.majorpanic.com/handplane_restor1.htm if you haven't seen it, enjoy!
If you're convinced about the Japanning, Craftmasters apparently supply excellent enamel paints. Price might be prohibitive and you can get lost wandering about the website as well. Not because it's a bad website its just very interesting! http://www.craftmasterpaints.co.uk/
Great Job
Regards
Chris
Similar threads
- Replies
- 3
- Views
- 3K
- Replies
- 41
- Views
- 12K