Setting a sliding carraige dead square

UKworkshop.co.uk

Help Support UKworkshop.co.uk:

This site may earn a commission from merchant affiliate links, including eBay, Amazon, and others.

Scrit

Established Member
Joined
17 Sep 2002
Messages
3,872
Reaction score
3
This afternoon someone I know wandered into the workshop and asked for advice on setting-up a small sliding carriage table saw he'd just bought. Apparently he was having difficulties trying to set the back fence on the carriage to cut square and all his pieces were tapered. Anyway I was just doing my monthly exercise of setting and checking my panel saw so I showed him how we do it on bigger machines. The technique is, however, applicable to many smaller saws, so I'll describe it here:

First Some Info

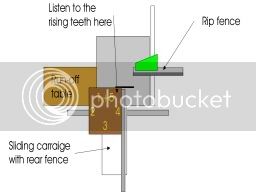
All sawblades vibrate to a greater or lesser extent. The falling teeth will tend to vibrate less as they are supported by the material being cut. A sliding carriage should be set-up to take this into account.

Setting the Free Cut - or the carriage and the saw blade don't line up exactly

Before fine-tuning the fence there must be what is called "free cut" or "freeboard" on the sliding carriage. This means that the sliding carriage doesn't run quite parallel to the blade, but that there is in effect a small amount of "toe-out" to the left of the blade. We set this by ear. The blade is wound-up to maximum height and a shortish piece of MDF (or planed timber) is butted-up against the fence and fed slowly through the blade to make what is called a "dust cut" (i.e. you are only facing a couple of millimetres off the end of the piece). As the piece is fed through listen to the sound of the rising teeth (i.e. the back of the blade) against the material - if the free cut is too small the rising teeth will make a loud noise and the carriage needs to be adjusted to the right. If the rising teeth make no sound at all then the free cut is too large and the opposite adjustment is made. Properly adjusted the rising teeth make only a slight scratching sound on the material being cut

Making the carriage Cut Bang On

Next the fence is checked making what is called a squaring cut. Take a piece of sheet material, 400 to 600 mm square (we use 1m square on a full-size panel saw) and make a dust cut one edge. Turn through 90 degrees (clockwise if the fence is at the infeed side of the carriage, anti-clockwise if it is at the outfeed side) and repeat the cut for the second edge. The idea is that the cut edge against the fence is always the one which has just been cut. Repeat the cuts for the third and fourth edges. Finally make a fifth cut, this time 5 to 10mm wide. Mark the outfeed end of this strip and break it in two. Then compare the width of the two ends of the broken strip. For an outfeed side crosscut fence: if the outfeed end of the strip is narrower then the outboard end of the fence needs to be adjusted anti-clockwise, if the outfeed end of the strip is wider then the fence needs to be adjusted clockwise. For an infeed side crosscut fence: if the outfeed end of the strip is narrower then the outboard end of the fence needs to be adjusted clockwise, if the outfeed end of the strip is wider then the fence needs to be adjusted anti-clockwise.

SlidingCarraigeSet-Up-1.jpg


This is a simple way to set-up a panel saw or indeed any saw with a sliding carriage. Accurate, foolproof and doesn't require any expensive tools :wink: - so, good if you're a cheapskate like me!

Scrit

Edited to try to clarify fence positioning - hope that helps
 
Hi Scrit

I made the 5 cut test when I made my sled.

I got (after correction) 0.2mm difference on 500mm square board, and left it like that.

With your permission, I will add 3 pictures to make it more "visual".

niki

0005.jpg


0006.jpg


0010.jpg
 
LyNx":juqeuozd said:
scrit, do you have numbers 3 and 4 the wrong way round?? :wink:
Yes :roll: , well spotted that man. Give the man a cockernutt! :lol:

Will correct the image :oops:

EDIT: Done!

Scrit
 
Scrit, no sliding table as yet, but it's getting nearer...

I get the idea of a minute toe out to make sure the non cutting teeth don't chip the edge of the dimensioned piece. Presumably when further dimensioning from the off cut, any chipping there is trimmed by an initial dust cut. What do they do with CNC production machines? Presumably these have to cut chip free on both sides of the cut?

regards, Ivan
 
ivan":datmxli3 said:
What do they do with CNC production machines? Presumably these have to cut chip free on both sides of the cut?
If you're talking about routers they use compression spirals (up-down cut) for a clean edge. On a panel saw most of the work is done on the carraige side, therefore that is always your good side and you accept that there might be slight chipping on the other side and make a dust cut from the carraige side if necessary to reduce the chipping. Incidentally the same free cut needs to be built-into the rip fence as well.

Scrit
 
I was wondering about those outfits who (say) make kitchens and are disecting melamine chipboard all day - I'd sort of assumed CNC cutting - and also assumed mainly by sawblade. If it's all done by routing no wonder they can cut it chipfree!
 
It depends on whether ot not they are using NBM (nest-based manufacturing) or "conventional" PTP (point to point) technology. The NBM guys load a single sheet, often 2.6 x 2.0 metres, then rout-out as many components as they can in a singe pass - hence the compression spiral cutters - and the KD fastenings are then either drilled off-line on a multi-borer machine or they utilise the "face drilled" style of fixing and machine on the CNC. The PTP guys (like I was) tend to slice-up panels on a panel saw or the like then face/edge drill on a PTP borer or dimension then drill on a PTP router (does both). If using a beam saw instead of a panel saw a part pack of 6 to 12 sheets is generally sawn as one. Break-out is only a problem on the top sheet and is dealt with by either shoving a sacrificial sheet of 2mm MDF on top of the pack or by employing a tapered scoring blade (as opposed to the split parellel scorer used on panel saws) which takes an extra 0.2mm or so extra off the top edge - almost invisible in effect.

Scrit
 
Aahh! (cut to glare of rising sun as per 2001 space oddesy) Scrit, thanks for explanation, I get the idea now.
 
After my tablesaw had been stored away for a year, I thought id better check all the settings and I found this very helpfull thread (ta!)
Now for the pedantic bit - Front and back ! which is the front of the carriage the side furthest away from you or nearest? (i Know! its sounds obvious but I like to be certain)
I read the front of the carriage as being the side nearest so when you make the first cut and turn the wood anti- clockwise you are not using the side you just cut as a reference, Why not? :?:
when all four sides have been cut is the wood square? if not why did we do this in the first place?
Also if my Normal Fence is set up square to the blade why would'nt it be better to just use a large square to set the carraige fence at right angles to the fence?
sorry to be a pain but i followed the instructions and i've got it nearly spot on! i'm just not sure i did it right and i'd like to be certain.

Thanks a lot
Mike
 
mikepooley":37uhapno said:
Now for the pedantic bit - Front and back ! which is the front of the carriage the side furthest away from you or nearest? (i Know! its sounds obvious but I like to be certain)
I've gone back and revised the original post to refer to infeed and outfeed sides of the carraige which is probably syntactically better.

mikepooley":37uhapno said:
When all four sides have been cut is the wood square?
Only if the carraige is running square. If not the fifth cut will produce a tapered strip

mikepooley":37uhapno said:
Also if my Normal Fence is set up square to the blade why wouldn't it be better to just use a large square to set the carraige fence at right angles to the fence?
I assume here that you mean crosscut fence by "Normal Fence". A large square simply isn't as accurate as this method because this method magnifies the discrepency by a factor of four (four cuts out by 1mm would give you a 4mm discrepency) and in addition this method isn't open to human interpretation of the results or affected by the square being off because it's been dropped. It's using the machine to check itself and requires no tools.

To digress slightly I own a 3.2 metre sliding carraige panel saw (an Altendorf) which weighs in at about 1250kg. Alts have a reputation of being extremely accurate, but with normal use all fences can wander a bit so this is the technique used on dimension saws to check and correct errors. I expect and achieve repeatable very high accuracy and square cuts on 2.8 metre panels regularly. An MFC carcass out by 2mm at one corner is simply unacceptable and taking a hand plane to it doesn't really work that well. If you want a carraige to run square then this really is the most accurate way to achieve it.

Scrit
 
Thanks! My feeble brain has now managed to absorb that and now all i've got to do is get over my problem that whenever i do the fine adjusting I ALWAYS do it thw wrong way!!! :oops:
 
Hi Scrit

I have never owned a table saw previously so having recently purchased a Fox F36-530 table saw with sliding carriage from Rutlands (on special offer at time-pleased with it for the price), your instructions on the sliding table set up is very welcome. Whilst they are very clear I do have some querys for my own peace of mind.

1. Do you have to start off with an exact square piece of wood, I assume that you must otherwise it may not magnify the discrepancy by a factor of 4.

2. If on carrying out the procedure for adjustment it is still not correct do you cut the board square and then repeat steps 1-5 again until correct?

3. The problem I see is that once you need to change the crosscut fence angle or use the rip fence it means moving or removing the crosscut fence. There have been some suggestions on this forum, eg scribing the table etc. What method would you advocate to easily return the crosscut fence to its original position?

4. Is there a method for using the machine itself to check any other common angles, eg 45 degrees?

Cheers Con
 
Con Owen":abywcuo4 said:
Hi Scrit
1. Do you have to start off with an exact square piece of wood, I assume that you must otherwise it may not magnify the discrepancy by a factor of 4.


Cheers Con

I think you only need one straight edge placed against the sliding table which then cuts the 90deg on the blade

That should make it as clear as mud
 
stairman":200mr0ok said:
Con Owen":200mr0ok said:
Hi Scrit
1. Do you have to start off with an exact square piece of wood, I assume that you must otherwise it may not magnify the discrepancy by a factor of 4.
Cheers Con

I think you only need one straight edge placed against the sliding table which then cuts the 90deg on the blade
Not even that. As long as you rotate the freshly cut edge into the crosscut fence for each cut you make then you'll automatically get a straight edge each time.

Incidentally, this technique can also be adapted for checking and correcting a radial arm saw......

Con Owen":200mr0ok said:
2. If on carrying out the procedure for adjustment it is still not correct do you cut the board square and then repeat steps 1-5 again until correct?
No need. If you adjust the carraige correcvtly it will autonatically cut square no matter what shape you start with as you will always use the edge you have just cut as the next edge against the fence

Con Owen":200mr0ok said:
3. The problem I see is that once you need to change the crosscut fence angle or use the rip fence it means moving or removing the crosscut fence. There have been some suggestions on this forum, eg scribing the table etc. What method would you advocate to easily return the crosscut fence to its original position?
My original instructions were based on having a dedicated crosscut fence which would needs be permanently set at right angles to the blade. With the combined mitre/crosscut fence you are referring to (such as is found on the WMaster OP201, for example) I am a bit nonplussed as to how you can guarantee an accurate right angle cut after doing a mitre cut as even scribing the table top leads to potential human error. I am inclined to think that an adjustable detent pin/socket arrangement would be needed to avoid rechecking every time this sort of sequence is followed. This may need some extra thought.

Con Owen":200mr0ok said:
4. Is there a method for using the machine itself to check any other common angles, eg 45 degrees?
Not to my knowledge, although 4 x 45 degrees placed together should give you a straight edge

Scrit
 
Hi Scrit

Many thanks for the additional information (even I understand now-I think!). I also have a DeWalt 1251--seen very little use because of the pain of adjusting it, it is nice to know that I can use the same method to set it up, I will use it more now-I guess it has only had about 1 hours use in total from new.

Cheers Con
 
Hi Scrit,
Many thanks for pointing me in the direction of your well written instruction.
I have just bought the Holzprofi (Austria) equivalent of the Ax saw that Tony wrote his report on. It is a very fine piece of engineering with adequate and easily accessible controls for adjusting just about everything so your article was very useful in helping me set up the slider.
Thanks very much for all your help.
Peter
 
Hi there Scrit I am new to the forum so hi to you & everyone from sunny Spain(bbbbbbbbrrrr @ the moment).Have just recently taken delivery of a Record TS250SB with squaring frame ,rhd CI extn & have been having fun setting everything up & read your article about setting a sliding carriage , it was a great help,but I noted re:freecut you state that this should be built into the rip fence also,please could you give me some procedural info on how to achieve this many thanks once again......Des
 
Back
Top