Router cutter for 9mm rebates?

UKworkshop.co.uk

Help Support UKworkshop.co.uk:

This site may earn a commission from merchant affiliate links, including eBay, Amazon, and others.

Jensmith

Established Member
Joined
19 Aug 2010
Messages
1,029
Reaction score
0
Location
Cheshire
I am trying to make a box from 9mm MDF using rebate joints. I bought a 9mm straight cutter from Wealden a while ago and tried it today with a jig I made today and the 9mm cutter isn't quite wide enough.

When I measured the MDF it was actually 9.34mm.

I went to buy a bigger router cutter thinking 9.5mm would be the one but Wealden are out of stock.

I'm just wanting to make sure that 9.5mm is the one to go for or should I be using a 10mm cutter?

The jig I've made is similar to one that you would use for dadoes where the router runs between two straight edges so it can't waver off course. This means the router position is fixed so it will always cut in the same position so I can't adjust it like you would with a fence.

The wood I'm cutting is clamped so it's up against the middle block and I can then cut a rebate quickly and accurately. It cut brilliantly, just not wide enough for the MDF!

I'm loath to pay double the price to get a cutter from Trend so would prefer to buy from Wealden but want to make sure I buy the right size this time.

Router jig.JPG


What do you think for cutter size?

Thanks,

Jennifer
 

Attachments

  • Router jig.JPG
    Router jig.JPG
    83 KB
why not just adjust your jig so you can run the extra width if the cut was clean
 
Jennifer, could you open the two router base guides to give you the correct amount of wobble room? It might be possible to organise a shimming space to allow adjustment for mdf thickness variations.

xy

Same answer as Den Dezyn really
 
When cutting rebates with a router i all ways use the largest cutter i can, at least 12mm in this case, anyway you will get a much nicer rebate. or do you mean cutting a groove?
 
xy mosian":3u6n0s7n said:
Jennifer, could you open the two router base guides to give you the correct amount of wobble room? It might be possible to organise a shimming space to allow adjustment for mdf thickness variations.

xy

Same answer as Den Dezyn really

I didn't really want to introduce wobble because the whole point of making the guides was so I got a really nice straight cut. It there's wobble room doesn't that just mean it will be able to wonder about too much?
 
You'll often find that dimensions of man made boards aren't exactly as they are described.

For example you'll often see 4 x 2 foot boards described as 1220 x 610 mm.

And don't get me started on plastic piping and steel tube!!! (hammer)

If it helps 3/8 inch is 9.525 mm.
 
Jen, Once you have made your first pass, stick a piece of electrical insulation tape to the guide on your router and make another pass, this should widen the cut enough to allow a nice fit, if not then stick another piece on but one should be enough to increase the rebate by 0.3mm.

If the guide is on the 'wrong' side, hopefully you will know what I mean, then stick the tape on first, make a cut then remove the tape, this will widen the rebate away from the top of your insert.

Andy
 
Jensmith":2gst4n8e said:
xy mosian":2gst4n8e said:
Jennifer, could you open the two router base guides to give you the correct amount of wobble room? It might be possible to organise a shimming space to allow adjustment for mdf thickness variations.

xy

Same answer as Den Dezyn really

I didn't really want to introduce wobble because the whole point of making the guides was so I got a really nice straight cut. It there's wobble room doesn't that just mean it will be able to wonder about too much?

Sorry Jennifer, I meant sufficient room to run the router along one side of the track and then run it again down the other side. If this is organised correctly you will produce a groove/rebate of the correct width with an undersized cutter. I didn't explain that very well :oops:
xy
 
xy mosian":6qpe208j said:
Jensmith":6qpe208j said:
xy mosian":6qpe208j said:
Jennifer, could you open the two router base guides to give you the correct amount of wobble room? It might be possible to organise a shimming space to allow adjustment for mdf thickness variations.

xy

Same answer as Den Dezyn really

I didn't really want to introduce wobble because the whole point of making the guides was so I got a really nice straight cut. It there's wobble room doesn't that just mean it will be able to wonder about too much?

Sorry Jennifer, I meant sufficient room to run the router along one side of the track and then run it again down the other side. If this is organised correctly you will produce a groove/rebate of the correct width with an undersized cutter. I didn't explain that very well :oops:
xy

Ah, ok :)

I don't think that will work with my router as the base is rounded on the 2 sides so it would rotate I think. That's why I had the 2 rails to keep it straight.

I think to do it your way I'd need to use the guide rails and have them running up and down a channel to keep the router running straight.
 
andersonec":1cxij4jw said:
Jen, Once you have made your first pass, stick a piece of electrical insulation tape to the guide on your router and make another pass, this should widen the cut enough to allow a nice fit, if not then stick another piece on but one should be enough to increase the rebate by 0.3mm.

If the guide is on the 'wrong' side, hopefully you will know what I mean, then stick the tape on first, make a cut then remove the tape, this will widen the rebate away from the top of your insert.

Andy

Thanks Andy, I thought that would be ideal until I realised that the way I've set it up the router just fits snugly between the 2 guide rails so I can try it but I'm not sure if there will be enough room.
 
I generally cut the rebate smaller than the width of the boards then using the router table trim a little of each side of the board a fraction of a time till I get a perfect fit
 
Jensmith":2gc861mb said:
Thanks Andy, I thought that would be ideal until I realised that the way I've set it up the router just fits snugly between the 2 guide rails so I can try it but I'm not sure if there will be enough room.

Jen, I realised that also after going for my dinner.

Your jig is great if you are going to finish your timber for inserting into your rebate at the same size as your cutter, you only really need one piece to guide your router and as long as you use firm but gentle pressure to keep your router against your guide, all will be ok. You may need two passes to get the full depth which will ease the pressure on your router bit and make the whole process so much smoother.

Go here http://www.youtube.com/watch?v=Cb6hcr86 ... re=related and see how he has made a guide to sit your router exactly the distance you need for your cut, you can then use the insulating tape trick, have a practice on a piece of scrap before you make your final cut and all will be well.

Andy
 
andersonec":hse6dc1y said:
Jensmith":hse6dc1y said:
Thanks Andy, I thought that would be ideal until I realised that the way I've set it up the router just fits snugly between the 2 guide rails so I can try it but I'm not sure if there will be enough room.

Jen, I realised that also after going for my dinner.

Your jig is great if you are going to finish your timber for inserting into your rebate at the same size as your cutter, you only really need one piece to guide your router and as long as you use firm but gentle pressure to keep your router against your guide, all will be ok. You may need two passes to get the full depth which will ease the pressure on your router bit and make the whole process so much smoother.

Go here http://www.youtube.com/watch?v=Cb6hcr86 ... re=related and see how he has made a guide to sit your router exactly the distance you need for your cut, you can then use the insulating tape trick, have a practice on a piece of scrap before you make your final cut and all will be well.

Andy

Thanks Andy.

I did use that youtube trick on the edge of the piece of wood that's the stop in my jig (bit screwed in between the guide rails). The MDF I'm cutting then goes up flush against it and I then know it will cut 9mm into the edge of the MDF.

I did do it in 2 passes.

My concern was that the rounded edge of my Dewalt 621 router wouldn't be stable against the guide rail as it's such a small point of contact, but given the feedback I'm getting is this just my lack of knowledge? Is it both the edge of the router base and the cutter itself that fundamentally keeps it going in a straight line against 1 straight edge?

If so, then we're onto a winner! Shim the edge and hey presto.
 
Jensmith":450y7ht2 said:
My concern was that the rounded edge of my Dewalt 621 router wouldn't be stable against the guide rail as it's such a small point of contact,

Jen, The reason the same point on the router base is used is because the router bit might not be EXACTLY central in the base, so one side of the base may be a fraction closer to the cutter than the other, If you were to use an indelible marker and mark a point on the base (on top where you can see it) then put that mark against your guide, then that will ensure the distance of your cut will match the width of the guide you use, hope that makes sense, Put your router against the guide and rotate it until it is comfortable in your hand then mark the base. Don't forget it will only be a small cut you are making so no force will be required, just take it slowly (two passes if necessary) and concentrate on keeping the base against the guide, practice on some scrap till you are confident.

You could also make your guide, set it up on your work, place your router against it and fit another strip on the opposite side of the base, first one end then the other using the base as a measure, if you want to make a guide similar to the one in your picture.

As long as you use the same point on the base against the guide all will be fine, this is just for super accuracy and if the cutter isn't quite central it should only be small amounts.

The cutter will play some part in keeping the router against the guide as long as the cut is made in the right direction, try doing it the other way and you will find the router will move away from the guide, this would be in effect 'climb cutting'.

Andy
 
andersonec":2dw6k4xk said:
Jen, The reason the same point on the router base is used is because the router bit might not be EXACTLY central in the base, so one side of the base may be a fraction closer to the cutter than the other, If you were to use an indelible marker and mark a point on the base (on top where you can see it) then put that mark against your guide, then that will ensure the distance of your cut will match the width of the guide you use, hope that makes sense, Put your router against the guide and rotate it until it is comfortable in your hand then mark the base. Don't forget it will only be a small cut you are making so no force will be required, just take it slowly (two passes if necessary) and concentrate on keeping the base against the guide, practice on some scrap till you are confident.

You could also make your guide, set it up on your work, place your router against it and fit another strip on the opposite side of the base, first one end then the other using the base as a measure, if you want to make a guide similar to the one in your picture.

Andy

Thanks Andy,

I did realise that about the distance from the cutter and mine isn't central.

The way you describe with the guides is how I did it the first time. Set up one guide exactly at 90 degrees, put in the router then set up the second guide in relation to the router then used the router to trim the edge of the wood acting as the stop.

Which would have worked great if the MDF was exactly 9mm!

I will try with 1 guide and see how it goes.
 
Jensmith":2u8j6nzc said:
My concern was that the rounded edge of my Dewalt 621 router wouldn't be stable against the guide rail as it's such a small point of contact

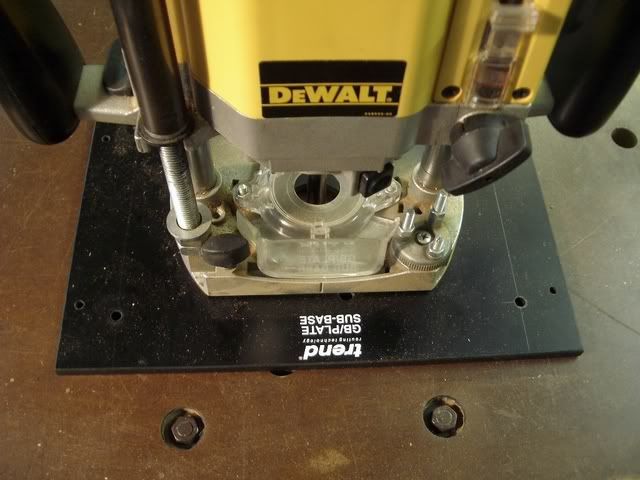
Why not fit a square base to your router? It overcomes a lot of problems when guiding the router along a straight edge. You can buy one made by Trend, like this

Router2.jpg


Router3.jpg


or make one from a piece of MDF or perspex, like this

Router9.jpg


It also makes the router far more stable for hand-held use.

Cheers :wink:

Paul
 
Thanks Paul - that might just be the answer.

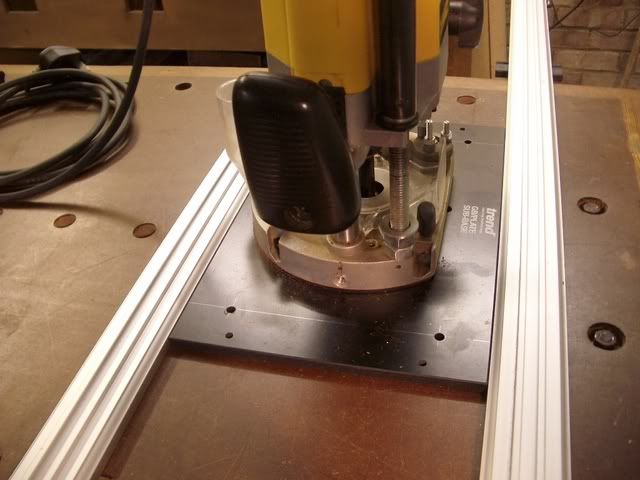
One question - In the second photo it looks like the router is running sideways - surely you can't use it like that can you? I always though it was mean to be used face on?
 
Jensmith":1mtpzr6t said:
Thanks Paul - that might just be the answer.

One question - In the second photo it looks like the router is running sideways - surely you can't use it like that can you? I always though it was mean to be used face on?

Hi Jennifer,

Yes, in that picture the router was running sideways. It doesn't matter whether the router is used face on or sideways. The only thing that matters is that the router is moved in the correct direction in relation to the direction the cutter is revolving. With the router hand held it should be moved from left to right.

Cheers :wink:

Paul
 
Back
Top