Removing a fireplace, a question or two.

UKworkshop.co.uk

Help Support UKworkshop.co.uk:

This site may earn a commission from merchant affiliate links, including eBay, Amazon, and others.

Bm101

Lean into the Curve
Joined
19 Aug 2015
Messages
4,322
Reaction score
717
Location
Herts.
Like every other wise soul who can take holiday from work I saw the opportunity to grab a full week off for 3 days taken. Job done I thought. Then, being so wise, I decided to use up the rest of my holibobs in the following week. I'll finish my everlasting bench build! Get some work in on the planes! Eat nice cheese and drink wine in the evenings! I'll take the chance to get fat basically. Two weeks off while its freezing! Marvelous! No more holidays till April but live fast die young and all that. What could go wrong?

Obviously the Mrs got wind of this and thought 'Sod That'.

:|

So I've spent the last day and a bit, (working to rule) stripping the front room properly. TBF the management did chip in and wanted to do her bit. So I let her spend the first 3 hours with a scraper and a spray bottle working off the Christmas Dinner before I suggested she pop out and but a £30 steamer lmao. Revenge is sweet but short lived. :oops: We should get rid of the fireplace she said. Ahhh.

She's right of course, it's far too big for the room and needs to go. I knew there's some blown plaster here and there and was prepared for the worst. Still, not too bad, 1/4 of one wall back to brickwork. Not as bad as I thought tbh and it needs doing properly. I'll bond it and leave plenty of clearance for a spread to come in and skim the room.
So onwards and upwards.

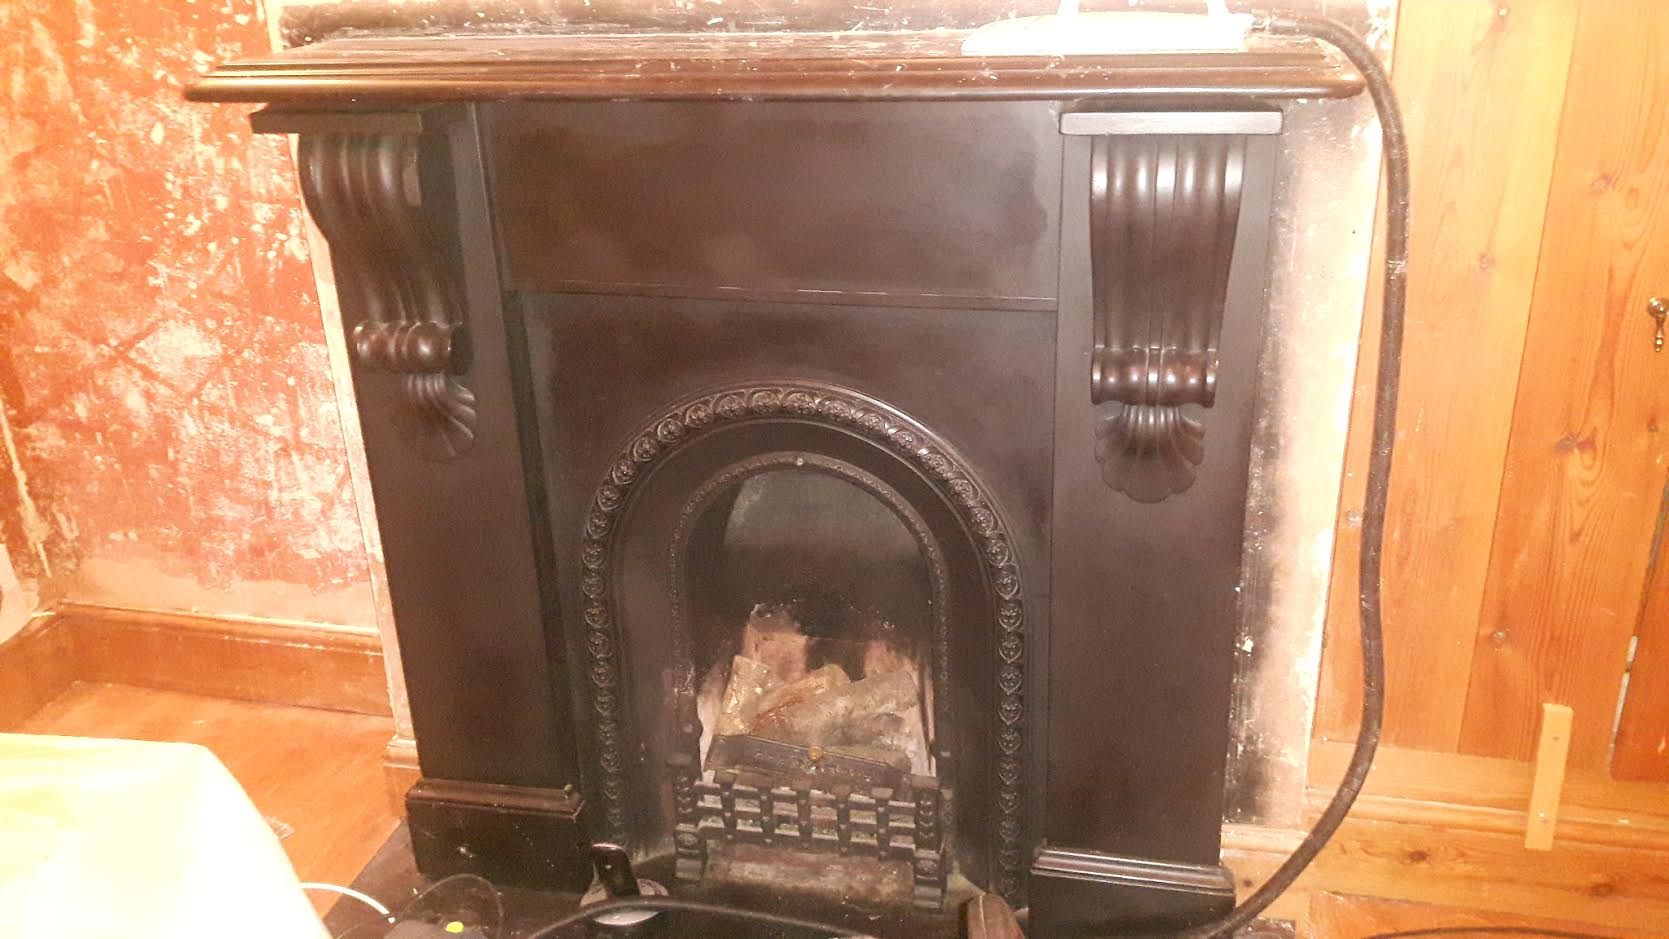
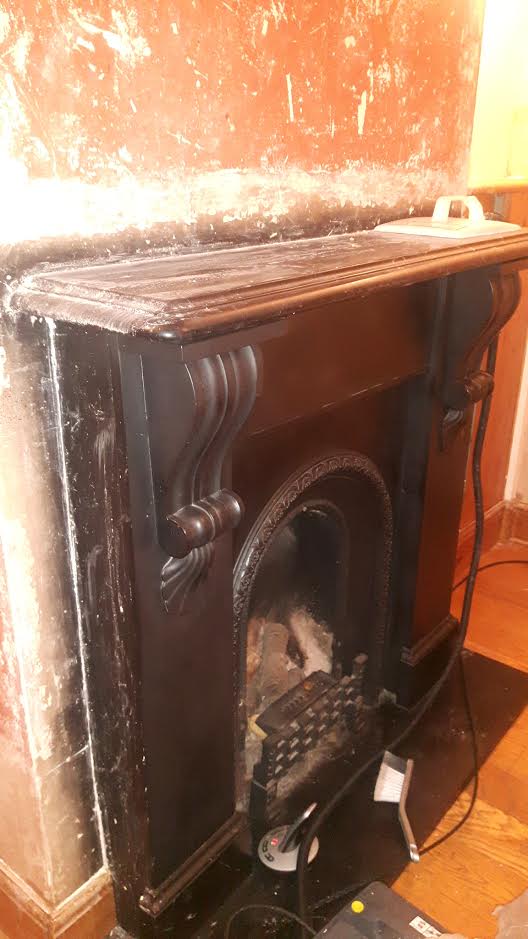
I'd like to keep the fire surround intact if at all possible to sell. I reckon it's mortared in, at least the mantel is. (You can see it was sprayed in situ after fitting). Anyone have an idea of how these kits are fitted together? Fire cement? some form of mastic? Gravity? Worse case scenario it'll be smashed out but that's the last option. I have the tools to cut/knock out the mortar holding the lintel in place. Just wondering if I'll have to deal with any more issues after to get it apart in one piece. I know there's gonna be issues behind the burner. Mrs reckons skip but I'm tight so I told her to go and buy some rubble bags lol. I may live to regret that. We'll suck it and see as we go. ;) Current plan is to tidy the chimney and hearth space and leave it ready for a woodburner in a few years when we have the money.

Cheers as always
Chris

R1L6ZRF.jpg


r2ctCYm.jpg
 
Bearing in mind there is a good chance we are going to have a decade of power black outs. I advise you to seriously rethink removing that.
Remember gas central heating does not work without leccy.
A wood burner will set you back a good 2 grand with fitting (now mandatory) by a registered fitter.
 
I agree with Lurker.

But to answer the question, whether it's original or recent, have a dig round in the plaster above the mantel shelf a few inches from each end. You should find a pair of screw plates (mirror plates) with screws into the brick. Remove these and the rest of the job should be simple with a crowbar and some gentle levering forward. Most of the holding in place is by gravity, with the screws preventing forward toppling.

There may be two more screws down near the feet, on the left and right sides.

If it's old, the joins will be some sort of fine cement or lime putty which will give up when asked. If it's newer it might be epoxy.

We had a new one put in, to replace the identical original one which was made into an ugly garden wall in the tasteless 70s. The focal point of the "modernised" room was a bit of hardboard with a plastic hit and miss ventilator, crooked. :(
 
They (sometimes) have wires attached to the back that are then fixed to the wall by wrapping the end of the wire around a screw attached to the brickwork. Chopping the plaster off around the edges may reveal some fixing points but not always.
 
Thanks guys. The chimney has all sorts of issues, which is why we were looking at lining it at some point for a burner. I've had my loft plans semi approved by the local authority which might change things but the fact remains, burner or open the surround is about 3 times too big for the room. It needs to come out and be replaced sympathetically one way or the other. I appreciate your advice as always. Many thanks.

Andy, S/D that's just what I was looking for. Cheers. I'll get cracking tomorrow.
 
Having recently removed two fire places in a early Victorian terrace I think you will find the front virtually lifts out. What's behind might be different. Be careful you do not disturb any breast supports.
You might be lucky and have a nice arc behind all of the modern crud in the front.
 
AndyT":2e4s1qri said:
I agree with Lurker.

But to answer the question, whether it's original or recent, have a dig round in the plaster above the mantel shelf a few inches from each end. You should find a pair of screw plates (mirror plates) with screws into the brick. Remove these and the rest of the job should be simple with a crowbar and some gentle levering forward. Most of the holding in place is by gravity, with the screws preventing forward toppling.

There may be two more screws down near the feet, on the left and right sides.

If it's old, the joins will be some sort of fine cement or lime putty which will give up when asked. If it's newer it might be epoxy.

We had a new one put in, to replace the identical original one which was made into an ugly garden wall in the tasteless 70s. The focal point of the "modernised" room was a bit of hardboard with a plastic hit and miss ventilator, crooked. :(
Did it match your newly hardboarded in stair spindles a la Barry Bucknell :D
 
Nice looking fireplace - if you can get it out in its respective lumps you should be able to sell it on. It's got some presence but I appreciate that in a small room it may be overbearing. It should come off the wall reasonably easily and slate is pretty forgiving. Chop away the plaster round the perimeter, pry away from the wall, loosen off any fastenings etc. Have someone help as the pieces may just come away quickly and fall.
Good luck!
 
Make sure you have something to drop it on before you loosen it - they are heavy if you get stuck half on half off with no floor space or blocks/battens to drop it on. Look around the perimeter for fixing eyes - sometimes you will find a couple of long screws in the sides somewhere.
 
phil.p":3cnl1glt said:
AndyT":3cnl1glt said:
Did it match your newly hardboarded in stair spindles a la Barry Bucknell :D

Fortunately they had left the stairs alone, except for sawing off the twiddly bits on the ends of some of the spindles.

I did replace a glazed door which had "jazzy" sloping glazing bars - remember them?
 
I've assembled/disassembled quite a few of those, and that is a nice example, worthy of care. If you don't scour the surface (leave the paint on it if there is any), it shold be worth anywhere between 700 and 1500 quid.

Historically they were held together with casting plaster (plaster of Paris). They are in five big pieces, and this is the order to disadssemble (in my opinion), if you don't want to break anything, including your back.:

1. The shelf/overmantle: This is held on by gravity mainly, and the plaster at the back, which holds the back edge down. It needs two people unless you're a gorilla. cut into the plaster all along about 1/4" above the back edge Gently lift up from the front and lift away to place somewhere safe (hint: don't prop it up on one end!).

2. The decorative lintel: This is the panel that goes across the top of the opening. It's held in by plaster poured into the tops of the pillars. Chip away at the plaster so that you can lean it backwards slightly, then lift out vertically. Two people advised.

3: The functional lintel. This blocks the gap between the cast grate and the decorative lintel, and it's usually about 2" wide and 3/4" to 1" thick. It is fragile as it's long and thin, but can be replaced by a piece of slate if broken. Fixed in at each end, by plaster.

4. & 5. The two pillars and corbels. There's usually a pair of iron hooks at the top, buried in the poured plaster. In the originals I've done, these are usually "L" shaped with the hook downwards, and sometimes they're hooked over one of the stone panels. They will fracture if they're heavily rusted (which is common). The pillars are the most fragile parts, as most of the decoration is stuck on, and the overall shape created by "glueing" pieces together with a plaster slip. Once you've loosened the tops, you should be able to lift the things away as one piece, but have something like old carpet to rest it on as the decorative suface chips very easily, especially at the bottom where the load is. They were fitted by getting them square, level and plumb by packing any unevenness in the hearth, then pouring casting plaster down the back (I usually just mix half a builders' bucket per leg). The wall was finally skimmed to the surround, which is hard if it's a complex shape, and the finish held everything in the right place.

The cast grate just stands in behind the surround. If done properly, it will have been backfilled with rubble and mortar, and finished with fire cement to a conical shape around the flue opening atthe back but quite often this has been omitted or done badly.

If the cast grate is in good condition, or even if it's not, it too is quite valuable...

I've repaired them by using two-part polyester/styrene resin to stick bits back together but it's a one-time repair, whereas plaster can be repeated.

[edited for accuracy]
 
PS:if you are (re-)fitting them, the single most important thing is to get a good flat, level hearth, back under the pillars where their stone pieces bear down, and to clean off the bottom of the pillars so they're smooth, square and the same height (to as accurate as you can be). And no voids under the tiles under the pillars, as the point load is enormous and they'll just crack.
 
It's an attractive fireplace - designed for coal, not wood, which is why the grate is quite small. Do not under estimate the amount of filthy dust you will generate (!) - worse if you've been burning much wood. I expect there will be a barrow-load or two of infill behind the cast iron, plus all the - probably crumbling - lime parging in the flue itself. Cheers, W2S
 
Thanks very much chaps. That's really useful information. Eric I appreciate you taking the time for such an in depth reply. Great to know the order of construction.
Given me pause for thought. I'll approach it with a bit more caution.
Thanks again Gents.
 
I put two similar age (cast iron with wooden surround) ones back in to my property and was astounded by the amount of material I needed to back fill behind the cast iron insert. Be ready for a barrrow load+ if you want the opening completely clear.

F.
 
Eric The Viking":mi8cmy03 said:
PS:if you are (re-)fitting them, the single most important thing is to get a good flat, level hearth, back under the pillars where their stone pieces bear down, and to clean off the bottom of the pillars so they're smooth, square and the same height (to as accurate as you can be). And no voids under the tiles under the pillars, as the point load is enormous and they'll just crack.

Quoted for truth - unless you get a properly level base the fireplace looks pineappled as a newt. The best thing about selling my last house was never having to look at the shoddy job I made of that again!
If it's blocked up and looks like it's been that way for a while, check for asbestos. I did a lot of house bashing a couple of decades ago - councils used asbestos sheets to block up fireplaces quite routinely.
 
I looked at your pictures again: your one looks like it's a 1980s or 1990s retro-fit. It's Victorian in style and they would usually have had a tiled hearth, not a one-piece slab. They also liked colour, and you can see from the wall staining that someone has black-leaded the whole thing at some point (it might be soot but it's very unlikely). The surround would never have been matt black (black leading was polished as much as possible).

So that merits a bit of caution: The shelf ought to come off the top cleanly, but I'd be careful doing the pillars etc. in case someone used epoxy resin to hold it all together as a "neat" result. Epoxy sticks horribly well to prepared marble and slate surfaces and the marble may break before the epoxy does. If there's a thin, obvious white line (ir just a gap) between the component pieces you may be in luck. Watch out for the fine decoration around the corbels, e.g. the shells -- they might just be cast in plaster, explaining why it's painted.

Some of the fireplace companies were good; some were total cowboys. A popular bodge was fitting mirror plates to the back edges of the pillars and screwing them to the wall then covering the screws. If they are reluctant to move when the top is clear, check down the edges for that sort of thing (obviously remove one pillar at a time!).

Marble and slate can both be drilled carefully with modern carbide-tiped drills. You might be able to re-use any original wall hooks at the top of the pillars, but if you can't... I very carefully drilled into the back of the thickest and strongest part of the pillars at the top, and fitted in a thick screw-eye (epoxy). Obviously be careful to get the depth and don't break through: You can water-lubricate the drill (if horizontal, make a small "pond" of plasticene or putty round the hole. Save any stone dust you create, if you can - mixed with clear epoxy you can use it to repair chips and holes in the polished surfaces fairly well.

Two more screw-eyes, anchored in the chimney breast (Rawlplugs, ideally in different bricks if the pointing is ropey!), and you can wind a piece of galv wire round all three and bend/tighten it, tourniquet style, to get the pillar in exactly the right spot before you pour plaster down the back. I'm sure there are other methods, but that worked well for me.

Cleaning the things up: The pros sandblast the actual fireplaces/grates - I had no means to do this. I've used Nitromors with success (no chance of a hot-air paintstripper working, because of the thermal mass). Don't apply heat to the surface of the surround, unless it's wood, as you risk spalling of the surface (bits will ping off with localised heating). Don't use any metal scrapers, just wooden spatulas, as the tiny scratches you cause are very hard to hide when you polish it. Ideally the spirit-washable old-style Nitromors is best because it has no effect on the stone. The old water-washable sort doesn't hurt, but I have no idea about the newer "eco-friendly" formulations. If using a wire brush (on the grate, NEVER the surround, use eye protection!

One surround I restored was big, in beautifully-veined creamy-white Carrera marble. In the 1960s, some numptie had drilled into it and fitted a double mains socket box to the front of a pedestal! I got some resin and filler/colouring (from Strand back then - dunno where to get it now), and managed to fill and polish back the two holes so that they were almost invisible (you had to know where to look to see any evidence). I've also glued back broken-off bits of decoration, although yours looks pretty complete. I also removed a huge fountain pen ink stain from the shelf with peroxide bleach!

There are some specialist marble polishes, used by stonemasons, which you can get in household-sized bottles. Can't remember the brand (we left it with the last place's new owners), but it really works, and seals the shelf top, which is a good idea if there's ink about! I'd ask a monumental mason in the first instance, or someone who fits top-end stone worktops. A lot of the cheaper Victorian stuff was cheaper stone, e.g. slate, with painted on marbleing. There's loads of craft-shop books on how to do this, and the effect can be pretty good. If that got damaged it may explain the black paint (but I doubt it!).

The actual grate on yours might well be repro - the bars are certainly replaced. You may find matching bars in salvage yards, etc., but the exact width of the opening varies quite a bit, so take measurements. You can drill and tap cast iron with care (the old Whitworth / BA threads are strongest), so any missing lugs/hooks can be replaced with steel studding where it doesn't show.

You didn't say the size of the room - smaller ones in Victorian cottages were quite often one piece, or with a wooden surround. They were keen on proportions, so if it looks oversized for the room, it probably is. The issue is that the smaller grates were often intended for coal burning only, and small amounts at a time, so they are hard to convert to gas or wood, which is why they're not popular for restorations. If your house is one of a number of similar properties, I'd ask the neighbours, in case someone has an original in a matching room.

One final thought - one shelf I did, in a brown veined marble, like yours, revealed deep scratches when we got the paint off. This was a let-down, we couldn't re-polish it because that would have spoiled the shape of the moulding, but the underside, though unpolished, was smooth. We sent it down to a local monumental mason, who ran the underneath of the shelf on his polishing machine, and it came back with a mirror finish. I think it cost a tenner (takes several hours to do on the machine). Might be worth considering.

Have fun - they look great when they're done sympathetically. This one is made of marble kitchen worktop offcuts and is entirely modern. The grate is repro. Done about 15 years ago, replacing a horrid Minster thing (Google them), which belonged in a baronial hall. That in turn replaced an Arts & Crafts multi-shelf tall oak thing (design unknown) from the original build in the 1910s.
2017-01-01 07.55.44.jpg
 

Attachments

  • 2017-01-01 07.55.44.jpg
    2017-01-01 07.55.44.jpg
    108.2 KB · Views: 756
I've prepped my dining room fireplace for a wood burner. Used to house the Baxi back boiler before fitting a combi in the bathroom a couple of years back. I used the advice here: http://www.stovefitterswarehouse.co.uk, which has been invaluable. All done now, waiting for HETAS fitter to come in a couple of weeks to fit flue, commission and sign off. I underestimated the amount of rubble I'd have to shift - 18 sackfuls.

I thought I would move the fireplace surround from the top floor room in my Victorian/Edwardian house (used only for storage so have just filled in the hole and made good). It was attached to the wall with screws at the top of the sides and lugs mortared in at the bottom. The mantel is attached to the top with bolts. I think it is the original fitting when the house was built in 1900/1910, but it is steel not cast iron. But still bloody heavy.
 

Attachments

  • IMG_0077.jpeg
    IMG_0077.jpeg
    82.3 KB · Views: 752
Thanks, more excellent advice! I'm fairly sure you're bang on about the date of the fitting Eric and fits exactly with what I can gather about the recent history of the house. Seems the previous but one owner was a builder who did most of the work on the house to a good standard if not all to our taste. Think lots of pine cladding... but fits with the dates for the fireplace. Expensive but dated kitchen is still in reasonable nick, I've fitted a new sink, taps and replumbed, retiled and new leds in to freshen it up till we have the money to do it properly in a few years. The last owners upkeep seems to have involved painting the occasional room with one eye shut in the dark and letting the windows rot and the house fall apart for 10 odd years.
Seems the one good thing they did was split up and get a Dunster house shed for him to live in at the bottom of the garden. Guess where my workshop is? :D

The front room is quite small hence taking the surround out. It's just too big for the room. At the moment the plan is not to replace it but tidy up the fireplace ready to fit a burner at some point in the future. Removing it might lead to another solution depending on what's hiding behind it.

Thanks again for all the help. I'll keep you updated when I get home and get cracking with it.
Regards
Chris
 
Marineboy's one looks really good. I'd do something similar in our dining room (the only Minster monster left!), but the Domestic Controller says the room's decorated and she won't have it "messed about with". I can't find a wood burner that would fit in the Minster as its opening is too small and you need air circulating round them.

Something else I thought of: The bricks in the chimney breast above the opening and forming the sides of the flue, especially lower down, often end up saturated in tars. This can spoil your whole day if/when you replaster, as it can seep through once the flue goes back into use and warms up again.

I *think* a waterproofing admixture in the render is probably good enough, and a lot of PVA might do it too, but if the brick looks darkened on the outside of the chimney breast in patches, or the mortar does, you need to attend to that or risk it ruining your interior decor later on.

The flue for the old coke boiler of our present house went up into its chimney on a diagonal that cut through the kitchen slightly, where there was a range originally. Boiler, range and chimney long gone, but it took polyurethane spray under plaster to stop the tar getting out. Really soul-destroying to repeatedly watch the same brown patch come back again...

... learning from other people's mistakes is by far the cheapest way to do it! :)
 
Back
Top