Ploughing a groove with stopped ends?

UKworkshop.co.uk

Help Support UKworkshop.co.uk:

This site may earn a commission from merchant affiliate links, including eBay, Amazon, and others.

henrylaw

New member
Joined
9 Aug 2011
Messages
2
Reaction score
0
Location
Manchester
I'm making a hardwood box which is to have a bottom of 3mm thick stuff. The sides of the box are dovetailed into one another. I need a 3mm (1/8") groove in the sides for the sheet material of the bottom to slot into.

My Stanley 13-030 plough plane is fine for the two sides whose grooves finish in a gap between the dovetails, because the pins cover up the end of the groove and I can simply plough it from end to end. But for the other two sides the groove has to stop short of the end of the timber, as otherwise it would be visible from the outside. (I hope this is clear: it would be a lot easier with a diagram!).

The cutter of the 13-030 is about 75mm from the front of the body, so I can't get any closer than that to the end of the groove. Is there such a thing as a "bull nose" plough plane? Would a better tool (this 13-030 is not one of Stanley's finest ...) be able to cut closer?

At present I'm finishing off the groove by using a 1/8" chisel; it's difficult and the finish isn't very good. Is there a better way?

Henry Law, Manchester, UK.
 
OK, I'm sheepish. I did search the forums but obviously didn't use the right terms or maybe didn't look hard enough. I apologise; duplicating questions is something I feel strongly about and usually manage not to do.

The answer, though, is that there is no better way than the way I'm doing it -- chopping out the ends of the stopped groove with a chisel, and using the plough plane for the bits that are more than 75mm-odd from either end (which for me is about 15mm ...).

I take the point that power-tool thinking sometimes leads to situations like this, but in the case of a dovetailed box I can't see how the design can be modified to put the ends of all the grooves out of sight. I guess I could make do with grooves only on two of the four box sides, relying on glue and the stiffness of the bottom material (3mm MDF) to do the rest. Sounds like a bodge, though.

Henry Law, Manchester UK
 
dont worry about asking questions again, it only took 2 seconds to copy you a link. i think it was andy who showed a solution where as you could have full grooves all the way around the box without seeing the ends. i think its important to groove all sides to make a solid box.

anyway good luck

adidat
 
henrylaw":zt5aj3mf said:
.......
I take the point that power-tool thinking sometimes leads to situations like this, but in the case of a dovetailed box I can't see how the design can be modified to put the ends of all the grooves out of sight. ....
Either blind DTs at each end so that the groove ends are covered, or slips at opposite ends. Or slips all round for a stronger box.
 
Henry
The trad method I've seen is to have a small mitre at the top and bottom of the box sides - just enough to hide your ploughed groove.
Matt
 
Although I agree that the best way is to adapt the design, - and Shrubby is spot on with the mitre suggestion - if you do decide that you must make a stopped groove, you might do better with a router, not a plough plane.
Obviously I mean a hand held router like the Stanley 71 or the famous 'old woman's tooth' pattern. The Stanley has a screw-on fence to help do cuts like this. You'd still need to hand-chisel the ends enough to get the cutter in and give it room to work.

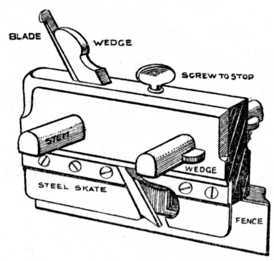
For the record, all plough skates are not the same. Some come to a blunt end and are fairly short;

Fig-121-The-Plough-Plane-and-its-Parts.jpg


others extend with a nicely curved skate looking like an ice skate and would need even more room to work:

screw%20stem%20plough%207-00.jpg


There were plough planes which could work in a bullnose mode, but they were never common. Stanley made a few:

141-9.JPG


but you're not likely to find one. I'd have thought that their strength would have been ploughing a groove from one open end but stopping short. This is a very common cut - every sliding sash window will have it, where the cords go at the sides, so ordinary joiners must have managed ok with the common pattern of tool.

A groove stopped at both ends in a little box is a different problem altogether.
 
Yep - the Stanley 71, with side fence fitted (in my case courtesy of Andy who gave me the screw that fixes the fence to the sole, big thanks). Provided the cutter is narrow enough it's an excellent tool to clean the ends of stopped grooves. And there are loads of spare blades around to be ground narrower if necessary too. The 71 id also great for hinge recesses, and a few other things. Well worth having one around and cheap as chips on ebay etc.
 
I've done this quite often. One solution is to have a shorter dovetail on the bottom. It does mean of course, an odd sized dovetail; but it does look quite exotic.
I'm not able to post the 'picture to save a thousand words' unfortunately, so sorry if this explanation doesn't help too much.
 
Jacob":11dnml0z said:
or slips at opposite ends. Or slips all round for a stronger box.

Please excuse the silly question, but how are slips normally attached to the sides? In the case of drawers I've seen pictures of slips being attached to the bottom of a shallow depth side, but I've also seen slips attached to the side of a full depth side. Thanks
 
Hi!

I saw an article written by Jim Tolpin in which he made a box with a full length groove on four sides and then fixed the "unwanted" part with a fitting from a cut-off of the same piece. If made well could be little visible or on the contrary decorative :) For sure...much easier and faster than stopped grooves. That, of course, a totally different solution than the question, but maybe will help.

Regards,
Lukasz.
 
DTR":1lbz9uqg said:
Jacob":1lbz9uqg said:
or slips at opposite ends. Or slips all round for a stronger box.

Please excuse the silly question, but how are slips normally attached to the sides? In the case of drawers I've seen pictures of slips being attached to the bottom of a shallow depth side, but I've also seen slips attached to the side of a full depth side. Thanks

Thinking about this a bit... a lot will depend on what sort of box is being made - there will be different answers for something chunky and utilitarian or for a fine jewellery box.

Drawer slips are just glued to the sides of the drawer.
You don't need one at the front, which will always be thick enough for a groove, nor at the back which is open to allow for wood movement. So the fitting problem is just cutting and trimming to length.

But if you wanted to go all round the inside of a box, you'd either need to butt the ends to exact length before assembly, or mitre them. I don't think it would be very easy to make a tidy job of assembling four mitred slips, with the bottom board in place, inside a finished box. Not if you wanted the mitres to fit tightly and not smear glue all over the place. It would also be difficult to fit each one exactly right so that as the dovetails pulled up the mitres or square ends would pull up tight as well.

But there is a variant of this which I used successfully some years back. I made up the box, and then mitred four pieces of thin wood to fit round the inside. They were not grooved slips; they were just a quadrant moulding. I eased each one to length and got them in, fitting nice and tightly. When the glue was dry I cut a plywood bottom to a very close fit, pushed it down into the box and glued it onto the square face of the moulding.

Theoretically there is a slight gap round the edge of bottom which is not hidden from inside the box, but it's fine for the purpose and has not moved or separated. An example of how a very simple method of construction is actually perfectly fit for purpose.
 

Latest posts

Back
Top