Planing difficulties with rippled sycamore

UKworkshop.co.uk

Help Support UKworkshop.co.uk:

This site may earn a commission from merchant affiliate links, including eBay, Amazon, and others.

Austinisgreat

Established Member
UKW Supporter
Joined
6 Aug 2014
Messages
161
Reaction score
0
Location
Bury St Edmunds
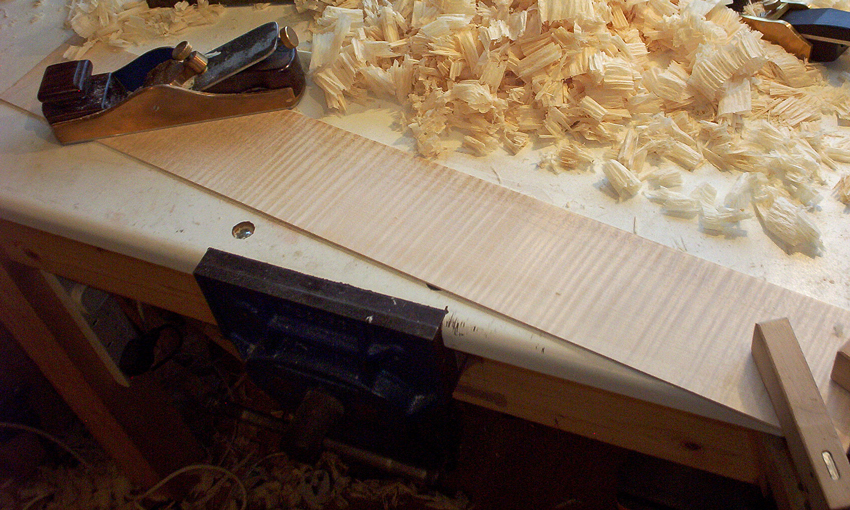
I have been trying to work a sycamore board off and on the last couple of months, in order to get some much-needed practice sharpening plane irons etc.

At the same time I had my P/T knives professionally re-ground, and (finally) having spent an awfully long time setting them as near perfectly as possible, thought this may be the answer to my problems with tear-out etc.

So I have achieved what is on the face of it a decent enough finish on the board, but on close inspection we have this:

wood prob 001_resize.JPG


wood prob 006_resize.JPG


wood prob 004_resize.JPG


Does anyone have any secrets to share in trying to prevent this tear-out in figured wood? Alternative plane iron bevel angles etc?

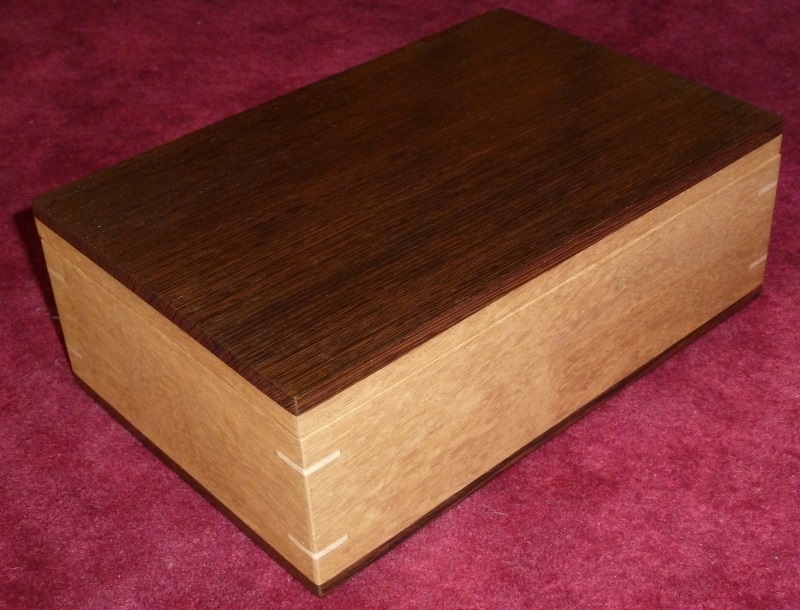
Or should I just make the best with a cabinet scraper and use clear epoxy to "drop fill" the holes during the finishing process? This board is destined to be two sides of a fancy box which will be my first attempt at dovetail joints also!

Any thoughts much appreciated,

Cheers

Andrew
 

Attachments

  • wood prob 001_resize.JPG
    wood prob 001_resize.JPG
    211.3 KB · Views: 433
  • wood prob 006_resize.JPG
    wood prob 006_resize.JPG
    237.3 KB · Views: 432
  • wood prob 004_resize.JPG
    wood prob 004_resize.JPG
    246.9 KB · Views: 433
Musical instrument makers almost all suggest planing cross-grain in figured wood - 45 degrees or so to the grain direction. With a really sharp iron and taking small shavings, this works for me.

I have a toothing blade for really gnarly grain, but rarely need to use it.
 
I work a lot with heavily figured timbers and over the years have accumulated a range of possible answers to the problem. Unfortunately it's been my experience that there's no one silver bullet solution for every timber so you need a selection of tricks up your sleeve.

1. Powered planing/thicknessing. Sharp knives, slow feed, and fine cuts. Try feeding at slight angle if practical. Thicknesing normally gives noticeably cleaner results than planing so minimal planing before moving as soon as possible to thicknessing. If all else fails I keep a set of knives with a tiny, 10 degree back bevel honed on. Only take very fine cuts with these as it takes a lot more force to move the timber through the machine. This really does work but it's a pain to change the knives, however with expensive timbers it's often the best route.

2. Drum sander. I'll frequently resort to my drum sander with an 80 grit belt, it takes 0.2mm per pass. You could replicate this with a random orbital but obviously it's a slow process.

3. Scraping. I use a few different scraping planes depending if it's veneer or solid wood that I'm working on. Couple of general scraping points. Scraping just doesn't work all that well with softer woods, and some Sycamore might be getting a bit too soft for good scraping results so it'll often tend to be slightly fuzzy and will probably need subsequent sanding. Aim for a really fine hook; when you apply the burnisher think in terms of the same pressure you'd use to butter bread...no more than that!

4. Bevel up hand planes are your friend with figured woods. I keep a few bevel up irons at different effective pitches; 50, 60, and even 75 degrees. The finish isn't as polished as you get from a normal 45 degree pitch, especially on softer hardwoods, but keep going up the scale and you'll eventually find a pitch that cures tear out. It's a lot harder work to plane at a high angle, but don't skew the plane to make it easier or tear out will return. You need to make sure there's sufficient slight camber to feather out the cut and also make sure the blade is really sharp right out to the edges or you're just asking for tear out at the blunt edge.

5. One final trick, a quick rubber of shellac will stiffen the fibres and significantly reduce tear out, but you'll only get one or two plane passes before you need another coat. Luckily shellac dries sufficiently in a few seconds so you're ready to go again, but it's still a long job. I know some craftsmen who use water to soften the fibres but personally I haven't had such good results going that alternative route so I stick to shellac, maybe you'll have better fortune.

6. I hear what you say about filling with epoxy, it can work but remember that epoxy will impact on your finishing options and you'll have to be pretty accomplished with a scraper to level the epoxy perfectly without causing yet more tear out around it!

Good luck!
 
When I'm working on a cello back I do exactly what Profchris mentions - I plane with the blade on a diagonal to the grain. Sometimes the figuring is wonky enough that I can't quite tell by eye the best way to direct the plane, but a few light test passes generally tells you which way is best.

Highly figured maple can be unpleasant when you're thicknessing the cello (or violin) ribs down by hand. You want to take long strokes all along the length of the maple rib, but if you do that with the plane at the natural angle (i.e. long plane, running it lengthwise along the long rib) then you'll get horrible tearout. So I'll turn the plane by 45 degrees, hold it with one hand on the front of the plane and one hand at the back, then run it along.

For example, this picture (which I grabbed from maestronet, posted by user Dave Slight): I'd run the plan at that angle along the length of the wooden rib/board in the picture.


The full post is here, and the planing tips certainly apply to your situation http://www.maestronet.com/forum/index.php?/topic/329155-planing-ribs-how-to/page-3
 
I use a toothing blade at a 45 degree angle coming from two directions to create a cross-hatched pattern, followed by a finely set smoother. Try to scrape your way to the bottom of that tear-out will be very difficult and leave a hollow.

I also would not drive myself crazy trying to clean up every last little bit of tear-out. Once I got close to an acceptable surface, I would whip out the random orbit sander with 220 grit paper.
 
custard":286vn7kq said:
1. Powered planing/thicknessing. Sharp knives, slow feed, and fine cuts. Try feeding at slight angle if practical. Thicknesing normally gives noticeably cleaner results than planing so minimal planing before moving as soon as possible to thicknessing. If all else fails I keep a set of knives with a tiny, 10 degree back bevel honed on. Only take very fine cuts with these as it takes a lot more force to move the timber through the machine. This really does work but it's a pain to change the knives, however with expensive timbers it's often the best route.

When I worked in a sawmill I recall seeing this trick, or rather a variant of it where you grind the knives as normal but with a much smaller relief angle and regrind and shim clamping blocks that fit into the planer block to adjust the angle of the knives. That took a lot of toolroom work, but achieved decent results in Lignum with the knives bedded at 80ish degrees and a glacially slow feed speed... It was a very impressive trick to see.

custard":286vn7kq said:
4. Bevel up hand planes are your friend with figured woods. I keep a few bevel up irons at different effective pitches; 50, 60, and even 75 degrees. The finish isn't as polished as you get from a normal 45 degree pitch, especially on softer hardwoods, but keep going up the scale and you'll eventually find a pitch that cures tear out. It's a lot harder work to plane at a high angle, but don't skew the plane to make it easier or tear out will return. You need to make sure there's sufficient slight camber to feather out the cut and also make sure the blade is really sharp right out to the edges or you're just asking for tear out at the blunt edge.

You can achive comparable results with a back-bevel on a bevel down plane, I keep a No.4 with a 20 degree back bevel (65deg effective pitch) for just such occurances, after advice to the effect of yours when struggling to plane purpleheart to a glassy finish.
 
A very close cap iron ground at around 70 deg will hold the wood down ahead of the cut preventing tear out.
By close I mean just the merest line of polished blade showing about the same as the shaving thickness.
If you ave it right it will make straight slightly crinkled shavings then come straight up out of the plane.
I plained some soft and rippled burr silver birch using this method and it worked very well.

Pete
 
I had similar problems with the last box I made - in the end I did the thicknessing using the CNC machine. Without one you could replicate the approach with a router thicknessing jig and a really big surfacing bit, taking very light passes.

This is the bit I use: http://www.wealdentool.com/acatalog/Onl ... m_225.html
And this is the thicknessing jig I made before I had the CNC machine - partway through making it. Basically two bits of aluminium box section on a very thick ply base with dog holes. I then made an aluminium gantry that slides along the boxes, and the router slides along the gantry, so you have X and Y movement with a fixed Z axis.

thicknessing%20jig.jpg


And, finally, this is the box - you can just see how curly the gain is on the sides:

box7-1sm.jpg
 
To add to all the other suggestions for power planing, particularly thicknessing, e.g., sharp knives, slow feed, skewing the board, even putting a back bevel on the face of the knives to create more of a scraping cut, you might also try wetting the surface with either water or white spirits. It's similar to the shellac trick mentioned by custard, but as a caution, my experience indicates the benefit is usually marginal. Slainte.
 
Wow thanks gents what a great response! Thanks Custard in particular unless you have that dictation software and spoke as you were working :shock: that must've taken loads of time so thanks to you and everyone else that chipped in.

Lots of suggestions, some of which I can try to act upon.

I don't have the expertise to mess with the P/T knives being freshly ground and all, but I did do it in thicknesser mode and very small cuts. Sadly with my Record Power PT 320 don't think I can slow the feed rate down! And with that board can't feed diagonally or much other than perpendicular.

Don't know anyone with a drum sander but will be on the lookout. Okay I have a heavy duty orbital but that would always be the last resort, I guess.

So to plane irons. Much talk of bevel up irons and also mention of increased back bevels. Pete also mentions moving the cap iron closer to the plane iron. Whilst I have limited experience of planing, I did buy a Ron Hock iron set for my No. 5 Stanley and tonight I've attempted to increase tha back bevel to 20 degrees on that and another plane iron with my Veritas honing guide. Will hopefully get a chance to try them tomorrow and post results back.

Good to hear from some luthier people too! Only reason I bought the sycamore was to make a drop top for a mahogany bodied telecaster, the main body of which I did months ago and is sitting waiting for attention!

And Sporky I do have a home made router sled for awkward thicknessing situations but didn't really think about it for this application, maybe worth another look! But I'd ideally like the planer/thicknesser to be able to give me perfect 1/4" thick guitar tops once I've ripped them on the bandsaw.

Meantime the box project is v special as it is to house the ashes of my old mate of eleven years who we had to put to sleep a few weeks ago after a mercifully short but incurable illness. He is the Austin in my user name. Should perhaps change it to Austinwasgreat but hey.

Thanks again for the amazing knowledge base and your willingness to share.

Cheers

Andrew

P.S Can I use bevel-up irons in my regular planes, and if so, any tips? Added having just re-read through the thread a third time! Its a bit late. Cheers.
 
Planning Sycamore can be very difficult and some great ideas have been put forward but once the damage has been done by the planer you do have a lot of hand work to put it right.

This is a short video of me using the Hammer Spiral cutter block on some demanding Quilted Maple to great effect.

https://www.youtube.com/watch?v=VyHi5d5aAEw

But most of us don't have a planner like this so this article shows some ways we can improve the planer we do have.

http://www.peterseftonfurnitureschool.c ... rticle.pdf

Or as said it's using a back bevel in your standard plane or a high angle blade in a low angle bevel up bench plane.

Cheers Peter
 
To add a little more - if this is going to be a drop top, then I would be tempted to just glue up to the mahog body, trim to size with flush cutting bit (add in any rebate for purfling), and use a powered sander to go through the tearout. Obviously this depends on the current timber thickness and your planned final thickness, but planing after glue-up would be near impossible anyway, given the arm-bevel. How do you plan on conforming the sycamore to the body?

Adam
 
Interesting stuff.
So how did Stradivari and co do it without machines? Would they have "carved" a surface down with adzes and gouges and then sanded/scraped? You sometimes see something this in old joinery, where the light shows up patterns of very fine adze (or gouge) marks, in a regular pattern unlike hand-plane marks.
 
It's a pity they wont have it at the D&M show Terry. I've seen one live at another show at Detling in Kent and they are lovely tools because apart from the innovation with the spiral cutter block cutting very cleanly, they're also really quiet as each tiny cutter takes sequential slices rather than 3 blades taking bigger slices. Less friction, less noise. The only downside with the Felder kit as far as I can see (for the amateur) is the cost and possibly the delivery time if you're in a hurry. In an industrial setting that price is justified but for mere mortals it's on the eye watering side. When I got my Startrite I had a very close look at the Hammer. With hindsight, I still wouldn't get one because though lovely, they get so relatively little use that its the classic case of eyes bigger than stomach or various other clichés for blokes making lunatic tool choices because they're all shiny. I had a PT260 before the Startrite and if I'm honest, for my use I should probably have stuck with that.

Next workshop for me will be 3 phase and both table saw and planar will be in that camp. Both 2nd hand where it seems to me all the real bargains are. Lumps of indestructible cast iron that will outlast anyone that cost less then the Far eastern clones. The barrier to entry is weight, 3 phase and maintenance knowledge/parts so folk shy away from them (maybe space as well). But the appeal to me is overwhelming hence my personal view is your Sedgewick plan is a good one.
 
Wizard9999":2ifqd4oy said:
Thanks for posting Peter, most impressive bit of kit.

True. And impressive planing technique as well! Very slow feed rate, even (but not dangerously excessive) downwards pressure, pressure transferred as soon as possible to the critical reference surface of the outfeed table.

Two other nice things about the spiral block. Much quieter than traditional knives, and the extraction waste is far more compacted so bag emptying is less frequent. I only wish it could be retro-fitted to my machine. Oh well, maybe next upgrade!
 
Austinisgreat":134hmjon said:
Good to hear from some luthier people too! Only reason I bought the sycamore was to make a drop top for a mahogany bodied telecaster


Can I use bevel-up irons in my regular planes


Unfortunately bevel up irons won't work in your regular planes. But a back bevel would work if all else fails.

I'm a little sceptical that luthiers have a magic solution to tear out. I suspect that because they're making smaller, higher value items they're prepared to sink more effort into finishing each square foot of their products than an equivalent furniture maker. Consequently they'll tolerate some micro tear out (that slight and patchy "fuzziness" which is almost inevitable on rippled sycamore) knowing that it will be dealt with at the grain filling stage. Fifty or a hundred padded on coats of shellac together with the attendant pumice treatment, or multiple rubbed out coats of varnish, will render most tear out undetectable to touch or eye. But that's hardly a realistic finishing regime for a double wardrobe!
 
I'd agree there's no magic "luthier solution" (though I only aspire to being a builder, luthier is way above my station). I suspect those making musical instruments are just more accustomed to dealing with the problem, because figured wood is expected in hand-made instruments and the thinness of the plates means that tearout is a real disaster - once I've worked a plate down to 2mm thickness a 0.5mm divot could mean I have to chuck it out and start again.

My own technique for a particularly challenging piece would be to start with cross-grain planing to see how it responds - up to 90 degrees to the grain direction, though in that case I need some spare on the edge as it tends to pull fibres away as the plane exits the wood. As I get close to final thickness, switch to toothed blade - I have an old woodie toothed scraper designed for veneering which is surprisingly quick for thicknessing. The last step is to use a cabinet scraper or sandpaper, depending on the wood. My limited experience with sycamore is that it doesn't much like cabinet scrapers.

And I'd agree with previous posters that a coat or two of shellac wiped on before final scraping/sanding really does make a substantial difference.
 

Latest posts

Back
Top