panel glue up advice

UKworkshop.co.uk

Help Support UKworkshop.co.uk:

This site may earn a commission from merchant affiliate links, including eBay, Amazon, and others.

Nick b

Member
Joined
1 May 2018
Messages
14
Reaction score
7
Location
Berlin
hi guys,

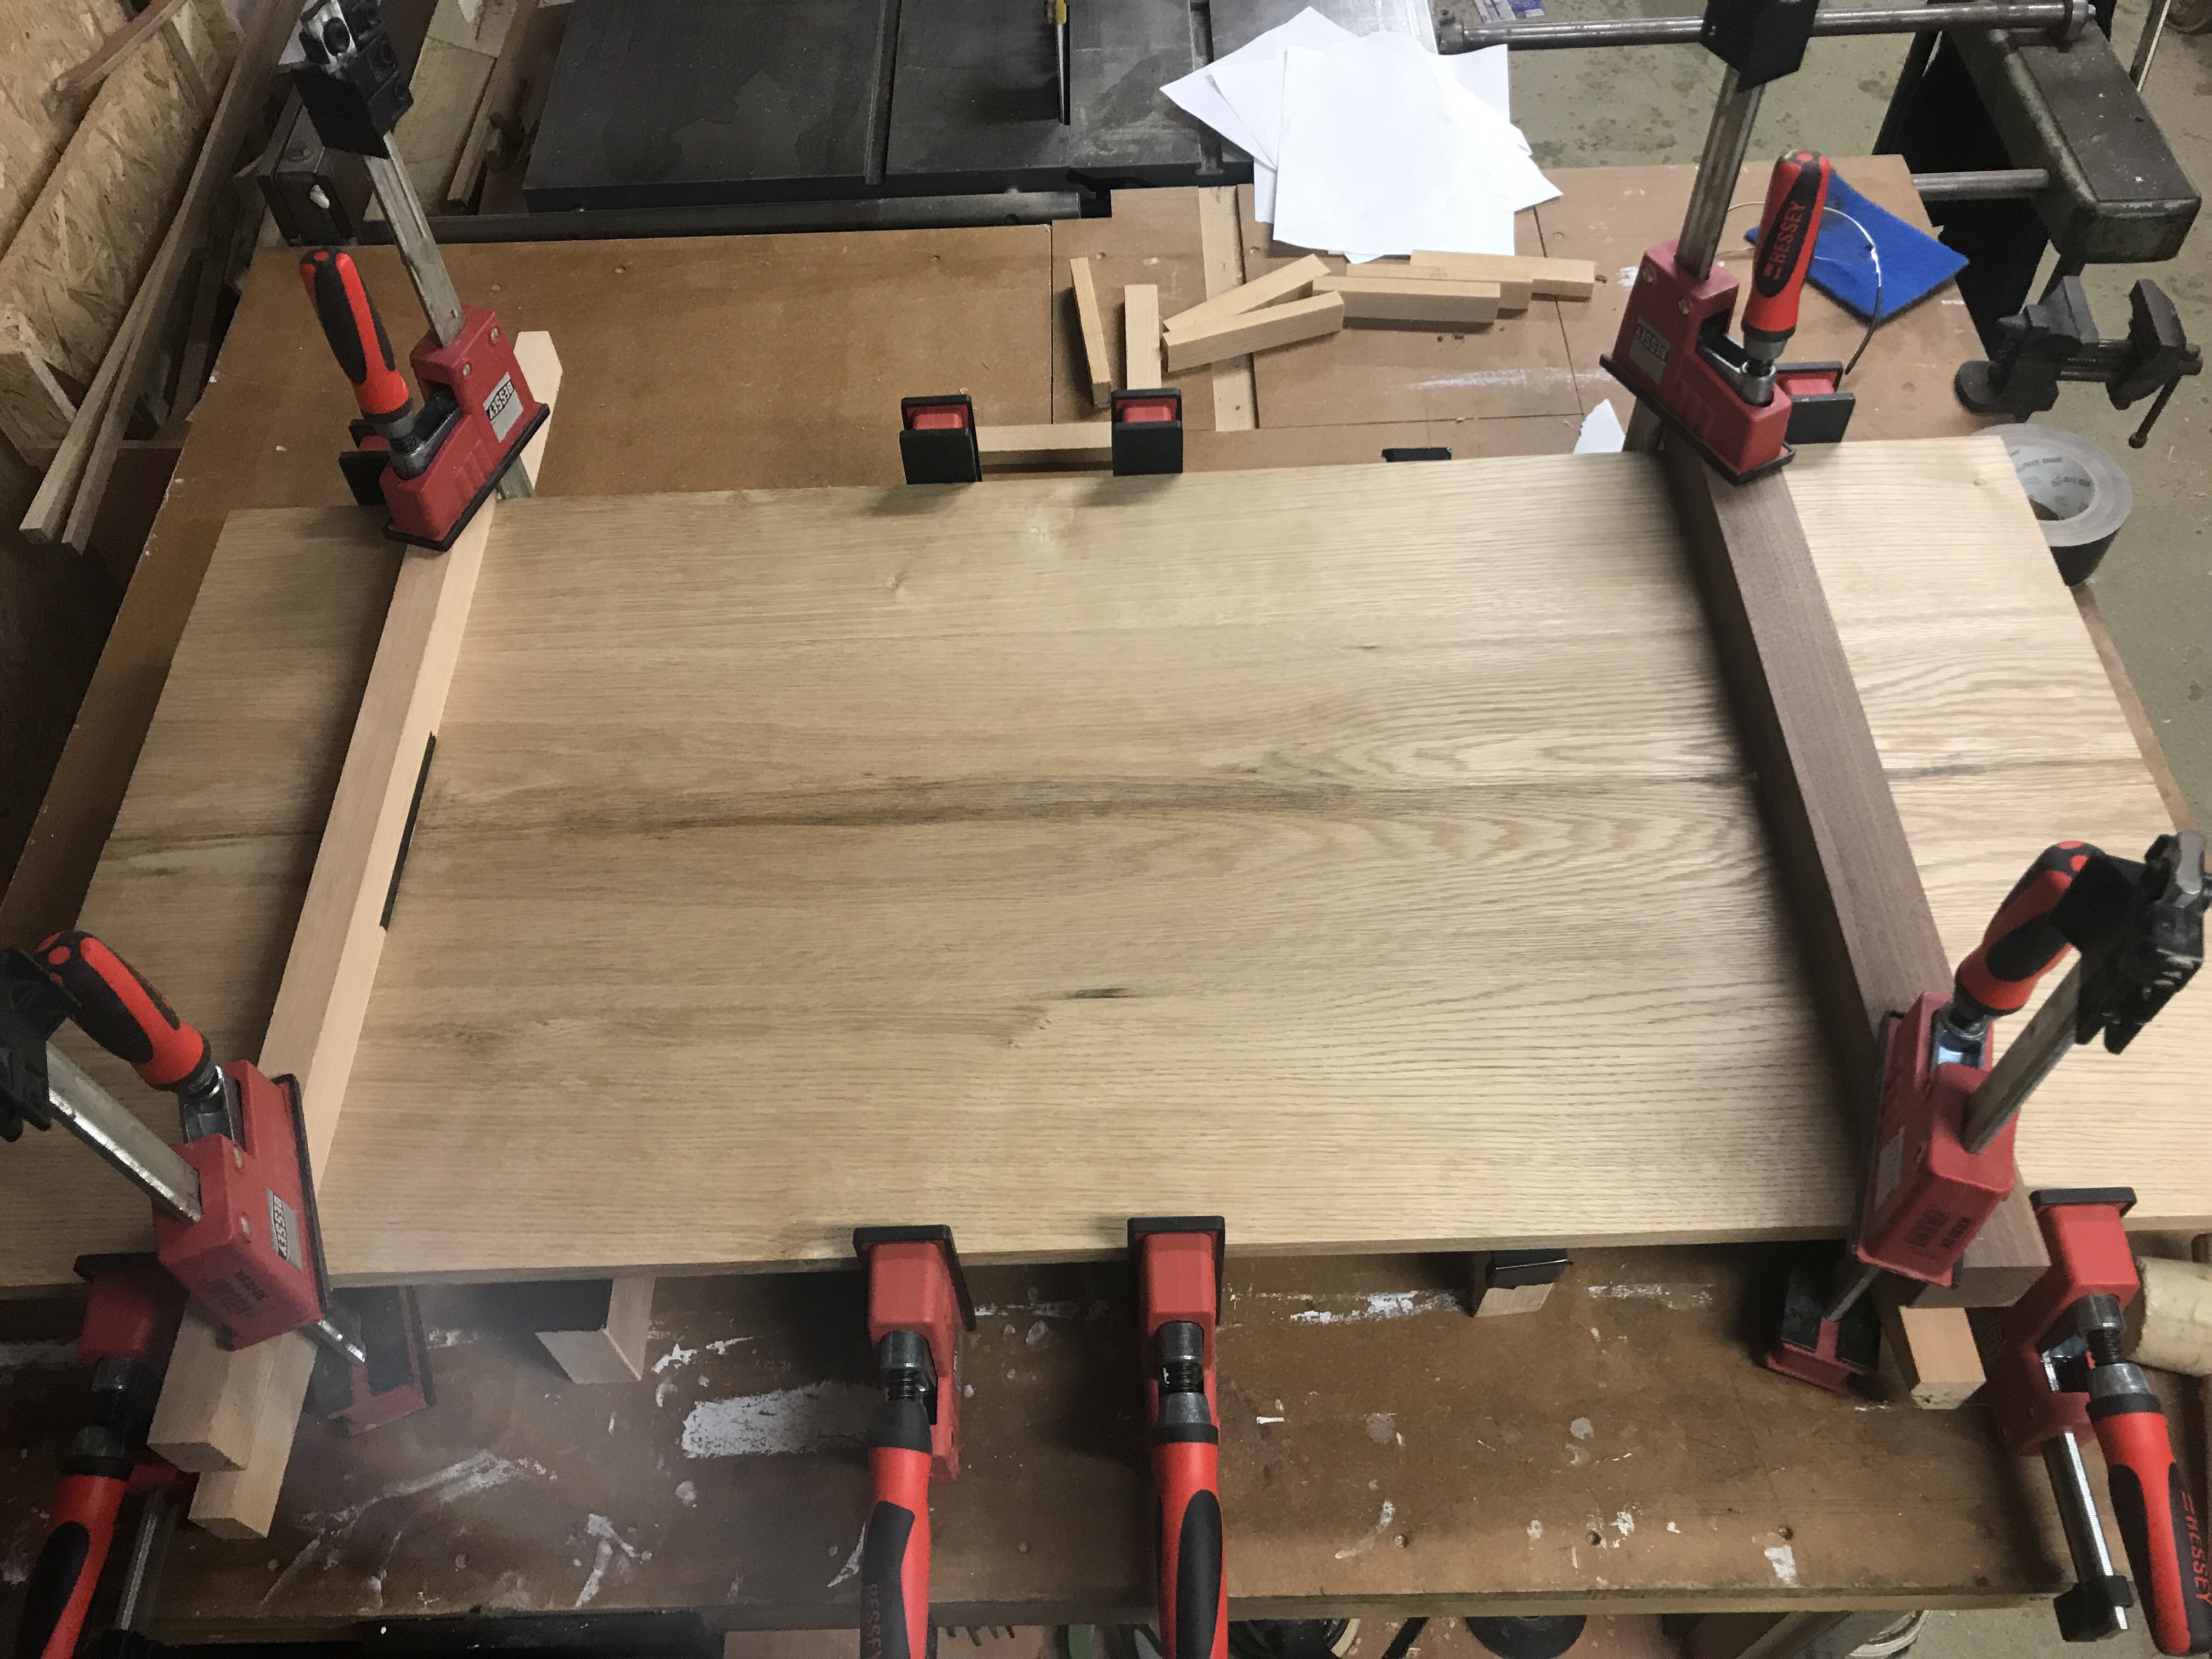
so i am building an oak table top at the moment and would like some advice on the glue up itself. i bought all the oak and had it planed on one face and jointed on one side and then ran it through my electra beckum planer to square up the adjacent faces. I then used a biscuit joiner to get everything nicely aligned for the glue up. Unfortunatly due to the capacity of my planer i had to cut down the original width to be able to pass the edges through on the planer. so i had 6 panels to glue up.

i dont have any sash clamps or anything in my shared workshop so i set the panels on some 2x4s and glued up the panels with regular wide clamps.
everything is pretty dead flat needing only some minor leveling treatment with a belt sander before orbital sanding. The only minor problem is the last panel isnt so well aligned with the others and sort of angles up slightly.

As a fairly novice woodworker i feel i have two choices at this stage belt sanding the last 3-4 inches on this section as this is the only really noticible part where its starts to angle up. or running a track saw through the glue line and biscuit joints and trying to glue it up to the rest of the panel flat again.

its not a major slant but enough for me to notice when looking at the joined endgrain. what do you think would be the best route to go?
 
If it was me I'd cut, redo the edges and be thankful I noticed in time. Sanding / planing it flat will still leave you with a wonky angle underneath to haunt you forever more. I have a scarfed dado rail that wasn't joined deadly straight and I only noticed once it was on the wall. It irks me every time I walk past it even though it's hidden behind a curtain (homer)
 
What about making sash cramps using timber lengths and wedges - is that a realistic option?

Sent from my Nexus 5X using Tapatalk
 
thanks for the reply guys. I think i'm gonna go ahead tomorrow and cut down the joint and try and rectify it as much as possible. unfortunatly im too broke at the moment to afford a set of sash clamps nor know anyone to loan me some. i dont have a jointer to plane the edges again but a new blade on the table saw. so will try and get the edges sitting flush and do some dry fits to see if i can atleast improve it a little bit before glueing it up.

here is a photo of it in the clamps. the last panel on the right angles slightly down but not very easy to notice in the photo.
 

Attachments

  • EDD3F938-7971-4075-B212-47229E51CFEC (1).jpeg
    EDD3F938-7971-4075-B212-47229E51CFEC (1).jpeg
    2.1 MB
You mentioned a track saw which would probably be easier than humffing that over a table saw. Cut once to separate the offending piece then secure both pieces (screws in the ends or hot glue and ensuring the pieces are level) and cut again down the gap ensuring the blade takes a bit off each. The resulting kerf should give you two pieces that will mate together. Depending on the blade you have you may want to do some tidying up with a pane.

Table or track saw you're going to end up with a narrower piece on the end but hopefully not too much.
 
Nelsun":3ckhjfm0 said:
You mentioned a track saw which would probably be easier than humffing that over a table saw. Cut once to separate the offending piece then secure both pieces (screws in the ends or hot glue and ensuring the pieces are level) and cut again down the gap ensuring the blade takes a bit off each. The resulting kerf should give you two pieces that will mate together. Depending on the blade you have you may want to do some tidying up with a pane.

Table or track saw you're going to end up with a narrower piece on the end but hopefully not too much.

Thanks Nelson! that seems like a solid idea! think i saw someone doing the same on a youtube video. assuming i would need to foam underneath the panels for that. Think i will give that one a go tomorrow!
 
Nick, beg borrow or steal some sash clamps. This job isn't really possible without.

Hi Nick. Where abouts are you.
Ian
 
Hornbeam":31alpz8d said:
Nick, beg borrow or steal some sash clamps. This job isn't really possible without.

Hi Nick. Where abouts are you.
Ian

Hi Ian,

yup out In berlin at the moment although from the uk. Thanks for your input everybody will keep you updated on how this turns out. got my eye on some sash clamps for future panel glue ups.

best,
Nick
 
All good advice above but you might do one or two things differently during your next attempt to help avoid the same thing happening again. If it were me I’d consider using bearers underneath the panel to raise it up a bit and cauls, across the width on each end, to keep it all level. This is what it looked like on an oak table top I did a year or so ago that also wanted to misbehave:
NxgbapQ.jpg


Good luck and let us know how you get on!
 
Nick, your clamps look Ok
I use pipe clamps for that kind of work; which are good and cheap :)

You need to learn about Cauls
More on Cauls
 
If you don't have cash for proper sash cramps, in my experience alternatives do work. I've used scrap wood with screwed-on stops + folding wedges to edge join 8" x 1" softwood. Well worth trying. Remember to put some above and some below the job.

I've also used threaded rod / studding to pull up suitable cauls. You can get 8mm or 12mm quite easily from electrical wholesalers. Cauls can ve offcuts from building work. Obviously it's not as quick as cramps but as so often there's a trade off between cost and convenience/time.
 
Doing them all together in one bash can be difficult especially if you don't have skills, good clamps, workspace etc. Sounds tedious but it's a lot easier of you just do one joint at a time: glue two pieces together, next day add another. Just have to fill in the time between with something useful, such as making the undercarriage etc.
 
So I ended up cutting down the glue joint and taking it to a friends bigger jointer and jointing the edge square, re glued and beltsanded top. Pretty dead flat now 8)

Wanted to ask you guys what would be the best route for a novice to go on doing mortise and tennon joinery for the aprons and legs.

I thought either using a spiral bit for the mortise on the router table using some marked masking tape on the table as a indicator for the start and stop point.

Or cutting out the waste with a spade bit on the drill press and using a chilsel to clean the rest up.

I'm more hesitant with the router table method. I've been using it for basic profiling and template cutting but this cut feels a bit more advanced but could achieve smoother results.

On the other hand I'm not amazing with a chilsel either but feel this could be quite easy and the mortise would be hidden anyway.

The tenons I would cut on the table saw.
 
For future reference, you don't necessarily need sash clamps to glue up a top. If you use hide glue you can do the job "old school", with a rub joint.

There are two main alternatives. Either you can stick to the traditional method and use Scotch pearls in a bain marie type arrangement (like the item in the background of this photo). Or you can use hide glue that's liquid at room temperature, like Old Brown Glue (available from Dieter Schmid in Germany) or there's a version available from Titebond.

For rub joints I much prefer Old Brown Glue over the Titebond Hide Glue because Old Brown Glue gels more at room temperature, which is what you need for a good rub joint.

Old-Brown-Glue.jpg


If money's tight learning how to use hide glue can save you a fortune in cramps.
 

Attachments

  • Old-Brown-Glue.jpg
    Old-Brown-Glue.jpg
    86.3 KB
I saw this a fair while ago but have never tried it. Buried deep in the favourites list. I nearly gave up looking for it but it always stuck in the back of my mind as a neat worthwhile tip.
Might be a solution. Might not. Worth posting anyway.
Poorboy parallel Clamps.

http://theapprenticeandthejourneyman.co ... el-clamps/
Worth (for me) looking at the website as well as the video. Can't give advice but maybe it might help.

[youtube]vSwlM7cf6mo[/youtube]
 
Whichever way you decide, do a trial joint or fix first. Your first ones will be wonky. But it doesn't take long to learn.

Learn how to mark it out properly from face edge.
 
Nick b":2dfh2coe said:
So I ended up cutting down the glue joint and taking it to a friends bigger jointer and jointing the edge square, re glued and beltsanded top. Pretty dead flat now 8)

Wanted to ask you guys what would be the best route for a novice to go on doing mortise and tennon joinery for the aprons and legs.

I thought either using a spiral bit for the mortise on the router table using some marked masking tape on the table as a indicator for the start and stop point.

Or cutting out the waste with a spade bit on the drill press and using a chilsel to clean the rest up.

I'm more hesitant with the router table method. I've been using it for basic profiling and template cutting but this cut feels a bit more advanced but could achieve smoother results.

On the other hand I'm not amazing with a chilsel either but feel this could be quite easy and the mortise would be hidden anyway.

The tenons I would cut on the table saw.

Check out either www.theenglishwoodworker.com or https://paulsellers.com. You will find a plethora of info related to morticing. You could make your own morticing guides to help keep your chisel vertical whilst morticing. The only way to increase your confidence with a chisel is to use a chisel....be brave.... if your mortice is slightly off it won't be seen.
 
bowmaster":2qc2oczf said:
Nick b":2qc2oczf said:
So I ended up cutting down the glue joint and taking it to a friends bigger jointer and jointing the edge square, re glued and beltsanded top. Pretty dead flat now 8)

Wanted to ask you guys what would be the best route for a novice to go on doing mortise and tennon joinery for the aprons and legs.

I thought either using a spiral bit for the mortise on the router table using some marked masking tape on the table as a indicator for the start and stop point.

Or cutting out the waste with a spade bit on the drill press and using a chilsel to clean the rest up.

I'm more hesitant with the router table method. I've been using it for basic profiling and template cutting but this cut feels a bit more advanced but could achieve smoother results.

On the other hand I'm not amazing with a chilsel either but feel this could be quite easy and the mortise would be hidden anyway.

The tenons I would cut on the table saw.

Check out either http://www.theenglishwoodworker.com or https://paulsellers.com. You will find a plethora of info related to morticing. You could make your own morticing guides to help keep your chisel vertical whilst morticing. The only way to increase your confidence with a chisel is to use a chisel....be brave.... if your mortice is slightly off it won't be seen.

With regards to your panel glue up - it might be easier if you glue up 2 or 3 boards at a time and when they're dry glue the larger boards together.
 
Back
Top