Nested Coffe Table Advice

UKworkshop.co.uk

Help Support UKworkshop.co.uk:

This site may earn a commission from merchant affiliate links, including eBay, Amazon, and others.

furyjohn

Established Member
Joined
21 Jan 2009
Messages
33
Reaction score
0
Location
Urmston
Morning all. SWMBO has commissioned her next piece of furniture so I'm back again for some

advice/tips on re-creating this nested set of tables.

http://furnitureulike.co.uk/index.php?t ... t_id=32202

She wants them to have that "chunky look" and from the pics i'm guessing they're about 3" thick.

The dims i'm going to use for the outer table are about 36" x 15" x 3" x 18" (L x W x T x H)

with only two tables underneath. Given these dims that's just under 3.5cuft

The plan is to use Ash (cheap to fix mistakes!) with some kind of dark stain finish similar to

the pics.

It looked easy when i first saw it but then i sat down to plan how i was going to do it and i

just can't decide on how to actually make them !

I could just joint and laminate loads of Ash, cut the mitres and biscuit/spline the bits

together. This seems relatively easy (might regret saying that) to do but but would require the

full 3.5cuft of Ash...plus wastage, Which is an awful lot and i'm guessing they're going to be

heavy.


The other idea i have is to create 3 or 4 "U" shaped pieces with half-lap joints from ply/mdf to

act as a frame, around which i attach the sides/fronts/backs/tops/etc

The sides/fronts/backs/tops/etc will be made from jointing the ash and could be only 1/2" thick,

saving a lot of timber. However, all those mitres scares me silly !


I just can't on how to proceed.

Any ideas/tips/advice would be gratefully appreciated.


furyJohn
 
Whichever way you go make them hollow, otherwise timber at say 50lbs/cube will make them too heavy to move and put dents in your carpets.

Bob
 
I agree with Bob, make them hollow. It should save you having to be so-much timber (even with a wastage allowance) and anyway, 1in. timber will be cheaper and drier than 3in. :wink:

How would you cut the mitres if the timber was finished at 70mm thick... :? At least, by creating a hollow box, you cut all the mitres on any saw before hand and clean them up a bit with hand plane afterwards. Then, you could biscuit-joint them together - or, if you're really luck, this would be a good one for the Domino jointer...! :twisted:
 
Bob's quite right, however you do them in solid material, they're going to be very heavy. Making them hollow reduces the weight but compounds the making process. My initial thought though would be to make them solid, but use a light weight mdf (which is available 'cos I used it before) and then veneer.
The other option is to point out the down sides to SWIMBO and ask her to reconsider.
I think I'd go for the former option :) - Rob
 
Triggered off by another post searching for poplar/tulipwood;
maybe a poplar core, still hollow, for the lightest result of all.

Not sure I like the style that much though so Rob's second option is taking hold for me!

Bob
 
You could always use the 'torsion-box' method. That would reduce the weight.

It would take some figuring out for the mitres, but if you used 18mm stuff for the 'walls', biscuits, or dowels should hold them together. Or even slip-tenons come to that.

HTH

John :)
 
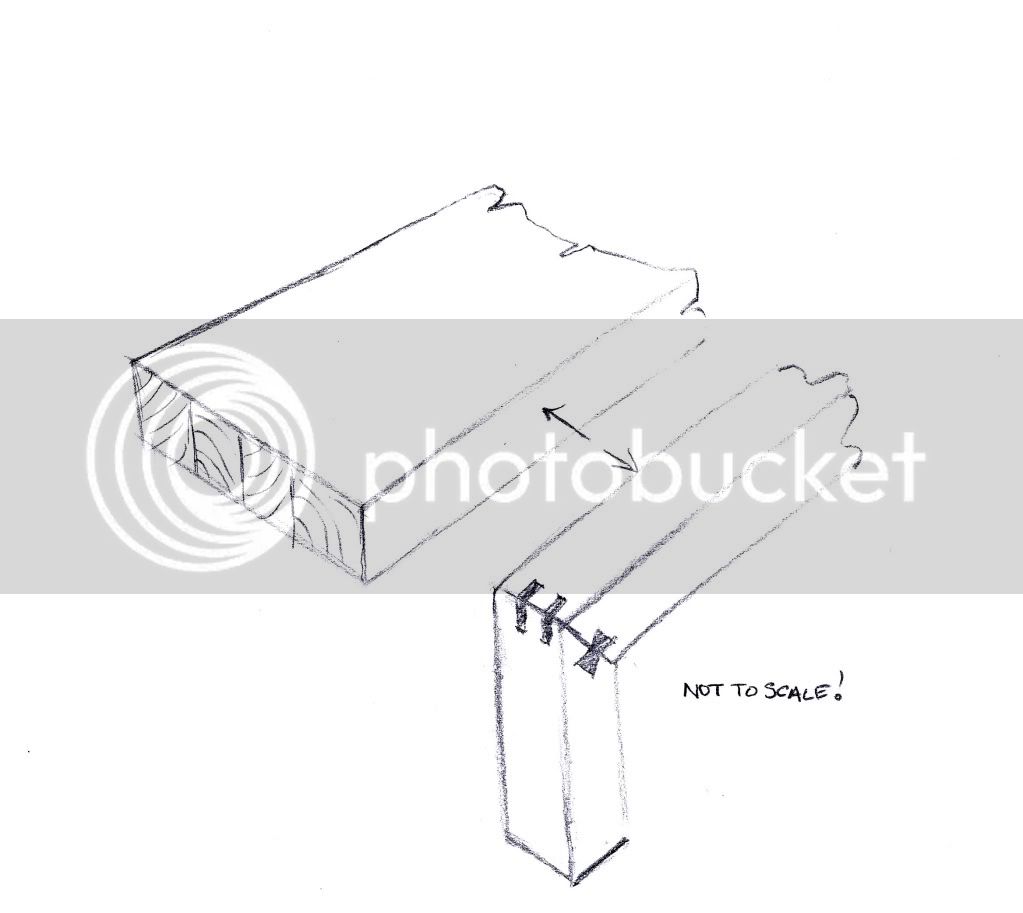
Just had a thought.
Similar... Chunky... Different than the one you saw.

Design.jpg


Milling would be the main job, but simple enough assuming you have the machinery? The only 'joint' you would need is a keyed-mitre, or one jointed with any of the methods OPJ suggested.

If I made this, I would add a plain, 1/2" (12mm) chamfer all around the top edges. With the thickness of the legs each side, the top would finish around 17" (425mm) wide


HTH

John
 
Thanks for the input guys. If i'm being honest it isn't just SWMBO who liked the chunky look - i do too, so i'm gonna aim for 3" thick. Thanks to all your input i've now decided i'll go with the hollow approach and the more i think about it the more it makes sense.

OPJ -
...if you're really luck, this would be a good one for the Domino jointer...! Twisted Evil
i usually don't need much arm-twisting to buy new tools BUT the dom is just way too expensive for hobbying - does look like a fab bit of kit for a pro tho.


woodbloke -
...use a light weight mdf (which is available 'cos I used it before) and then veneer.
veneering a light-weight mdf shell sounds like the ideal solution, but i wouldn't even know where to start with veneering ? does it come in sheets or does one have to 'make' it by bandsawing slithers from the stock and jointing - or is that just ridiculous ! ?

is the light-weight mdf easy to come by ?

How does the price compare to the standard stuff from the sheds ?


Benchwayze -
You could always use the 'torsion-box' method.
like it ! An mdf torsion box and then wrap my jointed ash around it.

when you say slip-tenons are they another name for floating/lose tenons ?

Also, not quite sure i'm understanding your sketch. You say it's different than the one i saw but is it not the same but just with some detail on the mitres ? Also the sketch shows the whole table as solid wood which would be very heavy and expensive. Please don't take offence at these comments but am i missing something ?


Once again, thanks for all the advice
 
Hi FJ,

Well, first off -- The legs would be made separately from the top, and then glued to the slab that forms the table. The ends of the table would be open and not closed in as in the photograph you pointed us to.

I would mill the 3" squares for the top and joint it up using biscuits, or even dowels for alignment. Saves work on flattening and smoothing.

Then using 3 x 3 I'd make the leg sections, (Like an elongated U) and glue them one each side to the top.

You could run a chamfer all the way around the top, as a decorative touch, to make the piece look just a little lighter and not so 'in your face'. If you wished!

You could join the leg sections with M&T, thick dowels or biscuits. (Or a Domino if you have one). If you use mitres you might need some strengthening, such as slip tounges or keyed inserts as shown.

Slip tenons are just loose tenons, and require aligning mortices to be cut in both parts of the job. In a leg and rail, you would cut a mortice in the leg, and the end of the rail. Stronger than a normal mortice and tenon, because there is no 'tenon-root', which is where a tenon can fail. So slip tenons are as strong in the rail as in the leg. I make slip tenons from waterproof plywood, in a strip, and then cut them off as I need them.

The arrangement I sketched out would be similar to the picture you saw, but the ends would be open and not closed in. There's a lot of solid wood so movement might be a problem.

The original design might look simple, but it would need careful work on the wide, thick mitre and at the price, I doubt it is solid wood.

You could use poplar, which is light, and takes stain very well, but it can be 'wooly' to work.

HTH
John :)
 
Ahhhh, Benchwayze, now i see what you mean about your sketch. However, in my previous post i said going for 3"what i should have said was going for 3" look.

I think your idea of the torsion box is favourite as it saves a lot of stock, hence cost. Would also reduce the potential for movement(?)

It does however introduce a whole lot of mitres to contend with but i'm willing to take that on.

My thinking so far is to use your torsion box method and wrap the jointed ash boards around it doing only the outer table first. If i can manage that then make the two inner tables after.

One other thing that's just occured to me is some kind of oil based finish would be best for 'sealing' to reduce moisture change thus reducing movement but would a stain provide the same level of 'sealing' ?

I can imagine that sometimes it gets frustrating answering what seem to be simple questions but it is very much appreciated.

regards

furyJohn
 
Hi John,
Not a problem. Among other things, we come here to help one another.
So good luck on the mitre front.
Hope it all turns out good!

Regards
John :)
 
Back
Top