My New Router

UKworkshop.co.uk

Help Support UKworkshop.co.uk:

This site may earn a commission from merchant affiliate links, including eBay, Amazon, and others.
Also how larger scale have you considered? Would it be possible to cut components from an 8x4 sheet of MDF? Could you make it so that the system can be adapted for occasional 8x4 cutting but then downsized for 'regular' tasks.
 
WiZeR":j9rokcqe said:
PS that last vid didnt work for me?

Hrm.. I'll try re-encoding it and putting a new one up there. Because I'm using different software to make the clip now, I had to use slightly different output settings. I was hoping it would be OK.... Gimme 15 mins to sort a new one out. I'll post a new message when I reckon it's worth trying again.
 
OK, there's a new one up there now. It's a bit bigger at 11MB instead - I've updated the last post to have the right size/link.
 
WiZeR":15ag70d5 said:
Also how larger scale have you considered? Would it be possible to cut components from an 8x4 sheet of MDF? Could you make it so that the system can be adapted for occasional 8x4 cutting but then downsized for 'regular' tasks.

I'd need a bigger shed! ;)

The biggest drawer slides I've found are 700mm long with 750mm of extension, so that rather limits the maximum travel of any axis for this machine. The threaded bar I'm using came in 1M lengths, and the machine's not exactly speedy as it it. You'd be able to make a cup of tea in the time it would take to make it to the other end of an 8ft board. Going above the current size I reckon you'd want to switch to a fixed-bed/moving gantry system using a girder for the gantry and sprocket+chain drives to get a reasonable speed for cutting large boards.... Basically, you'd start to look a lot like a conventional industrial CNC machine.

My machine in it's current configuration can travel X=745mm, Y=550mm, Z=150mm, which isn't great for cutting up whole sheets, or doing table tops.. but should be about the right size for things like drawer fronts/backs/sides and table/chair legs
 
Not much progress on the CNC machine this weekend due to an inundation of friends and relatives. Before the arrived on Saturday I cut out a section from the base, and drilled a couple holes into the X-Bed. I epoxy'd a couple of bolts into the holes and hammered them into place - After the epoxy had a chance to set, I filled in the remaining space around the bolts with a mixture of wood glue and dust from the extractor.
06102007194.jpg


I'm now trying to work out how to cut the pins for half-blind dovetails. After my visitors all went to bed yesterday, I spent a while watching the Leigh videos and trying to work out exactly how their jig fits everything together, and the path the cutter follows, and what offsets are used where. About the only thing I'm sure of is that the radius of the curves on the Leigh fingers are the same as the radius of the end of the cutter. My poor primate brain can't deal with depth adjustment, so I think I might just use trial and error until i get it right. If anyone fancies removing a finger from their leigh jig, and scanning it in so I can get some decent measurements, I would be eternally (or at least momentarily) grateful.
 
Not much of an update, but I managed to get lunchtime in the shed today, so I've finished off the Niki-style end-vice (complete with abrasive strips to hold things a bit better) now which means that next time I get some time in there, I can have a go at dovetail pins.

09102007198.jpg
 
Fecn,
I have uploaded a couple of scans to Flickr - you should be able to download the full size images by clicking on the pix, then clicking on "All Sizes" here

The two images you'll find there are both sides of the fingers which are a bit different in the way the straight part of the working profile is made - you'll need to look closely.

1523816329_db0f1c8019_m.jpg
 
I managed to snatch a few hours in the shed today. Hooray!

Over the past week, I've put some thought into cutting dovetails - I particularly liked Tony's Houndstooth dovetails featured on the ukworkshop home page at the moment.
1.jpg


but realised I'd wouldn't be able to cut the sharp angles using a router. I decided to see what I could come up with using a rounded shape instead. My first coreldraw attempt was a raindrop shape.
Teardrop.jpg


With my selection of cutters, it isn't possible to have the top point on the raindrop taper so thin. The smallest diameter I have is 1.6mm but that has very limited depth of cut.. I needed something with a reasonable cutting depth, and the smallest I had was 3.2mm.

I reworked my dovetails/raindrops into Egg shapes which could be cut with a 3.2mm diameter cutter, and used the contour tool to plot paths with compensation for the tool diameter.
Eggtails+Pins.jpg


The cutter is a 3.2mm shank, so I removed the large router and refitted the Proxxon using a few screws.
14102007201.jpg


I needed to mess around with the software for quite a while to get things working the way I planned... The machine whirred away for a while..
14102007203.jpg


Clearly I have a problem with my scaling.. The tops and bottoms of the eggs are clipped. Still, I'm rather pleased as I feel like I've made some real progress today.
14102007204.jpg
 
Turns out that the problem with the last set of pins was that I'd done my drawing assuming a 4.7mm cutter radius...

I caught a couple more hours in the shed just now, and evrything went a lot more smoothly.. I feel more confident with the software.

I re-jigged my coreldraw for a 3.2mm cutter, and set the machine to cut the pins again. It took it about 20 mins from when I hit the 'start' button for the pins. I had a nice cup of coffee.
15102007205.jpg


I also cut a set of tails, which were a bit quicker.. about 10 mins for the tails. I removed the excess bits from the pins using a sharp chisel, and cleaned up the tails using my thumbnail..
15102007207.jpg


:p :p Perfect Fit! :p :p Not the slightest hint of a wiggle or a jiggle. I'm delighted.
15102007208.jpg


Coming up next.. real wood... although it may be a few days before I get into the shed again :(
 
Fantastic!!!

For some reason, I didn't see this thread as it grew, but just read the lot and that is a lovely job - especialy that unique joint :shock:
 
Wow.... very unique joint...

"now with real wood" contrasting I hope :)

followed a few of the links you posted Fecn, and was suitably impressed by the guitar one, but I am in awe at your CNC router table been a "Garden shed knockup" you know what I mean, lots of stuff hanging about then :idea: "what can I make out of this lot" scenario...very very impressive.
the guitar one was definately engineered and cost a small fortune I should think...

Again, very very impressed by your CNC router table? gizmo.

keep it up, just waiting for the next posting
 
Fecn":17o9vayx said:
devonwoody":17o9vayx said:
If I post you over the timber please knock me up 4 secret dovetails at each end. Ten minute job?

I'd be more than happy to.

DW & I exchanged a few PMs and agreed to make 9"x4"x3" boxes for each other - It seemed like a fun idea and a nice little project to persue to help me learn to use the machine and DW was looking for a project on his new tablesaw.

A couple of weeks ago, I prepared some lefotover bits of Ipé (from the gate and picnic table) to make the box.

Ripped...
04102007178.jpg


Thicknessed...
04102007179.jpg


NeilO":17o9vayx said:
"now with real wood" contrasting I hope :)

Well.. it wasn't going to be contrasting.. but... I've got a bit of Cedar somewhere in the garage.

I spent nearly the whole day in the shed today :D

Last night I'd been playing around with trying to make the box more organic looking - I gave it a test run on some MDF this morning, but decided I didn't like the look of it, so decided to go for something more conventional instead.
19102007209.jpg


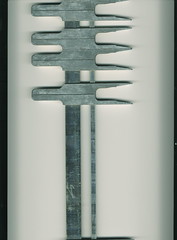
I did a few test cuts on mdf, and then clamped in a bit of the Ipé and let 'er rip - The machine took around 12 mins per end to do the tails at a feed rate of 300mm/min.
19102007214.jpg

Here's the tails fresh off the machine. I cleaned them up later using a stanley knife blade.
19102007215.jpg


It took me a few attempts to get the pins aligned correctly, but once the machine's set up right, it's easy to repeat for all the other copies. Here's some of the test cuts (there were many more)
19102007220.jpg


Test fitting with a set of pins from the Cedar. - Seems OK
19102007219.jpg


I know you're not supposed to dry-fit dovetails, but I couldn't resist seeing how it looked.
19102007221.jpg


I've no idea what to do for the bottom of the box or the top - I really hadn't thought any further than this. Ideas on a postcard to me please :)

I made some videos of the machine cutting the tails and the pins.. They're 13 mins and 17 mins respectively at the moment. After I've had my dinner, I'll shrink them a bit and post some links here.

I nearly forgot to say... the dovetail slots in the Ipé are a bit misformed in places where the bit has clearly been deflected from it's path. - Ipé is a very very hard wood, and I think it's about the limit of the machine's capability unless I stiffen up the tool holder a bit. Fortunately it's not anything that'll be noticed once it's been glued, sanded and finished.
 

Latest posts

Back
Top