Marking gauge/mortise gauge woes ?

UKworkshop.co.uk

Help Support UKworkshop.co.uk:

This site may earn a commission from merchant affiliate links, including eBay, Amazon, and others.

barkwindjammer

Established Member
Joined
2 Jan 2010
Messages
983
Reaction score
0
Location
Central Alba
A tip for 'noobs' and oldies :D

The simplest solutions are often.....the simplest solutions

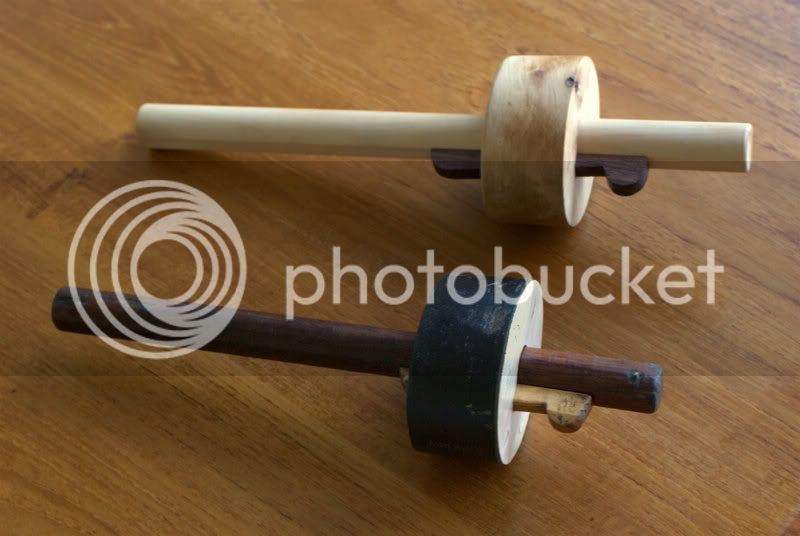
The marking gauge is a simple ancient tool, while there are a number of 'refinements' out there-the basic model (pin) when used correctly will render the same end results as the more racier versions. The pin is round and pointy-a perfect shape when you think about it for following grain-the result of using it incorrectly will result in the 'line' tracking the wood fibres-we've all done it and seen the results :D

The solutions are varied (on price as well as design) :shock:
Some 'solutions' use a blade/cutter to replace the pin, others use a 'wheel'

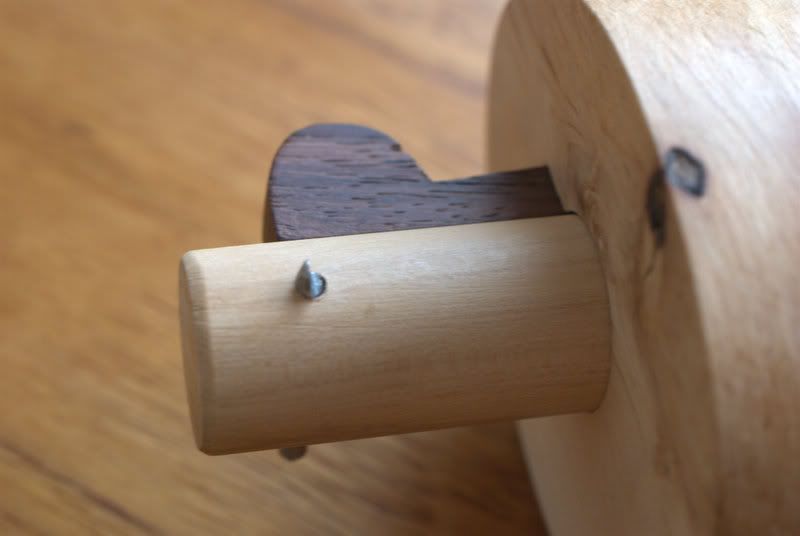
The simple solution ?, the pin is supposed to be used as a pin, it makes dots.
While marking a mortise or tenon-make a line of dots, set the fence of the tool against the stock then roll it (ever wondered why the fence is of a rounded shape?) to mark the dot-then join the dots up with your wide chisel.

And remember, a marking gauge (one pin-i.e. used for half lap joints) and a mortise gauge (2 pins) are two different tools-marking should always be done off of one 'reference' face of the stock.
 
The other way is to read the grain so that rather than allowing the point to follow the grain away from the line and towards the reference face, scribe so that the grain direction has the effect of pulling the scribing point away from the reference face so as to pull the gauge harder against the reference face.

In other words scribe against the grain direction when sloping down to the reference face.

...or if you find it wandering off-line scribe in the other direction. :wink:

...Much easier to do than to write down. :wink:

Jon
 
phil.p":2faht4hf said:
Why not just file the sides of the point to make a miniature knife?

You could do that Phil, but is it necessary ?

chipmunk":2faht4hf said:
The other way is to read the grain so that rather than allowing the point to follow the grain away from the line and towards the reference face, scribe so that the grain direction has the effect of pulling the scribing point away from the reference face so as to pull the gauge harder against the reference face.

In other words scribe against the grain direction when sloping down to the reference face.

...or if you find it wandering off-line scribe in the other direction. :wink:

...Much easier to do than to write down. :wink:

Jon

What if the stock your using meant that you had no choice but to follow the given grain direction on a particular side ?
 
What I do is always push a marking gauge away from me and in towards the workpiece. It's more positive than pulling towards. With practice you soon get to notice if it's following the grain. If it's a problem then start at the far end first and do the last 6" (away from you) and then the next, etc. working forwards but bringing it back in short lengths.
The other solution is to dip as you go forwards, with a sort of wrist twist, so the pin is lifting out of the grain every few inches and going back again.
 
barkwindjammer":3cllj4xh said:
A tip for 'noobs' and oldies :D

The simplest solutions are often.....the simplest solutions

The pin following the grain is the result of the forces on the pin "winning" against the restraining ability of the fence.

Jim Kingshott's technique to avoid this was to simply use multiple (hence shallow) passes. This is done by twisting the gauge, so that the depth of the pin is controlled by the gauge stem resting on the workpiece (for this reason, the pin should not protrude too much).

In actual use, this is very fast - just multiple passes and a twist of the wrist.

(logically, you could also apply more pressure to the fence, or use a larger fence, but JK's tricks works well).

Whilst we're on, another good marking gauge tip when marking other than the full length of the piece, is to "stab" the pin in at the ends of the line prior to marking. The gauge will stop nicely in these pits.

BugBear
 
bugbear":2b6hp2r9 said:
barkwindjammer":2b6hp2r9 said:
A tip for 'noobs' and oldies :D

The simplest solutions are often.....the simplest solutions


Whilst we're on, another good marking gauge tip when marking other than the full length of the piece, is to "stab" the pin in at the ends of the line prior to marking. The gauge will stop nicely in these pits.

BugBear

Thats a great tip BB
However you are all missing the point of my OP completely, I'm not looking for suggestions, I'm giving a solution which eliminates any other modification or technique.
I cant think of a simpler way of using these tools, there is no room for error-it just works, which in the end is also not really a necessity when you think about it, I cant think of a single joint that requires a 'one shot' perfect scribed line using a marking gauge.
 
Hi,

Knife edge is the way to go, mine work very well no grain following at all.
Coped from the ebony/lignum original in Hawthorn and rosewood with a silver steel knife.

DSC_0003-1.jpg


Close up
DSC_0006-2.jpg


Pete
 
barkwindjammer":2mop1fd7 said:
What if the stock your using meant that you had no choice but to follow the given grain direction on a particular side ?

As Jacob says, I think you can always reverse the direction of travel of the marking guage to address this.
If pulling the guage towards you causes the point to follow the grain then push the guage away from you and the grain direction ought to help you.

Jacob's also right though in that the grain direction on long sections may shift to and fro and so you may need to sub-divide the piece to get perfect results but it's not hard when you get into the swing of it.

I don't think that the pin prick method you describe would give you the tell-tale reference you get when planing down to a guaged line. That would take some getting used to compared to conventional marked line, at least for me.

HTH
Jon
 
Racers":1477p434 said:
Hi,

Knife edge is the way to go, mine work very well no grain following at all.
Coped from the ebony/lignum original in Hawthorn and rosewood with a silver steel knife.


Close up
DSC_0006-2.jpg


Pete
Those are indeed lovely Pete, but didn't you have to make them ?

phil.p":1477p434 said:
Sorry, but I'd have thought that any of the above solutions would be quicker and easier than joining the dots.

Ok, so you've obtained your guide lines, by which ever means, and the next tool you bring to that line is ?...........
 
barkwindjammer":uu4071cy said:
bugbear":uu4071cy said:
barkwindjammer":uu4071cy said:
A tip for 'noobs' and oldies :D

The simplest solutions are often.....the simplest solutions


Whilst we're on, another good marking gauge tip when marking other than the full length of the piece, is to "stab" the pin in at the ends of the line prior to marking. The gauge will stop nicely in these pits.

BugBear

Thats a great tip BB
However you are all missing the point of my OP completely, I'm not looking for suggestions, I'm giving a solution which eliminates any other modification or technique.
I cant think of a simpler way of using these tools, there is no room for error-it just works, which in the end is also not really a necessity when you think about it, I cant think of a single joint that requires a 'one shot' perfect scribed line using a marking guage.

I know you weren't looking for suggestions, but other people reading the thread might be interested in a variety of techniques. Spice of life, and all that.

In answer to your last semi-posed question, a cross halving joint is the most obvious example.

Fig 39.

http://www.basiccarpentrytechniques.com ... s%202.html

BugBear
 
I'm all for the 'horses for courses thing BB, all the various devices and techniques do work of course, my point is that a £1.99 Chinese made 'whayoowha' marking gauge is equal to a Lee Valley rollerflange if used in the correct way.
 
barkwindjammer":31oc3w6w said:
I'm all for the 'horses for courses thing BB, all the various devices and techniques do work of course, my point is that a £1.99 Chinese made 'whayoowha' marking guage is equal to a Lee Valley rollerflange if used in the correct way.
Agree. These are spot on.
 
barkwindjammer":1e7jtldd said:
phil.p":1e7jtldd said:
Sorry, but I'd have thought that any of the above solutions would be quicker and easier than joining the dots.

Ok, so you've obtained your guide lines, by which ever means, and the next tool you bring to that line is ?...........

... but having to join the dots with a chisel just adds another process, when what's really required is to use the tool correctly; saves the time and effort of marking the line twice, surely.

A light touch on the pin pressure helps to avoid grain following too, concentrate effort on the fence.
 
Mine cost me a couple of quid for the silver steel, and you can get lots of knives from a length.
The wood was free.

Marking the length of tenons is very easy with a knife edge marking gauge.

Pete
 
:lol: Ok, I will give you the last word Jacob
A good old £5.75 + VAT British made 'J Marples' marking gauge is equal to a Lee Valley rollerflange !
 
Scouse":1u0uni6d said:
barkwindjammer":1u0uni6d said:
phil.p":1u0uni6d said:
Sorry, but I'd have thought that any of the above solutions would be quicker and easier than joining the dots.

Ok, so you've obtained your guide lines, by which ever means, and the next tool you bring to that line is ?...........

... but having to join the dots with a chisel just adds another process, when what's really required is to use the tool correctly; saves the time and effort of marking the line twice, surely.

A light touch on the pin pressure helps to avoid grain following too, concentrate effort on the fence.

...But the next tool your going to use after you've marked (with dots or a scratchy line) is your chisel !
there is no extra process
 
Racers":3nf8tuvn said:
Mine cost me a couple of quid for the silver steel, and you can get lots of knives from a length.
The wood was free.

Marking the length of tenons is very easy with a knife edge marking gauge.

Pete

This thread is for the benefit of 'noobs' too Pete :)
 
Back
Top